Operating Instructions
Page 4
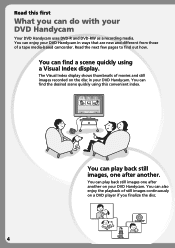
... another . You can enjoy your DVD Handycam in your DVD Handycam. You can find the desired scene quickly using a Visual Index display. Read this convenient index. The Visual Index display shows thumbnails of still images continuously on a DVD player if you can play back still...camcorder. You can find a scene quickly using this first What you finalize the disc. 4 Read the next few pages to find out how. You can do with your DVD Handycam. You can also enjoy the playback of movies and still images recorded on your DVD Handycam Your DVD Handycam uses DVD-R and DVD...
... another . You can enjoy your DVD Handycam in your DVD Handycam. You can find the desired scene quickly using a Visual Index display. Read this convenient index. The Visual Index display shows thumbnails of still images continuously on a DVD player if you can play back still...camcorder. You can find a scene quickly using this first What you finalize the disc. 4 Read the next few pages to find out how. You can do with your DVD Handycam. You can also enjoy the playback of movies and still images recorded on your DVD Handycam Your DVD Handycam uses DVD-R and DVD...
Operating Instructions
Page 7
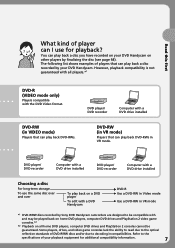
...) Players that can play back on other players by your DVD Handycam. Refer to the specifications of your DVD Handycam on a DVD player To edit with a DVD Handycam DVD-R Use a DVD-RW in Video mode Use a DVD-RW in VR mode *1 DVD-R/RW discs recorded by Sony DVD Handycam camcorders are designed to be compatible with a DVD drive installed Choosing a disc For long-term storage To...
...) Players that can play back on other players by your DVD Handycam. Refer to the specifications of your DVD Handycam on a DVD player To edit with a DVD Handycam DVD-R Use a DVD-RW in Video mode Use a DVD-RW in VR mode *1 DVD-R/RW discs recorded by Sony DVD Handycam camcorders are designed to be compatible with a DVD drive installed Choosing a disc For long-term storage To...
Operating Instructions
Page 10
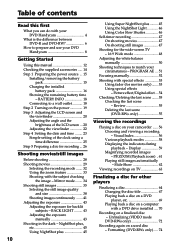
...Showing the remaining battery time - PROGRAM AE ... 51 Focusing manually 52 Shooting with your DVD Handycam 4 What is the difference between DVD-R and DVD-RW 6 How to prepare and use your DVD Handycam 8 Getting Started Using this first What you can do with special effects 53 Using fader ...DVD-RWs only 55 Viewing the recordings Playing a disc on a used disc - Slide Show 62 Viewing recordings on a computer with the subject checking the image - BACK LIGHT ......... 43 Adjusting the exposure manually 43 Shooting in the dark - BATTERY INFO 18 Connecting to match your camcorder ...
...Showing the remaining battery time - PROGRAM AE ... 51 Focusing manually 52 Shooting with your DVD Handycam 4 What is the difference between DVD-R and DVD-RW 6 How to prepare and use your DVD Handycam 8 Getting Started Using this first What you can do with special effects 53 Using fader ...DVD-RWs only 55 Viewing the recordings Playing a disc on a used disc - Slide Show 62 Viewing recordings on a computer with the subject checking the image - BACK LIGHT ......... 43 Adjusting the exposure manually 43 Shooting in the dark - BATTERY INFO 18 Connecting to match your camcorder ...
Operating Instructions
Page 93
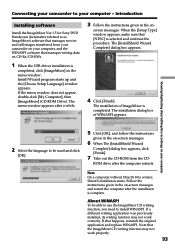
Introduction Installing software Install the ImageMixer Ver.1.5 for Sony DVD Handycam (hereinafter referred to as ImageMixer) software that manages movies and still images transferred from the CD- Install Wizard program starts up and the [Choose ... installation is completed, click [ImageMixer] on - Note that [NTSC] is completed. Note On a computer without DirectX 8.0a or later, DirectX installation starts. Connecting your camcorder to install WINASPI. The menu window appears after the computer restarts. ROM drive after a while. 3 Follow the instructions given in the on the menu window...
Introduction Installing software Install the ImageMixer Ver.1.5 for Sony DVD Handycam (hereinafter referred to as ImageMixer) software that manages movies and still images transferred from the CD- Install Wizard program starts up and the [Choose ... installation is completed, click [ImageMixer] on - Note that [NTSC] is completed. Note On a computer without DirectX 8.0a or later, DirectX installation starts. Connecting your camcorder to install WINASPI. The menu window appears after the computer restarts. ROM drive after a while. 3 Follow the instructions given in the on the menu window...
Operating Instructions
Page 94
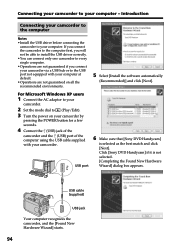
... •Install the USB driver before connecting the camcorder to your computer - USB port 6 Make sure that [Sony DVD Handycam] is not selected. [Completing the Found New Hardware Wizard] dialog box appears. For Microsoft Windows XP users 1 Connect the AC adaptor to your camcorder. 2 Set the mode dial to (Play/Edit... are not guaranteed if you will not be able to install the USB driver correctly. •You can connect only one camcorder to the USB port not equipped with your camcorder. Click [Sony DVD Handycam] if it is selected as the best match and click [Next]. If you connect the...
... •Install the USB driver before connecting the camcorder to your computer - USB port 6 Make sure that [Sony DVD Handycam] is not selected. [Completing the Found New Hardware Wizard] dialog box appears. For Microsoft Windows XP users 1 Connect the AC adaptor to your camcorder. 2 Set the mode dial to (Play/Edit... are not guaranteed if you will not be able to install the USB driver correctly. •You can connect only one camcorder to the USB port not equipped with your camcorder. Click [Sony DVD Handycam] if it is selected as the best match and click [Next]. If you connect the...
Operating Instructions
Page 97
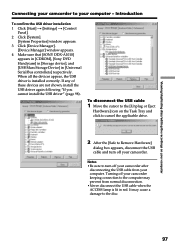
...To disconnect the USB cable 1 Move the cursor to the [Unplug or Eject Hardware] icon on your computer Connecting your camcorder to Remove Hardware] dialog box appears, disconnect the USB cable and turn off your computer. If any of these devices...may prevent from your camcorder. Introduction To confirm the USB driver installation 1 Click [Start] t [Settings] t [Control Panel]. 2 Click [System]. [System Properties] window appears. 3 Click [Device Manager]. [Device Manager] window appears. 4 Make sure that [SONY DDX-A1010] appears in [CDROM], [Sony DVD Handycam] in [Storage device],...
...To disconnect the USB cable 1 Move the cursor to the [Unplug or Eject Hardware] icon on your computer Connecting your camcorder to Remove Hardware] dialog box appears, disconnect the USB cable and turn off your computer. If any of these devices...may prevent from your camcorder. Introduction To confirm the USB driver installation 1 Click [Start] t [Settings] t [Control Panel]. 2 Click [System]. [System Properties] window appears. 3 Click [Device Manager]. [Device Manager] window appears. 4 Make sure that [SONY DDX-A1010] appears in [CDROM], [Sony DVD Handycam] in [Storage device],...
Operating Instructions
Page 99
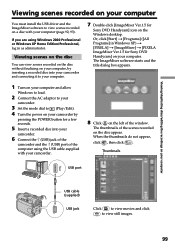
... 2000 Professional or Windows XP Home Edition/Professional, log in Windows XP) t [PIXELA] t [ImageMixer] t [PIXELA ImageMixer Ver.1.5 for Sony DVD Handycam] on your camcorder. 8 Click on the left of the scenes recorded on the disc appear. If you are using the USB cable supplied with your computer.... 7 Double-click [ImageMixer Ver.1.5 for Sony DVD Handycam] icon on the Windows desktop. Or, click [Start] t [Programs] ([All Programs] in as ...
... 2000 Professional or Windows XP Home Edition/Professional, log in Windows XP) t [PIXELA] t [ImageMixer] t [PIXELA ImageMixer Ver.1.5 for Sony DVD Handycam] on your camcorder. 8 Click on the left of the scenes recorded on the disc appear. If you are using the USB cable supplied with your computer.... 7 Double-click [ImageMixer Ver.1.5 for Sony DVD Handycam] icon on the Windows desktop. Or, click [Start] t [Programs] ([All Programs] in as ...


