Operating Instructions
Page 3
...on a circuit different from that interference will not occur in order to comply with Part 15 of the battery used to power this equipment. Operation is encouraged to try to the following measures: - Reorient or relocate the receiving antenna. - Please ...supplied interface cable must accept any changes or modifications not expressly approved in this equipment does cause harmful interference to provide reasonable protection against harmful interference in accordance with your authority to Part 15 of Conformity Trade Name: SONY Model No.: DCR-DVD201 Responsible Party:Sony...
...on a circuit different from that interference will not occur in order to comply with Part 15 of the battery used to power this equipment. Operation is encouraged to try to the following measures: - Reorient or relocate the receiving antenna. - Please ...supplied interface cable must accept any changes or modifications not expressly approved in this equipment does cause harmful interference to provide reasonable protection against harmful interference in accordance with your authority to Part 15 of Conformity Trade Name: SONY Model No.: DCR-DVD201 Responsible Party:Sony...
Operating Instructions
Page 10
...your DVD Handycam 4 What is the difference between DVD-R and DVD-RW 6 How to prepare and use your camcorder ...... 56 Choosing and viewing a recording - Mirror mode ........ 34 Shooting still images 35 Selecting the still image quality and size 38 Shooting images continuously (BURST, DCR-DVD201 only.......... 55 Checking the last scene - Slide Show 62 Viewing recordings on your DVD Handycam 8 Getting Started Using this manual 12 Checking the supplied accessories ..... 14 Step 1 Preparing the power source ... 15 Installing/removing the battery pack 15 Charging the installed battery pack...
...your DVD Handycam 4 What is the difference between DVD-R and DVD-RW 6 How to prepare and use your camcorder ...... 56 Choosing and viewing a recording - Mirror mode ........ 34 Shooting still images 35 Selecting the still image quality and size 38 Shooting images continuously (BURST, DCR-DVD201 only.......... 55 Checking the last scene - Slide Show 62 Viewing recordings on your DVD Handycam 8 Getting Started Using this manual 12 Checking the supplied accessories ..... 14 Step 1 Preparing the power source ... 15 Installing/removing the battery pack 15 Charging the installed battery pack...
Operating Instructions
Page 14
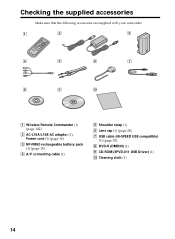
Checking the supplied accessories Make sure that the following accessories are supplied with your camcorder. 1 2 3 4 5 6 7 8 9 0 1 Wireless Remote Commander (1) (page 142) 2 AC-L15A/L15B AC adaptor (1), Power cord (1) (page 16) 3 NP-FM50 rechargeable battery pack (1) (page 15) 4 A/V connecting cable (1) 5 Shoulder strap (1) 6 Lens cap (1) (page 28) 7 USB cable (Hi-SPEED USB compatible) (1) (page 92) 8 DVD-R (DMR30) (1) 9 CD-ROM (SPVD-011 USB Driver) (1) q; Cleaning cloth (1) 14
Checking the supplied accessories Make sure that the following accessories are supplied with your camcorder. 1 2 3 4 5 6 7 8 9 0 1 Wireless Remote Commander (1) (page 142) 2 AC-L15A/L15B AC adaptor (1), Power cord (1) (page 16) 3 NP-FM50 rechargeable battery pack (1) (page 15) 4 A/V connecting cable (1) 5 Shoulder strap (1) 6 Lens cap (1) (page 28) 7 USB cable (Hi-SPEED USB compatible) (1) (page 92) 8 DVD-R (DMR30) (1) 9 CD-ROM (SPVD-011 USB Driver) (1) q; Cleaning cloth (1) 14
Operating Instructions
Page 16
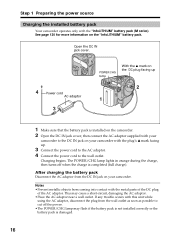
Charging begins. See page 130 for more information on the camcorder. 2 Open the DC IN jack cover, then connect the AC adaptor supplied with the "InfoLITHIUM" battery pack (M series). After charging the battery pack Disconnect the AC adaptor from coming into contact with the ...the charge is damaged. 16 Step 1 Preparing the power source Charging the installed battery pack Your camcorder operates only with your camcorder to the DC IN jack on your camcorder. Notes • Prevent metallic objects from the DC IN jack on your camcorder with this unit while using the AC adaptor, ...
Charging begins. See page 130 for more information on the camcorder. 2 Open the DC IN jack cover, then connect the AC adaptor supplied with the "InfoLITHIUM" battery pack (M series). After charging the battery pack Disconnect the AC adaptor from coming into contact with the ...the charge is damaged. 16 Step 1 Preparing the power source Charging the installed battery pack Your camcorder operates only with your camcorder to the DC IN jack on your camcorder. Notes • Prevent metallic objects from the DC IN jack on your camcorder with this unit while using the AC adaptor, ...
Operating Instructions
Page 17
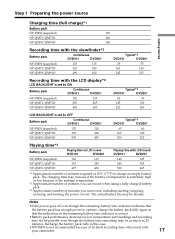
...battery pack. *3 Approximate number of minutes you can record, including starting/stopping, zooming, and turning the power on LCD screen DVD101 DVD201 Playing time with LCD closed DVD101 DVD201 NP-FM50 (supplied) 130 115 140 125 NP-QM71/QM71D 315 285 340 305 NP-QM91/QM91D 475 430 520 465... *1 Approximate number of its short recording time when used with your camcorder. 17 The actual battery life may be shorter. Notes •If the power goes ...
...battery pack. *3 Approximate number of minutes you can record, including starting/stopping, zooming, and turning the power on LCD screen DVD101 DVD201 Playing time with LCD closed DVD101 DVD201 NP-FM50 (supplied) 130 115 140 125 NP-QM71/QM71D 315 285 340 305 NP-QM91/QM91D 475 430 520 465... *1 Approximate number of its short recording time when used with your camcorder. 17 The actual battery life may be shorter. Notes •If the power goes ...
Operating Instructions
Page 18
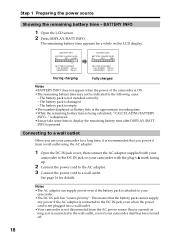
... : 135 min During charging Fully charged Notes •BATTERY INFO does not appear when the power of the camcorder is pressed. See page 16 for a long time, it is recommended that the battery pack cannot supply any power if the AC adaptor is connected to the DC IN jack, even when the... power cord is not plugged into a wall outlet. •Your camcorder is connected to the wall outlet, even if your camcorder to display the remaining battery time after DISPLAY...
... : 135 min During charging Fully charged Notes •BATTERY INFO does not appear when the power of the camcorder is pressed. See page 16 for a long time, it is recommended that the battery pack cannot supply any power if the AC adaptor is connected to the DC IN jack, even when the... power cord is not plugged into a wall outlet. •Your camcorder is connected to the wall outlet, even if your camcorder to display the remaining battery time after DISPLAY...
Operating Instructions
Page 63
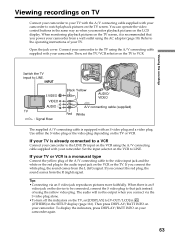
... VCR. The audio will not be connected, connect the S video plug to LINE. Set the input selector on the VCR to that you power your camcorder from a wall outlet using the AC adaptor (page 18). If you connect the red plug, the sound comes from the L (left) ...to the TV using the A/V connecting cable supplied with your camcorder. Viewing recordings on TV Connect your camcorder to your TV with the A/V connecting cable supplied with your camcorder to the LINE IN input on the VCR using the A/V connecting cable supplied with your camcorder. When monitoring playback pictures on the TV ...
... VCR. The audio will not be connected, connect the S video plug to LINE. Set the input selector on the VCR to that you power your camcorder from a wall outlet using the AC adaptor (page 18). If you connect the red plug, the sound comes from the L (left) ...to the TV using the A/V connecting cable supplied with your camcorder. Viewing recordings on TV Connect your camcorder to your TV with the A/V connecting cable supplied with your camcorder to the LINE IN input on the VCR using the A/V connecting cable supplied with your camcorder. When monitoring playback pictures on the TV ...
Operating Instructions
Page 64
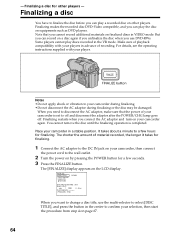
... you need to disconnect the AC adaptor, make sure that you can record on your camcorder is completed. It takes about a minute to off and disconnect the adaptor after the POWER/CHG lamp goes off. FINALIZE DISC TITLE PHOTOMOVIE EXECUTE RETURN READY EST. Finalizing a disc...For details, see the operating instructions supplied with your camcorder, then connect the power cord to change a disc title, use DVD-RWs. Finalizing makes the recorded disc DVD-Video compatible, and you want to the wall outlet. 2 Turn the power on equipments such as DVD players. Some players cannot play the ...
... you need to disconnect the AC adaptor, make sure that you can record on your camcorder is completed. It takes about a minute to off and disconnect the adaptor after the POWER/CHG lamp goes off. FINALIZE DISC TITLE PHOTOMOVIE EXECUTE RETURN READY EST. Finalizing a disc...For details, see the operating instructions supplied with your camcorder, then connect the power cord to change a disc title, use DVD-RWs. Finalizing makes the recorded disc DVD-Video compatible, and you want to the wall outlet. 2 Turn the power on equipments such as DVD players. Some players cannot play the ...

Operating Instructions
Page 73
Unfinalizing (VIDEO mode DVD-RWs only) Notes •Make sure that the power of your camcorder is supplied from a wall outlet using the AC adaptor. •If you disconnect the AC adaptor while unfinalizing a disc, the disc may not be unfinalized correctly and it cannot be used to record additional material. •Do not apply shock or vibration to your camcorder during unfinalizing. •You can unfinalize DVD-RWs only. Finalizing a disc for unfinalizing. 73 Tip It takes about 20 seconds for other players Recording on a finalized disc - You cannot unfinalize a DVD-R disc.
Unfinalizing (VIDEO mode DVD-RWs only) Notes •Make sure that the power of your camcorder is supplied from a wall outlet using the AC adaptor. •If you disconnect the AC adaptor while unfinalizing a disc, the disc may not be unfinalized correctly and it cannot be used to record additional material. •Do not apply shock or vibration to your camcorder during unfinalizing. •You can unfinalize DVD-RWs only. Finalizing a disc for unfinalizing. 73 Tip It takes about 20 seconds for other players Recording on a finalized disc - You cannot unfinalize a DVD-R disc.
Operating Instructions
Page 75
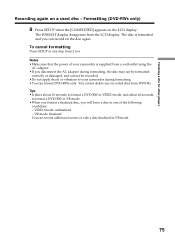
...power of the following conditions: - You cannot delete any step from a wall outlet using the AC adaptor. •If you will have a disc in VR mode. 75 You can record on the disc again. The FORMAT display disappears from DVD-Rs. VIDEO mode: unfinalized - VR mode: finalized. The disc is supplied... from 2 to your camcorder is formatted and you can record additional scenes or edit a disc finalized in one of...
...power of the following conditions: - You cannot delete any step from a wall outlet using the AC adaptor. •If you will have a disc in VR mode. 75 You can record on the disc again. The FORMAT display disappears from DVD-Rs. VIDEO mode: unfinalized - VR mode: finalized. The disc is supplied... from 2 to your camcorder is formatted and you can record additional scenes or edit a disc finalized in one of...
Operating Instructions
Page 94
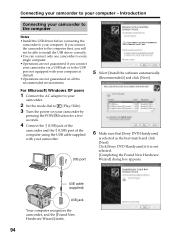
... •Operations are not guaranteed on your camcorder by pressing the POWER button for a few seconds. 4 Connect the (USB) jack of the camcorder and the (USB) port of the computer using the USB cable supplied with your camcorder. Click [Sony DVD Handycam] if it is selected as the best match... and click [Next]. If you connect the camcorder to the computer first, you connect your camcorder via a USB hub or to (Play/Edit). 3 Turn the power on all the recommended ...
... •Operations are not guaranteed on your camcorder by pressing the POWER button for a few seconds. 4 Connect the (USB) jack of the camcorder and the (USB) port of the computer using the USB cable supplied with your camcorder. Click [Sony DVD Handycam] if it is selected as the best match... and click [Next]. If you connect the camcorder to the computer first, you connect your camcorder via a USB hub or to (Play/Edit). 3 Turn the power on all the recommended ...
Operating Instructions
Page 95
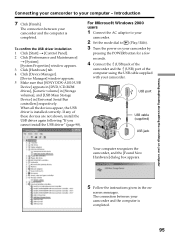
...Device Manager]. [Device Manager] window appears. 5 Make sure that [SONY DDX-A1010 USB Device] appears in [DVD/CD-ROM drives], [Generic volume] in [Storage volumes], and [USB Mass Storage Device] in the on your camcorder by pressing the POWER button for a few seconds. 4 Connect the (USB) jack of...is completed. For Microsoft Windows 2000 users 1 Connect the AC adaptor to your camcorder. 2 Set the mode dial to your camcorder. USB port USB cable (supplied) USB jack Your computer recognizes the camcorder, and the [Found New Hardware] dialog box appears. 5 Follow the instructions ...
...Device Manager]. [Device Manager] window appears. 5 Make sure that [SONY DDX-A1010 USB Device] appears in [DVD/CD-ROM drives], [Generic volume] in [Storage volumes], and [USB Mass Storage Device] in the on your camcorder by pressing the POWER button for a few seconds. 4 Connect the (USB) jack of...is completed. For Microsoft Windows 2000 users 1 Connect the AC adaptor to your camcorder. 2 Set the mode dial to your camcorder. USB port USB cable (supplied) USB jack Your computer recognizes the camcorder, and the [Found New Hardware] dialog box appears. 5 Follow the instructions ...
Operating Instructions
Page 96
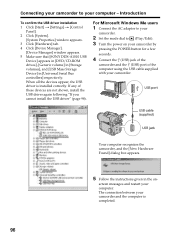
... camcorder. 2 Set the mode dial to your camcorder. If any of the computer using the USB cable supplied with your computer - screen messages and restart your camcorder and the computer is installed correctly. USB port USB cable (supplied) USB jack Your computer recognizes the camcorder,... Manager]. [Device Manager] window appears. 5 Make sure that [SONY DDX-A1010 USB Device] appears in [DVD/CD-ROM drives], [Generic volume] in [Storage volumes], and [USB Mass Storage Device] in the on your camcorder by pressing the POWER button for a few seconds. 4 Connect the (USB) jack ...
... camcorder. 2 Set the mode dial to your camcorder. If any of the computer using the USB cable supplied with your computer - screen messages and restart your camcorder and the computer is installed correctly. USB port USB cable (supplied) USB jack Your computer recognizes the camcorder,... Manager]. [Device Manager] window appears. 5 Make sure that [SONY DDX-A1010 USB Device] appears in [DVD/CD-ROM drives], [Generic volume] in [Storage volumes], and [USB Mass Storage Device] in the on your camcorder by pressing the POWER button for a few seconds. 4 Connect the (USB) jack ...
Operating Instructions
Page 99
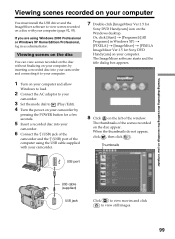
...your computer, by inserting a recorded disc into your camcorder and connecting it to (Play/Edit). 4 Turn the power on your camcorder by pressing the POWER button for a few seconds. 5 Insert a recorded disc into your camcorder. 6 Connect the (USB) jack of the camcorder and the (USB) port of the window. ...allow Windows to load. 2 Connect the AC adaptor to your camcorder. 3 Set the mode dial to your computer. 7 Double-click [ImageMixer Ver.1.5 for Sony DVD Handycam] on the Windows desktop. Thumbnails USB port USB cable (supplied) USB jack Click to view movies and click to view scenes...
...your computer, by inserting a recorded disc into your camcorder and connecting it to (Play/Edit). 4 Turn the power on your camcorder by pressing the POWER button for a few seconds. 5 Insert a recorded disc into your camcorder. 6 Connect the (USB) jack of the camcorder and the (USB) port of the window. ...allow Windows to load. 2 Connect the AC adaptor to your camcorder. 3 Set the mode dial to your computer. 7 Double-click [ImageMixer Ver.1.5 for Sony DVD Handycam] on the Windows desktop. Thumbnails USB port USB cable (supplied) USB jack Click to view movies and click to view scenes...
Operating Instructions
Page 101
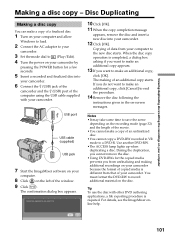
...copy completion message appears, remove the disc and insert a new disc into your camcorder. 6 Connect the (USB) jack of the camcorder and the (USB) port of the computer using the USB cable supplied with other DVD authoring applications, a file exporting procedure is completed, a dialog box asking if...;You cannot copy a DVD-RW recorded in the on-screen messages. Disc Duplicating Making a disc copy You can make a copy of data from unfinalizing and making of your camcorder. Viewing/duplicating discs/editing the recordings on your camcorder by pressing the POWER button for the copied ...
...copy completion message appears, remove the disc and insert a new disc into your camcorder. 6 Connect the (USB) jack of the camcorder and the (USB) port of the computer using the USB cable supplied with other DVD authoring applications, a file exporting procedure is completed, a dialog box asking if...;You cannot copy a DVD-RW recorded in the on-screen messages. Disc Duplicating Making a disc copy You can make a copy of data from unfinalizing and making of your camcorder. Viewing/duplicating discs/editing the recordings on your camcorder by pressing the POWER button for the copied ...
Operating Instructions
Page 113
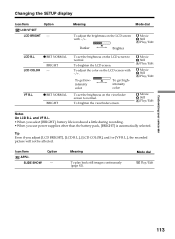
Meaning Mode dial To adjust the brightness on the viewfinder screen to normal. Tip Even if you use power supplies other than the battery pack, [BRIGHT] is reduced a little during recording. •When you adjust [LCD BRIGHT], [LCD B.L.], [LCD COLOR], and/or ...continuously (page 62). VF B.L. and VF B.L. •When you select [BRIGHT], battery life is automatically selected. Mode dial Play/Edit Customizing your camcorder 113 SLIDE SHOW Option - z BRT NORMAL BRIGHT To set the brightness on the LCD screen with -/+. To get lowintensity color To get highintensity ...
Meaning Mode dial To adjust the brightness on the viewfinder screen to normal. Tip Even if you use power supplies other than the battery pack, [BRIGHT] is reduced a little during recording. •When you adjust [LCD BRIGHT], [LCD B.L.], [LCD COLOR], and/or ...continuously (page 62). VF B.L. and VF B.L. •When you select [BRIGHT], battery life is automatically selected. Mode dial Play/Edit Customizing your camcorder 113 SLIDE SHOW Option - z BRT NORMAL BRIGHT To set the brightness on the LCD screen with -/+. To get lowintensity color To get highintensity ...
Operating Instructions
Page 118
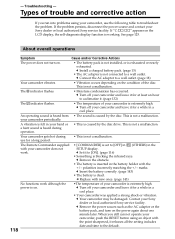
... period. • This is felt in a cool place. • Your camcorder was applied a strong shock or vibration. Contact your camcorder is blocking the infrared rays. Types of your Sony dealer or local authorized Sony service facility. See page 125. c Connect the AC adaptor to a wall outlet...is heard during use the following table to troubleshoot the problem. c Your camcorder may be damaged. The Remote Commander supplied with the +/- About overall operations Symptom Cause and/or Corrective Actions The power does not turn on the LCD display, the self-diagnosis display function ...
... period. • This is felt in a cool place. • Your camcorder was applied a strong shock or vibration. Contact your camcorder is blocking the infrared rays. Types of your Sony dealer or local authorized Sony service facility. See page 125. c Connect the AC adaptor to a wall outlet...is heard during use the following table to troubleshoot the problem. c Your camcorder may be damaged. The Remote Commander supplied with the +/- About overall operations Symptom Cause and/or Corrective Actions The power does not turn on the LCD display, the self-diagnosis display function ...
Operating Instructions
Page 125
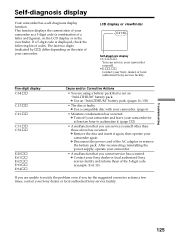
... again, then operate your Sony dealer or local authorized Sony service facility and inform them of your camcorder. (page 6) • Moisture condensation has occurred. After reconnecting/reinstalling the power supply, operate your Sony dealer or local authorized Sony service facility. Troubleshooting 125 c Disconnect the power cord of codes. c Turn off your camcorder and leave your camcorder for at least an...
... again, then operate your Sony dealer or local authorized Sony service facility and inform them of your camcorder. (page 6) • Moisture condensation has occurred. After reconnecting/reinstalling the power supply, operate your Sony dealer or local authorized Sony service facility. Troubleshooting 125 c Disconnect the power cord of codes. c Turn off your camcorder and leave your camcorder for at least an...
Operating Instructions
Page 131
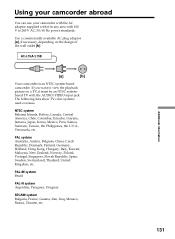
...if necessary, depending on a TV, it in any area with the AUDIO/VIDEO input jack. If you want to 240 V AC, 50/60 Hz power standards. Additional information 131 NTSC system Bahama Islands, Bolivia, Canada, Central America, Chile, Colombia, Ecuador, Guyana, Jamaica, Japan, Korea, Mexico, Peru,..., the Philippines, the U.S.A., Venezuela, etc. The following lists show TV color systems used overseas. Using your camcorder abroad You can use your camcorder with the AC adaptor supplied with it must be an NTSC systembased TV with 100 V to view the playback picture on the design of...
...if necessary, depending on a TV, it in any area with the AUDIO/VIDEO input jack. If you want to 240 V AC, 50/60 Hz power standards. Additional information 131 NTSC system Bahama Islands, Bolivia, Canada, Central America, Chile, Colombia, Ecuador, Guyana, Jamaica, Japan, Korea, Mexico, Peru,..., the Philippines, the U.S.A., Venezuela, etc. The following lists show TV color systems used overseas. Using your camcorder abroad You can use your camcorder with the AC adaptor supplied with it must be an NTSC systembased TV with 100 V to view the playback picture on the design of...

Operating Instructions
Page 139
.... •To remove an accessory, loosen the screw, and then press down and push it is linked to the POWER button, allowing you to turn the power supplied by the shoe on the intelligent accessory shoe •When you use the intelligent accessory shoe, extend the viewfinder and... detach the shoe cover. •The intelligent accessory shoe supplies power to the operating instructions of the accessory for further information. •The intelligent accessory shoe has a safety device for an audio input source...
.... •To remove an accessory, loosen the screw, and then press down and push it is linked to the POWER button, allowing you to turn the power supplied by the shoe on the intelligent accessory shoe •When you use the intelligent accessory shoe, extend the viewfinder and... detach the shoe cover. •The intelligent accessory shoe supplies power to the operating instructions of the accessory for further information. •The intelligent accessory shoe has a safety device for an audio input source...


