Operating Instructions
Page 2
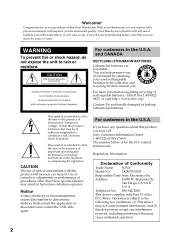
...accept any questions about this product, you can capture life's precious moments with this Sony Handycam. For more information regarding recycling of the FCC Rules. Use of controls or ... unit to discontinue midway (fail), restart the application or disconnect and connect the USB cable again. For customers in the U.S.A. This symbol is intended to alert the user to...Operation is very easy to constitute a risk of Conformity Trade Name: SONY Model No.: DCR-DVD101 Responsible Party:Sony Electronics Inc. and CANADA RECYCLING LITHIUM-ION BATTERIES Lithium-Ion batteries are...
...accept any questions about this product, you can capture life's precious moments with this Sony Handycam. For more information regarding recycling of the FCC Rules. Use of controls or ... unit to discontinue midway (fail), restart the application or disconnect and connect the USB cable again. For customers in the U.S.A. This symbol is intended to alert the user to...Operation is very easy to constitute a risk of Conformity Trade Name: SONY Model No.: DCR-DVD101 Responsible Party:Sony Electronics Inc. and CANADA RECYCLING LITHIUM-ION BATTERIES Lithium-Ion batteries are...
Operating Instructions
Page 3
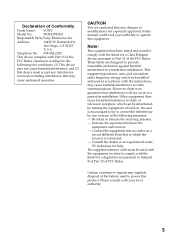
... that may cause harmful interference to provide reasonable protection against harmful interference in accordance with Part 15 of Conformity Trade Name: SONY Model No.: DCR-DVD201 Responsible Party:Sony Electronics Inc. The supplied interface cable must accept any changes or modifications not expressly approved in order to comply with the limits for a digital device pursuant...
... that may cause harmful interference to provide reasonable protection against harmful interference in accordance with Part 15 of Conformity Trade Name: SONY Model No.: DCR-DVD201 Responsible Party:Sony Electronics Inc. The supplied interface cable must accept any changes or modifications not expressly approved in order to comply with the limits for a digital device pursuant...
Operating Instructions
Page 14
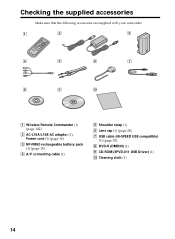
Cleaning cloth (1) 14 Checking the supplied accessories Make sure that the following accessories are supplied with your camcorder. 1 2 3 4 5 6 7 8 9 0 1 Wireless Remote Commander (1) (page 142) 2 AC-L15A/L15B AC adaptor (1), Power cord (1) (page 16) 3 NP-FM50 rechargeable battery pack (1) (page 15) 4 A/V connecting cable (1) 5 Shoulder strap (1) 6 Lens cap (1) (page 28) 7 USB cable (Hi-SPEED USB compatible) (1) (page 92) 8 DVD-R (DMR30) (1) 9 CD-ROM (SPVD-011 USB Driver) (1) q;
Cleaning cloth (1) 14 Checking the supplied accessories Make sure that the following accessories are supplied with your camcorder. 1 2 3 4 5 6 7 8 9 0 1 Wireless Remote Commander (1) (page 142) 2 AC-L15A/L15B AC adaptor (1), Power cord (1) (page 16) 3 NP-FM50 rechargeable battery pack (1) (page 15) 4 A/V connecting cable (1) 5 Shoulder strap (1) 6 Lens cap (1) (page 28) 7 USB cable (Hi-SPEED USB compatible) (1) (page 92) 8 DVD-R (DMR30) (1) 9 CD-ROM (SPVD-011 USB Driver) (1) q;
Operating Instructions
Page 49
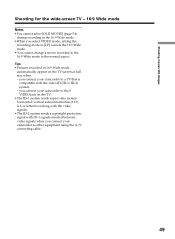
Tips •Pictures recorded in the 16:9 Wide mode to the normal aspect. you connect your camcorder to the S VIDEO jack on the TV screen at full size when: - Shooting movies/still images Shooting for the wide-screen TV - 16:9 Wide mode ... box) along with the video signals. •The ID-2 system sends a copyright protection signal with ID-1 signals inserted between video signals when you connect your camcorder to a TV that is compatible with the video ID (ID-1/ID-2) system. - you connect your...
Tips •Pictures recorded in the 16:9 Wide mode to the normal aspect. you connect your camcorder to the S VIDEO jack on the TV screen at full size when: - Shooting movies/still images Shooting for the wide-screen TV - 16:9 Wide mode ... box) along with the video signals. •The ID-2 system sends a copyright protection signal with ID-1 signals inserted between video signals when you connect your camcorder to a TV that is compatible with the video ID (ID-1/ID-2) system. - you connect your...
Operating Instructions
Page 63
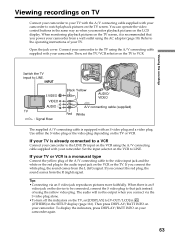
...signal. The audio will not be connected, connect the S video plug to VCR. Viewing recordings on TV Connect your camcorder to your TV with the A/V connecting cable supplied with your camcorder to the audio input jack on the VCR or the TV. You can operate the video control buttons in the SETUP... display (page 116). If you power your camcorder from a wall outlet using the A/V connecting cable supplied with your camcorder again. 63 Tips •Connecting via the S video plug alone. •To turn off the indicators on the ...
...signal. The audio will not be connected, connect the S video plug to VCR. Viewing recordings on TV Connect your camcorder to your TV with the A/V connecting cable supplied with your camcorder to the audio input jack on the VCR or the TV. You can operate the video control buttons in the SETUP... display (page 116). If you power your camcorder from a wall outlet using the A/V connecting cable supplied with your camcorder again. 63 Tips •Connecting via the S video plug alone. •To turn off the indicators on the ...
Operating Instructions
Page 71
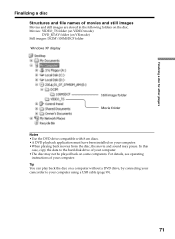
...play back the disc on some computers. In this case, copy the data to your computer using a USB cable (page 99). 71 Movies: VIDEO_TS folder (on VIDEO mode) DVD_RTAV folder (on VR mode) Still images:... DCIM\100MSDCF folder Windows XP display Still image folder Movie folder Notes •Use the DVD drive compatible with 8 cm discs. •A DVD playback application must have been installed on the disc. Finalizing a disc for other players ...and sound may not be played back on a computer without a DVD drive, by connecting your camcorder to the hard disk drive of your computer.
...play back the disc on some computers. In this case, copy the data to your computer using a USB cable (page 99). 71 Movies: VIDEO_TS folder (on VIDEO mode) DVD_RTAV folder (on VR mode) Still images:... DCIM\100MSDCF folder Windows XP display Still image folder Movie folder Notes •Use the DVD drive compatible with 8 cm discs. •A DVD playback application must have been installed on the disc. Finalizing a disc for other players ...and sound may not be played back on a computer without a DVD drive, by connecting your camcorder to the hard disk drive of your computer.

Operating Instructions
Page 91
...software, the file size may increase when you connect a USB interface not compatible with your camcorder by connecting the camcorder to your computer using the USB cable: •Copying recorded scenes to your computer •Viewing scenes on your computer •...Editing scenes copied to your computer - Viewing/duplicating discs/editing the recordings on your computer - Connecting your camcorder to your computer •Duplicating a disc •Making an original DVD...
...software, the file size may increase when you connect a USB interface not compatible with your camcorder by connecting the camcorder to your computer using the USB cable: •Copying recorded scenes to your computer •Viewing scenes on your computer •...Editing scenes copied to your computer - Viewing/duplicating discs/editing the recordings on your computer - Connecting your camcorder to your computer •Duplicating a disc •Making an original DVD...

Operating Instructions
Page 92
Install the USB driver to control your camcorder from your computer. If the menu window does not appear, double-click [My Computer], then [.... 5 Click [Finish]. Introduction Installing the USB driver Start the following the steps in "If you connect the USB cable before connecting the USB cable to your computer. If you are using Windows 2000 Professional or Windows XP Home Edition/Professional Log on as administrator. .... The installation menu window appears. 3 Move the cursor to [USB Driver] and click. Connecting your camcorder to your computer and allow Windows to load.
Install the USB driver to control your camcorder from your computer. If the menu window does not appear, double-click [My Computer], then [.... 5 Click [Finish]. Introduction Installing the USB driver Start the following the steps in "If you connect the USB cable before connecting the USB cable to your computer. If you are using Windows 2000 Professional or Windows XP Home Edition/Professional Log on as administrator. .... The installation menu window appears. 3 Move the cursor to [USB Driver] and click. Connecting your camcorder to your computer and allow Windows to load.
Operating Instructions
Page 94
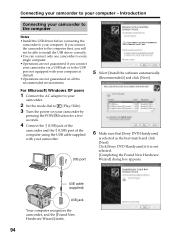
... pressing the POWER button for a few seconds. 4 Connect the (USB) jack of the camcorder and the (USB) port of the computer using the USB cable supplied with your computer. Click [Sony DVD Handycam] if it is selected as the best match and click [Next]. For Microsoft Windows XP users 1 Connect ...the AC adaptor to your camcorder. 2 Set the mode dial to (Play/Edit). 3 Turn the ...
... pressing the POWER button for a few seconds. 4 Connect the (USB) jack of the camcorder and the (USB) port of the computer using the USB cable supplied with your computer. Click [Sony DVD Handycam] if it is selected as the best match and click [Next]. For Microsoft Windows XP users 1 Connect ...the AC adaptor to your camcorder. 2 Set the mode dial to (Play/Edit). 3 Turn the ...
Operating Instructions
Page 95
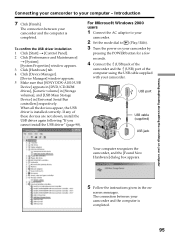
... appears. 5 Make sure that [SONY DDX-A1010 USB Device] appears in [DVD/CD-ROM drives], [Generic volume] in [Storage volumes], and [USB Mass Storage Device] in the on- For Microsoft Windows 2000 users 1 Connect the AC adaptor to your camcorder. 2 Set the mode dial to your camcorder. USB port USB cable (supplied) USB jack Your...
... appears. 5 Make sure that [SONY DDX-A1010 USB Device] appears in [DVD/CD-ROM drives], [Generic volume] in [Storage volumes], and [USB Mass Storage Device] in the on- For Microsoft Windows 2000 users 1 Connect the AC adaptor to your camcorder. 2 Set the mode dial to your camcorder. USB port USB cable (supplied) USB jack Your...
Operating Instructions
Page 96
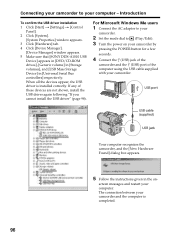
...4 Click [Device Manager]. [Device Manager] window appears. 5 Make sure that [SONY DDX-A1010 USB Device] appears in [DVD/CD-ROM drives], [Generic volume] in [Storage volumes], and [USB Mass Storage Device] in the on your camcorder by pressing the POWER button for a few seconds. 4 Connect the (USB) jack..., install the USB driver again following "If you cannot install the USB driver" (page 98). USB port USB cable (supplied) USB jack Your computer recognizes the camcorder, and the [New Hardware Found] dialog box appears. 5 Follow the instructions given in [Universal Serial Bus controllers]...
...4 Click [Device Manager]. [Device Manager] window appears. 5 Make sure that [SONY DDX-A1010 USB Device] appears in [DVD/CD-ROM drives], [Generic volume] in [Storage volumes], and [USB Mass Storage Device] in the on your camcorder by pressing the POWER button for a few seconds. 4 Connect the (USB) jack..., install the USB driver again following "If you cannot install the USB driver" (page 98). USB port USB cable (supplied) USB jack Your computer recognizes the camcorder, and the [New Hardware Found] dialog box appears. 5 Follow the instructions given in [Universal Serial Bus controllers]...
Operating Instructions
Page 97
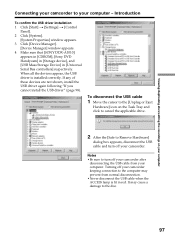
...the USB cable and turn off your camcorder. To disconnect the USB cable 1 Move the cursor to the [Unplug or Eject Hardware] icon on your computer Connecting your camcorder to the disc. 97 Turning off your camcorder keeping ...connection to the computer may cause a damage to your computer - Introduction To confirm the USB driver installation 1 Click [Start] t [Settings] t [Control Panel]. 2 Click [System]. [System Properties] window appears. 3 Click [Device Manager]. [Device Manager] window appears. 4 Make sure that [SONY DDX-A1010] appears in [CDROM], [Sony DVD Handycam...
...the USB cable and turn off your camcorder. To disconnect the USB cable 1 Move the cursor to the [Unplug or Eject Hardware] icon on your computer Connecting your camcorder to the disc. 97 Turning off your camcorder keeping ...connection to the computer may cause a damage to your computer - Introduction To confirm the USB driver installation 1 Click [Start] t [Settings] t [Control Panel]. 2 Click [System]. [System Properties] window appears. 3 Click [Device Manager]. [Device Manager] window appears. 4 Make sure that [SONY DDX-A1010] appears in [CDROM], [Sony DVD Handycam...

Operating Instructions
Page 98
...can find detailed operating instructions for ImageMixer software. 1 Click located at the top right of the window. Connecting your camcorder to your camcorder. 98 To close the on -line help Click the button at the top right of the window. Consulting the ...[Programs] ([All Programs] in Windows XP) t [PIXELA] t [ImageMixer] t [Help]. Introduction If you need from the computer following "To disconnect the USB cable" (page 97). 2 Install the USB driver again following "Installing the USB driver" (page 92). 3 After "InstallShield Wizard complete" dialog box disappears, restart your...
...can find detailed operating instructions for ImageMixer software. 1 Click located at the top right of the window. Connecting your camcorder to your camcorder. 98 To close the on -line help Click the button at the top right of the window. Consulting the ...[Programs] ([All Programs] in Windows XP) t [PIXELA] t [ImageMixer] t [Help]. Introduction If you need from the computer following "To disconnect the USB cable" (page 97). 2 Install the USB driver again following "Installing the USB driver" (page 92). 3 After "InstallShield Wizard complete" dialog box disappears, restart your...
Operating Instructions
Page 99
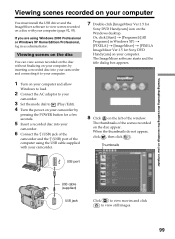
... a recorded disc into your camcorder. 6 Connect the (USB) jack of the camcorder and the (USB) port of the computer using Windows 2000 Professional or Windows XP Home Edition/Professional, log in Windows XP) t [PIXELA] t [ImageMixer] t [PIXELA ImageMixer Ver.1.5 for Sony DVD Handycam] icon on the Windows desktop. Thumbnails USB port USB cable (supplied) USB jack Click...
... a recorded disc into your camcorder. 6 Connect the (USB) jack of the camcorder and the (USB) port of the computer using Windows 2000 Professional or Windows XP Home Edition/Professional, log in Windows XP) t [PIXELA] t [ImageMixer] t [PIXELA ImageMixer Ver.1.5 for Sony DVD Handycam] icon on the Windows desktop. Thumbnails USB port USB cable (supplied) USB jack Click...

Operating Instructions
Page 100
...the thumbnail of the scene to view from your camcorder during displaying the thumbnails on the recording mode (page 32) and the length of the movie. •You cannot remove the disc from the thumbnails. When you connect the USB cable before USB driver installation is complete, the USB driver...8226;If you have selected a movie, click and start playback. Viewing scenes recorded on your computer 9 Double-click the scene to view from your camcorder to your computer. •Still images converted to a movie are not displayed. 100 Tips •An album is displayed in "If you cannot ...
...the thumbnail of the scene to view from your camcorder during displaying the thumbnails on the recording mode (page 32) and the length of the movie. •You cannot remove the disc from the thumbnails. When you connect the USB cable before USB driver installation is complete, the USB driver...8226;If you have selected a movie, click and start playback. Viewing scenes recorded on your computer 9 Double-click the scene to view from your camcorder to your computer. •Still images converted to a movie are not displayed. 100 Tips •An album is displayed in "If you cannot ...
Operating Instructions
Page 101
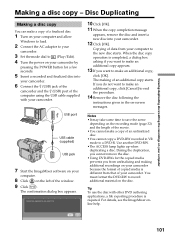
...copy completion message appears, remove the disc and insert a new disc into your camcorder. 6 Connect the (USB) jack of the camcorder and the (USB) port of the computer using the USB cable supplied with other DVD authoring applications, a file exporting procedure is completed, a dialog box asking if... Click [OK]. USB port USB cable (supplied) USB jack 7 Start the ImageMixer software on your camcorder by pressing the POWER button for the copied media prevents you cannot remove the disc. •Using DVD-RWs for a few seconds. 5 Insert a recorded and finalized disc into your computer ...
...copy completion message appears, remove the disc and insert a new disc into your camcorder. 6 Connect the (USB) jack of the camcorder and the (USB) port of the computer using the USB cable supplied with other DVD authoring applications, a file exporting procedure is completed, a dialog box asking if... Click [OK]. USB port USB cable (supplied) USB jack 7 Start the ImageMixer software on your camcorder by pressing the POWER button for the copied media prevents you cannot remove the disc. •Using DVD-RWs for a few seconds. 5 Insert a recorded and finalized disc into your computer ...

Operating Instructions
Page 105
... if you want to make an additional copy, click [OK]. Notes •It may take some time to the menu. 5 Click [OK]. The [DVD Video Output] window appears. Selects the icon N: Playback ./>: Backwards/ forwards the contents. Creating an original disc Recording on a disc Check the menu and ...3 When you want to make an additional copy appears. 6 If you have checked that all the contents are right, connect your camcorder to the computer with the USB cable, then insert a blank disc into your computer 2 Click the button on the (Preview panel) box on the upper left of the...
... if you want to make an additional copy, click [OK]. Notes •It may take some time to the menu. 5 Click [OK]. The [DVD Video Output] window appears. Selects the icon N: Playback ./>: Backwards/ forwards the contents. Creating an original disc Recording on a disc Check the menu and ...3 When you want to make an additional copy appears. 6 If you have checked that all the contents are right, connect your camcorder to the computer with the USB cable, then insert a blank disc into your computer 2 Click the button on the (Preview panel) box on the upper left of the...
Operating Instructions
Page 106
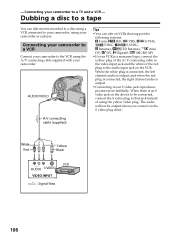
... via an S video jack reproduces pictures more faithfully. A/V connecting cable (supplied) White Red Yellow Black VCR AUDIO S VIDEO VIDEO INPUT : Signal flow 106 Connecting your camcorder to the VCR using the A/V connecting cable supplied with your camcorder as a player. AUDIO/VIDEO Tips •You can dub movies... a VCR connected to the audio input jack on VCRs that jack instead of the A/V connecting cable to the video input jack and the white or the red plug to your camcorder, using the yellow video plug. - When the white plug is connected, the left channel audio...
... via an S video jack reproduces pictures more faithfully. A/V connecting cable (supplied) White Red Yellow Black VCR AUDIO S VIDEO VIDEO INPUT : Signal flow 106 Connecting your camcorder to the VCR using the A/V connecting cable supplied with your camcorder as a player. AUDIO/VIDEO Tips •You can dub movies... a VCR connected to the audio input jack on VCRs that jack instead of the A/V connecting cable to the video input jack and the white or the red plug to your camcorder, using the yellow video plug. - When the white plug is connected, the left channel audio...

Operating Instructions
Page 108
... either the S video plug or the video plug depending on your camcorder. 2 Press SETUP. VIDEO SET HiFi SOUND VIDEO INPIT RETURN VIDEO S VIDEO A/V connecting cable (supplied) [ SETUP ] : END 5 Use the multi-selector to select [VIDEO INPUT]. Black Yellow S VIDEO White Red AUDIO REC button... VCR or a TV program. Connecting your camcorder to a TV or a VCR Connect your camcorder to [LCD] in the SETUP display (the default setting is equipped with your camcorder as a recorder. Set [DISPLAY] in (OTHERS) to the TV/VCR using the A/V connecting cable supplied with an S video plug and a...
... either the S video plug or the video plug depending on your camcorder. 2 Press SETUP. VIDEO SET HiFi SOUND VIDEO INPIT RETURN VIDEO S VIDEO A/V connecting cable (supplied) [ SETUP ] : END 5 Use the multi-selector to select [VIDEO INPUT]. Black Yellow S VIDEO White Red AUDIO REC button... VCR or a TV program. Connecting your camcorder to a TV or a VCR Connect your camcorder to [LCD] in the SETUP display (the default setting is equipped with your camcorder as a recorder. Set [DISPLAY] in (OTHERS) to the TV/VCR using the A/V connecting cable supplied with an S video plug and a...
Operating Instructions
Page 109
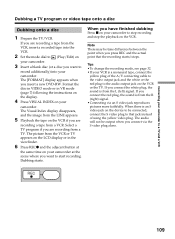
.... •Connecting via the S video plug alone. The picture from the LINE appears. 5 Playback the tape on your camcorder to be time difference between the point when you connect via an S video jack reproduces pictures more faithfully. The audio will... not be output when you press REC and the actual point that jack instead of the A/V connecting cable to the video output jack and the white or the red plug to the audio output jack on the device ... scene where you want to stop recording and stop the playback on your camcorder. If you insert a new DVD-RW.
.... •Connecting via the S video plug alone. The picture from the LINE appears. 5 Playback the tape on your camcorder to be time difference between the point when you connect via an S video jack reproduces pictures more faithfully. The audio will... not be output when you press REC and the actual point that jack instead of the A/V connecting cable to the video output jack and the white or the red plug to the audio output jack on the device ... scene where you want to stop recording and stop the playback on your camcorder. If you insert a new DVD-RW.


