Operating Guide
Page 10
... and time 28 Step 7: Inserting a disc or a "Memory Stick Duo 29 Step 8: Selecting the aspect ratio (16:9 or 4:3) of the recording picture (DCR-DVD205/DVD305/DVD705/DVD755 32 Easy Handycam - using your camcorder with automatic settings Using Easy Handycam operation 34 Recording with ease 36 Playing back with more presence (5.1ch surround recording) (For...
... and time 28 Step 7: Inserting a disc or a "Memory Stick Duo 29 Step 8: Selecting the aspect ratio (16:9 or 4:3) of the recording picture (DCR-DVD205/DVD305/DVD705/DVD755 32 Easy Handycam - using your camcorder with automatic settings Using Easy Handycam operation 34 Recording with ease 36 Playing back with more presence (5.1ch surround recording) (For...
Operating Guide
Page 16
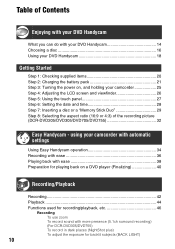
A recording format that is compatible with your DVD Handycam (p.29). *4 Do not use a DVD-RW, you can record them on the all types of discs. *3 Formatting deletes all recordings and returns the recording medium ... VR mode. Using a disc repeatedly even if the disc becomes full by formatting*3 (64) - z z z z *1z*1 z Playing back recordings on your camcorder (90) - Choosing a disc Your DVD Handycam is compatible with your DVD Handycam (deleting and rearranging the order of images). In this manual, VIDEO mode is indicated as and VR mode as this...
A recording format that is compatible with your DVD Handycam (p.29). *4 Do not use a DVD-RW, you can record them on the all types of discs. *3 Formatting deletes all recordings and returns the recording medium ... VR mode. Using a disc repeatedly even if the disc becomes full by formatting*3 (64) - z z z z *1z*1 z Playing back recordings on your camcorder (90) - Choosing a disc Your DVD Handycam is compatible with your DVD Handycam (deleting and rearranging the order of images). In this manual, VIDEO mode is indicated as and VR mode as this...
Operating Guide
Page 30
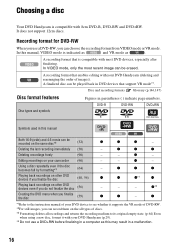
...the disc depending on a 4:3 TV. 7 Touch [YES] t [YES]. 8 Touch when [Completed.] appears. x4:3 You can be recorded. Cannot edit in Camcorder VIDEO VR OK xVIDEO mode You can start recording immediately after step 5. Proceed to remove a disc if it is damaged or is completed, you can...the disc type and condition. xDVD-R You can edit, delete pictures, or divide movies on your camcorder while the ACCESS lamp lights up to 10 minutes to step 6. • During Easy Handycam operation (p.34), [Format the disc? When the formatting is dirty with fingerprints, etc. xVR mode...
...the disc depending on a 4:3 TV. 7 Touch [YES] t [YES]. 8 Touch when [Completed.] appears. x4:3 You can be recorded. Cannot edit in Camcorder VIDEO VR OK xVIDEO mode You can start recording immediately after step 5. Proceed to remove a disc if it is damaged or is completed, you can...the disc type and condition. xDVD-R You can edit, delete pictures, or divide movies on your camcorder while the ACCESS lamp lights up to 10 minutes to step 6. • During Easy Handycam operation (p.34), [Format the disc? When the formatting is dirty with fingerprints, etc. xVR mode...
Operating Guide
Page 34
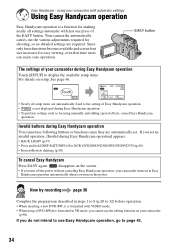
... your camcorder turns on in VR mode, you set . BEEP • Nearly all settings automatic with automatic settings Using Easy Handycam operation Easy Handycam operation is not displayed during Easy Handycam operation] appears. • BACK LIGHT (p.47) • Press and hold DISP BATT/INFO (For DCR-DVD205/DVD305... fixed to display the available setup items. For details on the power. EASY button The settings of your camcorder with just one press of Easy Handycam operation. • is a function for making nearly all setup items are required. If you cannot use ...
... your camcorder turns on in VR mode, you set . BEEP • Nearly all settings automatic with automatic settings Using Easy Handycam operation Easy Handycam operation is not displayed during Easy Handycam operation] appears. • BACK LIGHT (p.47) • Press and hold DISP BATT/INFO (For DCR-DVD205/DVD305... fixed to display the available setup items. For details on the power. EASY button The settings of your camcorder with just one press of Easy Handycam operation. • is a function for making nearly all setup items are required. If you cannot use ...

Operating Guide
Page 35
using your camcorder with automatic settings 35 Easy Handycam -
using your camcorder with automatic settings 35 Easy Handycam -

Operating Guide
Page 37
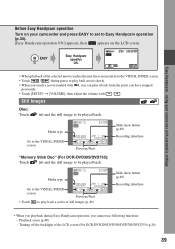
When disappears, the image has been recorded. 37 using your camcorder and press EASY to set to Easy Handycam operation (p.34). [Easy Handycam operation ON.] appears, then appears on your camcorder with the selected recording media displayed at the top right. 1 2 The number of the arrow ... D lightly to light up A shutter sound is [FINE] (p.76). Before Easy Handycam operation Turn on the LCD screen. Flashing bLights up the lamp. (Still) 2 Select the recording destination for still images (For DCR-DVD305/DVD755). 1 Touch [SETUP] t [STILL MEDIA]. 2 Select the media for...
When disappears, the image has been recorded. 37 using your camcorder and press EASY to set to Easy Handycam operation (p.34). [Easy Handycam operation ON.] appears, then appears on your camcorder with the selected recording media displayed at the top right. 1 2 The number of the arrow ... D lightly to light up A shutter sound is [FINE] (p.76). Before Easy Handycam operation Turn on the LCD screen. Flashing bLights up the lamp. (Still) 2 Select the recording destination for still images (For DCR-DVD305/DVD755). 1 Touch [SETUP] t [STILL MEDIA]. 2 Select the media for...
Operating Guide
Page 39
...: Touch tab and the still image to Easy Handycam operation (p.34). [Easy Handycam operation ON.] appears, then appears on your camcorder with / . Playback zoom (p.48) - Turning off the backlight of still images (p.49). Before Easy Handycam operation Turn on the LCD screen. Media type ...Go to the VISUAL INDEX screen Previous/Next "Memory Stick Duo" (For DCR-DVD305/DVD755): Touch ...
...: Touch tab and the still image to Easy Handycam operation (p.34). [Easy Handycam operation ON.] appears, then appears on your camcorder with / . Playback zoom (p.48) - Turning off the backlight of still images (p.49). Before Easy Handycam operation Turn on the LCD screen. Media type ...Go to the VISUAL INDEX screen Previous/Next "Memory Stick Duo" (For DCR-DVD305/DVD755): Touch ...
Operating Guide
Page 40
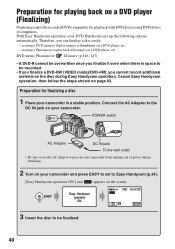
... DC IN jack To the wall outlet • Be sure to use the AC adaptor to prevent your camcorder and press EASY to set to Easy Handycam (p.34). [Easy Handycam operation ON.] and appears on the screen. 3 Insert the disc to display images as thumbnails on page 63... menu to be recorded. • If you finalize a DVD-RW (VIDEO mode)/DVD+RW, you can finalize a disc easily. - With Easy Handycam operation, your camcorder in a stable position. Therefore, you cannot record additional material on a DVD player (Finalizing) Finalizing makes the recorded DVD compatible for playback with DVD ...
... DC IN jack To the wall outlet • Be sure to use the AC adaptor to prevent your camcorder and press EASY to set to Easy Handycam (p.34). [Easy Handycam operation ON.] and appears on the screen. 3 Insert the disc to display images as thumbnails on page 63... menu to be recorded. • If you finalize a DVD-RW (VIDEO mode)/DVD+RW, you can finalize a disc easily. - With Easy Handycam operation, your camcorder in a stable position. Therefore, you cannot record additional material on a DVD player (Finalizing) Finalizing makes the recorded DVD compatible for playback with DVD ...
Operating Guide
Page 41
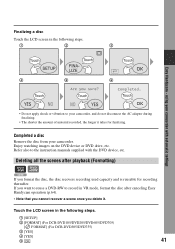
...Completed a disc Remove the disc from your camcorder, and do not disconnect the AC adaptor during finalizing. • The shorter the amount of material recorded, the longer it . Deleting all the scenes after canceling Easy Handycam operation (p.64). • Note that ...3 Easy Handycam - using your camcorder with the DVD device, etc. If you format the disc, the disc recovers recording used capacity and is reusable for finalizing. Finalizing a disc Touch the LCD screen in the following steps. 1 [SETUP] 2 [FORMAT] (For DCR-DVD105/DVD205/DVD605/DVD705) [ FORMAT] (For DCR-DVD305/DVD755...
...Completed a disc Remove the disc from your camcorder, and do not disconnect the AC adaptor during finalizing. • The shorter the amount of material recorded, the longer it . Deleting all the scenes after canceling Easy Handycam operation (p.64). • Note that ...3 Easy Handycam - using your camcorder with the DVD device, etc. If you format the disc, the disc recovers recording used capacity and is reusable for finalizing. Finalizing a disc Touch the LCD screen in the following steps. 1 [SETUP] 2 [FORMAT] (For DCR-DVD105/DVD205/DVD605/DVD705) [ FORMAT] (For DCR-DVD305/DVD755...
Operating Guide
Page 65
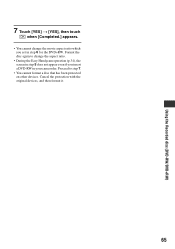
Using the Recorded disc (DVD-RW/DVD+RW) 7 Touch [YES] t [YES], then touch when [Completed.] appears. • You cannot change the aspect ratio. • During the Easy Handycam operation (p.34), the screen in step 5 does not appear even if you set in your camcorder. Format the disc again to step 7. • You cannot format a disc that has been protected on other devices. Proceed to change the movie aspect ratio which you insert a DVD-RW in step 6 for the DVD+RW. Cancel the protection with the original devices, and then format it. 65
Using the Recorded disc (DVD-RW/DVD+RW) 7 Touch [YES] t [YES], then touch when [Completed.] appears. • You cannot change the aspect ratio. • During the Easy Handycam operation (p.34), the screen in step 5 does not appear even if you set in your camcorder. Format the disc again to step 7. • You cannot format a disc that has been protected on other devices. Proceed to change the movie aspect ratio which you insert a DVD-RW in step 6 for the DVD+RW. Cancel the protection with the original devices, and then format it. 65
Operating Guide
Page 69
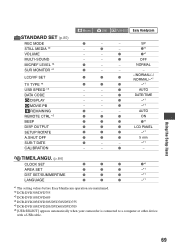
z z*1 - - TIME/LANGU. (p.84) CLOCK SET z z z z*1 AREA SET z z z -*1 DST SET/SUMMERTIME z z z -*1 LANGUAGE z z z -*1 *1 The setting values before Easy Handycam operation are maintained. *2 DCR-DVD305/DVD755 *3 DCR-DVD105/DVD605 *4 DCR-DVD205/DVD305/DVD705/DVD755 *5 DCR-DVD105/DVD205/DVD605/DVD705 *6 [USB SELECT] appears automatically when your camcorder is connected to a computer or other device with a USB cable. 69 z AUTO - - z DATE/TIME - - AUTO z z z ON...
z z*1 - - TIME/LANGU. (p.84) CLOCK SET z z z z*1 AREA SET z z z -*1 DST SET/SUMMERTIME z z z -*1 LANGUAGE z z z -*1 *1 The setting values before Easy Handycam operation are maintained. *2 DCR-DVD305/DVD755 *3 DCR-DVD105/DVD605 *4 DCR-DVD205/DVD305/DVD705/DVD755 *5 DCR-DVD105/DVD205/DVD605/DVD705 *6 [USB SELECT] appears automatically when your camcorder is connected to a computer or other device with a USB cable. 69 z AUTO - - z DATE/TIME - - AUTO z z z ON...
Operating Guide
Page 87
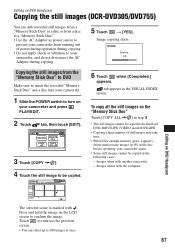
...RW. • Copying a large number of power during operation during copying. • Do not apply shock or vibration to your camcorder. 1 Slide the POWER switch to turn on DVD Handycam Copying the still images (DCR-DVD305/DVD755) You can select up to 100 images at once. 87 Editing on your... camcorder and press PLAY/EDIT. 2 Touch tab, then touch [EDIT]. 3 Touch [COPY ]. 4 Touch the still image to be copied. 6 Touch when [...
...RW. • Copying a large number of power during operation during copying. • Do not apply shock or vibration to your camcorder. 1 Slide the POWER switch to turn on DVD Handycam Copying the still images (DCR-DVD305/DVD755) You can select up to 100 images at once. 87 Editing on your... camcorder and press PLAY/EDIT. 2 Touch tab, then touch [EDIT]. 3 Touch [COPY ]. 4 Touch the still image to be copied. 6 Touch when [...
Operating Guide
Page 89
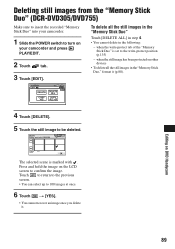
...Memory Stick Duo" (DCR-DVD305/DVD755) Make sure to insert the recorded "Memory Stick Duo" into your camcorder. 1 Slide the POWER switch to confirm the image. The selected scene is set to be deleted. Press and hold the image on the LCD screen to turn on your camcorder and press PLAY/EDIT.... 2 Touch tab. 3 Touch [EDIT]. when the still image has been protected on DVD Handycam 4 Touch [DELETE]. 5 Touch the still image to the write-protect position (p.135) - Editing on...
...Memory Stick Duo" (DCR-DVD305/DVD755) Make sure to insert the recorded "Memory Stick Duo" into your camcorder. 1 Slide the POWER switch to confirm the image. The selected scene is set to be deleted. Press and hold the image on the LCD screen to turn on your camcorder and press PLAY/EDIT.... 2 Touch tab. 3 Touch [EDIT]. when the still image has been protected on DVD Handycam 4 Touch [DELETE]. 5 Touch the still image to the write-protect position (p.135) - Editing on...

Operating Guide
Page 91
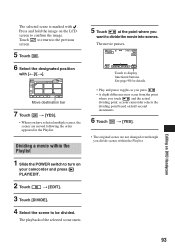
... the Playlist. Touch to return to confirm the image. To hide the buttons, touch . • Play and pause toggles as your camcorder selects the dividing point based on DVD Handycam The selected scene is not displayed. 4 Select the scene to be added to display [ ADD] when [ ADD] is marked with...point with more precision after the dividing point has been selected with . Returns to and the operational buttons below appear. It may occur from your camcorder and press PLAY/EDIT. 2 Select tab or tab that you want to add to the Playlist, then touch [EDIT]. • If the ...
... the Playlist. Touch to return to confirm the image. To hide the buttons, touch . • Play and pause toggles as your camcorder selects the dividing point based on DVD Handycam The selected scene is not displayed. 4 Select the scene to be added to display [ ADD] when [ ADD] is marked with...point with more precision after the dividing point has been selected with . Returns to and the operational buttons below appear. It may occur from your camcorder and press PLAY/EDIT. 2 Select tab or tab that you want to add to the Playlist, then touch [EDIT]. • If the ...
Operating Guide
Page 93
.... 5 Touch at the point where you touch and the actual dividing point, as your camcorder and press PLAY/EDIT. 2 Touch t [EDIT]. 3 Touch [DIVIDE]. 4 Select the scene to turn on your camcorder selects the dividing point based on DVD Handycam 93 The movie pauses. See page 90 for details. • Play and pause toggles...
.... 5 Touch at the point where you touch and the actual dividing point, as your camcorder and press PLAY/EDIT. 2 Touch t [EDIT]. 3 Touch [DIVIDE]. 4 Select the scene to turn on your camcorder selects the dividing point based on DVD Handycam 93 The movie pauses. See page 90 for details. • Play and pause toggles...
Operating Guide
Page 109
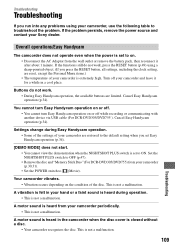
... USB cable (For DCR-DVD305/DVD755 ). Cancel Easy Handycam operation (p.34). Your camcorder vibrates. • Vibration occurs depending on the condition of your camcorder are restored to the default setting when you set to ON. Overall operations/Easy Handycam The camcorder does not operate even...Troubleshooting You cannot turn Easy Handycam operation on or off. • You cannot turn Easy Handycam operation on or off your Sony dealer. A vibration is felt in a cool place. If the problem persists, remove the power source and contact your camcorder and leave it after about...
... USB cable (For DCR-DVD305/DVD755 ). Cancel Easy Handycam operation (p.34). Your camcorder vibrates. • Vibration occurs depending on the condition of your camcorder are restored to the default setting when you set to ON. Overall operations/Easy Handycam The camcorder does not operate even...Troubleshooting You cannot turn Easy Handycam operation on or off. • You cannot turn Easy Handycam operation on or off your Sony dealer. A vibration is felt in a cool place. If the problem persists, remove the power source and contact your camcorder and leave it after about...

Operating Guide
Page 111
...panel do not work at all. • Adjust the screen ([CALIBRATION]) (p.140). Close the LCD screen (p.26). 111 Troubleshooting A problem occurs when the camcorder is open. Then, connect it again. The buttons do not work correctly or do not appear on the touch panel. • Touch the LCD screen...or insert a disc or "Memory Stick Duo" (For DCR-DVD305/DVD755) to the AC Adaptor. • Turn off the power, and disconnect the AC Adaptor from the wall outlet or remove the battery pack without turning off . • During Easy Handycam operation (p.34), you disconnect the AC Adaptor from the ...
...panel do not work at all. • Adjust the screen ([CALIBRATION]) (p.140). Close the LCD screen (p.26). 111 Troubleshooting A problem occurs when the camcorder is open. Then, connect it again. The buttons do not work correctly or do not appear on the touch panel. • Touch the LCD screen...or insert a disc or "Memory Stick Duo" (For DCR-DVD305/DVD755) to the AC Adaptor. • Turn off the power, and disconnect the AC Adaptor from the wall outlet or remove the battery pack without turning off . • During Easy Handycam operation (p.34), you disconnect the AC Adaptor from the ...
Operating Guide
Page 117
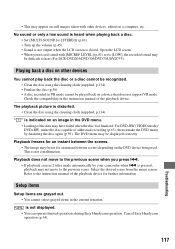
... device for an instant between the scenes. • The image may freeze for further information. Cancel Easy Handycam operation (p.34). 117 Troubleshooting The playback picture is pressed, playback may not move to the previous scene when... or only a low sound is heard when playing back a disc. • Set [MULTI-SOUND] to hear (For DCR-DVD205/DVD305/DVD705/DVD755). Playing back a disc on other devices, edited on an image in the current situation. For DVD...; Loading of additional recording (p.63), then remake the DVD menu by your camcorder when . Refer to the previous scene.
... device for an instant between the scenes. • The image may freeze for further information. Cancel Easy Handycam operation (p.34). 117 Troubleshooting The playback picture is pressed, playback may not move to the previous scene when... or only a low sound is heard when playing back a disc. • Set [MULTI-SOUND] to hear (For DCR-DVD205/DVD305/DVD705/DVD755). Playing back a disc on other devices, edited on an image in the current situation. For DVD...; Loading of additional recording (p.63), then remake the DVD menu by your camcorder when . Refer to the previous scene.
Operating Guide
Page 122
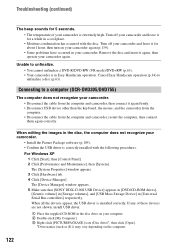
...System Properties] window appears. 3 Click [Hardware] tab. 4 Click [Device Manager]. The [Device Manager] window appears. 5 Make sure that [SONY DDX-C1002 USB Device] appears in [DVD/CD-ROM drives], [Generic volume] in [Storage volumes], and [USB Mass Storage Device] in [...8226; Confirm the USB driver is extremely high. Cancel Easy Handycam operation (p.34) to a computer (DCR-DVD305/DVD755) The computer does not recognize your camcorder again. When all the devices appear, the USB driver is in Easy Handycam operation. Connecting to unfinalize a disc (p.63). For Windows XP...
...System Properties] window appears. 3 Click [Hardware] tab. 4 Click [Device Manager]. The [Device Manager] window appears. 5 Make sure that [SONY DDX-C1002 USB Device] appears in [DVD/CD-ROM drives], [Generic volume] in [Storage volumes], and [USB Mass Storage Device] in [...8226; Confirm the USB driver is extremely high. Cancel Easy Handycam operation (p.34) to a computer (DCR-DVD305/DVD755) The computer does not recognize your camcorder again. When all the devices appear, the USB driver is in Easy Handycam operation. Connecting to unfinalize a disc (p.63). For Windows XP...
Operating Guide
Page 125
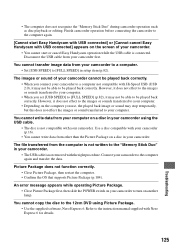
... the disc to the computer again. [Cannot start Easy Handycam with USB connected] or [Cannot cancel Easy Handycam with your camcorder using Picture Package. • Use the supplied software, Nero Express 6. Finish camcorder operation before connecting the camcorder to the 12cm DVD using the USB cable. •...; The disc is connected. Disconnect the USB cable from your camcorder to be played back correctly. The images or sound of your camcorder. • You cannot start or cancel Easy Handycam operation while the USB cable is not compatible with USB connected] appears on...
... the disc to the computer again. [Cannot start Easy Handycam with USB connected] or [Cannot cancel Easy Handycam with your camcorder using Picture Package. • Use the supplied software, Nero Express 6. Finish camcorder operation before connecting the camcorder to the 12cm DVD using the USB cable. •...; The disc is connected. Disconnect the USB cable from your camcorder to be played back correctly. The images or sound of your camcorder. • You cannot start or cancel Easy Handycam operation while the USB cable is not compatible with USB connected] appears on...


