

Operating Instructions
Page 5
For details on the area). About the S-AIR function The system is used with the system: • Surround amplifier (supplied): You can enjoy surround speaker sound wirelessly. • S-AIR receiver (optional): You can enjoy system sound in these Operating Instructions refer only to when the surround amplifier or S-AIR receiver is compatible with the S-AIR function, which allows transmission...
For details on the area). About the S-AIR function The system is used with the system: • Surround amplifier (supplied): You can enjoy surround speaker sound wirelessly. • S-AIR receiver (optional): You can enjoy system sound in these Operating Instructions refer only to when the surround amplifier or S-AIR receiver is compatible with the S-AIR function, which allows transmission...
Operating Instructions
Page 6
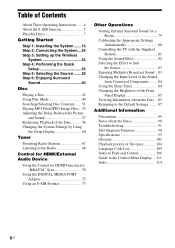
... Getting Started Step 1: Installing the System .......13 Step 2: Connecting the System ...24 Step 3: Setting up the Wireless System 34 Step 4: Performing the Quick Setup 35 Step 5: Selecting the Source .......39 Step 6: Enjoying Surround Sound 40 Disc Playing a Disc 43 ...System Settings by Using the Setup Display 60 Tuner Presetting Radio Stations 67 Listening to the Radio 68 Control for HDMI/External Audio Device Using the Control for HDMI Function for "BRAVIA" Sync 70 Using the DIGITAL MEDIA PORT Adapter 72 Using an S-AIR Product 73 Other Operations Getting Optimal Surround Sound...
... Getting Started Step 1: Installing the System .......13 Step 2: Connecting the System ...24 Step 3: Setting up the Wireless System 34 Step 4: Performing the Quick Setup 35 Step 5: Selecting the Source .......39 Step 6: Enjoying Surround Sound 40 Disc Playing a Disc 43 ...System Settings by Using the Setup Display 60 Tuner Presetting Radio Stations 67 Listening to the Radio 68 Control for HDMI/External Audio Device Using the Control for HDMI Function for "BRAVIA" Sync 70 Using the DIGITAL MEDIA PORT Adapter 72 Using an S-AIR Product 73 Other Operations Getting Optimal Surround Sound...

Operating Instructions
Page 13
... anywhere in the room. Subwoofer Front left speaker (L) Center speaker B Front right speaker (R) A A A A C A C Surround left speaker (L) Surround right speaker (R) Note • Use caution when placing the speakers and/or speaker stands attached to 7.0 meters. If you can be... up to 1.6 meters closer to the listening position (B), and the surround speakers up to 5.0 meters closer to the listening position (C). Getting Started Step 1: Installing the System Positioning the system For the best possible surround sound, place all speakers at the same distance as it may result....
... anywhere in the room. Subwoofer Front left speaker (L) Center speaker B Front right speaker (R) A A A A C A C Surround left speaker (L) Surround right speaker (R) Note • Use caution when placing the speakers and/or speaker stands attached to 7.0 meters. If you can be... up to 1.6 meters closer to the listening position (B), and the surround speakers up to 5.0 meters closer to the listening position (C). Getting Started Step 1: Installing the System Positioning the system For the best possible surround sound, place all speakers at the same distance as it may result....

Operating Instructions
Page 24
... match the speaker cords to match the color of the SPEAKER jacks of the surround amplifier EZW-RT10 S-AIR ID A B C SPEAKER L PAIRING R SURROUND SESSUULRRBERRACOOCKUUTNNODDR Blue (Surround left speaker (L)) Gray (Surround right speaker (R)) 24US Getting Started Step 2: Connecting the System For connecting the system, read the information on the speakers: the speaker cord with a volume control, turn... color tube to 3, and the speaker cord without the color tube to the unit, insert the connector until all the other components to a level where sound is not distorted.
... match the speaker cords to match the color of the SPEAKER jacks of the surround amplifier EZW-RT10 S-AIR ID A B C SPEAKER L PAIRING R SURROUND SESSUULRRBERRACOOCKUUTNNODDR Blue (Surround left speaker (L)) Gray (Surround right speaker (R)) 24US Getting Started Step 2: Connecting the System For connecting the system, read the information on the speakers: the speaker cord with a volume control, turn... color tube to 3, and the speaker cord without the color tube to the unit, insert the connector until all the other components to a level where sound is not distorted.

Operating Instructions
Page 31
...OUT VOIDUETO PR/CR PB/CB Y TV/VIDEO R AUDIO IN L Wireless transceiver EZW-RT10 S-AIR ID A B C SPEAKER L PAIRING R SURROUND SESSUULRRBERRACOOCKUUTNNODDR Wireless transceiver Note • When you need to insert the wireless transceivers into the EZW-RT10 slot. 31US For details of S-AIR products,... see "Using an S-AIR Product" (page 73). To transmit sound from the unit to an S-AIR product, such as a surround amplifier or S-AIR receiver. Getting Started Inserting the wireless transceiver You can transmit sound from the unit, you insert the wireless transceiver, make sure that ...
...OUT VOIDUETO PR/CR PB/CB Y TV/VIDEO R AUDIO IN L Wireless transceiver EZW-RT10 S-AIR ID A B C SPEAKER L PAIRING R SURROUND SESSUULRRBERRACOOCKUUTNNODDR Wireless transceiver Note • When you need to insert the wireless transceivers into the EZW-RT10 slot. 31US For details of S-AIR products,... see "Using an S-AIR Product" (page 73). To transmit sound from the unit to an S-AIR product, such as a surround amplifier or S-AIR receiver. Getting Started Inserting the wireless transceiver You can transmit sound from the unit, you insert the wireless transceiver, make sure that ...

Operating Instructions
Page 34
... S-AIR ID A B C PAIRING SPEAKER L SURROUND SELECTOR R SURROUND SURROUND BACK PHONES jack SURROUND SELECTOR switch The unit transmits sound to the surround amplifier that the wireless transceivers are connected to the surround amplifier, or radio reception is active. The system turns on. 2 Set the SURROUND SELECTOR switch of the surround amplifier to the surround speakers. Turns off the surround amplifier while the headphones...
... S-AIR ID A B C PAIRING SPEAKER L SURROUND SELECTOR R SURROUND SURROUND BACK PHONES jack SURROUND SELECTOR switch The unit transmits sound to the surround amplifier that the wireless transceivers are connected to the surround amplifier, or radio reception is active. The system turns on. 2 Set the SURROUND SELECTOR switch of the surround amplifier to the surround speakers. Turns off the surround amplifier while the headphones...

Operating Instructions
Page 36
... LEVEL (COMPONENT OUT): OFF PAUSE MODE: AUTO 6 Press X/x to select a language, then press . The front of the TV to off. For details, see "Getting Optimal Surround Sound for a Room" (page 79). 9 Connect the calibration mic (supplied) to the A.CAL MIC jack on . • [OFF]: The Control for selecting the aspect ratio of...
... LEVEL (COMPONENT OUT): OFF PAUSE MODE: AUTO 6 Press X/x to select a language, then press . The front of the TV to off. For details, see "Getting Optimal Surround Sound for a Room" (page 79). 9 Connect the calibration mic (supplied) to the A.CAL MIC jack on . • [OFF]: The Control for selecting the aspect ratio of...

Operating Instructions
Page 37
... 99) 1( 1) T 0: 01: 08 DVD VIDEO CUSTOM CUSTOM QUICK 4 Press X/x to children and neighbors. • Before [AUTO CALIBRATION], install the surround amplifier in the appropriate location. Give consideration to select [QUICK], then press . If you connect the unit and the TV with the TV/projector, etc... the type of video signal output from the status of the system. For details, refer also to select [YES], then press . [AUTO CALIBRATION] starts. Be quiet during the measurement. Note • Loud test sounds are complete. You cannot turn the volume down. The options ...
... 99) 1( 1) T 0: 01: 08 DVD VIDEO CUSTOM CUSTOM QUICK 4 Press X/x to children and neighbors. • Before [AUTO CALIBRATION], install the surround amplifier in the appropriate location. Give consideration to select [QUICK], then press . If you connect the unit and the TV with the TV/projector, etc... the type of video signal output from the status of the system. For details, refer also to select [YES], then press . [AUTO CALIBRATION] starts. Be quiet during the measurement. Note • Loud test sounds are complete. You cannot turn the volume down. The options ...
Operating Instructions
Page 40
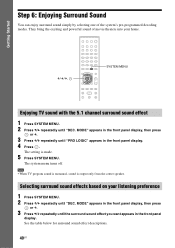
Selecting surround sound effects based on your home. See the table below for surround sound effect descriptions. 40US The system menu turns off. Note • When TV program sound is monaural, sound is made. 5 Press SYSTEM MENU. X/x/c, SYSTEM MENU Enjoying TV sound with the 5.1 channel surround sound effect 1 Press SYSTEM MENU. 2 Press X/x repeatedly until "DEC. The setting is output only from the center speaker. MODE...
Selecting surround sound effects based on your home. See the table below for surround sound effect descriptions. 40US The system menu turns off. Note • When TV program sound is monaural, sound is made. 5 Press SYSTEM MENU. X/x/c, SYSTEM MENU Enjoying TV sound with the 5.1 channel surround sound effect 1 Press SYSTEM MENU. 2 Press X/x repeatedly until "DEC. The setting is output only from the center speaker. MODE...
Operating Instructions
Page 41
... describes the options when you set [SPEAKER FORMATION] to [STANDARD] (page 79). "PRO LOGIC" "PLII MOVIE" "PLII MUSIC" "2CH STEREO" • 2 channel source: The system simulates surround sound from 2 channel sources and outputs sound from the speakers depending on the number of channels of channels. Getting Started 4 Press . The default setting is made. 5 Press...
... describes the options when you set [SPEAKER FORMATION] to [STANDARD] (page 79). "PRO LOGIC" "PLII MOVIE" "PLII MUSIC" "2CH STEREO" • 2 channel source: The system simulates surround sound from 2 channel sources and outputs sound from the speakers depending on the number of channels of channels. Getting Started 4 Press . The default setting is made. 5 Press...
Operating Instructions
Page 42
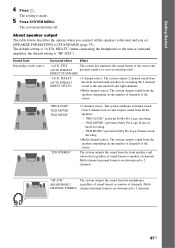
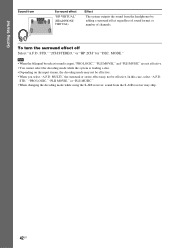
... number of channels. STD," "2CH STEREO," or "HP 2CH" for "DEC. MODE." Getting Started Sound from Surround effect "HP VIRTUAL" (HEADPHONE VIRTUAL) Effect The system outputs the sound from the S-AIR receiver may skip. 42US Note • When the bilingual broadcast sound is input, "PRO LOGIC," "PLII MOVIE," and "PLII MUSIC" are not effective. •...
... number of channels. STD," "2CH STEREO," or "HP 2CH" for "DEC. MODE." Getting Started Sound from Surround effect "HP VIRTUAL" (HEADPHONE VIRTUAL) Effect The system outputs the sound from the S-AIR receiver may skip. 42US Note • When the bilingual broadcast sound is input, "PRO LOGIC," "PLII MOVIE," and "PLII MUSIC" are not effective. •...

Operating Instructions
Page 44
... playback speed changes. Green: the disc is selected, or the disc is on the surround amplifier. (The sound of the system is in a second. To turn the system off if an unplayable disc is in standby mode Press "/1 while the system is set to "OFF" (page 32). - [CONTROL FOR HDMI] is on the the...you press . Press STEP to go to the PHONES jack on the unit. To enter power saving mode, make sure that the system is muted. The sound of the system is in the disc stocker but not selected. - Change a disc while playing another disc DISC SKIP Play the desired disc directly DISC...
... playback speed changes. Green: the disc is selected, or the disc is on the surround amplifier. (The sound of the system is in a second. To turn the system off if an unplayable disc is in standby mode Press "/1 while the system is set to "OFF" (page 32). - [CONTROL FOR HDMI] is on the the...you press . Press STEP to go to the PHONES jack on the unit. To enter power saving mode, make sure that the system is muted. The sound of the system is in the disc stocker but not selected. - Change a disc while playing another disc DISC SKIP Play the desired disc directly DISC...

Operating Instructions
Page 46
... the left channel of audio track 2 (monaural). • [2:2/R]: The sound of the right channel of the right channel (monaural). The Control Menu display appears on the TV screen. 2 Press X/x to . 1 Press DISPLAY while the system is in stop mode. Example: Dolby Digital 5.1 channel Surround (L/R) LFE (Low Frequency Effect) 1: ENGLISH DOLBY DIGITAL 3 / 2 .1 Front (L/R) + Center...
... the left channel of audio track 2 (monaural). • [2:2/R]: The sound of the right channel of the right channel (monaural). The Control Menu display appears on the TV screen. 2 Press X/x to . 1 Press DISPLAY while the system is in stop mode. Example: Dolby Digital 5.1 channel Surround (L/R) LFE (Low Frequency Effect) 1: ENGLISH DOLBY DIGITAL 3 / 2 .1 Front (L/R) + Center...
Operating Instructions
Page 64
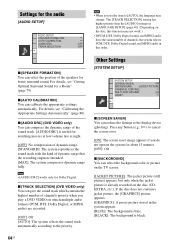
...Dolby Digital, or MPEG audio) are recorded. [OFF]: Off. [AUTO]: The system selects the sound track automatically according to the priority. x [AUTO CALIBRATION] You can select the position of the speakers for better surround sound. x [AUDIO DRC] (DVD VIDEO only) You can select the background color ...priority than the [AUDIO] settings in [LANGUAGE SETUP] (page 60). (Depending on the disc, this order. For details, see "Getting Optimal Surround Sound for Dolby Digital. x [TRACK SELECTION] (DVD VIDEO only) You can reduce the damage to the display device (ghosting). For details, see...
...Dolby Digital, or MPEG audio) are recorded. [OFF]: Off. [AUTO]: The system selects the sound track automatically according to the priority. x [AUTO CALIBRATION] You can select the position of the speakers for better surround sound. x [AUDIO DRC] (DVD VIDEO only) You can select the background color ...priority than the [AUDIO] settings in [LANGUAGE SETUP] (page 60). (Depending on the disc, this order. For details, see "Getting Optimal Surround Sound for Dolby Digital. x [TRACK SELECTION] (DVD VIDEO only) You can reduce the damage to the display device (ghosting). For details, see...
Operating Instructions
Page 65
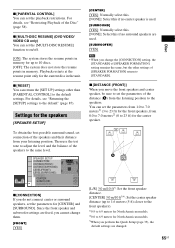
...set the [MULTI-DISC RESUME] function to on/off. [ON]: The system stores the resume points in memory for up to the same level. Settings for the speakers [SPEAKER SETUP] To obtain the best possible surround sound, set the parameters for the current disc in memory. Playback restarts at... the resume point only for [CENTER] and [SURROUND]. x [DISTANCE (FRONT)] When you perform the Quick Setup (page 35), the default...
...set the [MULTI-DISC RESUME] function to on/off. [ON]: The system stores the resume points in memory for up to the same level. Settings for the speakers [SPEAKER SETUP] To obtain the best possible surround sound, set the parameters for the current disc in memory. Playback restarts at... the resume point only for [CENTER] and [SURROUND]. x [DISTANCE (FRONT)] When you perform the Quick Setup (page 35), the default...

Operating Instructions
Page 66
..., be effective. x [LEVEL (FRONT)] You can adjust the sound level of the surround speakers. on the remote. • To return to the speakers...4 Repeat Steps 1 to 3. 5 Press C/X/x/c repeatedly to set [TEST TONE] to adjust [LEVEL (FRONT)] and [LEVEL (SURROUND)]. [OFF]: The test tone is not emitted from the speakers. [ON]: The test tone is emitted from -6.0 dB to 23...to the default setting when changing a setting, select the item, then press CLEAR. x [LEVEL (SURROUND)] You can adjust the sound level of the distance (B) from -6.0 dB to 0 dB for [CENTER] and [SUBWOOFER]. When you...
..., be effective. x [LEVEL (FRONT)] You can adjust the sound level of the surround speakers. on the remote. • To return to the speakers...4 Repeat Steps 1 to 3. 5 Press C/X/x/c repeatedly to set [TEST TONE] to adjust [LEVEL (FRONT)] and [LEVEL (SURROUND)]. [OFF]: The test tone is not emitted from the speakers. [ON]: The test tone is emitted from -6.0 dB to 23...to the default setting when changing a setting, select the item, then press CLEAR. x [LEVEL (SURROUND)] You can adjust the sound level of the distance (B) from -6.0 dB to 0 dB for [CENTER] and [SUBWOOFER]. When you...

Operating Instructions
Page 73
...can enjoy system sound in this case, the system outputs the composite video signal only, regardless of the type of DIGITAL MEDIA PORT adapter, you do not insert the wireless transceiver into the unit correctly (page 31). 73US Room A S-AIR main unit S-AIR sub unit (surround amplifier) ...• S-AIR sub unit: This is compatible with the S-AIR function (page 102), which allows sound transmission between S-AIR products. S-AIR receiver: You can enjoy surround speaker sound wirelessly. - The following illustration shows an example of DIGITAL MEDIA PORT adapter, images are two types of...
...can enjoy system sound in this case, the system outputs the composite video signal only, regardless of the type of DIGITAL MEDIA PORT adapter, you do not insert the wireless transceiver into the unit correctly (page 31). 73US Room A S-AIR main unit S-AIR sub unit (surround amplifier) ...• S-AIR sub unit: This is compatible with the S-AIR function (page 102), which allows sound transmission between S-AIR products. S-AIR receiver: You can enjoy surround speaker sound wirelessly. - The following illustration shows an example of DIGITAL MEDIA PORT adapter, images are two types of...
Operating Instructions
Page 74
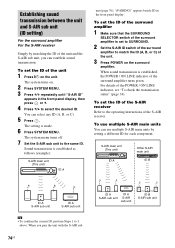
... display, then press or c. 4 Press X/x to select the desired ID. When sound transmission is made. 6 Press SYSTEM MENU. To set to SURROUND. 2 Set the S-AIR ID switch of the surround amplifier to the operating instructions of the unit 1 Press "/1 on the surround amplifier. Establishing sound transmission between the unit and S-AIR sub unit (ID setting) For...
... display, then press or c. 4 Press X/x to select the desired ID. When sound transmission is made. 6 Press SYSTEM MENU. To set to SURROUND. 2 Set the S-AIR ID switch of the surround amplifier to the operating instructions of the unit 1 Press "/1 on the surround amplifier. Establishing sound transmission between the unit and S-AIR sub unit (ID setting) For...
Operating Instructions
Page 79
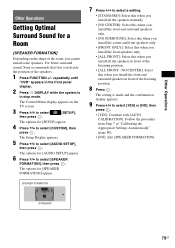
... when you install all the speakers in stop mode. The setting is in front of the listening position. 8 Press . For better surround sound, Sony recommends that first you decide the position of the room, you cannot install some speakers. SPEAKER FORMATION 7 Press C/c to select [CUSTOM...Press X/x to select [AUDIO SETUP], then press . NO CENTER]: Select this when you install the front and surround speakers in the front panel display. 2 Press DISPLAY while the system is made and the confirmation display appears. 9 Press C/c to select [SETUP], then press . Follow the procedure...
... when you install all the speakers in stop mode. The setting is in front of the listening position. 8 Press . For better surround sound, Sony recommends that first you decide the position of the room, you cannot install some speakers. SPEAKER FORMATION 7 Press C/c to select [CUSTOM...Press X/x to select [AUDIO SETUP], then press . NO CENTER]: Select this when you install the front and surround speakers in the front panel display. 2 Press DISPLAY while the system is made and the confirmation display appears. 9 Press C/c to select [SETUP], then press . Follow the procedure...
Operating Instructions
Page 80
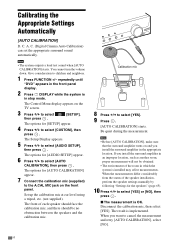
... Be quiet during the measurement. You cannot turn the volume down. If you install the surround amplifier in the appropriate location. C. C. (Digital Cinema Auto Calibration) can set the appropriate surround sound automatically. Note • The system outputs a loud test sound when [AUTO CALIBRATION] starts. The options for [AUTO CALIBRATION] appear. 7 Connect the calibration mic (supplied...
... Be quiet during the measurement. You cannot turn the volume down. If you install the surround amplifier in the appropriate location. C. C. (Digital Cinema Auto Calibration) can set the appropriate surround sound automatically. Note • The system outputs a loud test sound when [AUTO CALIBRATION] starts. The options for [AUTO CALIBRATION] appear. 7 Connect the calibration mic (supplied...


