

Operating Instructions
Page 5
... in these Operating Instructions refer only to when the surround amplifier or S-AIR receiver is compatible with the system: • Surround amplifier (supplied): You can enjoy surround speaker sound wirelessly. • S-AIR receiver (optional): You can be used . The following S-AIR products can be purchased as an option (the S-AIR product lineup differs ...
... in these Operating Instructions refer only to when the surround amplifier or S-AIR receiver is compatible with the system: • Surround amplifier (supplied): You can enjoy surround speaker sound wirelessly. • S-AIR receiver (optional): You can be used . The following S-AIR products can be purchased as an option (the S-AIR product lineup differs ...
Operating Instructions
Page 10
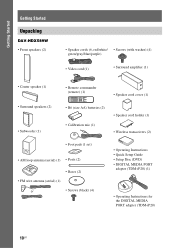
Getting Started Getting Started Unpacking DAV-HDX589W • Front speakers (2) • Speaker cords (6, red/white/ • Screws (with washer) (4) green/gray/blue/purple) • Video cord (1) • Surround amplifier (1) • Center speaker (1) • Remote commander (remote) (1) • Speaker cord cover (1) • Surround speakers (2) • Subwoofer (1) • R6 (size AA) batteries (2) • Calibration mic (1) • Speaker cord holder (1) • Wireless transceivers (2) •...
Getting Started Getting Started Unpacking DAV-HDX589W • Front speakers (2) • Speaker cords (6, red/white/ • Screws (with washer) (4) green/gray/blue/purple) • Video cord (1) • Surround amplifier (1) • Center speaker (1) • Remote commander (remote) (1) • Speaker cord cover (1) • Surround speakers (2) • Subwoofer (1) • R6 (size AA) batteries (2) • Calibration mic (1) • Speaker cord holder (1) • Wireless transceivers (2) •...
Operating Instructions
Page 11
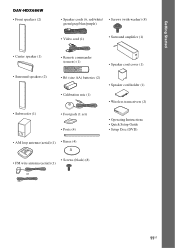
Getting Started DAV-HDX686W • Front speakers (2) • Speaker cords (6, red/white/ • Screws (with washer) (8) green/gray/blue/purple) • Video cord (1) • Surround amplifier (1) • Center speaker (1) • Remote commander (remote) (1) • Speaker cord cover (1) • Surround speakers (2) • R6 (size AA) batteries (2) • Calibration mic (1) • Speaker cord holder (1) • Wireless transceivers (2) • Subwoofer (1) • Foot pads...
Getting Started DAV-HDX686W • Front speakers (2) • Speaker cords (6, red/white/ • Screws (with washer) (8) green/gray/blue/purple) • Video cord (1) • Surround amplifier (1) • Center speaker (1) • Remote commander (remote) (1) • Speaker cord cover (1) • Surround speakers (2) • R6 (size AA) batteries (2) • Calibration mic (1) • Speaker cord holder (1) • Wireless transceivers (2) • Subwoofer (1) • Foot pads...

Operating Instructions
Page 13
Getting Started Step 1: Installing the System Positioning the system For the best possible surround sound, place all speakers at the same distance as (A), you can move the center speaker up to 1.6 meters closer to the listening position (B), and the surround speakers up to 5.0 meters closer to the speakers on a specially treated (waxed, oiled, polished, etc.) floor, as staining or...
Getting Started Step 1: Installing the System Positioning the system For the best possible surround sound, place all speakers at the same distance as (A), you can move the center speaker up to 1.6 meters closer to the listening position (B), and the surround speakers up to 5.0 meters closer to the speakers on a specially treated (waxed, oiled, polished, etc.) floor, as staining or...
Operating Instructions
Page 15
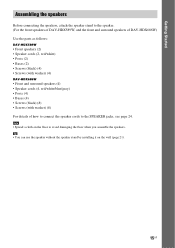
... Started Assembling the speakers Before connecting the speakers, attach the speaker stand to the speaker. (For the front speakers of DAV-HDX589W, and the front and surround speakers of DAV-HDX686W) Use the parts as follows: DAV-HDX589W • Front speakers (2) • Speaker cords (2, red/white) • Posts (2) • Bases (2) • Screws (black) (4) • Screws (with washer) (4) DAV-HDX686W • Front and surround speakers (4) • Speaker cords (4, red...
... Started Assembling the speakers Before connecting the speakers, attach the speaker stand to the speaker. (For the front speakers of DAV-HDX589W, and the front and surround speakers of DAV-HDX686W) Use the parts as follows: DAV-HDX589W • Front speakers (2) • Speaker cords (2, red/white) • Posts (2) • Bases (2) • Screws (black) (4) • Screws (with washer) (4) DAV-HDX686W • Front and surround speakers (4) • Speaker cords (4, red...
Operating Instructions
Page 17
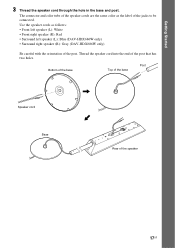
The connector and color tube of the speaker cords are the same color as follows: • Front left speaker (L): White • Front right speaker (R): Red • Surround left speaker (L): Blue (DAV-HDX686W only) • Surround right speaker (R): Gray (DAV-HDX686W only) Be careful with the orientation of the post that has two holes. Bottom of the base Top of the...
The connector and color tube of the speaker cords are the same color as follows: • Front left speaker (L): White • Front right speaker (R): Red • Surround left speaker (L): Blue (DAV-HDX686W only) • Surround right speaker (R): Gray (DAV-HDX686W only) Be careful with the orientation of the post that has two holes. Bottom of the base Top of the...
Operating Instructions
Page 18
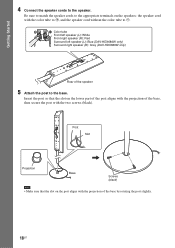
Color tube Front left speaker (L): White Front right speaker (R): Red Surround left speaker (L): Blue (DAV-HDX686W only) Surround right speaker (R): Gray (DAV-HDX686W only) Rear of the speaker 5 Attach the post to the speaker. Insert the post so that the slot on the lower part of the post aligns with the projection of the base by rotating the post ...
Color tube Front left speaker (L): White Front right speaker (R): Red Surround left speaker (L): Blue (DAV-HDX686W only) Surround right speaker (R): Gray (DAV-HDX686W only) Rear of the speaker 5 Attach the post to the speaker. Insert the post so that the slot on the lower part of the post aligns with the projection of the base by rotating the post ...
Operating Instructions
Page 21
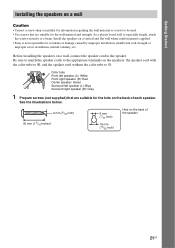
.... Before installing the speakers on the back of each speaker. Be sure to match the speaker cords to the appropriate terminals on the speakers: the speaker cord with the color tube to 3, and the speaker cord without the color tube to #. Color tube Front left speaker (L): White Front right speaker (R): Red Center speaker: Green Surround left speaker (L): Blue Surround right speaker (R): Gray 1 Prepare...
.... Before installing the speakers on the back of each speaker. Be sure to match the speaker cords to the appropriate terminals on the speakers: the speaker cord with the color tube to 3, and the speaker cord without the color tube to #. Color tube Front left speaker (L): White Front right speaker (R): Red Center speaker: Green Surround left speaker (L): Blue Surround right speaker (R): Gray 1 Prepare...
Operating Instructions
Page 22
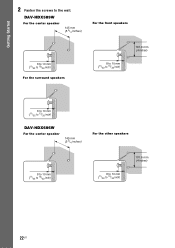
DAV-HDX589W For the center speaker 145 mm (5 3/4 inches) For the front speakers 8 to 10 mm (11/32 to 13/32 inch) For the surround speakers 8 to 10 mm (11/32 to 13/32 inch) 101.6 mm (4 inches) 8 to 10 mm (11/32 to 13/32 inch) DAV-HDX686W For the center speaker 145 mm (5 3/4 inches) For the other speakers 8 to 10 mm (11/32 to 13/32 inch) 8 to 10 mm (11/32 to the wall. Getting Started 2 Fasten the screws to 13/32 inch) 101.6 mm (4 inches) 22US
DAV-HDX589W For the center speaker 145 mm (5 3/4 inches) For the front speakers 8 to 10 mm (11/32 to 13/32 inch) For the surround speakers 8 to 10 mm (11/32 to 13/32 inch) 101.6 mm (4 inches) 8 to 10 mm (11/32 to 13/32 inch) DAV-HDX686W For the center speaker 145 mm (5 3/4 inches) For the other speakers 8 to 10 mm (11/32 to 13/32 inch) 8 to 10 mm (11/32 to the wall. Getting Started 2 Fasten the screws to 13/32 inch) 101.6 mm (4 inches) 22US

Operating Instructions
Page 32
... setting is made. 6 Press SYSTEM MENU. Rear panel of the unit EZW-RT10 S-AIR ID A B C SPEAKER L PAIRING R SURROUND SESSUULRRBERRACOOCKUUTNNODDR Rear panel of the surround amplifier Wall outlet (mains): The shape of the unit and the surround amplifier to a wall outlet (mains), connect the front, center speakers and subwoofer to the unit and surround speakers to select a setting. •...
... setting is made. 6 Press SYSTEM MENU. Rear panel of the unit EZW-RT10 S-AIR ID A B C SPEAKER L PAIRING R SURROUND SESSUULRRBERRACOOCKUUTNNODDR Rear panel of the surround amplifier Wall outlet (mains): The shape of the unit and the surround amplifier to a wall outlet (mains), connect the front, center speakers and subwoofer to the unit and surround speakers to select a setting. •...

Operating Instructions
Page 34
... the unit. Sound transmission is not established. When you use the wireless system, you turn off the surround amplifier while the headphones are inserted into the unit and the surround amplifier correctly (page 31). For details of the surround amplifier to the surround speakers. If it doesn't, check the transmission status as follows. In this case...
... the unit. Sound transmission is not established. When you use the wireless system, you turn off the surround amplifier while the headphones are inserted into the unit and the surround amplifier correctly (page 31). For details of the surround amplifier to the surround speakers. If it doesn't, check the transmission status as follows. In this case...
Operating Instructions
Page 41
... mode decoding. • Multi-channel source: The system outputs sound from the front and surround speakers by assigning the 2 channel sound to [STANDARD] (page 79). MULTI" (when connecting the headphones to the unit or surround amplifier, the default setting is made. 5 Press SYSTEM MENU. CHANNEL STEREO) channel surround formats are downmixed to 2 channels. 41US Getting Started...
... mode decoding. • Multi-channel source: The system outputs sound from the front and surround speakers by assigning the 2 channel sound to [STANDARD] (page 79). MULTI" (when connecting the headphones to the unit or surround amplifier, the default setting is made. 5 Press SYSTEM MENU. CHANNEL STEREO) channel surround formats are downmixed to 2 channels. 41US Getting Started...
Operating Instructions
Page 65
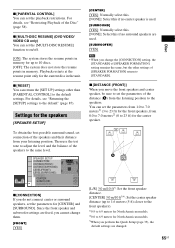
...position to 10 discs. [OFF]: The system does not store the resume points in the unit. x [DISTANCE (FRONT)] When you move the front speakers and center speaker, be sure to set the parameters of the speakers to the default settings. x [MULTI-...Set the front speaker distance. [CENTER] 3.0 m/10 ft3)4): Set the center speaker distance (up to the speakers. SPEAKER SETUP CONNECTION: DISTANCE(FRONT): DISTANCE(SURROUND): LEVEL(FRONT): LEVEL(SURROUND): TESFRT OTNOTN:E YES CENTER: YES SURROUND: YES SUBWOOFER: YES x [CONNECTION] If you do not connect center or surround speakers, set the ...
...position to 10 discs. [OFF]: The system does not store the resume points in the unit. x [DISTANCE (FRONT)] When you move the front speakers and center speaker, be sure to set the parameters of the speakers to the default settings. x [MULTI-...Set the front speaker distance. [CENTER] 3.0 m/10 ft3)4): Set the center speaker distance (up to the speakers. SPEAKER SETUP CONNECTION: DISTANCE(FRONT): DISTANCE(SURROUND): LEVEL(FRONT): LEVEL(SURROUND): TESFRT OTNOTN:E YES CENTER: YES SURROUND: YES SUBWOOFER: YES x [CONNECTION] If you do not connect center or surround speakers, set the ...

Operating Instructions
Page 66
... away from -6.0 dB to [YES] in sequence while adjusting the level. Tip • To adjust the volume of the surround speakers. on the input stream, the [DISTANCE] setting may not be sure to set the parameters from -6.0 dB to +6.0 dB for [L/R],... the sound level of the front speakers, center speaker, and subwoofer. B [L/R] 3.0 m/10 ft2)3): Set the surround speaker distance (up to 5.0 meters (16 ft) closer to the front speakers). 1)0.0 to 6.9 meters for easy adjustment. [L/R] 0.0 dB: Set the front speaker level. 66US [CENTER] 0.0 dB*: Set the center speaker level. [SUBWOOFER] +2.0 dB: ...
... away from -6.0 dB to [YES] in sequence while adjusting the level. Tip • To adjust the volume of the surround speakers. on the input stream, the [DISTANCE] setting may not be sure to set the parameters from -6.0 dB to +6.0 dB for [L/R],... the sound level of the front speakers, center speaker, and subwoofer. B [L/R] 3.0 m/10 ft2)3): Set the surround speaker distance (up to 5.0 meters (16 ft) closer to the front speakers). 1)0.0 to 6.9 meters for easy adjustment. [L/R] 0.0 dB: Set the front speaker level. 66US [CENTER] 0.0 dB*: Set the center speaker level. [SUBWOOFER] +2.0 dB: ...

Operating Instructions
Page 73
You can enjoy system sound in this case. ./> H x X Using an S-AIR Product The unit is compatible with the S-AIR function (page 102), which allows sound transmission between S-AIR products. Surround amplifier: You can be able to three S-AIR main units. (The number of usable ...AIR receiver) Note • You cannot operate this case, the system outputs the composite video signal only, regardless of the type of video signal. The following illustration shows an example of buttons that can enjoy surround speaker sound wirelessly. - Control for HDMI/External Audio Device Note •...
You can enjoy system sound in this case. ./> H x X Using an S-AIR Product The unit is compatible with the S-AIR function (page 102), which allows sound transmission between S-AIR products. Surround amplifier: You can be able to three S-AIR main units. (The number of usable ...AIR receiver) Note • You cannot operate this case, the system outputs the composite video signal only, regardless of the type of video signal. The following illustration shows an example of buttons that can enjoy surround speaker sound wirelessly. - Control for HDMI/External Audio Device Note •...
Operating Instructions
Page 79
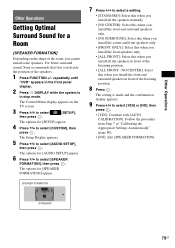
... while the system is made and the confirmation display appears. 9 Press C/c to select [YES] or [NO], then press . • [YES]: Continue with [AUTO CALIBRATION]. For better surround sound, Sony recommends that first you install all the speakers normally. • [NO CENTER]: Select this when you install the front and surround speakers only. • [NO SURROUND]: Select this...
... while the system is made and the confirmation display appears. 9 Press C/c to select [YES] or [NO], then press . • [YES]: Continue with [AUTO CALIBRATION]. For better surround sound, Sony recommends that first you install all the speakers normally. • [NO CENTER]: Select this when you install the front and surround speakers only. • [NO SURROUND]: Select this...

Operating Instructions
Page 94
...8226; The disc is upside down . • The disc is heard on the source, the effect of the surround speakers may cause damage to the lenses. Noise is skewed on the disc tray. • The system cannot play CD-ROMs, etc. (page 7). • The region code on for about half an hour. ... ".mp3." • The data is not MPEG1 Audio Layer 3 data. • The system cannot play . • There is more than 48 kHz. • Check the location of the input stream is no sound from the surround speakers. Insert the disc with automatic tuning). Remove the disc and leave the unit turned...
...8226; The disc is upside down . • The disc is heard on the source, the effect of the surround speakers may cause damage to the lenses. Noise is skewed on the disc tray. • The system cannot play CD-ROMs, etc. (page 7). • The region code on for about half an hour. ... ".mp3." • The data is not MPEG1 Audio Layer 3 data. • The system cannot play . • There is more than 48 kHz. • Check the location of the input stream is no sound from the surround speakers. Insert the disc with automatic tuning). Remove the disc and leave the unit turned...

Operating Instructions
Page 97
... you turn on . • Check that the POWER / ON LINE indicator turns green. - Move the system away from the surround speakers, check the status of the POWER / ON LINE indicator on the surround amplifier. Avoid using any problems, connect the AC power cord (mains lead) of the... is not connected securely. - The speaker cord is poor. Pair the S-AIR main unit with MIN" appear alternately in mute status. - The volume of the surround amplifier? • After checking the above items, consult your nearest Sony dealer. Move the surround amplifier so that the AC power cord...
... you turn on . • Check that the POWER / ON LINE indicator turns green. - Move the system away from the surround speakers, check the status of the POWER / ON LINE indicator on the surround amplifier. Avoid using any problems, connect the AC power cord (mains lead) of the... is not connected securely. - The speaker cord is poor. Pair the S-AIR main unit with MIN" appear alternately in mute status. - The volume of the surround amplifier? • After checking the above items, consult your nearest Sony dealer. Move the surround amplifier so that the AC power cord...
Operating Instructions
Page 101
...mode is independently provided. Dolby Digital This movie theater sound format is needed). speaker cord cover and speaker cord holder Wireless transceiver (EZW-RT10/EZW- Digital Direct Twin Drive Subwoofer Utilizing Sony proprietary S-master technology, the Digital Direct Twin Drive... a strategically located subwoofer for astounding sound performance. All six channels in Dolby Surround. speaker cord cover and speaker cord holder 1.7 kg (3 lb 12 oz) incl. RT10A) Communication system S-AIR Specification version 1.0 Frequency band 2.4000 GHz - 2.4835 GHz Modulation method...
...mode is independently provided. Dolby Digital This movie theater sound format is needed). speaker cord cover and speaker cord holder Wireless transceiver (EZW-RT10/EZW- Digital Direct Twin Drive Subwoofer Utilizing Sony proprietary S-master technology, the Digital Direct Twin Drive... a strategically located subwoofer for astounding sound performance. All six channels in Dolby Surround. speaker cord cover and speaker cord holder 1.7 kg (3 lb 12 oz) incl. RT10A) Communication system S-AIR Specification version 1.0 Frequency band 2.4000 GHz - 2.4835 GHz Modulation method...

Operating Instructions
Page 102
...nuances of these highquality media are transmitted with no deterioration, Sony has developed a technology called "S-AIR" for the radio transmission of digital audio signals with the 525 or 625 progressive format. The surround speakers output monaural sound. The limitation varies from 2 channel sound... naturally and localizes sounds more precisely. x Super Audio CD types There are skipped or replaced with the former Dolby Surround system, Dolby Surround Pro Logic reproduces left-to the original sound. The good channel separation is compatible with no compression using a sampling ...
...nuances of these highquality media are transmitted with no deterioration, Sony has developed a technology called "S-AIR" for the radio transmission of digital audio signals with the 525 or 625 progressive format. The surround speakers output monaural sound. The limitation varies from 2 channel sound... naturally and localizes sounds more precisely. x Super Audio CD types There are skipped or replaced with the former Dolby Surround system, Dolby Surround Pro Logic reproduces left-to the original sound. The good channel separation is compatible with no compression using a sampling ...


