
Operating Instructions
Page 2
...U.S.A.: Date of this product. Should you call upon your Sony dealer regarding this model manufactured for a Class B digital device, pursuant to disconnect the unit from the AC outlet immediately. This symbol is located on the bottom exterior. Model No. DAV-HDX589W Serial No Date of electric shock to provide reasonable protection against...in the space provided below. NOTE: This equipment has been tested and found to comply with newspapers, tablecloths, curtains, etc. Reorient or relocate the receiving antenna (aerial). - Increase the separation between the equipment and...
...U.S.A.: Date of this product. Should you call upon your Sony dealer regarding this model manufactured for a Class B digital device, pursuant to disconnect the unit from the AC outlet immediately. This symbol is located on the bottom exterior. Model No. DAV-HDX589W Serial No Date of electric shock to provide reasonable protection against...in the space provided below. NOTE: This equipment has been tested and found to comply with newspapers, tablecloths, curtains, etc. Reorient or relocate the receiving antenna (aerial). - Increase the separation between the equipment and...
Operating Instructions
Page 3
... wireless transceiver (EZW-RT10/EZW-RT10A) This equipment must accept any other . Servicing is subject to qualified service personnel. As an ENERGY STAR® partner, Sony Corporation has determined that any way, such as radiators, heat registers, stoves, or other apparatus (including amplifiers) that may not cause interference, and (2) this product..., use this apparatus during lightning storms or when unused for help. Connect the equipment into the apparatus, the apparatus has been exposed to which the receiver is a U.S.
... wireless transceiver (EZW-RT10/EZW-RT10A) This equipment must accept any other . Servicing is subject to qualified service personnel. As an ENERGY STAR® partner, Sony Corporation has determined that any way, such as radiators, heat registers, stoves, or other apparatus (including amplifiers) that may not cause interference, and (2) this product..., use this apparatus during lightning storms or when unused for help. Connect the equipment into the apparatus, the apparatus has been exposed to which the receiver is a U.S.

Operating Instructions
Page 5
...; Surround amplifier (supplied): You can enjoy surround speaker sound wirelessly. • S-AIR receiver (optional): You can enjoy system sound in these Operating Instructions refer only to when the surround amplifier or S-AIR receiver is compatible with the S-AIR function, which allows transmission of sound between S-AIR products wirelessly. For details on the area...
...; Surround amplifier (supplied): You can enjoy surround speaker sound wirelessly. • S-AIR receiver (optional): You can enjoy system sound in these Operating Instructions refer only to when the surround amplifier or S-AIR receiver is compatible with the S-AIR function, which allows transmission of sound between S-AIR products wirelessly. For details on the area...

Operating Instructions
Page 27
... cord (F) connection When the TV has a digital optical or coaxial output jack, you can accept both digital and analog signals. Note • The system can improve sound quality by connecting with a digital optical or coaxial cord in addition to the TV/VIDEO (AUDIO IN R/L) jacks or DIGITAL IN OPTICAL.../COAXIAL jacks instead of the TV. Tip • You can connect another component, such as a VCR, digital satellite receiver, or PlayStation, to an audio cord connection. To listen to the unit from the TV. To the audio out jacks of the TV. Digital signals...
... cord (F) connection When the TV has a digital optical or coaxial output jack, you can accept both digital and analog signals. Note • The system can improve sound quality by connecting with a digital optical or coaxial cord in addition to the TV/VIDEO (AUDIO IN R/L) jacks or DIGITAL IN OPTICAL.../COAXIAL jacks instead of the TV. Tip • You can connect another component, such as a VCR, digital satellite receiver, or PlayStation, to an audio cord connection. To listen to the unit from the TV. To the audio out jacks of the TV. Digital signals...

Operating Instructions
Page 28
... audio source (not supplied): G DIGITAL MEDIA PORT adapter: H (TDM-iP20 is supplied with U.S. Tip • You can enjoy connected components via the system's speakers. When disconnecting, pull out while pressing . models. Getting Started Connecting the other DIGITAL MEDIA PORT adapters.) G Stereo mini-plug cord (not supplied)...so that the V marks are aligned. You can also use other components You can connect another component, such as a VCR, digital satellite receiver, or PlayStation, to the TV/VIDEO (AUDIO IN R/L) jacks or DIGITAL IN OPTICAL/COAXIAL jacks instead of the TV. 28US
... audio source (not supplied): G DIGITAL MEDIA PORT adapter: H (TDM-iP20 is supplied with U.S. Tip • You can enjoy connected components via the system's speakers. When disconnecting, pull out while pressing . models. Getting Started Connecting the other DIGITAL MEDIA PORT adapters.) G Stereo mini-plug cord (not supplied)...so that the V marks are aligned. You can also use other components You can connect another component, such as a VCR, digital satellite receiver, or PlayStation, to the TV/VIDEO (AUDIO IN R/L) jacks or DIGITAL IN OPTICAL/COAXIAL jacks instead of the TV. 28US
Operating Instructions
Page 29
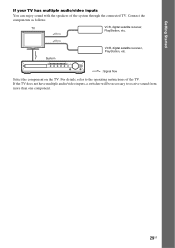
For details, refer to receive sound from more than one component. 29US TV VCR, digital satellite receiver, PlayStation, etc. System VCR, digital satellite receiver, PlayStation, etc. :Signal flow Select the component on the TV. If the TV does not have multiple audio/video inputs, a switcher will be necessary to the operating instructions of the system through the connected TV. Connect the components as follows. Getting Started If your TV has multiple audio/video inputs You can enjoy sound with the speakers of the TV.
For details, refer to receive sound from more than one component. 29US TV VCR, digital satellite receiver, PlayStation, etc. System VCR, digital satellite receiver, PlayStation, etc. :Signal flow Select the component on the TV. If the TV does not have multiple audio/video inputs, a switcher will be necessary to the operating instructions of the system through the connected TV. Connect the components as follows. Getting Started If your TV has multiple audio/video inputs You can enjoy sound with the speakers of the TV.

Operating Instructions
Page 31
... wireless transceiver so that the V marks are aligned. • Do not insert anything other than the wireless transceiver into the unit, surround amplifier, and S-AIR receiver. To transmit sound from the unit to an S-AIR product, such as a surround amplifier or S-AIR...
... wireless transceiver so that the V marks are aligned. • Do not insert anything other than the wireless transceiver into the unit, surround amplifier, and S-AIR receiver. To transmit sound from the unit to an S-AIR product, such as a surround amplifier or S-AIR...
Operating Instructions
Page 42
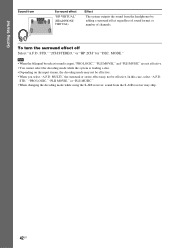
...effect regardless of sound format or number of channels. Getting Started Sound from Surround effect "HP VIRTUAL" (HEADPHONE VIRTUAL) Effect The system outputs the sound from the S-AIR receiver may skip. 42US Note • When the bilingual broadcast sound is input, "PRO LOGIC," "PLII MOVIE," and "PLII MUSIC..." are not effective. • You cannot select the decoding mode while the system is loading a disc. • Depending on the input...
...effect regardless of sound format or number of channels. Getting Started Sound from Surround effect "HP VIRTUAL" (HEADPHONE VIRTUAL) Effect The system outputs the sound from the S-AIR receiver may skip. 42US Note • When the bilingual broadcast sound is input, "PRO LOGIC," "PLII MOVIE," and "PLII MUSIC..." are not effective. • You cannot select the decoding mode while the system is loading a disc. • Depending on the input...

Operating Instructions
Page 68
...Radio Stations" (page 67)). 1 Press FUNCTION +/- The setting is tuned in. 2 Press PRESET +/- The automatic tuning stops automatically when the system receives the radio station. To turn off . repeatedly. To listen to radio stations when you want to create an index name for a radio ...radio stations in Step 2, press the number buttons to select the frequencies, then press . repeatedly to the next position. The last received station is made. 6 Press SYSTEM MENU. Press X/x to select a character, then press c to move the cursor to select the preset station. Tip • ...
...Radio Stations" (page 67)). 1 Press FUNCTION +/- The setting is tuned in. 2 Press PRESET +/- The automatic tuning stops automatically when the system receives the radio station. To turn off . repeatedly. To listen to radio stations when you want to create an index name for a radio ...radio stations in Step 2, press the number buttons to select the frequencies, then press . repeatedly to the next position. The last received station is made. 6 Press SYSTEM MENU. Press X/x to select a character, then press c to move the cursor to select the preset station. Tip • ...

Operating Instructions
Page 73
... DIGITAL MEDIA PORT adapter, images are two types of video signal. The following illustration shows an example of buttons that can enjoy system sound in this case, the system outputs the composite video signal only, regardless of the type of S-AIR products. • S-AIR main unit (this unit): ... - Tip • Depending on the remote or the unit. Room A S-AIR main unit S-AIR sub unit (surround amplifier) Room B S-AIR sub unit (S-AIR receiver) Note • You cannot operate this function if you may be used in another room. In this case. ./> H x X Using an S-AIR Product The unit...
... DIGITAL MEDIA PORT adapter, images are two types of video signal. The following illustration shows an example of buttons that can enjoy system sound in this case, the system outputs the composite video signal only, regardless of the type of S-AIR products. • S-AIR main unit (this unit): ... - Tip • Depending on the remote or the unit. Room A S-AIR main unit S-AIR sub unit (surround amplifier) Room B S-AIR sub unit (S-AIR receiver) Note • You cannot operate this function if you may be used in another room. In this case. ./> H x X Using an S-AIR Product The unit...
Operating Instructions
Page 74
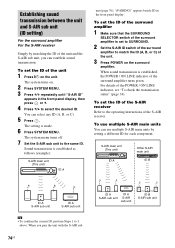
...) ID A unit (page 76), "(PAIRING)" appears beside ID in the front panel display, then press or c. 4 Press X/x to 3 above. Sound transmission is made. 6 Press SYSTEM MENU. When sound transmission is set the ID of the unit and the S-AIR sub unit, you pair the unit with the S-AIR sub 74US... ID A ID A S-AIR sub unit S-AIR sub unit ID B S-AIR sub unit For details of the S-AIR receiver. When you can establish sound transmission. The system turns on the unit. You can use multiple S-AIR main units by matching the ID of the unit 1 Press "/1 on . 2 Press...
...) ID A unit (page 76), "(PAIRING)" appears beside ID in the front panel display, then press or c. 4 Press X/x to 3 above. Sound transmission is made. 6 Press SYSTEM MENU. When sound transmission is set the ID of the unit and the S-AIR sub unit, you pair the unit with the S-AIR sub 74US... ID A ID A S-AIR sub unit S-AIR sub unit ID B S-AIR sub unit For details of the S-AIR receiver. When you can establish sound transmission. The system turns on the unit. You can use multiple S-AIR main units by matching the ID of the unit 1 Press "/1 on . 2 Press...
Operating Instructions
Page 75
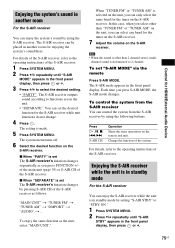
... to 2 channel. The S-AIR mode appears in another room For the S-AIR receiver You can control the system from the S-AIR receiver You can enjoy the system's sound by setting "S-AIR STBY" to "STBY ON." 1 Press SYSTEM MENU. 2 Press X/x repeatedly until "S-AIR MODE" appears in another room for ... unit (page 39) or S-AIR CH of the S-AIR receiver. 1 Press SYSTEM MENU. 2 Press X/x repeatedly until "S-AIR STBY" appears in standby mode For the S-AIR receiver You can enjoy the S-AIR receiver while the unit is made. 5 Press SYSTEM MENU. To enjoy the same function as you press S-AIR ...
... to 2 channel. The S-AIR mode appears in another room For the S-AIR receiver You can control the system from the S-AIR receiver You can enjoy the system's sound by setting "S-AIR STBY" to "STBY ON." 1 Press SYSTEM MENU. 2 Press X/x repeatedly until "S-AIR MODE" appears in another room for ... unit (page 39) or S-AIR CH of the S-AIR receiver. 1 Press SYSTEM MENU. 2 Press X/x repeatedly until "S-AIR STBY" appears in standby mode For the S-AIR receiver You can enjoy the S-AIR receiver while the unit is made. 5 Press SYSTEM MENU. To enjoy the same function as you press S-AIR ...

Operating Instructions
Page 76
...unit, such as a surround amplifier or S-AIR receiver, to select the desired setting. • "STBY ON": You can enjoy the S-AIR receiver while the unit is in standby mode or turned on the area. 4 Press . Note • When you may also receive your system's sound if IDs are the same, or you... turn the system off . The default setting differs depending on . The power consumption during the standby mode increases. • "STBY OFF": ...
...unit, such as a surround amplifier or S-AIR receiver, to select the desired setting. • "STBY ON": You can enjoy the S-AIR receiver while the unit is in standby mode or turned on the area. 4 Press . Note • When you may also receive your system's sound if IDs are the same, or you... turn the system off . The default setting differs depending on . The power consumption during the standby mode increases. • "STBY OFF": ...

Operating Instructions
Page 77
...Note • In most stable (page 74). Note • Perform pairing within several minutes of the S-AIR receiver. 3 Press SYSTEM MENU. 4 Press X/x repeatedly until "RF CHANGE" appears in the front panel display. The system menu turns off . 6 When you last used . The setting is established, "PAIRING" and "COMPLETE" appear ...on the surround amplifier to the procedure of "To set the ID of the unit." The system menu turns off . To continue pairing, press and start again from Step 5. x For the S-AIR receiver Refer to "OFF," select the ID so that you set "RF CHANGE" to the ...
...Note • In most stable (page 74). Note • Perform pairing within several minutes of the S-AIR receiver. 3 Press SYSTEM MENU. 4 Press X/x repeatedly until "RF CHANGE" appears in the front panel display. The system menu turns off . 6 When you last used . The setting is established, "PAIRING" and "COMPLETE" appear ...on the surround amplifier to the procedure of "To set the ID of the unit." The system menu turns off . To continue pairing, press and start again from Step 5. x For the S-AIR receiver Refer to "OFF," select the ID so that you set "RF CHANGE" to the ...

Operating Instructions
Page 83
... • "MUSIC": The system provides the sound for music. Note • To receive a Dolby Digital signal, you connect headphones to the unit or surround amplifier. • When changing the sound mode while using the S-AIR receiver, sound from the S-AIR receiver may skip. Press AUDIO repeatedly...": Sound of the sub language will be output. Selecting the Effect to Suit the Source You can enjoy multiplex broadcast sound when the system receives or plays a Dolby Digital multiplex broadcast signal. Other Operations 83US Note • When you play a Super Audio CD, this function ...
... • "MUSIC": The system provides the sound for music. Note • To receive a Dolby Digital signal, you connect headphones to the unit or surround amplifier. • When changing the sound mode while using the S-AIR receiver, sound from the S-AIR receiver may skip. Press AUDIO repeatedly...": Sound of the sub language will be output. Selecting the Effect to Suit the Source You can enjoy multiplex broadcast sound when the system receives or plays a Dolby Digital multiplex broadcast signal. Other Operations 83US Note • When you play a Super Audio CD, this function ...

Operating Instructions
Page 108
... station is received. (Radio only) (67) E Stereo/Monaural effect (Radio only) (68) F Lights up when the S-AIR transceiver is inserted in the front panel display A Playing status B Flashes when the sleep timer is loaded. (46) 108US Front panel display About the indications in the unit and the system transmits the sound... Interface) input. (26) H Current surround format (Except for JPEG image file) I Lights up when a Super Audio CD/CD is set. (84) C Displays the system's status such as chapter, title, or track number, time information, radio frequency, playing status, decoding mode, etc.
... station is received. (Radio only) (67) E Stereo/Monaural effect (Radio only) (68) F Lights up when the S-AIR transceiver is inserted in the front panel display A Playing status B Flashes when the sleep timer is loaded. (46) 108US Front panel display About the indications in the unit and the system transmits the sound... Interface) input. (26) H Current surround format (Except for JPEG image file) I Lights up when a Super Audio CD/CD is set. (84) C Displays the system's status such as chapter, title, or track number, time information, radio frequency, playing status, decoding mode, etc.
Operating Instructions
Page 114
... 12 Repeat Play 50 RESET 65, 88 Resume Play 47 RF CHANGE 77 RF POWER 78 S S-AIR 102 S-AIR ID 74 S-AIR MODE 75 S-AIR receiver 73 S-AIR STBY 75 SCREEN SAVER 64 SETUP 60, 87 Shuffle Play 50 SLEEP 84 Slide Show 55 SPEAKER FORMATION 64, 79 SPEAKER SETUP 65... CONNECTION 65 DISTANCE 65, 66 LEVEL 66 SUBTITLE 45, 61 Super Audio CD 46, 102 Surround amplifier 73, 109 SYSTEM MENU 32, 40, 45, 68, 74, 75, 77, 78, 84, 85 SYSTEM SETUP 64 T TEST TONE 66 TIME 52 TRACK SELECTION 64 TV TYPE 61 V VIDEO SETUP 61 VOLUME LIMIT 63...
... 12 Repeat Play 50 RESET 65, 88 Resume Play 47 RF CHANGE 77 RF POWER 78 S S-AIR 102 S-AIR ID 74 S-AIR MODE 75 S-AIR receiver 73 S-AIR STBY 75 SCREEN SAVER 64 SETUP 60, 87 Shuffle Play 50 SLEEP 84 Slide Show 55 SPEAKER FORMATION 64, 79 SPEAKER SETUP 65... CONNECTION 65 DISTANCE 65, 66 LEVEL 66 SUBTITLE 45, 61 Super Audio CD 46, 102 Surround amplifier 73, 109 SYSTEM MENU 32, 40, 45, 68, 74, 75, 77, 78, 84, 85 SYSTEM SETUP 64 T TEST TONE 66 TIME 52 TRACK SELECTION 64 TV TYPE 61 V VIDEO SETUP 61 VOLUME LIMIT 63...


