HDMI Control Guide
Page 3
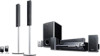
The options for [SETUP] appear. 1 2 ( 2 7 ) 1 8 ( 3 4 ) T 0:00:02 DVD VIDEO QUICK QUICK CUSTOM RESET BNR 4 Press X/x to select [CUSTOM SETUP], then press . LANGUAGE SETUP OSD: MENU: AUDIO: SUBTITLE: ENGLISH ENGLISH ORIGINAL AUDIO FOLLOW GUSB 5 Press X/x to select [CUSTOM], then press . CUSTOM SETUP HDMI CONTROL: PAUSE MODE: TRACK SELECTION: MULTI-DISC RESUME: AUDIO DRC: AUDIO (HDMI): OFF AUTO OFF...
The options for [SETUP] appear. 1 2 ( 2 7 ) 1 8 ( 3 4 ) T 0:00:02 DVD VIDEO QUICK QUICK CUSTOM RESET BNR 4 Press X/x to select [CUSTOM SETUP], then press . LANGUAGE SETUP OSD: MENU: AUDIO: SUBTITLE: ENGLISH ENGLISH ORIGINAL AUDIO FOLLOW GUSB 5 Press X/x to select [CUSTOM], then press . CUSTOM SETUP HDMI CONTROL: PAUSE MODE: TRACK SELECTION: MULTI-DISC RESUME: AUDIO DRC: AUDIO (HDMI): OFF AUTO OFF...
HDMI Control Guide
Page 5
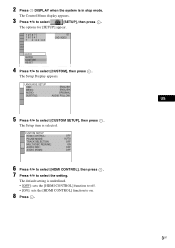
...system. Tip • You can operate this system by an HDMI cord (not supplied) (make sure to select the setting. The names of HDMI inputs in stop mode. 3 Press X/x to select [SETUP...], then press . 4 Press X/x to select [CUSTOM], then press . 5 Press X/x to select [CUSTOM SETUP...Press "/1. 2 Press DISPLAY when the system is underlined. • [OFF]: ...tuner sound from the system (Models with DIGITAL... Press . The system accepts the signal from...
...system. Tip • You can operate this system by an HDMI cord (not supplied) (make sure to select the setting. The names of HDMI inputs in stop mode. 3 Press X/x to select [SETUP...], then press . 4 Press X/x to select [CUSTOM], then press . 5 Press X/x to select [CUSTOM SETUP...Press "/1. 2 Press DISPLAY when the system is underlined. • [OFF]: ...tuner sound from the system (Models with DIGITAL... Press . The system accepts the signal from...
Operating Instructions (DAV-HDX500/HDX501W)
Page 4
...in Random Order 50 (Shuffle Play) Playing Repeatedly 51 (Repeat Play) Using the DVD's Menu 52 Changing the Sound 52 Selecting [ORIGINAL] or [PLAY LIST] on a DVD-R/DVD-RW 54 Viewing Information About the Disc ... 54 Changing the Angles 56 Displaying the Subtitles 57 Adjusting the Delay Between the... XM Radio 67 Presetting XM Radio Channels 70 4US ADVANCED - Step 1: Assembling the Speakers 10 Step 2: Connecting the System and TV 19 Step 3: Positioning the System ...24 Step 4: Performing the Quick Setup 24 Getting Started - Table of Contents Welcome 3 About This Manual 6 This...
...in Random Order 50 (Shuffle Play) Playing Repeatedly 51 (Repeat Play) Using the DVD's Menu 52 Changing the Sound 52 Selecting [ORIGINAL] or [PLAY LIST] on a DVD-R/DVD-RW 54 Viewing Information About the Disc ... 54 Changing the Angles 56 Displaying the Subtitles 57 Adjusting the Delay Between the... XM Radio 67 Presetting XM Radio Channels 70 4US ADVANCED - Step 1: Assembling the Speakers 10 Step 2: Connecting the System and TV 19 Step 3: Positioning the System ...24 Step 4: Performing the Quick Setup 24 Getting Started - Table of Contents Welcome 3 About This Manual 6 This...
Operating Instructions (DAV-HDX500/HDX501W)
Page 5
... Information Precautions 95 Notes about the Discs 96 Troubleshooting 96 Self-diagnosis Function 100 (When letters/numbers appear in the display) Specifications 101 Glossary 103 Language Code List 107 Index to Parts and Controls 108 Guide to the Control Menu Display ... 111 DVD Setup Display List 114 System Menu List 115 Index 116 5US
... Information Precautions 95 Notes about the Discs 96 Troubleshooting 96 Self-diagnosis Function 100 (When letters/numbers appear in the display) Specifications 101 Glossary 103 Language Code List 107 Index to Parts and Controls 108 Guide to the Control Menu Display ... 111 DVD Setup Display List 114 System Menu List 115 Index 116 5US

Operating Instructions (DAV-HDX500/HDX501W)
Page 21
... the bare wire of insulation. Getting Started - Make sure the bare wire of each other than the one currently displayed on the Setup Display, the speaker may damage the system. Stripped cords are reversed, the sound will lack bass and may be short-circuited. If no sound is heard from a speaker other...
... the bare wire of insulation. Getting Started - Make sure the bare wire of each other than the one currently displayed on the Setup Display, the speaker may damage the system. Stripped cords are reversed, the sound will lack bass and may be short-circuited. If no sound is heard from a speaker other...

Operating Instructions (DAV-HDX500/HDX501W)
Page 24
... the steps below . Very humid - If this message does not appear, recall the Quick Setup display (page 26) and perform again. 4 Press without inserting a disc. Place speakers as illustrated below to make the minimum number of the speakers, it is set the speakers in an inclined position. ... the on the TV screen. [Press [ENTER] to "DVD" (page 37). 3 Switch the input selector on your TV so that the signal from the system appears on -screen display appears. "/1 C/X/x/c, DISPLAY Note • Do not set to run QUICK SETUP.] appears at the same distance from the listening position (A). ...
... the steps below . Very humid - If this message does not appear, recall the Quick Setup display (page 26) and perform again. 4 Press without inserting a disc. Place speakers as illustrated below to make the minimum number of the speakers, it is set the speakers in an inclined position. ... the on the TV screen. [Press [ENTER] to "DVD" (page 37). 3 Switch the input selector on your TV so that the signal from the system appears on -screen display appears. "/1 C/X/x/c, DISPLAY Note • Do not set to run QUICK SETUP.] appears at the same distance from the listening position (A). ...
Operating Instructions (DAV-HDX500/HDX501W)
Page 25
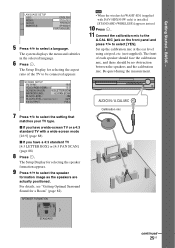
...the aspect ratio of each speaker should face the calibration mic, and there should be connected appears. The system displays the menu and subtitles in the selected language. 6 Press . LANGUAGE SETUP OSD: MENU: AUDIO: SUBTITLE: ENGLISH ENGLISH FRENCH SPANISH PORTUGUESE 5 Press X/x to select the setting ...kit WAHT-SD1 (supplied with a wide-screen mode [16:9] (page 88) x If you have a wide-screen TV or a 4:3 standard TV with DAV-HDX501W only) is installed, [STANDARD (WIRELESS)] appears instead. 10 Press . 11 Connect the calibration mic to the A.CAL MIC jack on the front panel and...
...the aspect ratio of each speaker should face the calibration mic, and there should be connected appears. The system displays the menu and subtitles in the selected language. 6 Press . LANGUAGE SETUP OSD: MENU: AUDIO: SUBTITLE: ENGLISH ENGLISH FRENCH SPANISH PORTUGUESE 5 Press X/x to select the setting ...kit WAHT-SD1 (supplied with a wide-screen mode [16:9] (page 88) x If you have a wide-screen TV or a 4:3 standard TV with DAV-HDX501W only) is installed, [STANDARD (WIRELESS)] appears instead. 10 Press . 11 Connect the calibration mic to the A.CAL MIC jack on the front panel and...

Operating Instructions (DAV-HDX500/HDX501W)
Page 26
..." (page 84). • If you want to select [YES]. To recall the Quick Setup display 1 Press DISPLAY when the system is not displayed. 14 Press . Start measurement? YES NO Tip • If you select [SECOND ROOM] for [SETUP] appear. 1 2 ( 2 7 ) 1 8 ( 3 4 ) T 0:00:02 DVD VIDEO QUICK QUICK CUSTOM RESET BNR 3 Press X/x to select [QUICK], then press...
..." (page 84). • If you want to select [YES]. To recall the Quick Setup display 1 Press DISPLAY when the system is not displayed. 14 Press . Start measurement? YES NO Tip • If you select [SECOND ROOM] for [SETUP] appear. 1 2 ( 2 7 ) 1 8 ( 3 4 ) T 0:00:02 DVD VIDEO QUICK QUICK CUSTOM RESET BNR 3 Press X/x to select [QUICK], then press...
Operating Instructions (DAV-HDX500/HDX501W)
Page 40
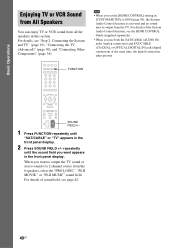
...panel display. When you want to [ON] (page 90), the System Audio Control function is activated and no sound may be output from all the speakers in [CUSTOM SETUP] to output the TV sound or stereo sound of the System Audio Control function, see the HDMI CONTROL Guide (supplied separately). &#...8226; When you set the [HDMI CONTROL] setting in this system. Basic Operations Enjoying TV or VCR Sound from ...
...panel display. When you want to [ON] (page 90), the System Audio Control function is activated and no sound may be output from all the speakers in [CUSTOM SETUP] to output the TV sound or stereo sound of the System Audio Control function, see the HDMI CONTROL Guide (supplied separately). &#...8226; When you set the [HDMI CONTROL] setting in this system. Basic Operations Enjoying TV or VCR Sound from ...

Operating Instructions (DAV-HDX500/HDX501W)
Page 47
... be able to stop the disc, the system may be cleared when: - CHAPTER VIEWER ENTER 2 Press PICTURE NAVI repeatedly to normal play during playback. The system starts playback from the selected scene. Note • Depending on the Setup Display. - the system enters standby mode (DATA CD/ DATA DVD only). - you eject the disc. - The following display appears...
... be able to stop the disc, the system may be cleared when: - CHAPTER VIEWER ENTER 2 Press PICTURE NAVI repeatedly to normal play during playback. The system starts playback from the selected scene. Note • Depending on the Setup Display. - the system enters standby mode (DATA CD/ DATA DVD only). - you eject the disc. - The following display appears...
Operating Instructions (DAV-HDX500/HDX501W)
Page 48
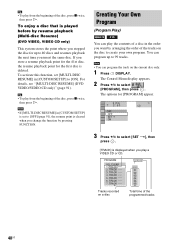
... 03 04 05 06 Tracks recorded on a disc Total time of the disc, press x twice, then press H. For details, see "[MULTI-DISC RESUME] (DVD VIDEO/VIDEO CD only)" (page 91). Creating Your Own Program (Program Play) You can play the contents of a disc in [CUSTOM SETUP] to create your own program. TRACK -...when you store a resume playback point for the 41st disc, the resume playback point for the first disc is played before by resume playback (Multi-disc Resume) (DVD VIDEO, VIDEO CD only) This system stores the point where you stopped the disc for up to select [PROGRAM], then press . ...
... 03 04 05 06 Tracks recorded on a disc Total time of the disc, press x twice, then press H. For details, see "[MULTI-DISC RESUME] (DVD VIDEO/VIDEO CD only)" (page 91). Creating Your Own Program (Program Play) You can play the contents of a disc in [CUSTOM SETUP] to create your own program. TRACK -...when you store a resume playback point for the 41st disc, the resume playback point for the first disc is played before by resume playback (Multi-disc Resume) (DVD VIDEO, VIDEO CD only) This system stores the point where you stopped the disc for up to select [PROGRAM], then press . ...

Operating Instructions (DAV-HDX500/HDX501W)
Page 84
... FORMATION Continue with [AUTO CALIBRATION], see the operating instructions of the speakers, it is in [SPEAKER SETUP], the [SPEAKER FORMATION] setting returns to select [YES] or [NO], then press . •... to children and neighbor. 1 Press FUNCTION repeatedly until "DVD" appears in the front panel display. 2 Press DISPLAY when the system is recommended you set [SPEAKER FORMATION], and then set ... CALIBRATION], then press . Tip • When the wireless kit WAHT-SD1 (supplied with DAV-HDX501W only) is output when [AUTO CALIBRATION] starts. It does not indicate the speakers which output...
... FORMATION Continue with [AUTO CALIBRATION], see the operating instructions of the speakers, it is in [SPEAKER SETUP], the [SPEAKER FORMATION] setting returns to select [YES] or [NO], then press . •... to children and neighbor. 1 Press FUNCTION repeatedly until "DVD" appears in the front panel display. 2 Press DISPLAY when the system is recommended you set [SPEAKER FORMATION], and then set ... CALIBRATION], then press . Tip • When the wireless kit WAHT-SD1 (supplied with DAV-HDX501W only) is output when [AUTO CALIBRATION] starts. It does not indicate the speakers which output...

Operating Instructions (DAV-HDX500/HDX501W)
Page 86
... on the country model. The options for [SETUP] appear. 1 2 ( 2 7 ) 1 8 ( 3 4 ) T 0:00:02 DVD VIDEO QUICK QUICK CUSTOM RESET BNR 3 Press X/x to select [SETUP], then press . do not turn off the power. - Using the Setup Display By using the Setup Display, you can make various adjustments to items... such as picture and sound. Note • Playback settings stored in the disc take priority over the Setup Display settings and not all the functions described may work. 1 Press DISPLAY when the system ...
... on the country model. The options for [SETUP] appear. 1 2 ( 2 7 ) 1 8 ( 3 4 ) T 0:00:02 DVD VIDEO QUICK QUICK CUSTOM RESET BNR 3 Press X/x to select [SETUP], then press . do not turn off the power. - Using the Setup Display By using the Setup Display, you can make various adjustments to items... such as picture and sound. Note • Playback settings stored in the disc take priority over the Setup Display settings and not all the functions described may work. 1 Press DISPLAY when the system ...

Operating Instructions (DAV-HDX500/HDX501W)
Page 87
... seconds to the Control Menu display by selecting [NO] here. 3 Press . Note • When you turn the system on after resetting and no disc is in Step 3 and press . 2 Select [YES] using X/x, then press . SCREEN SETUP TV TYPE: SCREEN SAVER: BACKGROUND: 4:3 OUTPUT: 4:3 LETTER BOX ON JACKET PICTURE FULL Selected setting Advanced Settings and...
... seconds to the Control Menu display by selecting [NO] here. 3 Press . Note • When you turn the system on after resetting and no disc is in Step 3 and press . 2 Select [YES] using X/x, then press . SCREEN SETUP TV TYPE: SCREEN SAVER: BACKGROUND: 4:3 OUTPUT: 4:3 LETTER BOX ON JACKET PICTURE FULL Selected setting Advanced Settings and...

Operating Instructions (DAV-HDX500/HDX501W)
Page 88
... underlined. The default setting varies, depending on the DVD VIDEO. For details, see "Using the Setup Display" (page 86). Setting the Display or Sound Track Language [LANGUAGE SETUP] [LANGUAGE SETUP] allows you select [ORIGINAL], the language given priority in the disc is not recorded on the DVD VIDEO, one of the recorded languages will be connected...
... underlined. The default setting varies, depending on the DVD VIDEO. For details, see "Using the Setup Display" (page 86). Setting the Display or Sound Track Language [LANGUAGE SETUP] [LANGUAGE SETUP] allows you select [ORIGINAL], the language given priority in the disc is not recorded on the DVD VIDEO, one of the recorded languages will be connected...

Operating Instructions (DAV-HDX500/HDX501W)
Page 89
... audio), or DATA DVD (MP3 audio). Raise the standard black level. Advanced Settings and Adjustments [JACKET PICTURE] [GRAPHICS] [BLUE] [BLACK] The jacket picture (still picture) appears, but only when the jacket picture is connected to cancel the screen saver. [ON] [OFF] Turns on the disc (CD-EXTRA, etc...any button (e.g., H button) to equipment with a DVI jack, [RGB] signals will help prevent your TV, not the system. If you select [YCBCR]. x [BLACK LEVEL] Selects the black level (setup level) for 15 minutes, or when you set [YCBCR] to [RGB]. • If the HDMI OUT jack is ...
... audio), or DATA DVD (MP3 audio). Raise the standard black level. Advanced Settings and Adjustments [JACKET PICTURE] [GRAPHICS] [BLUE] [BLACK] The jacket picture (still picture) appears, but only when the jacket picture is connected to cancel the screen saver. [ON] [OFF] Turns on the disc (CD-EXTRA, etc...any button (e.g., H button) to equipment with a DVI jack, [RGB] signals will help prevent your TV, not the system. If you select [YCBCR]. x [BLACK LEVEL] Selects the black level (setup level) for 15 minutes, or when you set [YCBCR] to [RGB]. • If the HDMI OUT jack is ...

Operating Instructions (DAV-HDX500/HDX501W)
Page 90
... cord. This function is available when you connect the system and TV with the HDMI cord and you set [HDMI CONTROL] to on your TV. You can change the aspect ratio on . CUSTOM SETUP HDMI CONTROL: STB SYNCHRO: PAUSE MODE: TRACK SELECTION: MULTI-DISC RESUME: AUDIO DRC: AUDIO (HDMI): OFF OFF AUTO OFF...
... cord. This function is available when you connect the system and TV with the HDMI cord and you set [HDMI CONTROL] to on your TV. You can change the aspect ratio on . CUSTOM SETUP HDMI CONTROL: STB SYNCHRO: PAUSE MODE: TRACK SELECTION: MULTI-DISC RESUME: AUDIO DRC: AUDIO (HDMI): OFF OFF AUTO OFF...

Operating Instructions (DAV-HDX500/HDX501W)
Page 91
...-DISC RESUME] (DVD VIDEO/ VIDEO CD only) Switches the Multi-disc Resume setting on . x [AUDIO (HDMI)] Selects the audio output status from the HDMI OUT jack. [OFF] [ON] The sound is output with no jitter. Playback restarts at night. [OFF] [STANDARD] [MAX] No compression of channels, the system...setting has higher priority than the [AUDIO] settings in high resolution. x [AUDIO DRC] (DVD VIDEO only) Narrows the dynamic range of dynamic range that is output in [LANGUAGE SETUP] (page 88). (Depending on which contains the highest number of channels priority when you connect ...
...-DISC RESUME] (DVD VIDEO/ VIDEO CD only) Switches the Multi-disc Resume setting on . x [AUDIO (HDMI)] Selects the audio output status from the HDMI OUT jack. [OFF] [ON] The sound is output with no jitter. Playback restarts at night. [OFF] [STANDARD] [MAX] No compression of channels, the system...setting has higher priority than the [AUDIO] settings in high resolution. x [AUDIO DRC] (DVD VIDEO only) Narrows the dynamic range of dynamic range that is output in [LANGUAGE SETUP] (page 88). (Depending on which contains the highest number of channels priority when you connect ...

Operating Instructions (DAV-HDX500/HDX501W)
Page 92
... settings are changed. 2)0.00 to 7.01 meters for North American models. 3)3.04 m/10 ft for North American models. 92US SPEAKER SETUP CONNECTION: DISTANCE(FRONT): DISTANCE(SURROUND): LEVEL(FRONT): LEVEL(SURROUND): TEST TONE: OFF FRONT: YES CENTER: YES SURROUND: YES SUBWOOFER:...7.00 m2)/ 0 - 23 ft Be sure to change the [CONNECTION] setting, the [SPEAKER FORMATION] setting returns to [STANDARD]. Select [SPEAKER SETUP] in the Setup Display. Since the front speaker and subwoofer setting is fixed, you cannot change them. [FRONT] [YES] [CENTER] [YES]: Normally select this...
... settings are changed. 2)0.00 to 7.01 meters for North American models. 3)3.04 m/10 ft for North American models. 92US SPEAKER SETUP CONNECTION: DISTANCE(FRONT): DISTANCE(SURROUND): LEVEL(FRONT): LEVEL(SURROUND): TEST TONE: OFF FRONT: YES CENTER: YES SURROUND: YES SUBWOOFER:...7.00 m2)/ 0 - 23 ft Be sure to change the [CONNECTION] setting, the [SPEAKER FORMATION] setting returns to [STANDARD]. Select [SPEAKER SETUP] in the Setup Display. Since the front speaker and subwoofer setting is fixed, you cannot change them. [FRONT] [YES] [CENTER] [YES]: Normally select this...

Operating Instructions (DAV-HDX500/HDX501W)
Page 93
... being the number). x [LEVEL (SURROUND)] You can vary the level of the [SPEAKER SETUP] items, the test tone is emitted from 0.00 to 7.00 set the distance using the test tone 1 Press DISPLAY when the system is automatically displayed. 0.00 - 7.00 m2)/ 0 - 23 ft Be sure to 7.01...can (appears when you move the speakers. [L/R] Surround speaker distance 3.00 m/10 ft1)3) from the speakers. Be sure to set [CENTER] to [ON] for [SETUP] appear. Note • Depending on the remote. When you set [SURROUND] to meters2) (0 to 23 ft). [YES] in the [CONNECTION] setting.) 1)...
... being the number). x [LEVEL (SURROUND)] You can vary the level of the [SPEAKER SETUP] items, the test tone is emitted from 0.00 to 7.00 set the distance using the test tone 1 Press DISPLAY when the system is automatically displayed. 0.00 - 7.00 m2)/ 0 - 23 ft Be sure to 7.01...can (appears when you move the speakers. [L/R] Surround speaker distance 3.00 m/10 ft1)3) from the speakers. Be sure to set [CENTER] to [ON] for [SETUP] appear. Note • Depending on the remote. When you set [SURROUND] to meters2) (0 to 23 ft). [YES] in the [CONNECTION] setting.) 1)...

