Operating Instructions
Page 10
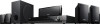
Package Contents Main unit Speaker packages • DAV-DZ170/DAV-DZ171 • DAV-DZ175 • Speaker cords (1 set) (red/white/green/gray/blue) • Foot pads (1 set) Accessories • Remote commander (remote) (1) • FM wire antenna (aerial) (1) or • HDMI cable (1) (DAV-DZ171 only) • R6 (size AA) batteries (2) • Calibration mic (1) • Video cord (1) • Operating Instructions • Quick Setup Guide • Easy Setup Disc (DVD) 10US
Package Contents Main unit Speaker packages • DAV-DZ170/DAV-DZ171 • DAV-DZ175 • Speaker cords (1 set) (red/white/green/gray/blue) • Foot pads (1 set) Accessories • Remote commander (remote) (1) • FM wire antenna (aerial) (1) or • HDMI cable (1) (DAV-DZ171 only) • R6 (size AA) batteries (2) • Calibration mic (1) • Video cord (1) • Operating Instructions • Quick Setup Guide • Easy Setup Disc (DVD) 10US

Operating Instructions
Page 11
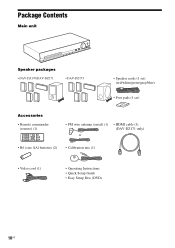
G AUDIO IN jack (page 24) Used for connecting the calibration mic. J Play operation buttons Z (open/close) Opens or closes the disc tray. D MASTER VOLUME control Adjusts the system's volume. E REC TO USB (page 49) Transfers ...
G AUDIO IN jack (page 24) Used for connecting the calibration mic. J Play operation buttons Z (open/close) Opens or closes the disc tray. D MASTER VOLUME control Adjusts the system's volume. E REC TO USB (page 49) Transfers ...
Operating Instructions
Page 18
Use the Quick Setup to select the desired language of the on-screen display, the aspect ratio of your TV, and start the Auto Calibration. [FOLDER] (page 33) You can select the folder to be played. [FILE] (page 33) You can select the JPEG image file or video file to ...
Use the Quick Setup to select the desired language of the on-screen display, the aspect ratio of your TV, and start the Auto Calibration. [FOLDER] (page 33) You can select the folder to be played. [FILE] (page 33) You can select the JPEG image file or video file to ...
Operating Instructions
Page 27
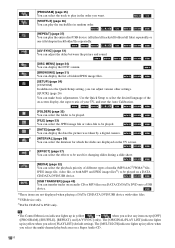
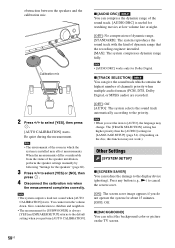
... is installed may affect measurements. Getting Started 8 Press C/c to select the speaker formation image as the speakers are output when [AUTO CALIBRATION] starts. Calibration mic 10 Press C/c to select [YES], then press . Note • Loud test sounds are actually positioned, then press . To... quit the Quick Setup Press DISPLAY in front of the listening position. 9 Connect the calibration mic (supplied) to the A.CAL MIC jack on the front panel. Give consideration to children and neighbors. • The environment of ...
... is installed may affect measurements. Getting Started 8 Press C/c to select the speaker formation image as the speakers are output when [AUTO CALIBRATION] starts. Calibration mic 10 Press C/c to select [YES], then press . Note • Loud test sounds are actually positioned, then press . To... quit the Quick Setup Press DISPLAY in front of the listening position. 9 Connect the calibration mic (supplied) to the A.CAL MIC jack on the front panel. Give consideration to children and neighbors. • The environment of ...
Operating Instructions
Page 57
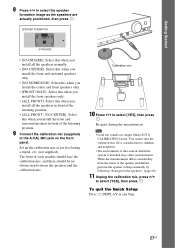
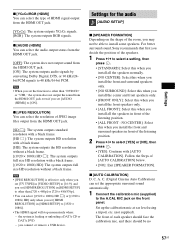
...AUDIO (HDMI)] to [ON]. Settings for the audio [AUDIO SETUP] x [SPEAKER FORMATION] Depending on the front panel. For better surround sound, Sony recommends that first you set [HDMI RESOLUTION] in front of JPEG image files output from the HDMI OUT jack. [SD ]: The system outputs standard.../576p]. • You can select [(1920 × 1080i) HD ] or [(1920 × 1080i) HD] only when you decide the position of [AUTO CALIBRATION] below. • [NO]: Exit [SPEAKER FORMATION]. Follow the Steps of the speakers. 1 Press C/c to install some speakers. the system is effective only when...
...AUDIO (HDMI)] to [ON]. Settings for the audio [AUDIO SETUP] x [SPEAKER FORMATION] Depending on the front panel. For better surround sound, Sony recommends that first you set [HDMI RESOLUTION] in front of JPEG image files output from the HDMI OUT jack. [SD ]: The system outputs standard.../576p]. • You can select [(1920 × 1080i) HD ] or [(1920 × 1080i) HD] only when you decide the position of [AUTO CALIBRATION] below. • [NO]: Exit [SPEAKER FORMATION]. Follow the Steps of the speakers. 1 Press C/c to install some speakers. the system is effective only when...
Operating Instructions
Page 58
... The system selects the sound track automatically according to cancel the screen saver. [ON]: The screen saver image appears if you perform [AUTO CALIBRATION]. Note • When you set the item to the default setting when you do not operate the system for [SUBWOOFER] is always [... 54). (Depending on the TV screen. 58US Note • The system outputs a loud test sound when [AUTO CALIBRATION] starts. Calibration mic 2 Press C/c to select [YES], then press . [AUTO CALIBRATION] starts. x [AUDIO DRC] You can select the background color or picture on the disc, this function may not...
... The system selects the sound track automatically according to cancel the screen saver. [ON]: The screen saver image appears if you perform [AUTO CALIBRATION]. Note • When you set the item to the default setting when you do not operate the system for [SUBWOOFER] is always [... 54). (Depending on the TV screen. 58US Note • The system outputs a loud test sound when [AUTO CALIBRATION] starts. Calibration mic 2 Press C/c to select [YES], then press . [AUTO CALIBRATION] starts. x [AUDIO DRC] You can select the background color or picture on the disc, this function may not...
Operating Instructions
Page 64
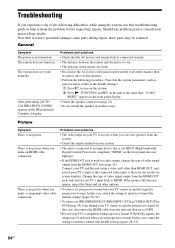
Troubleshooting If you experience any problem persist, consult your nearest Sony dealer. After performing [AUTO CALIBRATION], [NONE] appears in another room. Should any of video signal output from the HDMI OUT jack (page 56). Picture Symptom There is no picture when ...
Troubleshooting If you experience any problem persist, consult your nearest Sony dealer. After performing [AUTO CALIBRATION], [NONE] appears in another room. Should any of video signal output from the HDMI OUT jack (page 56). Picture Symptom There is no picture when ...


