
Operating Instructions
Page 5
... a Disc/ USB Device 39 Enjoying the Audio/Video of the Connected Component 40 Tuner Presetting Radio Stations 42 Listening to the Radio 42 Sound Effect Enjoying Surround Sound 44 Selecting the Sound Effect 46 Convenient Functions Using the Control for HDMI Function for "BRAVIA" Sync 47 Transferring Songs onto a USB Device 49 Using the...
... a Disc/ USB Device 39 Enjoying the Audio/Video of the Connected Component 40 Tuner Presetting Radio Stations 42 Listening to the Radio 42 Sound Effect Enjoying Surround Sound 44 Selecting the Sound Effect 46 Convenient Functions Using the Control for HDMI Function for "BRAVIA" Sync 47 Transferring Songs onto a USB Device 49 Using the...
Operating Instructions
Page 12
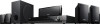
F HDMI indicator Lights up when a station is established between a TV and the unit via HDMI. C System status display D TUNED indicator (Radio only) Lights up when a signal is received. G Surround format indicator H SA-CD indicator Lights up when stereo sound is loaded. 12US E ST indicator (Radio only) Lights up when a Super Audio CD/CD is received. Front panel display A Playing status indicator B SLEEP indicator Flashes when the sleep timer is set.
F HDMI indicator Lights up when a station is established between a TV and the unit via HDMI. C System status display D TUNED indicator (Radio only) Lights up when a signal is received. G Surround format indicator H SA-CD indicator Lights up when stereo sound is loaded. 12US E ST indicator (Radio only) Lights up when a Super Audio CD/CD is received. Front panel display A Playing status indicator B SLEEP indicator Flashes when the sleep timer is set.
Operating Instructions
Page 27
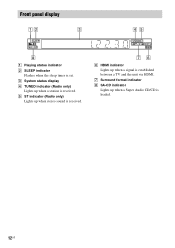
... mic (supplied) to select [YES], then press . The front of the listening position. • [ALL FRONT - Note • Loud test sounds are actually positioned, then press . Give consideration to select [YES], then press . SPEAKER FORMATION STANDARD • [STANDARD]: Select this when you install... all the speakers normally. • [NO CENTER]: Select this when you install the front and surround speakers only. • [NO SURROUND]: Select this when you install the center and front speakers only. • [FRONT ONLY]: Select this when you install ...
... mic (supplied) to select [YES], then press . The front of the listening position. • [ALL FRONT - Note • Loud test sounds are actually positioned, then press . Give consideration to select [YES], then press . SPEAKER FORMATION STANDARD • [STANDARD]: Select this when you install... all the speakers normally. • [NO CENTER]: Select this when you install the front and surround speakers only. • [NO SURROUND]: Select this when you install the center and front speakers only. • [FRONT ONLY]: Select this when you install ...
Operating Instructions
Page 34
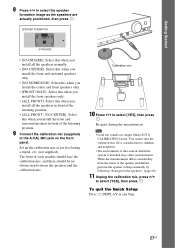
... angle. Example: Dolby Digital 5.1 channel Surround (L/R) LFE (Low Frequency Effect) 1: ENGLISH DOLBY DIGITAL 3 / 2 .1 Front (L/R) + Center LCR LFE LS RS Currently playing program format 34US x DVD-VR You can also select the number by pressing the number buttons while holding down SHIFT. x Super VCD You can change the sound track. • [1:STEREO]: The...
... angle. Example: Dolby Digital 5.1 channel Surround (L/R) LFE (Low Frequency Effect) 1: ENGLISH DOLBY DIGITAL 3 / 2 .1 Front (L/R) + Center LCR LFE LS RS Currently playing program format 34US x DVD-VR You can also select the number by pressing the number buttons while holding down SHIFT. x Super VCD You can change the sound track. • [1:STEREO]: The...
Operating Instructions
Page 44
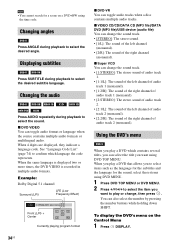
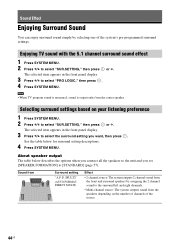
... in the front panel display. 3 Press X/x to select "SUR.SETTING," then press or c. Sound Effect Enjoying Surround Sound You can enjoy surround sound simply by assigning the 2 channel sound to the surround left and right channels. • Multi-channel source: The system outputs sound from the speakers depending on your listening preference 1 Press SYSTEM MENU. 2 Press X/x to select...
... in the front panel display. 3 Press X/x to select "SUR.SETTING," then press or c. Sound Effect Enjoying Surround Sound You can enjoy surround sound simply by assigning the 2 channel sound to the surround left and right channels. • Multi-channel source: The system outputs sound from the speakers depending on your listening preference 1 Press SYSTEM MENU. 2 Press X/x to select...
Operating Instructions
Page 45
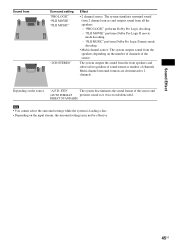
... source. The system outputs the sound from all the speakers. - STD" The system discriminates the sound format of channels. Depending on the source. Sound Effect 45US Sound from Surround setting "PRO LOGIC" "PLII MOVIE" "PLII MUSIC" "2CH STEREO" Effect • 2 channel source: The system simulates surround sound from 2 channel sources and outputs sound from the front speakers and...
... source. The system outputs the sound from all the speakers. - STD" The system discriminates the sound format of channels. Depending on the source. Sound Effect 45US Sound from Surround setting "PRO LOGIC" "PLII MOVIE" "PLII MUSIC" "2CH STEREO" Effect • 2 channel source: The system simulates surround sound from 2 channel sources and outputs sound from the front speakers and...
Operating Instructions
Page 57
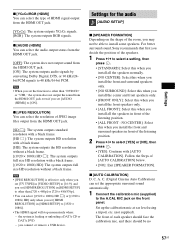
...]: Select this when you install all the speakers normally. • [NO CENTER]: Select this when you install the front and surround speakers only. • [NO SURROUND]: Select this when you install the center and front speakers only. • [FRONT ONLY]: Select this when you install the ... mic (supplied) to the A.CAL MIC jack on the shape of the listening position. 2 Press C/c to 48 kHz/16-bit PCM. For better surround sound, Sony recommends that first you decide the position of [AUTO CALIBRATION] below. • [NO]: Exit [SPEAKER FORMATION]. Follow the Steps of the speakers. 1...
...]: Select this when you install all the speakers normally. • [NO CENTER]: Select this when you install the front and surround speakers only. • [NO SURROUND]: Select this when you install the center and front speakers only. • [FRONT ONLY]: Select this when you install the ... mic (supplied) to the A.CAL MIC jack on the shape of the listening position. 2 Press C/c to 48 kHz/16-bit PCM. For better surround sound, Sony recommends that first you decide the position of [AUTO CALIBRATION] below. • [NO]: Exit [SPEAKER FORMATION]. Follow the Steps of the speakers. 1...
Operating Instructions
Page 60
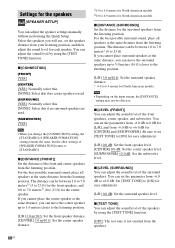
...speaker up to 5.0 meters (16 ft) closer to the listening position. [L/R] 3.0 m/10 ft: Set the surround speaker distance. * 0.0 to [ON] for each speaker. For the best possible surround sound, place all speakers at the same distance, you change the [CONNECTION] setting, the [STANDARD] of [SPEAKER ...speakers from the listening position. If you can adjust the speaker settings manually without performing the Quick Setup. For the best possible surround sound, place all speakers at the same distance, you cannot place the center speaker at the same distance from the listening position....
...speaker up to 5.0 meters (16 ft) closer to the listening position. [L/R] 3.0 m/10 ft: Set the surround speaker distance. * 0.0 to [ON] for each speaker. For the best possible surround sound, place all speakers at the same distance, you change the [CONNECTION] setting, the [STANDARD] of [SPEAKER ...speakers from the listening position. If you can adjust the speaker settings manually without performing the Quick Setup. For the best possible surround sound, place all speakers at the same distance, you cannot place the center speaker at the same distance from the listening position....
Operating Instructions
Page 65
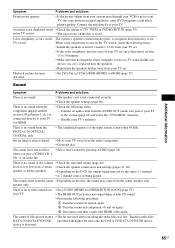
...contain magnet parts, so magnetic distortion may not be the entire 5.1 channel. • A 2 channel source is no sound or the volume • Check the surround setting (page 44). Severe hum or noise is fixed. Additional Information Symptom Problems and solutions Picture noise appears. •... TV set . • If the color irregularity persists, turn it on after 15 to 30 minutes. • Make sure that no sound when the component (digital satellite receiver, PlayStation 3, etc.) is placed near the speakers. • Reposition the speakers farther away from your TV...
...contain magnet parts, so magnetic distortion may not be the entire 5.1 channel. • A 2 channel source is no sound or the volume • Check the surround setting (page 44). Severe hum or noise is fixed. Additional Information Symptom Problems and solutions Picture noise appears. •... TV set . • If the color irregularity persists, turn it on after 15 to 30 minutes. • Make sure that no sound when the component (digital satellite receiver, PlayStation 3, etc.) is placed near the speakers. • Reposition the speakers farther away from your TV...


