
Operating Instructions
Page 11
...) port (pages 24, 30) Used for connecting a USB device or iPod. J Play operation buttons Z (open/close) Opens or closes the disc tray. D MASTER VOLUME control Adjusts the system's volume. Index to Parts and Control For more information, refer to standby mode. 11US I FUNCTION Selects the playback source. K "/1 (on/standby) Turns on the...
...) port (pages 24, 30) Used for connecting a USB device or iPod. J Play operation buttons Z (open/close) Opens or closes the disc tray. D MASTER VOLUME control Adjusts the system's volume. Index to Parts and Control For more information, refer to standby mode. 11US I FUNCTION Selects the playback source. K "/1 (on/standby) Turns on the...
Operating Instructions
Page 14
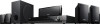
... DVD TOP MENU 5 AUDIO IN 6 FUNCTION 8 SOUND MODE 9 SYSTEM MENU 0 TV INPUT SUBTITLE ANGLE D.TUNING MEM SEL DVD MENU MUTING VOLUME 1 2,3 4 6 RETURN PRESET TUNING SHIFT DISPLAY PRESET TUNING 5 Number 5/AUDIO IN, VOLUME +, AUDIO, and N buttons have a tactile dot. MEM SEL (pages 30, 49) Selects the USB device's memory number for watching movies...
... DVD TOP MENU 5 AUDIO IN 6 FUNCTION 8 SOUND MODE 9 SYSTEM MENU 0 TV INPUT SUBTITLE ANGLE D.TUNING MEM SEL DVD MENU MUTING VOLUME 1 2,3 4 6 RETURN PRESET TUNING SHIFT DISPLAY PRESET TUNING 5 Number 5/AUDIO IN, VOLUME +, AUDIO, and N buttons have a tactile dot. MEM SEL (pages 30, 49) Selects the USB device's memory number for watching movies...
Operating Instructions
Page 15
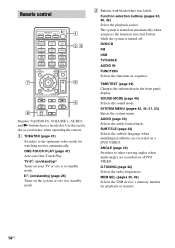
...34) Opens or closes the DVD's menu. O RETURN (page 31) Returns to a displayed item. (ENTER) Enters the selected item. VOLUME +/- (page 30) Adjusts the volume. F SHIFT Press and hold SHIFT (6).) Number buttons (pages 33, 42) Enters the title/chapter numbers, radio frequencies, etc. C/X/x/c ...(previous/next) m/M (fast reverse/fast forward) / (slow) N (play) X (pause) x (stop) Radio operation buttons See "Listening to use buttons with Sony TVs only. TUNING +/- DISPLAY (pages 16, 26, 30, 32, 35, 47, 49, 54) Displays the playback information on the batteries to the markings inside ...
...34) Opens or closes the DVD's menu. O RETURN (page 31) Returns to a displayed item. (ENTER) Enters the selected item. VOLUME +/- (page 30) Adjusts the volume. F SHIFT Press and hold SHIFT (6).) Number buttons (pages 33, 42) Enters the title/chapter numbers, radio frequencies, etc. C/X/x/c ...(previous/next) m/M (fast reverse/fast forward) / (slow) N (play) X (pause) x (stop) Radio operation buttons See "Listening to use buttons with Sony TVs only. TUNING +/- DISPLAY (pages 16, 26, 30, 32, 35, 47, 49, 54) Displays the playback information on the batteries to the markings inside ...
Operating Instructions
Page 26
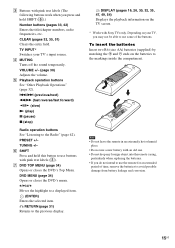
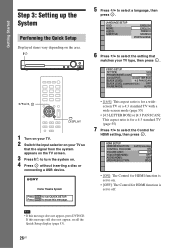
"/1 5 Press X/x to run QUICK SETUP. HDMI SETUP HDMI RESOLUTION: CONTROL FOR HDMI: VOLUME LIMIT: YCBCR/RGB(HDMI): AUDIO(HDMI): JPEG RESOLUTION: AUTO(1920x1080p) ON ON OFF OFF SD • [ON]: The Control for HDMI function is set to ...
"/1 5 Press X/x to run QUICK SETUP. HDMI SETUP HDMI RESOLUTION: CONTROL FOR HDMI: VOLUME LIMIT: YCBCR/RGB(HDMI): AUDIO(HDMI): JPEG RESOLUTION: AUTO(1920x1080p) ON ON OFF OFF SD • [ON]: The Control for HDMI function is set to ...
Operating Instructions
Page 27
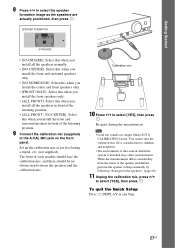
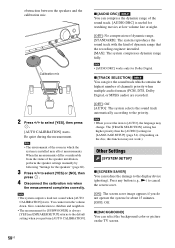
... of each speaker should face the calibration mic, and there should be no obstruction between the speakers and the calibration mic. You cannot turn the volume down. Getting Started 8 Press C/c to select [YES], then press .
... of each speaker should face the calibration mic, and there should be no obstruction between the speakers and the calibration mic. You cannot turn the volume down. Getting Started 8 Press C/c to select [YES], then press .
Operating Instructions
Page 28
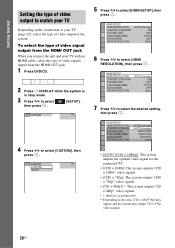
... select [HDMI SETUP], then press . CUSTOM 4 Press X/x to select the desired setting, then press . HDMI SETUP HDMI RESOLUTION: CONTROL FOR HDMI: VOLUME LIMIT: YCBCR/RGB(HDMI): AUDIO(HDMI): JPEG RESOLUTION: AUTO(1920x1080p) ON OFF YCBCR OFF SD 7 Press X/x to select [CUSTOM], then press ....; 480/576p] may appear and the system may output 720 × 576p video signals. 28US HDMI SETUP HDMI RESOLUTION: CONTROL FOR HDMI: VOLUME LIMIT: YCBCR/RGB(HDMI): AUDIO(HDMI): JPEG RESOLUTION: AUTO(1920x1080p) AUTO(1920x1O08F0pF) 1920LxE1V0E8L02i 1280YxC72BC0pR 720x4O80FpF SD • [AUTO (1920 ×...
... select [HDMI SETUP], then press . CUSTOM 4 Press X/x to select the desired setting, then press . HDMI SETUP HDMI RESOLUTION: CONTROL FOR HDMI: VOLUME LIMIT: YCBCR/RGB(HDMI): AUDIO(HDMI): JPEG RESOLUTION: AUTO(1920x1080p) ON OFF YCBCR OFF SD 7 Press X/x to select [CUSTOM], then press ....; 480/576p] may appear and the system may output 720 × 576p video signals. 28US HDMI SETUP HDMI RESOLUTION: CONTROL FOR HDMI: VOLUME LIMIT: YCBCR/RGB(HDMI): AUDIO(HDMI): JPEG RESOLUTION: AUTO(1920x1080p) AUTO(1920x1O08F0pF) 1920LxE1V0E8L02i 1280YxC72BC0pR 720x4O80FpF SD • [AUTO (1920 ×...
Operating Instructions
Page 30
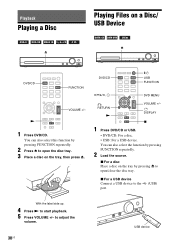
...then press Z. You can also select the function by pressing FUNCTION repeatedly. 2 Load the source. DVD/CD "/1 USB FUNCTION C/X/x/c, DVD MENU O RETURN N VOLUME +/- You can also select this function by pressing Z to open /close the disc tray. DISPLAY x 1 Press DVD/CD or USB. • DVD.... x For a USB device Connect a USB device to the port. (USB) With the label side up. 4 Press N to adjust the volume. 30US USB device to start playback. 5 Press VOLUME +/- x For a disc Place a disc on the tray by pressing FUNCTION repeatedly. 2 Press Z to open the disc tray. 3 Place a...
...then press Z. You can also select the function by pressing FUNCTION repeatedly. 2 Load the source. DVD/CD "/1 USB FUNCTION C/X/x/c, DVD MENU O RETURN N VOLUME +/- You can also select this function by pressing Z to open /close the disc tray. DISPLAY x 1 Press DVD/CD or USB. • DVD.... x For a USB device Connect a USB device to the port. (USB) With the label side up. 4 Press N to adjust the volume. 30US USB device to start playback. 5 Press VOLUME +/- x For a disc Place a disc on the tray by pressing FUNCTION repeatedly. 2 Press Z to open the disc tray. 3 Place a...
Operating Instructions
Page 31
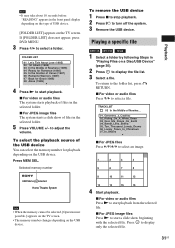
... image files The system starts a slide show beginning with the selected file. To return to start a slide show of files in the selected folder. 5 Press VOLUME +/- x For JPEG image files Press N to the folder list, press O RETURN. Playback Note • It may take about 10 seconds before "READING" appears in the... playback. x For video or audio files Press N to turn off the system. 3 Remove the USB device. x For video or audio files Press X/x to adjust the volume. to select a file. Press to display only the selected file. 31US
... image files The system starts a slide show beginning with the selected file. To return to start a slide show of files in the selected folder. 5 Press VOLUME +/- x For JPEG image files Press N to the folder list, press O RETURN. Playback Note • It may take about 10 seconds before "READING" appears in the... playback. x For video or audio files Press N to turn off the system. 3 Remove the USB device. x For video or audio files Press X/x to adjust the volume. to select a file. Press to display only the selected file. 31US
Operating Instructions
Page 42
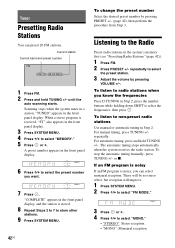
... "COMPLETE" appears in Step 2. repeatedly to store other stations. 9 Press SYSTEM MENU. 42US To change the preset number Select the desired preset number by pressing VOLUME +/-. To listen to select "MEMORY." 5 Press or c. repeatedly. or x. When a stereo program is received, "ST" also appears in the front panel .... If an FM program is noisy If an FM program is stored. 8 Repeat Steps 2 to 7 to select the preset station. 3 Adjust the volume by pressing PRESET +/- (page 42), then perform the procedure from Step 3. Current station Current band and preset number FM FM 10 : 88.00 MHz ...
... "COMPLETE" appears in Step 2. repeatedly to store other stations. 9 Press SYSTEM MENU. 42US To change the preset number Select the desired preset number by pressing VOLUME +/-. To listen to select "MEMORY." 5 Press or c. repeatedly. or x. When a stereo program is received, "ST" also appears in the front panel .... If an FM program is noisy If an FM program is stored. 8 Repeat Steps 2 to 7 to select the preset station. 3 Adjust the volume by pressing PRESET +/- (page 42), then perform the procedure from Step 3. Current station Current band and preset number FM FM 10 : 88.00 MHz ...
Operating Instructions
Page 47
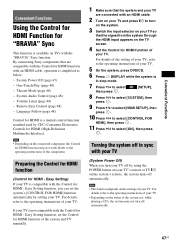
...47US For details of the setting of your TV, refer to the operating instructions of the system (ex. One-Touch Play (page 48) - Volume Limit (page 48) - Language Follow (page 48) Control for HDMI is a mutual control function standard used by setting your TV is not compatible... the input selector on the settings of your TV. Convenient Functions Convenient Functions Using the Control for HDMI Function for HDMI - By connecting Sony components that are connected with the Control for HDMI function of the component. Note • Depending on your TV. Preparing the Control for...
...47US For details of the setting of your TV, refer to the operating instructions of the system (ex. One-Touch Play (page 48) - Volume Limit (page 48) - Language Follow (page 48) Control for HDMI is a mutual control function standard used by setting your TV is not compatible... the input selector on the settings of your TV. Convenient Functions Convenient Functions Using the Control for HDMI Function for HDMI - By connecting Sony components that are connected with the Control for HDMI function of the component. Note • Depending on your TV. Preparing the Control for...
Operating Instructions
Page 48
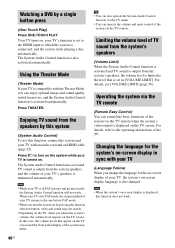
... is activated and TV sound is output from the speakers by this system (System Audio Control) To use this function does not work . Limiting the volume level of your TV is displayed on the TV screen. Operating the system via the TV remote (Remote Easy Control) You can control the basic... is limited to the operating instructions of the system may not match. • Depending on the TV, when you adjust the system's volume, the volume level appears on the TV screen. Note • While your TV is displayed, this function, connect the system and your TV with your TV (Language ...
... is activated and TV sound is output from the speakers by this system (System Audio Control) To use this function does not work . Limiting the volume level of your TV is displayed on the TV screen. Operating the system via the TV remote (Remote Easy Control) You can control the basic... is limited to the operating instructions of the system may not match. • Depending on the TV, when you adjust the system's volume, the volume level appears on the TV screen. Note • While your TV is displayed, this function, connect the system and your TV with your TV (Language ...
Operating Instructions
Page 56
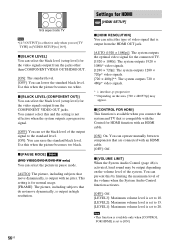
...system outputs 720 × 480p* video signals. * i: interlace, p: progressive ** Depending on the area, [720 × 480/576p] may be output depending on the volume level of video signal that is output from the HDMI OUT jack. [AUTO (1920 × 1080p)]: The system outputs the optimal video signal for HDMI... only) You can raise the standard black level. Note • This function is available only when [CONTROL FOR HDMI] is set to [16:9]. x [VOLUME LIMIT] When the System Audio Control (page 48) is activated, loud sound may appear. 16:9 aspect ratio TV Note • [4:3 OUTPUT] is effective...
...system outputs 720 × 480p* video signals. * i: interlace, p: progressive ** Depending on the area, [720 × 480/576p] may be output depending on the volume level of video signal that is output from the HDMI OUT jack. [AUTO (1920 × 1080p)]: The system outputs the optimal video signal for HDMI... only) You can raise the standard black level. Note • This function is available only when [CONTROL FOR HDMI] is set to [16:9]. x [VOLUME LIMIT] When the System Audio Control (page 48) is activated, loud sound may appear. 16:9 aspect ratio TV Note • [4:3 OUTPUT] is effective...
Operating Instructions
Page 58
You cannot turn the volume down. x [TRACK SELECTION] You can compress the dynamic range of channels priority when multiple audio formats (PCM, DTS, Dolby Digital, or MPEG audio) are recorded. [.... When the measurements differ considerably from the status of the speaker installation, perform the speaker settings manually by following "Settings for watching movies at low volume late at night. [OFF]: No compression of dynamic range. [STANDARD]: The system reproduces the sound track with the kind of the room in [LANGUAGE SETUP...
You cannot turn the volume down. x [TRACK SELECTION] You can compress the dynamic range of channels priority when multiple audio formats (PCM, DTS, Dolby Digital, or MPEG audio) are recorded. [.... When the measurements differ considerably from the status of the speaker installation, perform the speaker settings manually by following "Settings for watching movies at low volume late at night. [OFF]: No compression of dynamic range. [STANDARD]: The system reproduces the sound track with the kind of the room in [LANGUAGE SETUP...
Operating Instructions
Page 62
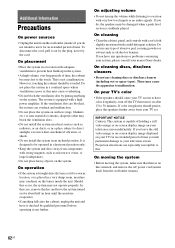
... magnets, such as radiators, or air ducts, or in a horizontal position only. • Keep the system and discs away from your nearest Sony dealer. These may cause the apparatus to be avoided. IMPORTANT NOTICE Caution: This system is designed to malfunction. To disconnect the cord, pull it...becomes hot to direct sunlight, excessive dust, mechanical vibration, or shock. • Do not install the system in the system. • At high volume, over long periods of holding a still video image or on-screen display image on surfaces (rugs, blankets, etc.) or near heat sources such as ...
... magnets, such as radiators, or air ducts, or in a horizontal position only. • Keep the system and discs away from your nearest Sony dealer. These may cause the apparatus to be avoided. IMPORTANT NOTICE Caution: This system is designed to malfunction. To disconnect the cord, pull it...becomes hot to direct sunlight, excessive dust, mechanical vibration, or shock. • Do not install the system in the system. • At high volume, over long periods of holding a still video image or on-screen display image on surfaces (rugs, blankets, etc.) or near heat sources such as ...
Operating Instructions
Page 65
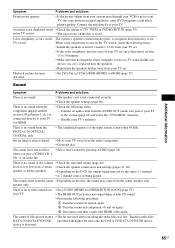
... speaker connections and settings (pages 21, 60). When color irregularity occurs on the TV screen, check the following status. - There is no sound or the volume • Check the surround setting (page 44). There is fixed. Transfer audio files DATA CD/DATA DVD/USB encoded with higher bit rates onto the...
... speaker connections and settings (pages 21, 60). When color irregularity occurs on the TV screen, check the following status. - There is no sound or the volume • Check the surround setting (page 44). There is fixed. Transfer audio files DATA CD/DATA DVD/USB encoded with higher bit rates onto the...


