
Child Safety: It Makes A Difference Where Your TV Stands
Page 1
... over. 7 Share our safety message on this hidden hazard of the home with furniture and television sets. 5 Avoid placing any items on or play with your home. The Consumer Electronics Association formed the Home Entertainment Support Safety Committee comprised of your television (and other electronic components).... families about television safety. Use the appropriate furniture that may cause unnecessary injury. The Industry Cares! The home theater entertainment experience is large enough to support the weight of television and consumer electronics furniture manufacturers to making...
... over. 7 Share our safety message on this hidden hazard of the home with furniture and television sets. 5 Avoid placing any items on or play with your home. The Consumer Electronics Association formed the Home Entertainment Support Safety Committee comprised of your television (and other electronic components).... families about television safety. Use the appropriate furniture that may cause unnecessary injury. The Industry Cares! The home theater entertainment experience is large enough to support the weight of television and consumer electronics furniture manufacturers to making...
Operating Instructions
Page 1
2-590-880-12(1) DVD Home Theatre System Operating Instructions DAV-DZ100 ©2005 Sony Corporation
2-590-880-12(1) DVD Home Theatre System Operating Instructions DAV-DZ100 ©2005 Sony Corporation

Operating Instructions
Page 2
...servicing) instructions in a particular installation. Record the serial number in this manual could void your Sony dealer regarding this apparatus to radio communications. This equipment generates, uses, and can be determined... hazard, do not place objects filled with the instructions, may be connected to the grounding system of the building, as close to the point of cable entry as vases, on a ... TO PREVENT ELECTRIC SHOCK, MATCH WIDE BLADE OF PLUG TO WIDE SLOT, FULLY INSERT. 2GB DAV-DZ100 Serial No WARNING This equipment has been tested and found to constitute a risk of the FCC...
...servicing) instructions in a particular installation. Record the serial number in this manual could void your Sony dealer regarding this apparatus to radio communications. This equipment generates, uses, and can be determined... hazard, do not place objects filled with the instructions, may be connected to the grounding system of the building, as close to the point of cable entry as vases, on a ... TO PREVENT ELECTRIC SHOCK, MATCH WIDE BLADE OF PLUG TO WIDE SLOT, FULLY INSERT. 2GB DAV-DZ100 Serial No WARNING This equipment has been tested and found to constitute a risk of the FCC...
Operating Instructions
Page 3
... for an extended period of time. It is a U.S. Before operating this system, please read this product meets the ENERGY STAR® guidelines for purchasing Sony DVD Home Theatre System. As an ENERGY STAR® partner, Sony Corporation has determined that may condense inside the DVD Home Theatre System and cause damage to direct sunlight, excessive dust, mechanical vibration, or...
... for an extended period of time. It is a U.S. Before operating this system, please read this product meets the ENERGY STAR® guidelines for purchasing Sony DVD Home Theatre System. As an ENERGY STAR® partner, Sony Corporation has determined that may condense inside the DVD Home Theatre System and cause damage to direct sunlight, excessive dust, mechanical vibration, or...

Operating Instructions
Page 4
... Discs 6 Guide to the Control Menu Display........ 9 Getting Started Unpacking 12 Inserting Batteries into the Remote....... 12 Hookup Overview 13 Step 1: Speaker System Hookup........... 14 Step 2: Antenna (Aerial) Hookup ......... 18 Step 3: TV Hookup 19 Step 4: Other Component Hookup........ 24 Step 5: Connecting the AC... 25 Step 7: Performing the Quick Setup ..... 26 Speaker Setup 28 Playing Discs Playing Discs 29 Using the DVD's Menu 33 Selecting [ORIGINAL] or [PLAY LIST] on a DVD-RW 34 Playing VIDEO CDs with PBC Functions (Ver.2.0 34 (PBC Playback) About MP3 Audio Tracks and ...
... Discs 6 Guide to the Control Menu Display........ 9 Getting Started Unpacking 12 Inserting Batteries into the Remote....... 12 Hookup Overview 13 Step 1: Speaker System Hookup........... 14 Step 2: Antenna (Aerial) Hookup ......... 18 Step 3: TV Hookup 19 Step 4: Other Component Hookup........ 24 Step 5: Connecting the AC... 25 Step 7: Performing the Quick Setup ..... 26 Speaker Setup 28 Playing Discs Playing Discs 29 Using the DVD's Menu 33 Selecting [ORIGINAL] or [PLAY LIST] on a DVD-RW 34 Playing VIDEO CDs with PBC Functions (Ver.2.0 34 (PBC Playback) About MP3 Audio Tracks and ...

Operating Instructions
Page 5
Additional Information Precautions 74 Notes about the Discs 75 Troubleshooting 75 Self-diagnosis Function 78 (When letters/numbers appear in the display) Specifications 79 Glossary 80 Language Code List 83 Index to Parts and Controls 84 DVD Setup Display List 88 AMP Menu List 90 Index 91 5GB
Additional Information Precautions 74 Notes about the Discs 75 Troubleshooting 75 Self-diagnosis Function 78 (When letters/numbers appear in the display) Specifications 79 Glossary 80 Language Code List 83 Index to Parts and Controls 84 DVD Setup Display List 88 AMP Menu List 90 Index 91 5GB

Operating Instructions
Page 6
... system if they have the same or similar names as those recorded in the formats listed on page 6 • CD-ROMs recorded in the following formats: - MP3 audio tracks and JPEG image files of format conforming to ISO 9660 Level 1/ Level 2, or its extended format, Joliet Example of discs DVD...the remote. • The Control Menu items may be used in this manual. Symbol Meaning Functions available for DVD VIDEOs, DVD-Rs/DVD-RWs in video mode, and DVD+Rs/ DVD+RWs Functions available for DVD-RWs in VR (Video Recording) mode Functions available for VIDEO CDs (including Super VCDs or CDRs/CD-RWs ...
... system if they have the same or similar names as those recorded in the formats listed on page 6 • CD-ROMs recorded in the following formats: - MP3 audio tracks and JPEG image files of format conforming to ISO 9660 Level 1/ Level 2, or its extended format, Joliet Example of discs DVD...the remote. • The Control Menu items may be used in this manual. Symbol Meaning Functions available for DVD VIDEOs, DVD-Rs/DVD-RWs in video mode, and DVD+Rs/ DVD+RWs Functions available for DVD-RWs in VR (Video Recording) mode Functions available for VIDEO CDs (including Super VCDs or CDRs/CD-RWs ...

Operating Instructions
Page 7
... labeled ALL will also play on the TV screen. • Data part of CD-Extras • DVD Audios • Super Audio CD • DVD-RAMs Also, the system cannot play the following discs: • A DVD VIDEO with a different region code (page 7, 82). • A disc that has a non-standard shape (e.g., card...can play highresolution still pictures, if they are recorded in the first session. Notes about CD-R/CD-RW/DVD-R/ DVD-RW/DVD+R/DVD+RW In some cases, CD-R/CD-RW/DVD-R/DVD-RW/ DVD+R/DVD+RW cannot be playable by area limitations.] will only play if it has not been correctly finalized. The...
... labeled ALL will also play on the TV screen. • Data part of CD-Extras • DVD Audios • Super Audio CD • DVD-RAMs Also, the system cannot play the following discs: • A DVD VIDEO with a different region code (page 7, 82). • A disc that has a non-standard shape (e.g., card...can play highresolution still pictures, if they are recorded in the first session. Notes about CD-R/CD-RW/DVD-R/ DVD-RW/DVD+R/DVD+RW In some cases, CD-R/CD-RW/DVD-R/DVD-RW/ DVD+R/DVD+RW cannot be playable by area limitations.] will only play if it has not been correctly finalized. The...
Operating Instructions
Page 8
...is protected by area restrictions. Reverse engineering or disassembly is intended for home and other intellectual property rights. "Dolby," "Pro Logic," and the double-D symbol are trademarks of this system plays DVDs and VIDEO CDs according to the instructions supplied with Dolby*1 Digital and... software producers designed, some playback features may be intentionally set by Macrovision. Use of Digital Theater Systems, Inc. 8GB "DTS" and "DTS Digital Surround" are trademarks of DVDs and VIDEO CDs may not be authorized by Macrovision, and is prohibited. Since this copyright...
...is protected by area restrictions. Reverse engineering or disassembly is intended for home and other intellectual property rights. "Dolby," "Pro Logic," and the double-D symbol are trademarks of this system plays DVDs and VIDEO CDs according to the instructions supplied with Dolby*1 Digital and... software producers designed, some playback features may be intentionally set by Macrovision. Use of Digital Theater Systems, Inc. 8GB "DTS" and "DTS Digital Surround" are trademarks of DVDs and VIDEO CDs may not be authorized by Macrovision, and is prohibited. Since this copyright...
Operating Instructions
Page 9
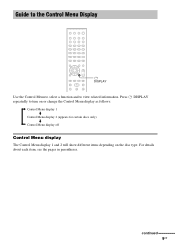
For details about each item, see the pages in parentheses. continued 9GB Guide to the Control Menu Display DISPLAY Use the Control Menu to select a function and to turn on or change the Control Menu display as follows: , Control Menu display 1 m Control Menu display 2 (appears for certain discs only) m Control Menu display off Control Menu display The Control Menu display 1 and 2 will show different items depending on the disc type. Press DISPLAY repeatedly to view related information.
For details about each item, see the pages in parentheses. continued 9GB Guide to the Control Menu Display DISPLAY Use the Control Menu to select a function and to turn on or change the Control Menu display as follows: , Control Menu display 1 m Control Menu display 2 (appears for certain discs only) m Control Menu display off Control Menu display The Control Menu display 1 and 2 will show different items depending on the disc type. Press DISPLAY repeatedly to view related information.
Operating Instructions
Page 10
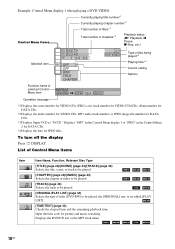
..." in the Control Menu 2 for DATA CDs. *4 Displays the date for picture and music searching. Example: Control Menu display 1 when playing a DVD VIDEO. Input the time code for JPEG files. Control Menu items Selected item Currently playing title number*1 Currently playing chapter number*2 Total number of titles..., X Pause, x Stop, etc.) 12 (27) 18 (34) T 1:32:55 OFF OFF DISC TITLE CHAPTER DVD VIDEO Type of disc being played*3 Playing time*4 Current setting Options Function name of titles (DVD-RW) to be played, the [ORIGINAL] one, or an edited [PLAY LIST]. [TIME/TEXT] (page 44) ...
..." in the Control Menu 2 for DATA CDs. *4 Displays the date for picture and music searching. Example: Control Menu display 1 when playing a DVD VIDEO. Input the time code for JPEG files. Control Menu items Selected item Currently playing title number*1 Currently playing chapter number*2 Total number of titles..., X Pause, x Stop, etc.) 12 (27) 18 (34) T 1:32:55 OFF OFF DISC TITLE CHAPTER DVD VIDEO Type of disc being played*3 Playing time*4 Current setting Options Function name of titles (DVD-RW) to be played, the [ORIGINAL] one, or an edited [PLAY LIST]. [TIME/TEXT] (page 44) ...
Operating Instructions
Page 11
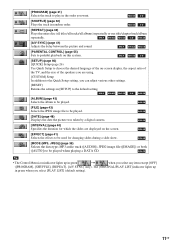
.../chapter/track/album repeatedly. [A/V SYNC] (page 41) Adjusts the delay between the picture and sound. [PARENTAL CONTROL] (page 55) Sets to prohibit playback on this system. [SETUP] (page 66) [QUICK] Setup (page 26) Use Quick Setup to choose the desired language of the on-screen display, the aspect ratio of the...
.../chapter/track/album repeatedly. [A/V SYNC] (page 41) Adjusts the delay between the picture and sound. [PARENTAL CONTROL] (page 55) Sets to prohibit playback on this system. [SETUP] (page 66) [QUICK] Setup (page 26) Use Quick Setup to choose the desired language of the on-screen display, the aspect ratio of the...

Operating Instructions
Page 12
... the batteries to avoid possible damage from the sun or lighting apparatus. Insert two Size AA (R6) batteries by matching the 3 and # ends on the system. Note • Do not leave the remote in an extremely hot or humid place. • Do not use the remote for an extended period of... do not intend to use a new battery with an old one. • Do not drop any foreign object into the Remote You can control the system using the remote, point it at the remote sensor on the batteries to the markings inside the compartment.
... the batteries to avoid possible damage from the sun or lighting apparatus. Insert two Size AA (R6) batteries by matching the 3 and # ends on the system. Note • Do not leave the remote in an extremely hot or humid place. • Do not use the remote for an extended period of... do not intend to use a new battery with an old one. • Do not drop any foreign object into the Remote You can control the system using the remote, point it at the remote sensor on the batteries to the markings inside the compartment.
Operating Instructions
Page 13
"Step 1: Speaker System Hookup" (page 14) "Step 2: Antenna (Aerial) Hookup" (page 18) "Step 3: TV Hookup" (page 19) "Step 4: Other Component Hookup" (page 24) "Step 5: Connecting the AC Power ... TV, and is output from the speakers of other sources, such as TV programs, in addition to 7. audio signals are processed by following Steps 1 to DVDs or CDs. 13GB You can also enjoy sound of this system. Getting Started Hookup Overview Perform all connections and settings by this...
"Step 1: Speaker System Hookup" (page 14) "Step 2: Antenna (Aerial) Hookup" (page 18) "Step 3: TV Hookup" (page 19) "Step 4: Other Component Hookup" (page 24) "Step 5: Connecting the AC Power ... TV, and is output from the speakers of other sources, such as TV programs, in addition to 7. audio signals are processed by following Steps 1 to DVDs or CDs. 13GB You can also enjoy sound of this system. Getting Started Hookup Overview Perform all connections and settings by this...
Operating Instructions
Page 14
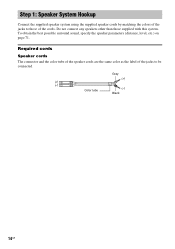
Required cords Speaker cords The connector and the color tube of the speaker cords are the same color as the label of the jacks to those supplied with this system. Gray (+) (+) (-) Color tube (-) Black 14GB To obtain the best possible surround sound, specify the speaker parameters (distance, level, etc.) on page 71. Step 1: Speaker System Hookup Connect the supplied speaker system using the supplied speaker cords by matching the colors of the jacks to be connected. Do not connect any speakers other than those of the cords.
Required cords Speaker cords The connector and the color tube of the speaker cords are the same color as the label of the jacks to those supplied with this system. Gray (+) (+) (-) Color tube (-) Black 14GB To obtain the best possible surround sound, specify the speaker parameters (distance, level, etc.) on page 71. Step 1: Speaker System Hookup Connect the supplied speaker system using the supplied speaker cords by matching the colors of the jacks to be connected. Do not connect any speakers other than those of the cords.
Operating Instructions
Page 15
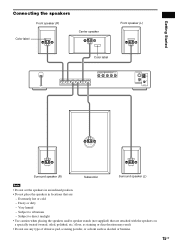
... (R) Color label Center speaker Front speaker (L) Color label FRONT R FRONT L SURR R SURR L CENTER WOOFER SPEAKER VIDEO/SAT R AUDIO IN L COMPONENT VIDEO OUT DVD ONLY Y PB/CB PR/CR S VIDEO (DVD ONLY) AM VIDEO MONITOR OUT COAXIAL FM 75 Surround speaker (R) Subwoofer Surround speaker (L) Note • Do not set the speakers in an...
... (R) Color label Center speaker Front speaker (L) Color label FRONT R FRONT L SURR R SURR L CENTER WOOFER SPEAKER VIDEO/SAT R AUDIO IN L COMPONENT VIDEO OUT DVD ONLY Y PB/CB PR/CR S VIDEO (DVD ONLY) AM VIDEO MONITOR OUT COAXIAL FM 75 Surround speaker (R) Subwoofer Surround speaker (L) Note • Do not set the speakers in an...
Operating Instructions
Page 16
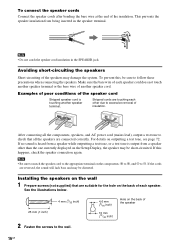
... for the hole on the wall 1 Prepare screws (not supplied) that all the speakers are reversed, the sound will lack bass and may damage the system. If this , be sure to the wall. 4.6 mm (3/16 inch) 10 mm (13/32 inch) Hole on the Setup Display, the speaker may be distorted...
... for the hole on the wall 1 Prepare screws (not supplied) that all the speakers are reversed, the sound will lack bass and may damage the system. If this , be sure to the wall. 4.6 mm (3/16 inch) 10 mm (13/32 inch) Hole on the Setup Display, the speaker may be distorted...

Operating Instructions
Page 17
... on a vertical and flat wall where reinforcement is applied. • Contact a screw shop or installer regarding the wall material or screws to be used. • Sony is especially fragile, attach the screws securely to a beam and fasten them to 9/32 inch) 3 Hang the speakers on the screws. 4.6 mm (3/16 inch) 10...
... on a vertical and flat wall where reinforcement is applied. • Contact a screw shop or installer regarding the wall material or screws to be used. • Sony is especially fragile, attach the screws securely to a beam and fasten them to 9/32 inch) 3 Hang the speakers on the screws. 4.6 mm (3/16 inch) 10...

Operating Instructions
Page 18
.... AM loop antenna (aerial) FM wire antenna (aerial) Note • To prevent noise pickup, keep the AM loop antenna (aerial) away from the system and other components. • Be sure to the radio. Tip • When you have poor FM reception, use a 75-ohms coaxial cable (not ...supplied) to connect the system to either terminal. System Outdoor FM antenna (aerial) 18GB A B • If you connect the supplied AM loop antenna (aerial), cord (A) or cord (B) can be connected...
.... AM loop antenna (aerial) FM wire antenna (aerial) Note • To prevent noise pickup, keep the AM loop antenna (aerial) away from the system and other components. • Be sure to the radio. Tip • When you have poor FM reception, use a 75-ohms coaxial cable (not ...supplied) to connect the system to either terminal. System Outdoor FM antenna (aerial) 18GB A B • If you connect the supplied AM loop antenna (aerial), cord (A) or cord (B) can be connected...
Operating Instructions
Page 19
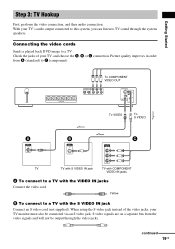
...S video jack. FRONT R FRONT L SURR R SURR L CENTER WOOFER SPEAKER To COMPONENT VIDEO OUT VIDEO/SAT R AUDIO IN L COMPONENT VIDEO OUT DVD ONLY Y PB/CB PR/CR S VIDEO (DVD ONLY) AM VIDEO MONITOR OUT COAXIAL FM 75 To VIDEO To S VIDEO A VIDEO IN B S VIDEO IN Y PB/CB PR/CR C TV...). When using the S video jack instead of your TV's audio output connected to this system, you can listen to TV sound through the video jacks. continued 19GB Connecting the video cords Sends a played back DVD image to a TV with the VIDEO IN jacks Connect the video cord. Yellow B To...
...S video jack. FRONT R FRONT L SURR R SURR L CENTER WOOFER SPEAKER To COMPONENT VIDEO OUT VIDEO/SAT R AUDIO IN L COMPONENT VIDEO OUT DVD ONLY Y PB/CB PR/CR S VIDEO (DVD ONLY) AM VIDEO MONITOR OUT COAXIAL FM 75 To VIDEO To S VIDEO A VIDEO IN B S VIDEO IN Y PB/CB PR/CR C TV...). When using the S video jack instead of your TV's audio output connected to this system, you can listen to TV sound through the video jacks. continued 19GB Connecting the video cords Sends a played back DVD image to a TV with the VIDEO IN jacks Connect the video cord. Yellow B To...