
Child Safety: It Makes A Difference Where Your TV Stands
Page 1
...committed to climb on or play with furniture and television sets. 5 Avoid placing any items on top of TVs such as VCRs and remotes that may pique the children's curiosity. 6 Remember that children can become excited while watching a program and can potentially push or pull a... stands. Tune Into Safety 1 One size does NOT fit all. Thank you have a television in fact, have more than one television. The home theater entertainment experience is a Sector of your television (and other electronic components). 2 Use appropriate angle braces, straps and anchors to advocate children's safety...
...committed to climb on or play with furniture and television sets. 5 Avoid placing any items on top of TVs such as VCRs and remotes that may pique the children's curiosity. 6 Remember that children can become excited while watching a program and can potentially push or pull a... stands. Tune Into Safety 1 One size does NOT fit all. Thank you have a television in fact, have more than one television. The home theater entertainment experience is a Sector of your television (and other electronic components). 2 Use appropriate angle braces, straps and anchors to advocate children's safety...

Operating Instructions
Page 4
... Play the Following Discs 6 Guide to the Control Menu Display........ 9 Getting Started Unpacking 12 Inserting Batteries into the Remote....... 12 Hookup Overview 13 Step 1: Speaker System Hookup........... 14 Step 2: Antenna (Aerial) Hookup ......... 18 Step 3: TV Hookup 19 Step 4: Other Component Hookup........ 24 Step 5: ... 25 Step 7: Performing the Quick Setup ..... 26 Speaker Setup 28 Playing Discs Playing Discs 29 Using the DVD's Menu 33 Selecting [ORIGINAL] or [PLAY LIST] on a DVD-RW 34 Playing VIDEO CDs with PBC Functions (Ver.2.0 34 (PBC Playback) About MP3 Audio Tracks and ...
... Play the Following Discs 6 Guide to the Control Menu Display........ 9 Getting Started Unpacking 12 Inserting Batteries into the Remote....... 12 Hookup Overview 13 Step 1: Speaker System Hookup........... 14 Step 2: Antenna (Aerial) Hookup ......... 18 Step 3: TV Hookup 19 Step 4: Other Component Hookup........ 24 Step 5: ... 25 Step 7: Performing the Quick Setup ..... 26 Speaker Setup 28 Playing Discs Playing Discs 29 Using the DVD's Menu 33 Selecting [ORIGINAL] or [PLAY LIST] on a DVD-RW 34 Playing VIDEO CDs with PBC Functions (Ver.2.0 34 (PBC Playback) About MP3 Audio Tracks and ...

Operating Instructions
Page 6
...MPEG1 Audio Layer 3) is a standard format defined by ISO/MPEG which compresses audio data. 6GB This System Can Play the Following Discs Format of discs that the system cannot play The system cannot play CD-ROMs/CD-Rs/CDRWs recorded in the following symbols are trademarks. About This Manual ...-Rs/CD-RWs other than those on the remote. • The Control Menu items may be different depending on the remote. Symbol Meaning Functions available for DVD VIDEOs, DVD-Rs/DVD-RWs in video mode, and DVD+Rs/ DVD+RWs Functions available for DVD-RWs in VR (Video Recording) mode Functions available...
...MPEG1 Audio Layer 3) is a standard format defined by ISO/MPEG which compresses audio data. 6GB This System Can Play the Following Discs Format of discs that the system cannot play The system cannot play CD-ROMs/CD-Rs/CDRWs recorded in the following symbols are trademarks. About This Manual ...-Rs/CD-RWs other than those on the remote. • The Control Menu items may be different depending on the remote. Symbol Meaning Functions available for DVD VIDEOs, DVD-Rs/DVD-RWs in video mode, and DVD+Rs/ DVD+RWs Functions available for DVD-RWs in VR (Video Recording) mode Functions available...

Operating Instructions
Page 12
... Started Unpacking Check that you do not intend to use a new battery with an old one. • Do not drop any foreign object into the Remote You can control the system using the remote, point it at the remote sensor on the batteries to the markings inside the compartment.
... Started Unpacking Check that you do not intend to use a new battery with an old one. • Do not drop any foreign object into the Remote You can control the system using the remote, point it at the remote sensor on the batteries to the markings inside the compartment.
Operating Instructions
Page 25
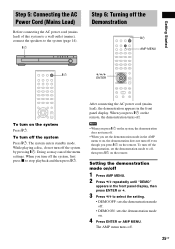
When you press "/1 on the remote, the demonstration turns off the system Press "/1. To turn off the system, first press x to select the setting. • DEMO OFF: sets the demonstration mode off. • DEMO ON: sets the demonstration mode on the system Press "/1. When you turn off . ...The AMP menu turns off the Demonstration "/1 AMP MENU "/1 X/x/c ENTER To turn off , then press "/1 on /off even though you set the demonstration mode to on the remote. "/1 Step 6: Turning off . 25GB ...
When you press "/1 on the remote, the demonstration turns off the system Press "/1. To turn off the system, first press x to select the setting. • DEMO OFF: sets the demonstration mode off. • DEMO ON: sets the demonstration mode on the system Press "/1. When you turn off . ...The AMP menu turns off the Demonstration "/1 AMP MENU "/1 X/x/c ENTER To turn off , then press "/1 on /off even though you set the demonstration mode to on the remote. "/1 Step 6: Turning off . 25GB ...
Operating Instructions
Page 59
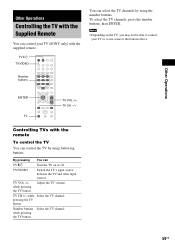
TV ?/1 TV/VIDEO You can TV [/1 Turn the TV on the TV, you may not be able to control your TV (SONY only) with the remote To control the TV You can control the TV by using following buttons. Note • Depending on or off. By pressing You can select the ...TV channels by using the number buttons. while pressing the TV button 59GB TV CH -/+ Controlling TVs with the supplied remote. TV VOL +/- pressing the TV button Number buttons Select the TV channel. Other Operations Other Operations Controlling the TV with the Supplied...
TV ?/1 TV/VIDEO You can TV [/1 Turn the TV on the TV, you may not be able to control your TV (SONY only) with the remote To control the TV You can control the TV by using following buttons. Note • Depending on or off. By pressing You can select the ...TV channels by using the number buttons. while pressing the TV button 59GB TV CH -/+ Controlling TVs with the supplied remote. TV VOL +/- pressing the TV button Number buttons Select the TV channel. Other Operations Other Operations Controlling the TV with the Supplied...
Operating Instructions
Page 60
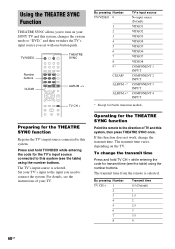
... time 0.5 (Default) 1 1.5 2 2.5 3 3.5 4 60GB Set your TV's input to the input you used to "DVD," and then switches the TV's input source you to turn on the TV. If this function does not work, change the transmit...hold TV/VIDEO while entering the code for the THEATRE SYNC function Point the remote to this system (see the table) using the number buttons. The transmit time varies depending... for the TV's input source connected to the direction of your SONY TV and this system, changes the system mode to connect the system. Press and hold TV CH + while entering the code for...
... time 0.5 (Default) 1 1.5 2 2.5 3 3.5 4 60GB Set your TV's input to the input you used to "DVD," and then switches the TV's input source you to turn on the TV. If this function does not work, change the transmit...hold TV/VIDEO while entering the code for the THEATRE SYNC function Point the remote to this system (see the table) using the number buttons. The transmit time varies depending... for the TV's input source connected to the direction of your SONY TV and this system, changes the system mode to connect the system. Press and hold TV CH + while entering the code for...

Operating Instructions
Page 61
... the remote pointed in the direction of the TV and this function may not work. DVD t TUNER FM t TUNER AM t SAT t DVD t ... Refer to "ATT ON." Other Operations Note • This function is only for further information on some SONY TVs.) • If distance between TV and this system is ..." is set to the operation manual supplied with the components for SONY TVs. (This function may not work on the operation. Enjoying the Sound of the system changes in the front panel display. DVD t TUNER FM t TUNER AM t VIDEO t DVD t ... For details on the rear panel. When "ATTENUATE" ...
... the remote pointed in the direction of the TV and this function may not work. DVD t TUNER FM t TUNER AM t SAT t DVD t ... Refer to "ATT ON." Other Operations Note • This function is only for further information on some SONY TVs.) • If distance between TV and this system is ..." is set to the operation manual supplied with the components for SONY TVs. (This function may not work on the operation. Enjoying the Sound of the system changes in the front panel display. DVD t TUNER FM t TUNER AM t VIDEO t DVD t ... For details on the rear panel. When "ATTENUATE" ...
Operating Instructions
Page 72
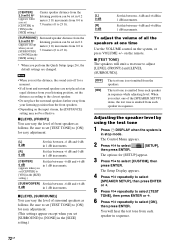
...You can vary the level of front speakers as follows. x [LEVEL (SURROUND)] You can vary the level of surround speakers as follows. on the remote. x [TEST TONE] The speakers will hear the test tone from each speaker in the [SIZE] setting.) * When you select one of all.... [CENTER] Set this between -6 dB and +6 dB in 1 dB increments. Adjusting the speaker level by using the test tone 1 Press DISPLAY when the system is not emitted from each speaker in stop mode. The Setup Display appears. 4 Press X/x repeatedly to select [SPEAKER SETUP], then press ENTER or c. 5 ...
...You can vary the level of front speakers as follows. x [LEVEL (SURROUND)] You can vary the level of surround speakers as follows. on the remote. x [TEST TONE] The speakers will hear the test tone from each speaker in the [SIZE] setting.) * When you select one of all.... [CENTER] Set this between -6 dB and +6 dB in 1 dB increments. Adjusting the speaker level by using the test tone 1 Press DISPLAY when the system is not emitted from each speaker in stop mode. The Setup Display appears. 4 Press X/x repeatedly to select [SPEAKER SETUP], then press ENTER or c. 5 ...
Operating Instructions
Page 76
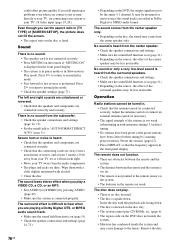
...). • Depending on the source, the effect of [SCREEN SETUP], the picture does not fill the screen. • The aspect ratio on the DVD, the output signal may cause damage to [STEREO] by scanning preset stations). No sound is heard from the audio components. • The plugs and ...too weak (when tuning in . • Check that the speakers and components are obstacles between the remote and the system. • The distance between the remote and the system is too far. • The remote is in pause mode or in Dolby Digital or MPEG audio format. It may be monaural or stereo...
...). • Depending on the source, the effect of [SCREEN SETUP], the picture does not fill the screen. • The aspect ratio on the DVD, the output signal may cause damage to [STEREO] by scanning preset stations). No sound is heard from the audio components. • The plugs and ...too weak (when tuning in . • Check that the speakers and components are obstacles between the remote and the system. • The distance between the remote and the system is too far. • The remote is in pause mode or in Dolby Digital or MPEG audio format. It may be monaural or stereo...

Operating Instructions
Page 77
...width) × 2,048 (height) in normal mode, or more than 3,300,000 pixels in the front panel display. • Contact your Sony dealer or local authorized Sony service facility. [Data error] appears on . The subtitle cannot be played. • The DATA CD is not recorded in the MP3 format... the [MODE (MP3, JPEG)] setting, re-load the disc or turn the system off subtitles. A disc does not start playback (page 30). • The title, DVD or PBC menu automatically appears on the system or the remote and then start playing from the beginning. • Program play is broken. •...
...width) × 2,048 (height) in normal mode, or more than 3,300,000 pixels in the front panel display. • Contact your Sony dealer or local authorized Sony service facility. [Data error] appears on . The subtitle cannot be played. • The DATA CD is not recorded in the MP3 format... the [MODE (MP3, JPEG)] setting, re-load the disc or turn the system off subtitles. A disc does not start playback (page 30). • The title, DVD or PBC menu automatically appears on the system or the remote and then start playing from the beginning. • Program play is broken. •...
Operating Instructions
Page 84
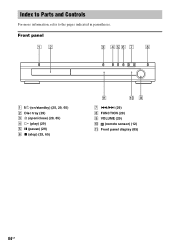
Index to Parts and Controls For more information, refer to the pages indicated in parentheses. Front panel A "/1 (on/standby) (25, 29, 65) B Disc tray (29) C A (open/close) (29, 65) D H (play) (29) E X (pause) (29) F x (stop) (29, 65) G ./> (29) H FUNCTION (29) I VOLUME (29) J (remote sensor) (12) K Front panel display (85) 84GB
Index to Parts and Controls For more information, refer to the pages indicated in parentheses. Front panel A "/1 (on/standby) (25, 29, 65) B Disc tray (29) C A (open/close) (29, 65) D H (play) (29) E X (pause) (29) F x (stop) (29, 65) G ./> (29) H FUNCTION (29) I VOLUME (29) J (remote sensor) (12) K Front panel display (85) 84GB

Operating Instructions
Page 87
... a tactile dot.* I CLEAR, - (26, 31, 59, 60) Additional Information J TOP MENU (33) K C/X/x/c/ENTER (25, 31, 51, 55, 61, 65, 66) L O RETURN (34) M REPLAY, STEP (29) N . Remote A TV [/1 (on /standby) (25, 29, 63) T AMP MENU (25, 61, 65) U DSGX (53) V FUNCTION (20, 29, 53, 61) W SOUND FIELD (51) X DISPLAY (63) Y PICTURE NAVI... ADVANCE, STEP (29) eh M/ SLOW, TUNING + (42, 62) ej x (stop) (29, 55, 63) ek X (pause) (29) * Use the tactile dot as a reference when operating the system. 87GB
... a tactile dot.* I CLEAR, - (26, 31, 59, 60) Additional Information J TOP MENU (33) K C/X/x/c/ENTER (25, 31, 51, 55, 61, 65, 66) L O RETURN (34) M REPLAY, STEP (29) N . Remote A TV [/1 (on /standby) (25, 29, 63) T AMP MENU (25, 61, 65) U DSGX (53) V FUNCTION (20, 29, 53, 61) W SOUND FIELD (51) X DISPLAY (63) Y PICTURE NAVI... ADVANCE, STEP (29) eh M/ SLOW, TUNING + (42, 62) ej x (stop) (29, 55, 63) ek X (pause) (29) * Use the tactile dot as a reference when operating the system. 87GB
Operating Instructions
Page 90
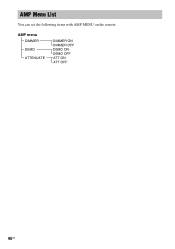
AMP Menu List You can set the following items with AMP MENU on the remote. AMP menu DIMMER DEMO ATTENUATE DIMMER ON DIMMER OFF DEMO ON DEMO OFF ATT ON ATT OFF 90GB
AMP Menu List You can set the following items with AMP MENU on the remote. AMP menu DIMMER DEMO ATTENUATE DIMMER ON DIMMER OFF DEMO ON DEMO OFF ATT ON ATT OFF 90GB
Operating Instructions
Page 91
...70 B BACKGROUND 69 Batteries 12 BLACK LEVEL 69 BLACK LEVEL (COMPONENT OUT) 69 C CHAPTER 43 Chapter 80 COLOR SYSTEM 68 COMPONENT VIDEO OUT 20 Connecting the AC power cord (mains lead) 25 Continuous play 29 Control Menu 9 Controlling...Digital 80 Dolby Pro Logic II 80 Dolby Surround Pro Logic 80 DSGX 53 DTS 49, 81 DVD 81 DVD+RW 81 DVD's menu 33 DVD-RW 34, 81 E EFFECT 41 F Fast forward 42 Fast reverse 42 FILE 43 File 81... PROGRESSIVE VIDEO 21 Q Quick Setup 26 R Radio 63 Rear Panel 86 Region Code 7, 82 Remote 12, 59, 87 Repeat Play 32 RESET 67 Resume Play 30 S S VIDEO 19 Scan 42 SCENE 43 Scene 82...
...70 B BACKGROUND 69 Batteries 12 BLACK LEVEL 69 BLACK LEVEL (COMPONENT OUT) 69 C CHAPTER 43 Chapter 80 COLOR SYSTEM 68 COMPONENT VIDEO OUT 20 Connecting the AC power cord (mains lead) 25 Continuous play 29 Control Menu 9 Controlling...Digital 80 Dolby Pro Logic II 80 Dolby Surround Pro Logic 80 DSGX 53 DTS 49, 81 DVD 81 DVD+RW 81 DVD's menu 33 DVD-RW 34, 81 E EFFECT 41 F Fast forward 42 Fast reverse 42 FILE 43 File 81... PROGRESSIVE VIDEO 21 Q Quick Setup 26 R Radio 63 Rear Panel 86 Region Code 7, 82 Remote 12, 59, 87 Repeat Play 32 RESET 67 Resume Play 30 S S VIDEO 19 Scan 42 SCENE 43 Scene 82...


