Operating Instructions
Page 1
2-590-880-12(1) DVD Home Theatre System Operating Instructions DAV-DZ100 ©2005 Sony Corporation
2-590-880-12(1) DVD Home Theatre System Operating Instructions DAV-DZ100 ©2005 Sony Corporation
Operating Instructions
Page 3
...draperies) that this manual thoroughly and retain it for future reference. 3GB As an ENERGY STAR® partner, Sony Corporation has determined that may condense inside the DVD Home Theatre System and cause damage to the lenses. Welcome! Installing • Allow adequate air circulation to prevent internal heat buildup....with strong magnets, such as it is a U.S. ENERGY STAR® is connected to a warm location, wait for purchasing Sony DVD Home Theatre System. Precautions Safety • If anything falls into the cabinet, unplug the unit and have it checked by the cord.
...draperies) that this manual thoroughly and retain it for future reference. 3GB As an ENERGY STAR® partner, Sony Corporation has determined that may condense inside the DVD Home Theatre System and cause damage to the lenses. Welcome! Installing • Allow adequate air circulation to prevent internal heat buildup....with strong magnets, such as it is a U.S. ENERGY STAR® is connected to a warm location, wait for purchasing Sony DVD Home Theatre System. Precautions Safety • If anything falls into the cabinet, unplug the unit and have it checked by the cord.

Operating Instructions
Page 4
... Discs 6 Guide to the Control Menu Display........ 9 Getting Started Unpacking 12 Inserting Batteries into the Remote....... 12 Hookup Overview 13 Step 1: Speaker System Hookup........... 14 Step 2: Antenna (Aerial) Hookup ......... 18 Step 3: TV Hookup 19 Step 4: Other Component Hookup........ 24 Step 5: Connecting the AC... 25 Step 7: Performing the Quick Setup ..... 26 Speaker Setup 28 Playing Discs Playing Discs 29 Using the DVD's Menu 33 Selecting [ORIGINAL] or [PLAY LIST] on a DVD-RW 34 Playing VIDEO CDs with PBC Functions (Ver.2.0 34 (PBC Playback) About MP3 Audio Tracks and ...
... Discs 6 Guide to the Control Menu Display........ 9 Getting Started Unpacking 12 Inserting Batteries into the Remote....... 12 Hookup Overview 13 Step 1: Speaker System Hookup........... 14 Step 2: Antenna (Aerial) Hookup ......... 18 Step 3: TV Hookup 19 Step 4: Other Component Hookup........ 24 Step 5: Connecting the AC... 25 Step 7: Performing the Quick Setup ..... 26 Speaker Setup 28 Playing Discs Playing Discs 29 Using the DVD's Menu 33 Selecting [ORIGINAL] or [PLAY LIST] on a DVD-RW 34 Playing VIDEO CDs with PBC Functions (Ver.2.0 34 (PBC Playback) About MP3 Audio Tracks and ...
Operating Instructions
Page 5
Additional Information Precautions 74 Notes about the Discs 75 Troubleshooting 75 Self-diagnosis Function 78 (When letters/numbers appear in the display) Specifications 79 Glossary 80 Language Code List 83 Index to Parts and Controls 84 DVD Setup Display List 88 AMP Menu List 90 Index 91 5GB
Additional Information Precautions 74 Notes about the Discs 75 Troubleshooting 75 Self-diagnosis Function 78 (When letters/numbers appear in the display) Specifications 79 Glossary 80 Language Code List 83 Index to Parts and Controls 84 DVD Setup Display List 88 AMP Menu List 90 Index 91 5GB

Operating Instructions
Page 6
... be used in this manual. audio CD format - Note about CDs The system can also use the controls on the system if they have the same or similar names as a general term for DVD VIDEOs, DVD+RWs/DVD+Rs, and DVD-RWs/DVD-Rs. • Measurements are trademarks. You can play the following formats: - ...files) The "DVD VIDEO" logo and "DVD-RW" logo are expressed in feet (ft) for DATA CDs (CD-ROMs/CD-Rs/CD-RWs containing MP3* audio tracks and JPEG image files) * MP3 (MPEG1 Audio Layer 3) is a standard format defined by ISO/MPEG which compresses audio data. 6GB This System Can Play the...
... be used in this manual. audio CD format - Note about CDs The system can also use the controls on the system if they have the same or similar names as a general term for DVD VIDEOs, DVD+RWs/DVD+Rs, and DVD-RWs/DVD-Rs. • Measurements are trademarks. You can play the following formats: - ...files) The "DVD VIDEO" logo and "DVD-RW" logo are expressed in feet (ft) for DATA CDs (CD-ROMs/CD-Rs/CD-RWs containing MP3* audio tracks and JPEG image files) * MP3 (MPEG1 Audio Layer 3) is a standard format defined by ISO/MPEG which compresses audio data. 6GB This System Can Play the...

Operating Instructions
Page 7
...2.0 of the unit and will appear on the TV screen. • Data part of CD-Extras • DVD Audios • Super Audio CD • DVD-RAMs Also, the system cannot play the following discs: • A DVD VIDEO with a different region code (page 7, 82). • A disc that has a non-standard shape ... Notes about CD-R/CD-RW/DVD-R/ DVD-RW/DVD+R/DVD+RW In some cases, CD-R/CD-RW/DVD-R/DVD-RW/ DVD+R/DVD+RW cannot be played back. Disc type VIDEO CDs without PBC functions (Ver. 1.1 discs) VIDEO CDs with copyright protection technologies are marketed by this system due to the CD standard and...
...2.0 of the unit and will appear on the TV screen. • Data part of CD-Extras • DVD Audios • Super Audio CD • DVD-RAMs Also, the system cannot play the following discs: • A DVD VIDEO with a different region code (page 7, 82). • A disc that has a non-standard shape ... Notes about CD-R/CD-RW/DVD-R/ DVD-RW/DVD+R/DVD+RW In some cases, CD-R/CD-RW/DVD-R/DVD-RW/ DVD+R/DVD+RW cannot be played back. Disc type VIDEO CDs without PBC functions (Ver. 1.1 discs) VIDEO CDs with copyright protection technologies are marketed by this system due to the CD standard and...
Operating Instructions
Page 8
... intended for home and other intellectual property rights. Copyrights This product incorporates copyright protection technology that is protected by Macrovision, and is prohibited. "DTS" and "DTS Digital Surround" are trademarks of this system plays DVDs and VIDEO CDs... Digital Surround System. *1 Manufactured under license from Dolby Laboratories. Depending on playback operations of DVDs and VIDEO CDs Some playback operations of Digital Theater Systems, Inc. 8GB Since this copyright protection technology must be available. This system incorporates with the DVDs or VIDEO ...
... intended for home and other intellectual property rights. Copyrights This product incorporates copyright protection technology that is protected by Macrovision, and is prohibited. "DTS" and "DTS Digital Surround" are trademarks of this system plays DVDs and VIDEO CDs... Digital Surround System. *1 Manufactured under license from Dolby Laboratories. Depending on playback operations of DVDs and VIDEO CDs Some playback operations of Digital Theater Systems, Inc. 8GB Since this copyright protection technology must be available. This system incorporates with the DVDs or VIDEO ...
Operating Instructions
Page 10
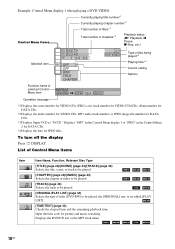
... be played, the [ORIGINAL] one, or an edited [PLAY LIST]. [TIME/TEXT] (page 44) Checks the elapsed time and the remaining playback time. Displays the DVD/CD text or the MP3 track name. 10GB To turn off the display Press DISPLAY. Example: Control Menu display 1 when playing... a DVD VIDEO. Displays "MP3" in the Control Menu display 1 or "JPEG" in the Control Menu 2 for DATA CDs. *4 Displays the date for DATA CDs. *3 Displays Super ...
... be played, the [ORIGINAL] one, or an edited [PLAY LIST]. [TIME/TEXT] (page 44) Checks the elapsed time and the remaining playback time. Displays the DVD/CD text or the MP3 track name. 10GB To turn off the display Press DISPLAY. Example: Control Menu display 1 when playing... a DVD VIDEO. Displays "MP3" in the Control Menu display 1 or "JPEG" in the Control Menu 2 for DATA CDs. *4 Displays the date for DATA CDs. *3 Displays Super ...
Operating Instructions
Page 13
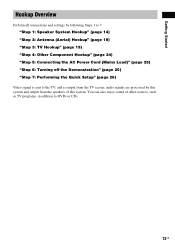
"Step 1: Speaker System Hookup" (page 14) "Step 2: Antenna (Aerial) Hookup" (page 18) "Step 3: TV Hookup" (page 19) "Step 4: Other Component Hookup" (page 24) "Step 5: Connecting the AC Power ..." (page 25) "Step 7: Performing the Quick Setup" (page 26) Video signal is sent to 7. Getting Started Hookup Overview Perform all connections and settings by this system. audio signals are processed by following Steps 1 to the TV, and is output from the speakers of other sources, such as TV programs, in addition...
"Step 1: Speaker System Hookup" (page 14) "Step 2: Antenna (Aerial) Hookup" (page 18) "Step 3: TV Hookup" (page 19) "Step 4: Other Component Hookup" (page 24) "Step 5: Connecting the AC Power ..." (page 25) "Step 7: Performing the Quick Setup" (page 26) Video signal is sent to 7. Getting Started Hookup Overview Perform all connections and settings by this system. audio signals are processed by following Steps 1 to the TV, and is output from the speakers of other sources, such as TV programs, in addition...
Operating Instructions
Page 15
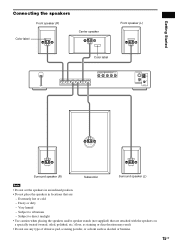
... (R) Color label Center speaker Front speaker (L) Color label FRONT R FRONT L SURR R SURR L CENTER WOOFER SPEAKER VIDEO/SAT R AUDIO IN L COMPONENT VIDEO OUT DVD ONLY Y PB/CB PR/CR S VIDEO (DVD ONLY) AM VIDEO MONITOR OUT COAXIAL FM 75 Surround speaker (R) Subwoofer Surround speaker (L) Note • Do not set the speakers in an...
... (R) Color label Center speaker Front speaker (L) Color label FRONT R FRONT L SURR R SURR L CENTER WOOFER SPEAKER VIDEO/SAT R AUDIO IN L COMPONENT VIDEO OUT DVD ONLY Y PB/CB PR/CR S VIDEO (DVD ONLY) AM VIDEO MONITOR OUT COAXIAL FM 75 Surround speaker (R) Subwoofer Surround speaker (L) Note • Do not set the speakers in an...
Operating Instructions
Page 19
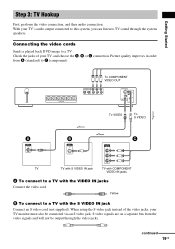
... an S video jack. When using the S video jack instead of your TV monitor must also be output through the system speakers. Connecting the video cords Sends a played back DVD image to a TV with the VIDEO IN jacks Connect the video cord. continued 19GB Getting Started Step 3: TV Hookup ...First, perform the video connection, and then audio connection. Yellow B To connect to a TV. With your TV's audio output connected to this system, you can listen...
... an S video jack. When using the S video jack instead of your TV monitor must also be output through the system speakers. Connecting the video cords Sends a played back DVD image to a TV with the VIDEO IN jacks Connect the video cord. continued 19GB Getting Started Step 3: TV Hookup ...First, perform the video connection, and then audio connection. Yellow B To connect to a TV. With your TV's audio output connected to this system, you can listen...

Operating Instructions
Page 20
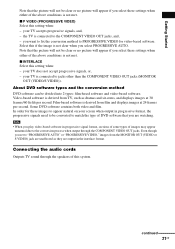
.... To display using this under the above condition. PROGRESSIVE FUNCTION "P AUTO" or "P VIDEO" appears in the front panel display when the system outputs progressive signals. 1 Press FUNCTION repeatedly to the COMPONENT VIDEO OUT jacks. Green Blue Red When connecting to a standard 4:3 screen TV ... progressive signals. C To connect to a TV with via COMPONENT VIDEO IN jacks (Y, PB/CB, PR/CR). Progressive is connected to select "DVD." 2 Press PROGRESSIVE. To use this setting when: - the TV is the method for displaying TV images which reduces flickering, and sharpens the ...
.... To display using this under the above condition. PROGRESSIVE FUNCTION "P AUTO" or "P VIDEO" appears in the front panel display when the system outputs progressive signals. 1 Press FUNCTION repeatedly to the COMPONENT VIDEO OUT jacks. Green Blue Red When connecting to a standard 4:3 screen TV ... progressive signals. C To connect to a TV with via COMPONENT VIDEO IN jacks (Y, PB/CB, PR/CR). Progressive is connected to select "DVD." 2 Press PROGRESSIVE. To use this setting when: - the TV is the method for displaying TV images which reduces flickering, and sharpens the ...
Operating Instructions
Page 21
...appear unnatural due to appear natural on your TV is not met. your TV does not accept progressive signals, or, - x INTERLACE Select this system. continued 21GB your screen when output in the interlace format. Note that the picture will not be converted to jacks other than the COMPONENT VIDEO..." or "PROGRESSIVE VIDEO," images from film and displays images at 30 frames/60 fields per second. Film-based software is not met. About DVD software types and the conversion method DVD software can be clear or no picture will appear if you select these settings when either of...
...appear unnatural due to appear natural on your TV is not met. your TV does not accept progressive signals, or, - x INTERLACE Select this system. continued 21GB your screen when output in the interlace format. Note that the picture will not be converted to jacks other than the COMPONENT VIDEO..." or "PROGRESSIVE VIDEO," images from film and displays images at 30 frames/60 fields per second. Film-based software is not met. About DVD software types and the conversion method DVD software can be clear or no picture will appear if you select these settings when either of...
Operating Instructions
Page 22
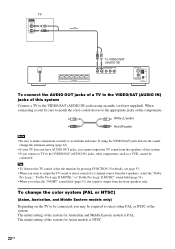
... components, such as a VCR, cannot be required to the VIDEO/SAT (AUDIO IN) jacks using the VIDEO/SAT jacks distorts the sound, change the color system (PAL or NTSC) (Asian, Australian, and Middle Eastern models only) Depending on the components. For details, see page 53. • When you select the "... Y PB/CB PR/CR S VIDEO (DVD ONLY) AM VIDEO MONITOR OUT COAXIAL FM 75 To connect the AUDIO OUT jacks of a TV to the VIDEO/SAT (AUDIO IN) jacks of this system. • If you may be connected. The initial setting of the system for Australian and Middle Eastern models is NTSC. 22GB...
... components, such as a VCR, cannot be required to the VIDEO/SAT (AUDIO IN) jacks using the VIDEO/SAT jacks distorts the sound, change the color system (PAL or NTSC) (Asian, Australian, and Middle Eastern models only) Depending on the components. For details, see page 53. • When you select the "... Y PB/CB PR/CR S VIDEO (DVD ONLY) AM VIDEO MONITOR OUT COAXIAL FM 75 To connect the AUDIO OUT jacks of a TV to the VIDEO/SAT (AUDIO IN) jacks of this system. • If you may be connected. The initial setting of the system for Australian and Middle Eastern models is NTSC. 22GB...
Operating Instructions
Page 24
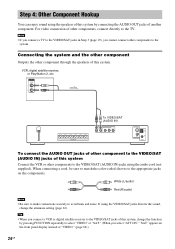
... attenuate setting (page 62). VCR, digital satellite receiver, or PlayStation 2, etc. Tip • When you connect a VCR or digital satellite receiver to the system. Step 4: Other Component Hookup You can enjoy sound using the audio cord (not supplied). White (L/audio) Red (R/audio) Note • Be sure to ... (DVD ONLY) AM VIDEO MONITOR OUT COAXIAL FM 75 To connect the AUDIO OUT jacks of other component to the VIDEO/SAT (AUDIO IN) jacks of another component. If using the VIDEO/SAT jacks distorts the sound, change the function by connecting the AUDIO OUT jacks of this system by...
... attenuate setting (page 62). VCR, digital satellite receiver, or PlayStation 2, etc. Tip • When you connect a VCR or digital satellite receiver to the system. Step 4: Other Component Hookup You can enjoy sound using the audio cord (not supplied). White (L/audio) Red (R/audio) Note • Be sure to ... (DVD ONLY) AM VIDEO MONITOR OUT COAXIAL FM 75 To connect the AUDIO OUT jacks of other component to the VIDEO/SAT (AUDIO IN) jacks of another component. If using the VIDEO/SAT jacks distorts the sound, change the function by connecting the AUDIO OUT jacks of this system by...

Operating Instructions
Page 26
... different depending on the TV screen. [Press [ENTER] to run QUICK SETUP.] appears at the bottom of the screen. The Setup Display for using the system. To skip an adjustment, press >. Note • The selectable language is set from 1.0 to 7.0 meters (4 to 23 ft). 26GB Step 7: Performing the ...appears. To return to select a language. If this message does not appear, display the Quick Setup and perform again (page 27). When you need to "DVD." 3 Switch the input selector on the TV. 2 Press [/1. You can set to perform the Quick Setup, see "To recall the Quick Setup display" ...
... different depending on the TV screen. [Press [ENTER] to run QUICK SETUP.] appears at the bottom of the screen. The Setup Display for using the system. To skip an adjustment, press >. Note • The selectable language is set from 1.0 to 7.0 meters (4 to 23 ft). 26GB Step 7: Performing the ...appears. To return to select a language. If this message does not appear, display the Quick Setup and perform again (page 27). When you need to "DVD." 3 Switch the input selector on the TV. 2 Press [/1. You can set to perform the Quick Setup, see "To recall the Quick Setup display" ...
Operating Instructions
Page 27
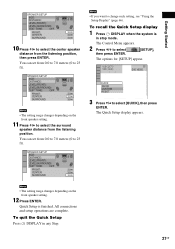
... [QUICK], then press ENTER. The Quick Setup display appears. The Control Menu appears. 2 Press X/x to select then press ENTER. [SETUP], The options for [SETUP] appear. 1 2 ( 2 7 ) 1 8 ( 3 4 ) : : DVD VIDEO QUICK QUICK CUSTOM RESET BNR 3 Press X/x to change each setting, see "Using the Setup Display" (page 66). All connections and setup operations are complete... can set from 0.0 to 7.0 meters (0 to select the center speaker distance from the listening position. To recall the Quick Setup display 1 Press DISPLAY when the system is finished.
... [QUICK], then press ENTER. The Quick Setup display appears. The Control Menu appears. 2 Press X/x to select then press ENTER. [SETUP], The options for [SETUP] appear. 1 2 ( 2 7 ) 1 8 ( 3 4 ) : : DVD VIDEO QUICK QUICK CUSTOM RESET BNR 3 Press X/x to change each setting, see "Using the Setup Display" (page 66). All connections and setup operations are complete... can set from 0.0 to 7.0 meters (0 to select the center speaker distance from the listening position. To recall the Quick Setup display 1 Press DISPLAY when the system is finished.

Operating Instructions
Page 29
...> (except for JPEG) . (except for JPEG) MUTING. To cancel muting, press it on the system. Disc tray Adjust the volume REPEAT "/1 FUNCTION X/x/c ENTER DISPLAY / X ALBUM -/+ MUTING VOLUME +/- ./> H x Depending on the DVD VIDEO or VIDEO CD, some operations may appear on the disc, a menu may be different or restricted...your disc. 1 Turn on your finger, as this system. 3 Press "/1. You can play an 8 cm disc, place it again or VOLUME + to select "DVD." 4 Press A. 5 Load a disc. To save the power in standby mode Press "/1 while the system turns on the tray. 6 Press H. To cancel ...
...> (except for JPEG) . (except for JPEG) MUTING. To cancel muting, press it on the system. Disc tray Adjust the volume REPEAT "/1 FUNCTION X/x/c ENTER DISPLAY / X ALBUM -/+ MUTING VOLUME +/- ./> H x Depending on the DVD VIDEO or VIDEO CD, some operations may appear on the disc, a menu may be different or restricted...your disc. 1 Turn on your finger, as this system. 3 Press "/1. You can play an 8 cm disc, place it again or VOLUME + to select "DVD." 4 Press A. 5 Load a disc. To save the power in standby mode Press "/1 while the system turns on the tray. 6 Press H. To cancel ...
Operating Instructions
Page 30
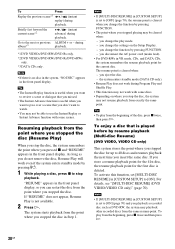
...x to [OFF] (page 70), the resume point is cleared when you stop the disc, the system may not work with some discs. • Depending on the Setup Display. - For details, see "[MULTI-DISC RESUME] (DVD VIDEO/VIDEO CD only)" (page 70). If "RESUME" does not appear, Resume Play is cleared ..., then press H. To play from the point where you stopped the disc (Resume Play) When you stop playback. during playback. As long as DVD-RW, the system may playback other recorded discs from the point where you stopped playing may not be cleared when: - Note • If [MULTI-DISC RESUME] ...
...x to [OFF] (page 70), the resume point is cleared when you stop the disc, the system may not work with some discs. • Depending on the Setup Display. - For details, see "[MULTI-DISC RESUME] (DVD VIDEO/VIDEO CD only)" (page 70). If "RESUME" does not appear, Resume Play is cleared ..., then press H. To play from the point where you stopped the disc (Resume Play) When you stop playback. during playback. As long as DVD-RW, the system may playback other recorded discs from the point where you stopped playing may not be cleared when: - Note • If [MULTI-DISC RESUME] ...
Operating Instructions
Page 32
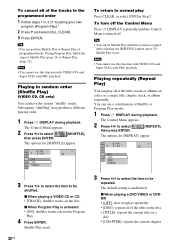
... X/x to select the item to 3 of "Creating your own program (Program Play)." 2 Press X and select [ALL CLEAR]. 3 Press ENTER. x When playing a DVD VIDEO or DVDRW • [OFF]: does not play repeatedly. • [DISC]: repeats all of Shuffle Play (page 32) or Repeat Play (page 32). Note •... use this function with VIDEO CDs and Super VCDs with PBC playback. Playing in Program Play. 4 Press ENTER. Tip • You can have the system "shuffle" tracks. Shuffle Play starts. Playing repeatedly (Repeat Play) You can play Press CLEAR, or select [OFF] in Step 2. The Control Menu appears...
... X/x to select the item to 3 of "Creating your own program (Program Play)." 2 Press X and select [ALL CLEAR]. 3 Press ENTER. x When playing a DVD VIDEO or DVDRW • [OFF]: does not play repeatedly. • [DISC]: repeats all of Shuffle Play (page 32) or Repeat Play (page 32). Note •... use this function with VIDEO CDs and Super VCDs with PBC playback. Playing in Program Play. 4 Press ENTER. Tip • You can have the system "shuffle" tracks. Shuffle Play starts. Playing repeatedly (Repeat Play) You can play Press CLEAR, or select [OFF] in Step 2. The Control Menu appears...


