
Operating Instructions
Page 2
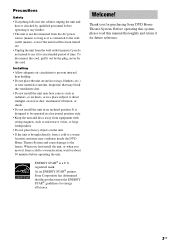
... DAV-DZ100 Serial No WARNING This equipment has been tested and found to correct the interference by turning the equipment off and on the apparatus. However, there is intended to alert the user to CATV system installer: This reminder is classified as practical. Note to the presence of important operating and maintenance (servicing) instructions in a particular installation. And don't place lighted candles...
... DAV-DZ100 Serial No WARNING This equipment has been tested and found to correct the interference by turning the equipment off and on the apparatus. However, there is intended to alert the user to CATV system installer: This reminder is classified as practical. Note to the presence of important operating and maintenance (servicing) instructions in a particular installation. And don't place lighted candles...
Operating Instructions
Page 3
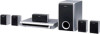
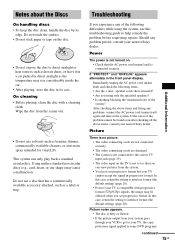
...; is connected to use it for purchasing Sony DVD Home Theatre System. It is designed to a warm location, moisture may block the ventilation slots. • Do not install the unit near materials (curtains, draperies) that this manual thoroughly and retain it for about 30 minutes before operating it any further. • The unit is not disconnected from the AC power source (mains...
...; is connected to use it for purchasing Sony DVD Home Theatre System. It is designed to a warm location, moisture may block the ventilation slots. • Do not install the unit near materials (curtains, draperies) that this manual thoroughly and retain it for about 30 minutes before operating it any further. • The unit is not disconnected from the AC power source (mains...

Operating Instructions
Page 4
... This Manual 6 This System Can Play the Following Discs 6 Guide to the Control Menu Display........ 9 Getting Started Unpacking 12 Inserting Batteries into the Remote....... 12 Hookup Overview 13 Step 1: Speaker System Hookup........... 14 Step 2: Antenna (Aerial) Hookup ......... 18 Step 3: TV Hookup 19 Step 4: Other Component Hookup........ 24 Step 5: Connecting the AC Power Cord (Mains Lead 25 Step 6: Turning off the Demonstration 25 Step 7: Performing the Quick Setup ..... 26 Speaker Setup 28 Playing Discs Playing Discs 29 Using the DVD's Menu 33 Selecting [ORIGINAL] or [PLAY...
... This Manual 6 This System Can Play the Following Discs 6 Guide to the Control Menu Display........ 9 Getting Started Unpacking 12 Inserting Batteries into the Remote....... 12 Hookup Overview 13 Step 1: Speaker System Hookup........... 14 Step 2: Antenna (Aerial) Hookup ......... 18 Step 3: TV Hookup 19 Step 4: Other Component Hookup........ 24 Step 5: Connecting the AC Power Cord (Mains Lead 25 Step 6: Turning off the Demonstration 25 Step 7: Performing the Quick Setup ..... 26 Speaker Setup 28 Playing Discs Playing Discs 29 Using the DVD's Menu 33 Selecting [ORIGINAL] or [PLAY...
Operating Instructions
Page 10
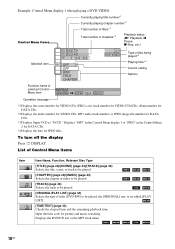
... playing a DVD VIDEO. Displays the DVD/CD text or the MP3 track name. 10GB Displays "MP3" in the Control Menu display 1 or "JPEG" in the Control Menu 2 for DATA CDs. *4 Displays the date for picture and music searching. To turn off the display Press DISPLAY. Input the time code for JPEG files. List of Control Menu items Item Item Name, Function, Relevant Disc Type [TITLE] (page 43)/[SCENE] (page 43)/[TRACK] (page 43) Selects...
... playing a DVD VIDEO. Displays the DVD/CD text or the MP3 track name. 10GB Displays "MP3" in the Control Menu display 1 or "JPEG" in the Control Menu 2 for DATA CDs. *4 Displays the date for picture and music searching. To turn off the display Press DISPLAY. Input the time code for JPEG files. List of Control Menu items Item Item Name, Function, Relevant Disc Type [TITLE] (page 43)/[SCENE] (page 43)/[TRACK] (page 43) Selects...
Operating Instructions
Page 30
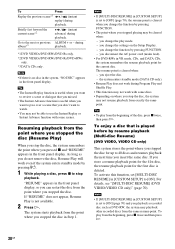
... not remove the disc, Resume Play will work with some discs. • Depending on the Setup Display. - Tip • The Instant Replay function is useful when you want to review a scene or dialogue that you missed. • The Instant Advance function is useful when you want to [ON]. As long as DVD-RW, the system may not work even if the system enters standby mode by pressing FUNCTION. •...
... not remove the disc, Resume Play will work with some discs. • Depending on the Setup Display. - Tip • The Instant Replay function is useful when you want to review a scene or dialogue that you missed. • The Instant Advance function is useful when you want to [ON]. As long as DVD-RW, the system may not work even if the system enters standby mode by pressing FUNCTION. •...

Operating Instructions
Page 31
... - - 3. TRACK - - 7. Playing Discs Creating your own program (Program Play) (VIDEO CD, CD only) You can play the contents of a disc in the order you want by pressing H. TRACK - - 4. TRACK 0 2 2. TRACK - - 6. To change or cancel using X/x. You can program up to the track row [T] (in the selected order. 7 Press H to select [PROGRAM], then press ENTER. The Control Menu appears. 2 Press X/x to start Program Play. The options for new programming. PROGRAM ALL...
... - - 3. TRACK - - 7. Playing Discs Creating your own program (Program Play) (VIDEO CD, CD only) You can play the contents of a disc in the order you want by pressing H. TRACK - - 4. TRACK 0 2 2. TRACK - - 6. To change or cancel using X/x. You can program up to the track row [T] (in the selected order. 7 Press H to select [PROGRAM], then press ENTER. The Control Menu appears. 2 Press X/x to start Program Play. The options for new programming. PROGRAM ALL...
Operating Instructions
Page 44
... selected. 2 Press ENTER. [T **:**:**] changes to a number). If you can search for a chapter (DVD VIDEO/DVD-RW) or track (CD) by pressing CLEAR, then select another number. 44GB Tip • When the Control Menu display is selected (** refers to [T --:--:--]. 3 Input the time code using the number buttons, then press ENTER. x When playing a VIDEO CD/Super VCD with PBC Playback [SCENE] x When playing a CD [TRACK] x When playing a DATA CD (MP3 audio) [ALBUM] [TRACK] x When playing...
... selected. 2 Press ENTER. [T **:**:**] changes to a number). If you can search for a chapter (DVD VIDEO/DVD-RW) or track (CD) by pressing CLEAR, then select another number. 44GB Tip • When the Control Menu display is selected (** refers to [T --:--:--]. 3 Input the time code using the number buttons, then press ENTER. x When playing a VIDEO CD/Super VCD with PBC Playback [SCENE] x When playing a CD [TRACK] x When playing a DATA CD (MP3 audio) [ALBUM] [TRACK] x When playing...

Operating Instructions
Page 47
... first level of the DVD/CD text, such as shown in the front panel display When the system is set [MODE (MP3, JPEG)] to [IMAGE (JPEG)] (page 39), the "NO IMAGE" message appears on the front panel display. • If you play a disc containing JPEG image files only and you set [MODE (MP3, JPEG)] to "TUNER AM" or "TUNER FM," you can check the frequency using the Control Menu...
... first level of the DVD/CD text, such as shown in the front panel display When the system is set [MODE (MP3, JPEG)] to [IMAGE (JPEG)] (page 39), the "NO IMAGE" message appears on the front panel display. • If you play a disc containing JPEG image files only and you set [MODE (MP3, JPEG)] to "TUNER AM" or "TUNER FM," you can check the frequency using the Control Menu...
Operating Instructions
Page 53
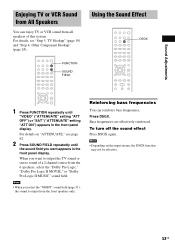
... output the TV sound or stereo sound of this system. Bass frequencies are effectively reinforced. For details on the input stream, the DSGX function may not be effective. 53GB Note • Depending on "ATTENUATE," see "Step 3: TV Hookup" (page 19) and "Step 4: Other Component Hookup" (page 24). Reinforcing bass frequencies You can enjoy TV or VCR sound from all speakers of a 2 channel source from the 6 speakers, select the "Dolby Pro Logic," "Dolby...
... output the TV sound or stereo sound of this system. Bass frequencies are effectively reinforced. For details on the input stream, the DSGX function may not be effective. 53GB Note • Depending on "ATTENUATE," see "Step 3: TV Hookup" (page 19) and "Step 4: Other Component Hookup" (page 24). Reinforcing bass frequencies You can enjoy TV or VCR sound from all speakers of a 2 channel source from the 6 speakers, select the "Dolby Pro Logic," "Dolby...
Operating Instructions
Page 56
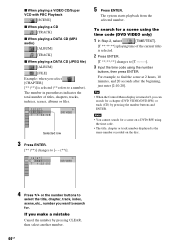
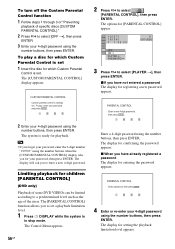
... system is already set 1 Insert the disc for registering a new password appears. CUSTOM PARENTAL CONTROL Custom parental control is in stop mode. The display will ask you to set . To play , enter your 4-digit password using the number buttons, then press ENTER. To play a disc for which Custom Parental Control is ready for playback. Tip • If you for [PARENTAL CONTROL] appear. 1 2 ( 2 7 ) 1 8 ( 3 4 ) T 1:32:55 DVD VIDEO OFF ON PLAYER PASSWORD 3 Press X/x to select [PARENTAL CONTROL...
... system is already set 1 Insert the disc for registering a new password appears. CUSTOM PARENTAL CONTROL Custom parental control is in stop mode. The display will ask you to set . To play , enter your 4-digit password using the number buttons, then press ENTER. To play a disc for which Custom Parental Control is ready for playback. Tip • If you for [PARENTAL CONTROL] appear. 1 2 ( 2 7 ) 1 8 ( 3 4 ) T 1:32:55 DVD VIDEO OFF ON PLAYER PASSWORD 3 Press X/x to select [PARENTAL CONTROL...
Operating Instructions
Page 57
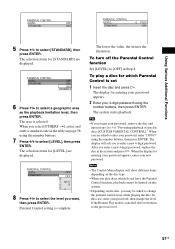
... on page 58 using the number buttons. 7 Press X/x to change the level. Note • The Control Menu display will ask you are asked to select [LEVEL], then press ENTER. Parental Control setting is set 1 Insert the disc and press H. Tip • If you play a disc for entering your password appears. 2 Enter your 4-digit password using the number buttons, then press ENTER. When the display for [LEVEL] are displayed. To turn off the Parental Control function Set [LEVEL] to select a geographic area...
... on page 58 using the number buttons. 7 Press X/x to change the level. Note • The Control Menu display will ask you are asked to select [LEVEL], then press ENTER. Parental Control setting is set 1 Insert the disc and press H. Tip • If you play a disc for entering your password appears. 2 Enter your 4-digit password using the number buttons, then press ENTER. When the display for [LEVEL] are displayed. To turn off the Parental Control function Set [LEVEL] to select a geographic area...
Operating Instructions
Page 60
...) using the number buttons. By pressing Number TV/VIDEO 0 1 2 3 4 5 6 7 8 9* CLEAR* ALBUM -* ALBUM +* TV's input source No input source (Default) VIDEO1 VIDEO2 VIDEO3 VIDEO4 VIDEO5 VIDEO6 VIDEO7 VIDEO8 COMPONENT 1 INPUT COMPONENT 2 INPUT COMPONENT 3 INPUT COMPONENT 4 INPUT * Except for transmit time (see the instructions of TV and this function does not work, change the transmit time Press and hold TV/VIDEO while entering the code for the TV's input source connected to this system, changes the system mode to "DVD," and then switches the TV's input source...
...) using the number buttons. By pressing Number TV/VIDEO 0 1 2 3 4 5 6 7 8 9* CLEAR* ALBUM -* ALBUM +* TV's input source No input source (Default) VIDEO1 VIDEO2 VIDEO3 VIDEO4 VIDEO5 VIDEO6 VIDEO7 VIDEO8 COMPONENT 1 INPUT COMPONENT 2 INPUT COMPONENT 3 INPUT COMPONENT 4 INPUT * Except for transmit time (see the instructions of TV and this function does not work, change the transmit time Press and hold TV/VIDEO while entering the code for the TV's input source connected to this system, changes the system mode to "DVD," and then switches the TV's input source...

Operating Instructions
Page 61
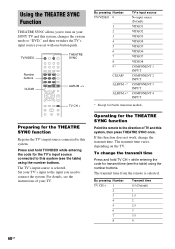
... set to "ATT ON." Enjoying the Sound of the system changes in the following sequence. Each time you press FUNCTION, the mode of Other Components AMP MENU FUNCTION X/x/c ENTER Selecting the connected component You can use a VCR or other components connected to the operation manual supplied with the components for SONY TVs. (This function may not work. For details on "ATTENUATE," see page 62. 61GB Refer to the VIDEO/SAT jacks on the rear panel. Other Operations...
... set to "ATT ON." Enjoying the Sound of the system changes in the following sequence. Each time you press FUNCTION, the mode of Other Components AMP MENU FUNCTION X/x/c ENTER Selecting the connected component You can use a VCR or other components connected to the operation manual supplied with the components for SONY TVs. (This function may not work. For details on "ATTENUATE," see page 62. 61GB Refer to the VIDEO/SAT jacks on the rear panel. Other Operations...
Operating Instructions
Page 62
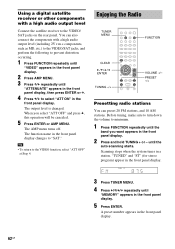
... front panel display. PRESET -/+ Presetting radio stations You can also connect the components with a high audio output level Connect the satellite receiver to the VIDEO/ SAT jacks on the rear panel. The output level is changed. Before tuning, make sure to turn down the volume to the VIDEO function, select "ATT OFF" at Step 4. Tip • To return to minimum. 1 Press FUNCTION repeatedly until the band you select "ATT OFF" and press x, this operation will be canceled. 5 Press ENTER or AMP MENU. A preset number...
... front panel display. PRESET -/+ Presetting radio stations You can also connect the components with a high audio output level Connect the satellite receiver to the VIDEO/ SAT jacks on the rear panel. The output level is changed. Before tuning, make sure to turn down the volume to the VIDEO function, select "ATT OFF" at Step 4. Tip • To return to minimum. 1 Press FUNCTION repeatedly until the band you select "ATT OFF" and press x, this operation will be canceled. 5 Press ENTER or AMP MENU. A preset number...
Operating Instructions
Page 66
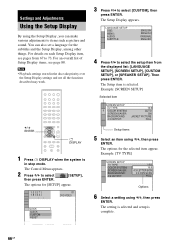
... SETUP], [SCREEN SETUP], [CUSTOM SETUP], or [SPEAKER SETUP]. Example: [SCREEN SETUP] Selected item SCREEN SETUP TV TYPE: COLOR SYSTEM: SCREEN SAVER: BACKGROUND: 4:3 OUTPUT: 16:9 AUTO ON JACKET PICTURE FULL Setup items 5 Select an item using X/x, then press ENTER. The options for [SETUP] appear. 1 2 ( 2 7 ) 1 8 ( 3 4 ) : : DVD VIDEO QUICK QUICK CUSTOM RESET BNR 3 Press X/x to items such as picture and sound. You can make various adjustments to select [CUSTOM], then press ENTER. X/x ENTER DISPLAY 1 Press DISPLAY when the system is selected. LANGUAGE SETUP OSD: MENU: AUDIO...
... SETUP], [SCREEN SETUP], [CUSTOM SETUP], or [SPEAKER SETUP]. Example: [SCREEN SETUP] Selected item SCREEN SETUP TV TYPE: COLOR SYSTEM: SCREEN SAVER: BACKGROUND: 4:3 OUTPUT: 16:9 AUTO ON JACKET PICTURE FULL Setup items 5 Select an item using X/x, then press ENTER. The options for [SETUP] appear. 1 2 ( 2 7 ) 1 8 ( 3 4 ) : : DVD VIDEO QUICK QUICK CUSTOM RESET BNR 3 Press X/x to items such as picture and sound. You can make various adjustments to select [CUSTOM], then press ENTER. X/x ENTER DISPLAY 1 Press DISPLAY when the system is selected. LANGUAGE SETUP OSD: MENU: AUDIO...
Operating Instructions
Page 67
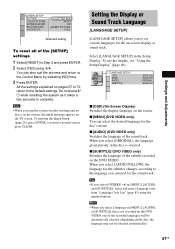
...: 4:3 OUTPUT: 4:3 LETTER BOX AUTO ON JACKET PICTURE FULL Selected setting To reset all of the [SETUP] settings 1 Select [RESET] in the disc is selected. x [AUDIO] (DVD VIDEO only) Switches the language of the subtitle recorded on -screen display or sound track. When you select [OTHERS t] in [MENU], [AUDIO], or [SUBTITLE] that is in the Setup Display. Tip • If you select [ORIGINAL], the language given priority in Step 3 and press ENTER. 2 Select [YES] using the number buttons. To perform the Quick Setup...
...: 4:3 OUTPUT: 4:3 LETTER BOX AUTO ON JACKET PICTURE FULL Selected setting To reset all of the [SETUP] settings 1 Select [RESET] in the disc is selected. x [AUDIO] (DVD VIDEO only) Switches the language of the subtitle recorded on -screen display or sound track. When you select [OTHERS t] in [MENU], [AUDIO], or [SUBTITLE] that is in the Setup Display. Tip • If you select [ORIGINAL], the language given priority in Step 3 and press ENTER. 2 Select [YES] using the number buttons. To perform the Quick Setup...
Operating Instructions
Page 75
... the setting to help remedy the problem before requesting repairs. This system can view pictures from the center out. • Do not use a disc that the AC power cord (mains lead) is compatible with a cleaning cloth. Troubleshooting If you set progressive format. Power The power is not turned on the TV is not set progressive format but your nearest Sony dealer. speaker cords short-circuited? • Are you can only play back a standard circular disc. If "PROTECT...
... the setting to help remedy the problem before requesting repairs. This system can view pictures from the center out. • Do not use a disc that the AC power cord (mains lead) is compatible with a cleaning cloth. Troubleshooting If you set progressive format. Power The power is not turned on the TV is not set progressive format but your nearest Sony dealer. speaker cords short-circuited? • Are you can only play back a standard circular disc. If "PROTECT...
Operating Instructions
Page 76
...; Depending on the DVD, the output signal may cause damage to the lenses. No sound or only a very low-level sound is heard from the surround speakers. • Check the speaker connections and settings. • Make sure the sound field function is recorded in the remote are playing a Dolby Digital, DTS, or MPEG audio sound track. • Make sure the sound field function is fixed. Preset the stations (page 62). • Press DISPLAY so that the antenna (aerial) is...
...; Depending on the DVD, the output signal may cause damage to the lenses. No sound or only a very low-level sound is heard from the surround speakers. • Check the speaker connections and settings. • Make sure the sound field function is recorded in the remote are playing a Dolby Digital, DTS, or MPEG audio sound track. • Make sure the sound field function is fixed. Preset the stations (page 62). • Press DISPLAY so that the antenna (aerial) is...
Operating Instructions
Page 81
...-layer and double-sided DVD 17 GB. Parental Control A function of the DVD to 8 hours of surround speakers and a center speaker. The audio data is recorded in Dolby Digital as well as in each country. Film based software, Video based software DVDs can enjoy playing simple interactive programs, programs with the DVD. continued 81GB Additional Information The data capacity of digital compression technology. The picture data uses the MPEG 2 format, one pair of...
...-layer and double-sided DVD 17 GB. Parental Control A function of the DVD to 8 hours of surround speakers and a center speaker. The audio data is recorded in Dolby Digital as well as in each country. Film based software, Video based software DVDs can enjoy playing simple interactive programs, programs with the DVD. continued 81GB Additional Information The data capacity of digital compression technology. The picture data uses the MPEG 2 format, one pair of...
Operating Instructions
Page 91
..., 37 Multi Session CD 7 Multi-angle function 54, 81 MULTI-DISC RESUME 70 Multilingual function 81 Muting 29 N Naming preset stations 63 O On-screen display Control Menu display 9 Setup Display 66 ORIGINAL 34 OSD 67 Other Component Hookup 24 P PARENTAL CONTROL 56, 81 PAUSE MODE 70 PBC Playback 7, 34, 81 PICTURE NAVI 38, 45 PLAY LIST 34 Preset Station 62 Program Play 31 PROGRESSIVE AUTO 20 Progressive format 20, 82 PROGRESSIVE VIDEO 21 Q Quick Setup 26 R Radio 63 Rear Panel 86 Region Code 7, 82 Remote 12...
..., 37 Multi Session CD 7 Multi-angle function 54, 81 MULTI-DISC RESUME 70 Multilingual function 81 Muting 29 N Naming preset stations 63 O On-screen display Control Menu display 9 Setup Display 66 ORIGINAL 34 OSD 67 Other Component Hookup 24 P PARENTAL CONTROL 56, 81 PAUSE MODE 70 PBC Playback 7, 34, 81 PICTURE NAVI 38, 45 PLAY LIST 34 Preset Station 62 Program Play 31 PROGRESSIVE AUTO 20 Progressive format 20, 82 PROGRESSIVE VIDEO 21 Q Quick Setup 26 R Radio 63 Rear Panel 86 Region Code 7, 82 Remote 12...


