
Operating Instructions (Main Stereo System)
Page 1
2-635-101-13(1) DVD Home Theatre System Operating Instructions DAV-DX170/DX250 ©2005 Sony Corporation
2-635-101-13(1) DVD Home Theatre System Operating Instructions DAV-DX170/DX250 ©2005 Sony Corporation
Operating Instructions (Main Stereo System)
Page 3
... you for energy efficiency. As an ENERGY STAR® partner, Sony Corporation has determined that this manual thoroughly and retain it from a cold to a warm location, moisture may condense inside the DVD Home Theatre System and cause damage to a warm location, wait for future reference....move it for about 30 minutes before operating the unit. registered mark. Before operating this system, please read this product meets the ENERGY STAR® guidelines for purchasing Sony DVD Home Theatre System. • Keep the unit and discs away from equipment with strong magnets, such as...
... you for energy efficiency. As an ENERGY STAR® partner, Sony Corporation has determined that this manual thoroughly and retain it from a cold to a warm location, moisture may condense inside the DVD Home Theatre System and cause damage to a warm location, wait for future reference....move it for about 30 minutes before operating the unit. registered mark. Before operating this system, please read this product meets the ENERGY STAR® guidelines for purchasing Sony DVD Home Theatre System. • Keep the unit and discs away from equipment with strong magnets, such as...
Operating Instructions (Main Stereo System)
Page 4
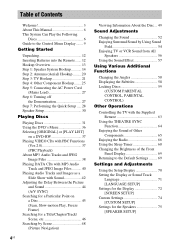
... Discs 6 Guide to the Control Menu Display........ 9 Getting Started Unpacking 12 Inserting Batteries into the Remote....... 12 Hookup Overview 13 Step 1: Speaker System Hookup........... 14 Step 2: Antenna (Aerial) Hookup ......... 20 Step 3: TV Hookup 21 Step 4: Other Component Hookup........ 25 Step 5: Connecting the AC... 27 Step 7: Performing the Quick Setup ..... 28 Speaker Setup 30 Playing Discs Playing Discs 31 Using the DVD's Menu 36 Selecting [ORIGINAL] or [PLAY LIST] on a DVD-RW 37 Playing VIDEO CDs with PBC Functions (Ver.2.0 37 (PBC Playback) About MP3 Audio Tracks and ...
... Discs 6 Guide to the Control Menu Display........ 9 Getting Started Unpacking 12 Inserting Batteries into the Remote....... 12 Hookup Overview 13 Step 1: Speaker System Hookup........... 14 Step 2: Antenna (Aerial) Hookup ......... 20 Step 3: TV Hookup 21 Step 4: Other Component Hookup........ 25 Step 5: Connecting the AC... 27 Step 7: Performing the Quick Setup ..... 28 Speaker Setup 30 Playing Discs Playing Discs 31 Using the DVD's Menu 36 Selecting [ORIGINAL] or [PLAY LIST] on a DVD-RW 37 Playing VIDEO CDs with PBC Functions (Ver.2.0 37 (PBC Playback) About MP3 Audio Tracks and ...
Operating Instructions (Main Stereo System)
Page 5
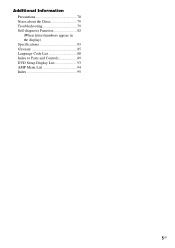
Additional Information Precautions 78 Notes about the Discs 79 Troubleshooting 79 Self-diagnosis Function 82 (When letters/numbers appear in the display) Specifications 83 Glossary 85 Language Code List 88 Index to Parts and Controls 89 DVD Setup Display List 93 AMP Menu List 94 Index 95 5US
Additional Information Precautions 78 Notes about the Discs 79 Troubleshooting 79 Self-diagnosis Function 82 (When letters/numbers appear in the display) Specifications 83 Glossary 85 Language Code List 88 Index to Parts and Controls 89 DVD Setup Display List 93 AMP Menu List 94 Index 95 5US
Operating Instructions (Main Stereo System)
Page 6
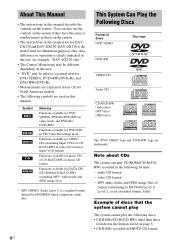
... tracks and JPEG image files) * MP3 (MPEG1 Audio Layer 3) is clearly indicated in the text, for DAVDX170 and DAV-DX250. video CD format - audio CD format - DAV-DX170 is the model used as those recorded in the formats listed on the remote. • The instructions in this manual... for illustration purposes only. Note about CDs The system can also use the controls on the system if they have the same or similar names as a general term for DVD VIDEOs, DVD+RWs/DVD+Rs, and DVD-RWs/DVD-Rs. • Measurements are for example, "DAV-DX170 only." • The Control Menu items may...
... tracks and JPEG image files) * MP3 (MPEG1 Audio Layer 3) is clearly indicated in the text, for DAVDX170 and DAV-DX250. video CD format - audio CD format - DAV-DX170 is the model used as those recorded in the formats listed on the remote. • The instructions in this manual... for illustration purposes only. Note about CDs The system can also use the controls on the system if they have the same or similar names as a general term for DVD VIDEOs, DVD+RWs/DVD+Rs, and DVD-RWs/DVD-Rs. • Measurements are for example, "DAV-DX170 only." • The Control Menu items may...
Operating Instructions (Main Stereo System)
Page 7
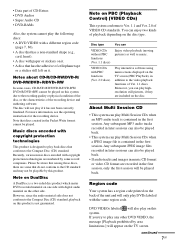
... screen (PBC Playback), in later sessions can also be played back. • This system can play highresolution still pictures, if they are marketed by some cases, CD-R/CD-RW/DVD-R/DVD-RW/ DVD+R/DVD+RW cannot be played back. Any subsequent MP3 audio tracks recorded in addition to Ver.... 1.1 and Ver. 2.0 of Ver. 1.1 discs. Notes about CD-R/CD-RW/DVD-R/ DVD-RW/DVD+R/DVD+RW In some record companies. Note on PBC (Playback Control) (VIDEO CDs) This system conforms to the video playback functions of VIDEO CD standards. Note on DualDisc A DualDisc is contained ...
... screen (PBC Playback), in later sessions can also be played back. • This system can play highresolution still pictures, if they are marketed by some cases, CD-R/CD-RW/DVD-R/DVD-RW/ DVD+R/DVD+RW cannot be played back. Any subsequent MP3 audio tracks recorded in addition to Ver.... 1.1 and Ver. 2.0 of Ver. 1.1 discs. Notes about CD-R/CD-RW/DVD-R/ DVD-RW/DVD+R/DVD+RW In some record companies. Note on PBC (Playback Control) (VIDEO CDs) This system conforms to the video playback functions of VIDEO CD standards. Note on DualDisc A DualDisc is contained ...

Operating Instructions (Main Stereo System)
Page 8
... that is prohibited. Reverse engineering or disassembly is protected by Macrovision. This system incorporates with the DVDs or VIDEO CDs. Depending on playback operations of DVDs and VIDEO CDs Some playback operations of DVDs and VIDEO CDs may be available. Also, refer to the disc contents ... not be intentionally set by area restrictions. patents and other limited viewing uses only unless otherwise authorized by U.S. Use of this system plays DVDs and VIDEO CDs according to the instructions supplied with Dolby*1 Digital and Dolby Pro Logic (II) adaptive matrix surround decoder and ...
... that is prohibited. Reverse engineering or disassembly is protected by Macrovision. This system incorporates with the DVDs or VIDEO CDs. Depending on playback operations of DVDs and VIDEO CDs Some playback operations of DVDs and VIDEO CDs may be available. Also, refer to the disc contents ... not be intentionally set by area restrictions. patents and other limited viewing uses only unless otherwise authorized by U.S. Use of this system plays DVDs and VIDEO CDs according to the instructions supplied with Dolby*1 Digital and Dolby Pro Logic (II) adaptive matrix surround decoder and ...

Operating Instructions (Main Stereo System)
Page 10
...for DATA CDs. *4 Displays the date for picture and music searching. To turn off the display Press DISPLAY. Example: Control Menu display 1 when playing a DVD VIDEO. Input the time code for JPEG files. List of Control Menu items Item Item Name, Function, Relevant Disc Type [TITLE] (page 46)/[SCENE] ... Playback, X Pause, x Stop, etc.) 12 (27) 18 (34) T 1:32:55 OFF OFF DISC TITLE CHAPTER DVD VIDEO Type of disc being played*3 Playing time*4 Current setting Options Function name of titles (DVD-RW) to be played, the [ORIGINAL] one, or an edited [PLAY LIST]. [TIME/TEXT] (page 47) Checks ...
...for DATA CDs. *4 Displays the date for picture and music searching. To turn off the display Press DISPLAY. Example: Control Menu display 1 when playing a DVD VIDEO. Input the time code for JPEG files. List of Control Menu items Item Item Name, Function, Relevant Disc Type [TITLE] (page 46)/[SCENE] ... Playback, X Pause, x Stop, etc.) 12 (27) 18 (34) T 1:32:55 OFF OFF DISC TITLE CHAPTER DVD VIDEO Type of disc being played*3 Playing time*4 Current setting Options Function name of titles (DVD-RW) to be played, the [ORIGINAL] one, or an edited [PLAY LIST]. [TIME/TEXT] (page 47) Checks ...
Operating Instructions (Main Stereo System)
Page 13
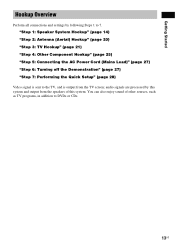
audio signals are processed by following Steps 1 to the TV, and is sent to 7. You can also enjoy sound of this system and output from the TV screen; "Step 1: Speaker System Hookup" (page 14) "Step 2: Antenna (Aerial) Hookup" (page 20) "Step 3: TV Hookup" (page 21) "Step 4: Other Component Hookup" (page 25) "Step 5: Connecting... 27) "Step 7: Performing the Quick Setup" (page 28) Video signal is output from the speakers of other sources, such as TV programs, in addition to DVDs or CDs. 13US Getting Started Hookup Overview Perform all connections and settings by this...
audio signals are processed by following Steps 1 to the TV, and is sent to 7. You can also enjoy sound of this system and output from the TV screen; "Step 1: Speaker System Hookup" (page 14) "Step 2: Antenna (Aerial) Hookup" (page 20) "Step 3: TV Hookup" (page 21) "Step 4: Other Component Hookup" (page 25) "Step 5: Connecting... 27) "Step 7: Performing the Quick Setup" (page 28) Video signal is output from the speakers of other sources, such as TV programs, in addition to DVDs or CDs. 13US Getting Started Hookup Overview Perform all connections and settings by this...
Operating Instructions (Main Stereo System)
Page 15
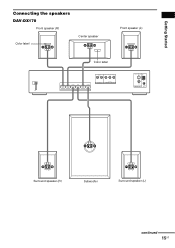
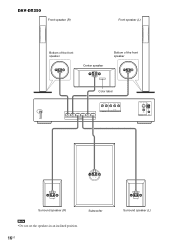
Getting Started Connecting the speakers DAV-DX170 Front speaker (R) Color label Center speaker Front speaker (L) Color label FRONT R FRONT L SURR R SURR L CENTER WOOFER SPEAKER AUDIO IN Y PB/CB PR/CR R L VIDEO/SAT DVD ONLY COMPONENT VIDEO OUT S VIDEO (DVD ONLY) AM VIDEO MONITOR OUT COAXIAL FM 75 Surround speaker (R) Subwoofer Surround speaker (L) continued 15US
Getting Started Connecting the speakers DAV-DX170 Front speaker (R) Color label Center speaker Front speaker (L) Color label FRONT R FRONT L SURR R SURR L CENTER WOOFER SPEAKER AUDIO IN Y PB/CB PR/CR R L VIDEO/SAT DVD ONLY COMPONENT VIDEO OUT S VIDEO (DVD ONLY) AM VIDEO MONITOR OUT COAXIAL FM 75 Surround speaker (R) Subwoofer Surround speaker (L) continued 15US
Operating Instructions (Main Stereo System)
Page 16
DAV-DX250 Front speaker (R) Front speaker (L) Bottom of the front speaker Center speaker Bottom of the front speaker Color label FRONT R FRONT L SURR R SURR L CENTER WOOFER SPEAKER AUDIO IN Y PB/CB PR/CR R L VIDEO/SAT DVD ONLY COMPONENT VIDEO OUT S VIDEO (DVD ONLY) AM VIDEO MONITOR OUT COAXIAL FM 75 Surround speaker (R) Note • Do not set the speakers in an inclined position. 16US Subwoofer Surround speaker (L)
DAV-DX250 Front speaker (R) Front speaker (L) Bottom of the front speaker Center speaker Bottom of the front speaker Color label FRONT R FRONT L SURR R SURR L CENTER WOOFER SPEAKER AUDIO IN Y PB/CB PR/CR R L VIDEO/SAT DVD ONLY COMPONENT VIDEO OUT S VIDEO (DVD ONLY) AM VIDEO MONITOR OUT COAXIAL FM 75 Surround speaker (R) Note • Do not set the speakers in an inclined position. 16US Subwoofer Surround speaker (L)
Operating Instructions (Main Stereo System)
Page 21
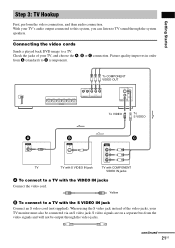
... VIDEO OUT S VIDEO (DVD ONLY) AM VIDEO MONITOR OUT COAXIAL FM 75 To VIDEO To S VIDEO A VIDEO IN B S VIDEO IN Y PB/CB PR/CR C TV TV with S VIDEO IN jack TV with COMPONENT VIDEO IN jacks A To connect to C (component). With your TV's audio output connected to this system, you can listen... to a TV. continued 21US Connecting the video cords Sends a played back DVD image to TV sound through the video jacks.
... VIDEO OUT S VIDEO (DVD ONLY) AM VIDEO MONITOR OUT COAXIAL FM 75 To VIDEO To S VIDEO A VIDEO IN B S VIDEO IN Y PB/CB PR/CR C TV TV with S VIDEO IN jack TV with COMPONENT VIDEO IN jacks A To connect to C (component). With your TV's audio output connected to this system, you can listen... to a TV. continued 21US Connecting the video cords Sends a played back DVD image to TV sound through the video jacks.
Operating Instructions (Main Stereo System)
Page 22
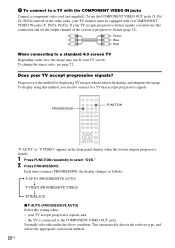
...under the above condition. Does your TV monitor must use the COMPONENT VIDEO OUT jacks (Y, PB/ CB, PR/CR) instead of the system to the COMPONENT VIDEO OUT jacks. Progressive is connected to progressive format (page 22). This automatically detects the software type, and selects the... appropriate conversion method. 22US Each time you need to connect to select "DVD." 2 Press PROGRESSIVE. If your TV accepts progressive format signals, you must be equipped with the COMPONENT VIDEO IN jacks Connect a component video...
...under the above condition. Does your TV monitor must use the COMPONENT VIDEO OUT jacks (Y, PB/ CB, PR/CR) instead of the system to the COMPONENT VIDEO OUT jacks. Progressive is connected to progressive format (page 22). This automatically detects the software type, and selects the... appropriate conversion method. 22US Each time you need to connect to select "DVD." 2 Press PROGRESSIVE. If your TV accepts progressive format signals, you must be equipped with the COMPONENT VIDEO IN jacks Connect a component video...

Operating Instructions (Main Stereo System)
Page 23
...AUTO" or "PROGRESSIVE VIDEO," images from TV, such as they are output in progressive format, the progressive signals need to match the type of DVD software that you select these settings when either of this if the image is not met. x INTERLACE Select this setting when: - Getting Started Note... that the picture will not be divided into 2 types: film-based software and video-based software. Select this system. Note that the picture will not be converted to be clear or no picture will appear if you select these settings when either of the...
...AUTO" or "PROGRESSIVE VIDEO," images from TV, such as they are output in progressive format, the progressive signals need to match the type of DVD software that you select these settings when either of this if the image is not met. x INTERLACE Select this setting when: - Getting Started Note... that the picture will not be divided into 2 types: film-based software and video-based software. Select this system. Note that the picture will not be converted to be clear or no picture will appear if you select these settings when either of the...
Operating Instructions (Main Stereo System)
Page 24
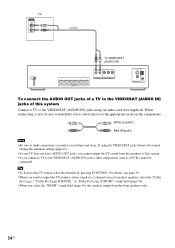
... COMPONENT VIDEO OUT S VIDEO (DVD ONLY) AM VIDEO MONITOR OUT COAXIAL FM 75 To connect the AUDIO OUT jacks of a TV to the VIDEO/SAT (AUDIO IN) jacks of this system Connect a TV to the TV sound, select the function by pressing FUNCTION. If using an audio cord (not supplied). When connecting... attenuate setting (page 66). • If your TV does not have AUDIO OUT jacks, you cannot output the TV sound from the speakers of this system. • If you connect a TV to the VIDEO/SAT (AUDIO IN) jacks, other components, such as a VCR, cannot be sure to match the color-coded...
... COMPONENT VIDEO OUT S VIDEO (DVD ONLY) AM VIDEO MONITOR OUT COAXIAL FM 75 To connect the AUDIO OUT jacks of a TV to the VIDEO/SAT (AUDIO IN) jacks of this system Connect a TV to the TV sound, select the function by pressing FUNCTION. If using an audio cord (not supplied). When connecting... attenuate setting (page 66). • If your TV does not have AUDIO OUT jacks, you cannot output the TV sound from the speakers of this system. • If you connect a TV to the VIDEO/SAT (AUDIO IN) jacks, other components, such as a VCR, cannot be sure to match the color-coded...

Operating Instructions (Main Stereo System)
Page 25
... the VCR or other components to the system. continued 25US AUDIO OUT L R To VIDEO/SAT (AUDIO IN) FRONT R FRONT L SURR R SURR L CENTER WOOFER SPEAKER AUDIO IN Y PB/CB PR/CR R L VIDEO/SAT DVD ONLY COMPONENT VIDEO OUT S VIDEO (DVD ONLY) AM VIDEO MONITOR OUT COAXIAL FM 75 To connect the ...AUDIO OUT jacks of other component to the VIDEO/SAT (AUDIO IN) jacks of this system by connecting the AUDIO OUT jacks of another component.
... the VCR or other components to the system. continued 25US AUDIO OUT L R To VIDEO/SAT (AUDIO IN) FRONT R FRONT L SURR R SURR L CENTER WOOFER SPEAKER AUDIO IN Y PB/CB PR/CR R L VIDEO/SAT DVD ONLY COMPONENT VIDEO OUT S VIDEO (DVD ONLY) AM VIDEO MONITOR OUT COAXIAL FM 75 To connect the ...AUDIO OUT jacks of other component to the VIDEO/SAT (AUDIO IN) jacks of this system by connecting the AUDIO OUT jacks of another component.
Operating Instructions (Main Stereo System)
Page 28
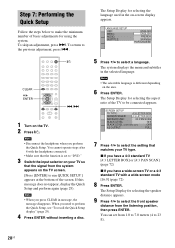
...or a 4:3 standard TV with the headphone connected. • Make sure that the signal from the listening position, then press ENTER. You can set to "DVD." 3 Switch the input selector on your TV type. Note • The selectable language is set from 1.0 to 7.0 meters (4 to 23 ft). 28US ... X/x to select the setting that matches your TV so that the function is different depending on -screen display appears. The Setup Display for using the system. Note • When you have a 4:3 standard TV [4:3 LETTER BOX] or [4:3 PAN SCAN] (page 72) x If you press CLEAR in message, the ...
...or a 4:3 standard TV with the headphone connected. • Make sure that the signal from the listening position, then press ENTER. You can set to "DVD." 3 Switch the input selector on your TV type. Note • The selectable language is set from 1.0 to 7.0 meters (4 to 23 ft). 28US ... X/x to select the setting that matches your TV so that the function is different depending on -screen display appears. The Setup Display for using the system. Note • When you have a 4:3 standard TV [4:3 LETTER BOX] or [4:3 PAN SCAN] (page 72) x If you press CLEAR in message, the ...

Operating Instructions (Main Stereo System)
Page 29
.... The Control Menu appears. 2 Press X/x to select then press ENTER. [SETUP], The options for [SETUP] appear. 1 2 ( 2 7 ) 1 8 ( 3 4 ) : : DVD VIDEO QUICK QUICK CUSTOM RESET BNR 3 Press X/x to 23 ft). All connections and setup operations are complete. You can set from 0.0 to 7.0 meters (0 to select... [QUICK], then press ENTER. To recall the Quick Setup display 1 Press DISPLAY when the system is finished. Quick Setup is in any Step. 29US Getting Started SPEAKER SETUP SIZE: DISTANCE: LEVEL(FRONT): LEVEL(SURROUND): TEST TONE: OFF ...
.... The Control Menu appears. 2 Press X/x to select then press ENTER. [SETUP], The options for [SETUP] appear. 1 2 ( 2 7 ) 1 8 ( 3 4 ) : : DVD VIDEO QUICK QUICK CUSTOM RESET BNR 3 Press X/x to 23 ft). All connections and setup operations are complete. You can set from 0.0 to 7.0 meters (0 to select... [QUICK], then press ENTER. To recall the Quick Setup display 1 Press DISPLAY when the system is finished. Quick Setup is in any Step. 29US Getting Started SPEAKER SETUP SIZE: DISTANCE: LEVEL(FRONT): LEVEL(SURROUND): TEST TONE: OFF ...
Operating Instructions (Main Stereo System)
Page 31
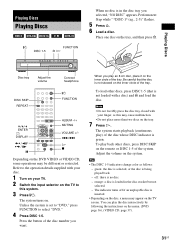
...on the tray, and then press A. Tip • The DISC 1-5 indicators change color as this system. 3 Press "/1. Adjust the volume on the tray. 7 Press H. orange: a disc is being played back. - Refer to select "DVD." 4 Press DISC 1-5. When you want. green: the disc is selected, or the disc is...DISC 1-5 of the tray. off if an unplayable disc is not skewed on the DVD VIDEO or VIDEO CD, some operations may cause malfunction. • Do not place more than two discs on the system. Playing Discs Disc tray Adjust the volume DISC SKIP REPEAT Connect headphone "/1 FUNCTION X/x/c...
...on the tray, and then press A. Tip • The DISC 1-5 indicators change color as this system. 3 Press "/1. Adjust the volume on the tray. 7 Press H. orange: a disc is being played back. - Refer to select "DVD." 4 Press DISC 1-5. When you want. green: the disc is selected, or the disc is...DISC 1-5 of the tray. off if an unplayable disc is not skewed on the DVD VIDEO or VIDEO CD, some operations may cause malfunction. • Do not place more than two discs on the system. Playing Discs Disc tray Adjust the volume DISC SKIP REPEAT Connect headphone "/1 FUNCTION X/x/c...

Operating Instructions (Main Stereo System)
Page 32
...the disc. However, this is no disc in the system, "NO DISC" appears in the front panel display. Change a disc while playing DISC SKIP another disc Play the desired disc directly DISC 1-5 on and off. About DVD 5-DISC changer Sub Tray Stocker Disc DISC 3 Main... appears in standby mode Press "/1 while the system turns on the desired disc system. To cancel standby mode, press "/1 once. Briefly fast forward the current scene*2 (instant advance) during album*3 playback. *1 DVD VIDEOs/DVD-RWs/DVD-Rs only. *2 DVD VIDEOs/DVD-RWs/DVD-Rs/DVD+RWs only. *3 DATA CDs only. To save...
...the disc. However, this is no disc in the system, "NO DISC" appears in the front panel display. Change a disc while playing DISC SKIP another disc Play the desired disc directly DISC 1-5 on and off. About DVD 5-DISC changer Sub Tray Stocker Disc DISC 3 Main... appears in standby mode Press "/1 while the system turns on the desired disc system. To cancel standby mode, press "/1 once. Briefly fast forward the current scene*2 (instant advance) during album*3 playback. *1 DVD VIDEOs/DVD-RWs/DVD-Rs only. *2 DVD VIDEOs/DVD-RWs/DVD-Rs/DVD+RWs only. *3 DATA CDs only. To save...


