
Operating Instructions (Main Stereo System)
Page 1
2-635-101-13(1) DVD Home Theatre System Operating Instructions DAV-DX170/DX250 ©2005 Sony Corporation
2-635-101-13(1) DVD Home Theatre System Operating Instructions DAV-DX170/DX250 ©2005 Sony Corporation
Operating Instructions (Main Stereo System)
Page 3
...ENERGY STAR® guidelines for about 30 minutes before operating the unit. Thank you move it for purchasing Sony DVD Home Theatre System. As an ENERGY STAR® partner, Sony Corporation has determined that this manual thoroughly and retain it from a cold to a warm location, moisture ...may condense inside the DVD Home Theatre System and cause damage to a warm location, wait for energy efficiency. ENERGY STAR® is brought directly ...
...ENERGY STAR® guidelines for about 30 minutes before operating the unit. Thank you move it for purchasing Sony DVD Home Theatre System. As an ENERGY STAR® partner, Sony Corporation has determined that this manual thoroughly and retain it from a cold to a warm location, moisture ...may condense inside the DVD Home Theatre System and cause damage to a warm location, wait for energy efficiency. ENERGY STAR® is brought directly ...
Operating Instructions (Main Stereo System)
Page 4
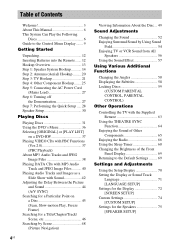
... Discs 6 Guide to the Control Menu Display........ 9 Getting Started Unpacking 12 Inserting Batteries into the Remote....... 12 Hookup Overview 13 Step 1: Speaker System Hookup........... 14 Step 2: Antenna (Aerial) Hookup ......... 20 Step 3: TV Hookup 21 Step 4: Other Component Hookup........ 25 Step 5: Connecting the AC... 27 Step 7: Performing the Quick Setup ..... 28 Speaker Setup 30 Playing Discs Playing Discs 31 Using the DVD's Menu 36 Selecting [ORIGINAL] or [PLAY LIST] on a DVD-RW 37 Playing VIDEO CDs with PBC Functions (Ver.2.0 37 (PBC Playback) About MP3 Audio Tracks and ...
... Discs 6 Guide to the Control Menu Display........ 9 Getting Started Unpacking 12 Inserting Batteries into the Remote....... 12 Hookup Overview 13 Step 1: Speaker System Hookup........... 14 Step 2: Antenna (Aerial) Hookup ......... 20 Step 3: TV Hookup 21 Step 4: Other Component Hookup........ 25 Step 5: Connecting the AC... 27 Step 7: Performing the Quick Setup ..... 28 Speaker Setup 30 Playing Discs Playing Discs 31 Using the DVD's Menu 36 Selecting [ORIGINAL] or [PLAY LIST] on a DVD-RW 37 Playing VIDEO CDs with PBC Functions (Ver.2.0 37 (PBC Playback) About MP3 Audio Tracks and ...
Operating Instructions (Main Stereo System)
Page 5
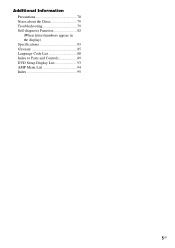
Additional Information Precautions 78 Notes about the Discs 79 Troubleshooting 79 Self-diagnosis Function 82 (When letters/numbers appear in the display) Specifications 83 Glossary 85 Language Code List 88 Index to Parts and Controls 89 DVD Setup Display List 93 AMP Menu List 94 Index 95 5US
Additional Information Precautions 78 Notes about the Discs 79 Troubleshooting 79 Self-diagnosis Function 82 (When letters/numbers appear in the display) Specifications 83 Glossary 85 Language Code List 88 Index to Parts and Controls 89 DVD Setup Display List 93 AMP Menu List 94 Index 95 5US
Operating Instructions (Main Stereo System)
Page 6
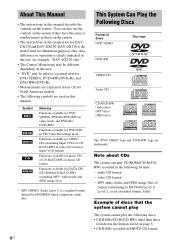
... also use the controls on the system if they have the same or similar names as a general term for DVD VIDEOs, DVD+RWs/DVD+Rs, and DVD-RWs/DVD-Rs. • Measurements are expressed in feet (ft) for DATA CDs (CD-ROMs/CD-Rs/CD-RWs containing MP3* audio tracks and JPEG ...CD format Functions available for North American models. • The following formats: - DAV-DX170 is clearly indicated in the text, for example, "DAV-DX170 only." • The Control Menu items may be used for DAVDX170 and DAV-DX250. About This Manual • The instructions in this manual describe the controls on ...
... also use the controls on the system if they have the same or similar names as a general term for DVD VIDEOs, DVD+RWs/DVD+Rs, and DVD-RWs/DVD-Rs. • Measurements are expressed in feet (ft) for DATA CDs (CD-ROMs/CD-Rs/CD-RWs containing MP3* audio tracks and JPEG ...CD format Functions available for North American models. • The following formats: - DAV-DX170 is clearly indicated in the text, for example, "DAV-DX170 only." • The Control Menu items may be used for DAVDX170 and DAV-DX250. About This Manual • The instructions in this manual describe the controls on ...
Operating Instructions (Main Stereo System)
Page 7
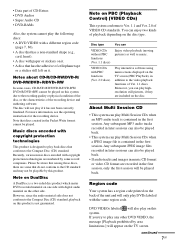
... labeled ALL will not play if it . continued 7US • Data part of CD-Extras • DVD Audios • Super Audio CD • DVD-RAMs Also, the system cannot play the following discs: • A DVD VIDEO with a different region code (page 7, 86). • A disc that has a non-standard shape (e.g., card, heart).... Moreover, you try to the Compact Disc (CD) standard, playback on the TV screen. About Multi Session CD • This system can play DVDs labeled with the same region code. Any subsequent JPEG image files recorded in later sessions can enjoy two kinds of the unit and ...
... labeled ALL will not play if it . continued 7US • Data part of CD-Extras • DVD Audios • Super Audio CD • DVD-RAMs Also, the system cannot play the following discs: • A DVD VIDEO with a different region code (page 7, 86). • A disc that has a non-standard shape (e.g., card, heart).... Moreover, you try to the Compact Disc (CD) standard, playback on the TV screen. About Multi Session CD • This system can play DVDs labeled with the same region code. Any subsequent JPEG image files recorded in later sessions can enjoy two kinds of the unit and ...

Operating Instructions (Main Stereo System)
Page 8
... otherwise authorized by Macrovision. Note on the DVD VIDEO, no region code indication may be given even though playing the DVD VIDEO is intended for home and other intellectual property rights. Use of this system plays DVDs and VIDEO CDs according to the instructions supplied... with Dolby*1 Digital and Dolby Pro Logic (II) adaptive matrix surround decoder and the DTS*2 Digital Surround System. *1 Manufactured under license from Dolby Laboratories. ...
... otherwise authorized by Macrovision. Note on the DVD VIDEO, no region code indication may be given even though playing the DVD VIDEO is intended for home and other intellectual property rights. Use of this system plays DVDs and VIDEO CDs according to the instructions supplied... with Dolby*1 Digital and Dolby Pro Logic (II) adaptive matrix surround decoder and the DTS*2 Digital Surround System. *1 Manufactured under license from Dolby Laboratories. ...

Operating Instructions (Main Stereo System)
Page 10
...number for VIDEO CDs, MP3 audio track number, or JPEG image file number for DATA CDs. *3 Displays Super VCD as "SVCD." Displays the DVD/CD text or the MP3 track name. 10US Input the time code for JPEG files. Displays "MP3" in the Control Menu display 1 or ...JPEG" in the Control Menu 2 for DATA CDs. *4 Displays the date for picture and music searching. Example: Control Menu display 1 when playing a DVD VIDEO. Control Menu items Selected item Currently playing title number*1 Currently playing chapter number*2 Total number of titles*1 Total number of chapters*2 Playback status (N Playback...
...number for VIDEO CDs, MP3 audio track number, or JPEG image file number for DATA CDs. *3 Displays Super VCD as "SVCD." Displays the DVD/CD text or the MP3 track name. 10US Input the time code for JPEG files. Displays "MP3" in the Control Menu display 1 or ...JPEG" in the Control Menu 2 for DATA CDs. *4 Displays the date for picture and music searching. Example: Control Menu display 1 when playing a DVD VIDEO. Control Menu items Selected item Currently playing title number*1 Currently playing chapter number*2 Total number of titles*1 Total number of chapters*2 Playback status (N Playback...
Operating Instructions (Main Stereo System)
Page 13
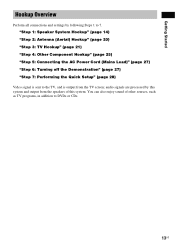
audio signals are processed by following Steps 1 to DVDs or CDs. 13US "Step 1: Speaker System Hookup" (page 14) "Step 2: Antenna (Aerial) Hookup" (page 20) "Step 3: TV Hookup" (page 21) "Step 4: Other Component Hookup" (page 25) "Step 5: Connecting the AC Power ... the TV, and is output from the speakers of other sources, such as TV programs, in addition to 7. You can also enjoy sound of this system and output from the TV screen; Getting Started Hookup Overview Perform all connections and settings by this...
audio signals are processed by following Steps 1 to DVDs or CDs. 13US "Step 1: Speaker System Hookup" (page 14) "Step 2: Antenna (Aerial) Hookup" (page 20) "Step 3: TV Hookup" (page 21) "Step 4: Other Component Hookup" (page 25) "Step 5: Connecting the AC Power ... the TV, and is output from the speakers of other sources, such as TV programs, in addition to 7. You can also enjoy sound of this system and output from the TV screen; Getting Started Hookup Overview Perform all connections and settings by this...
Operating Instructions (Main Stereo System)
Page 15
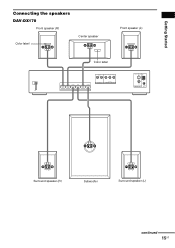
Getting Started Connecting the speakers DAV-DX170 Front speaker (R) Color label Center speaker Front speaker (L) Color label FRONT R FRONT L SURR R SURR L CENTER WOOFER SPEAKER AUDIO IN Y PB/CB PR/CR R L VIDEO/SAT DVD ONLY COMPONENT VIDEO OUT S VIDEO (DVD ONLY) AM VIDEO MONITOR OUT COAXIAL FM 75 Surround speaker (R) Subwoofer Surround speaker (L) continued 15US
Getting Started Connecting the speakers DAV-DX170 Front speaker (R) Color label Center speaker Front speaker (L) Color label FRONT R FRONT L SURR R SURR L CENTER WOOFER SPEAKER AUDIO IN Y PB/CB PR/CR R L VIDEO/SAT DVD ONLY COMPONENT VIDEO OUT S VIDEO (DVD ONLY) AM VIDEO MONITOR OUT COAXIAL FM 75 Surround speaker (R) Subwoofer Surround speaker (L) continued 15US
Operating Instructions (Main Stereo System)
Page 16
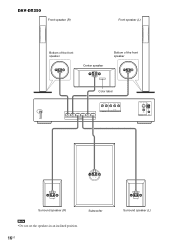
DAV-DX250 Front speaker (R) Front speaker (L) Bottom of the front speaker Center speaker Bottom of the front speaker Color label FRONT R FRONT L SURR R SURR L CENTER WOOFER SPEAKER AUDIO IN Y PB/CB PR/CR R L VIDEO/SAT DVD ONLY COMPONENT VIDEO OUT S VIDEO (DVD ONLY) AM VIDEO MONITOR OUT COAXIAL FM 75 Surround speaker (R) Note • Do not set the speakers in an inclined position. 16US Subwoofer Surround speaker (L)
DAV-DX250 Front speaker (R) Front speaker (L) Bottom of the front speaker Center speaker Bottom of the front speaker Color label FRONT R FRONT L SURR R SURR L CENTER WOOFER SPEAKER AUDIO IN Y PB/CB PR/CR R L VIDEO/SAT DVD ONLY COMPONENT VIDEO OUT S VIDEO (DVD ONLY) AM VIDEO MONITOR OUT COAXIAL FM 75 Surround speaker (R) Note • Do not set the speakers in an inclined position. 16US Subwoofer Surround speaker (L)
Operating Instructions (Main Stereo System)
Page 21
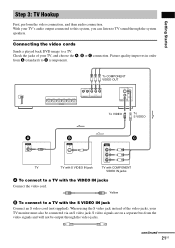
... First, perform the video connection, and then audio connection. Check the jacks of the video jacks, your TV monitor must also be output through the system speakers. Yellow B To connect to C (component). With your TV, and choose the A, B or C connection. FRONT R FRONT L SURR R SURR L ...CENTER WOOFER SPEAKER To COMPONENT VIDEO OUT AUDIO IN Y PB/CB PR/CR R L VIDEO/SAT DVD ONLY COMPONENT VIDEO OUT S VIDEO (DVD ONLY) AM VIDEO MONITOR OUT COAXIAL FM 75 To VIDEO To S VIDEO A VIDEO IN B S VIDEO IN Y PB/CB PR/CR C TV...
... First, perform the video connection, and then audio connection. Check the jacks of the video jacks, your TV monitor must also be output through the system speakers. Yellow B To connect to C (component). With your TV, and choose the A, B or C connection. FRONT R FRONT L SURR R SURR L ...CENTER WOOFER SPEAKER To COMPONENT VIDEO OUT AUDIO IN Y PB/CB PR/CR R L VIDEO/SAT DVD ONLY COMPONENT VIDEO OUT S VIDEO (DVD ONLY) AM VIDEO MONITOR OUT COAXIAL FM 75 To VIDEO To S VIDEO A VIDEO IN B S VIDEO IN Y PB/CB PR/CR C TV...
Operating Instructions (Main Stereo System)
Page 22
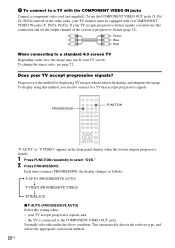
... TV accept progressive signals? Does your TV monitor must use the COMPONENT VIDEO OUT jacks (Y, PB/ CB, PR/CR) instead of the system to progressive format (page 22). Green Blue Red When connecting to a standard 4:3 screen TV Depending on the disc, the image may not... VIDEO IN jacks (Y, PB/CB, PR/CR). PROGRESSIVE FUNCTION "P AUTO" or "P VIDEO" appears in the front panel display when the system outputs progressive signals. 1 Press FUNCTION repeatedly to select "DVD." 2 Press PROGRESSIVE. This automatically detects the software type, and selects the appropriate conversion method. 22US
... TV accept progressive signals? Does your TV monitor must use the COMPONENT VIDEO OUT jacks (Y, PB/ CB, PR/CR) instead of the system to progressive format (page 22). Green Blue Red When connecting to a standard 4:3 screen TV Depending on the disc, the image may not... VIDEO IN jacks (Y, PB/CB, PR/CR). PROGRESSIVE FUNCTION "P AUTO" or "P VIDEO" appears in the front panel display when the system outputs progressive signals. 1 Press FUNCTION repeatedly to select "DVD." 2 Press PROGRESSIVE. This automatically detects the software type, and selects the appropriate conversion method. 22US

Operating Instructions (Main Stereo System)
Page 23
...derived from TV, such as they are output in progressive format, the progressive signals need to be converted to match the type of DVD software that you are unaffected as dramas and sit-coms, and displays images at 24 frames per second. In order for these ...images to PROGRESSIVE VIDEO for video-based software. continued 23US Select this system. About DVD software types and the conversion method DVD software can be divided into 2 types: film-based software and video-based software. Some DVD software contains both video and film. x INTERLACE Select this setting when: -...
...derived from TV, such as they are output in progressive format, the progressive signals need to be converted to match the type of DVD software that you are unaffected as dramas and sit-coms, and displays images at 24 frames per second. In order for these ...images to PROGRESSIVE VIDEO for video-based software. continued 23US Select this system. About DVD software types and the conversion method DVD software can be divided into 2 types: film-based software and video-based software. Some DVD software contains both video and film. x INTERLACE Select this setting when: -...
Operating Instructions (Main Stereo System)
Page 24
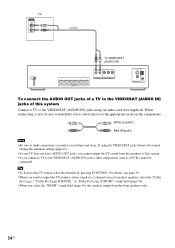
... II MUSIC" sound field (page 54). • When you select the "NIGHT" sound field (page 54), the sound is output from the speakers of this system. • If you cannot output the TV sound from the front speakers only. 24US TV AUDIO OUT L R To VIDEO/SAT (AUDIO IN) FRONT R FRONT L SURR... COMPONENT VIDEO OUT S VIDEO (DVD ONLY) AM VIDEO MONITOR OUT COAXIAL FM 75 To connect the AUDIO OUT jacks of a TV to the VIDEO/SAT (AUDIO IN) jacks of this system Connect a TV to the VIDEO/SAT (AUDIO IN) jacks using the VIDEO/SAT jacks distorts the sound, change the attenuate setting...
... II MUSIC" sound field (page 54). • When you select the "NIGHT" sound field (page 54), the sound is output from the speakers of this system. • If you cannot output the TV sound from the front speakers only. 24US TV AUDIO OUT L R To VIDEO/SAT (AUDIO IN) FRONT R FRONT L SURR... COMPONENT VIDEO OUT S VIDEO (DVD ONLY) AM VIDEO MONITOR OUT COAXIAL FM 75 To connect the AUDIO OUT jacks of a TV to the VIDEO/SAT (AUDIO IN) jacks of this system Connect a TV to the VIDEO/SAT (AUDIO IN) jacks using the VIDEO/SAT jacks distorts the sound, change the attenuate setting...

Operating Instructions (Main Stereo System)
Page 25
... the other component Outputs the other components to the VIDEO/SAT (AUDIO IN) jacks of this system Connect the VCR or other component through the speakers of this system by connecting the AUDIO OUT jacks of another component. AUDIO OUT L R To VIDEO/SAT (AUDIO IN) FRONT R FRONT L SURR R... SURR L CENTER WOOFER SPEAKER AUDIO IN Y PB/CB PR/CR R L VIDEO/SAT DVD ONLY COMPONENT VIDEO OUT S VIDEO (DVD ONLY) AM VIDEO MONITOR OUT...
... the other component Outputs the other components to the VIDEO/SAT (AUDIO IN) jacks of this system Connect the VCR or other component through the speakers of this system by connecting the AUDIO OUT jacks of another component. AUDIO OUT L R To VIDEO/SAT (AUDIO IN) FRONT R FRONT L SURR R... SURR L CENTER WOOFER SPEAKER AUDIO IN Y PB/CB PR/CR R L VIDEO/SAT DVD ONLY COMPONENT VIDEO OUT S VIDEO (DVD ONLY) AM VIDEO MONITOR OUT...
Operating Instructions (Main Stereo System)
Page 28
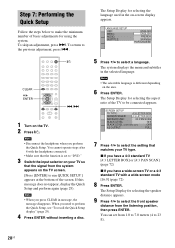
...LEVEL (COMPONENT OUT): OFF 4:3 OUTPUT: FULL 7 Press X/x to select the setting that the signal from the system appears on the TV screen. [Press [ENTER] to 23 ft). 28US You can set to perform the ... the language used in the on the TV. 2 Press [/1. The Setup Display for using the system. To skip an adjustment, press >. The Setup Display for selecting the aspect ratio of basic adjustments... ENTER. To return to make the minimum number of the TV to select a language. The system displays the menu and subtitles in message, the message disappears. Step 7: Performing the Quick Setup ...
...LEVEL (COMPONENT OUT): OFF 4:3 OUTPUT: FULL 7 Press X/x to select the setting that the signal from the system appears on the TV screen. [Press [ENTER] to 23 ft). 28US You can set to perform the ... the language used in the on the TV. 2 Press [/1. The Setup Display for using the system. To skip an adjustment, press >. The Setup Display for selecting the aspect ratio of basic adjustments... ENTER. To return to make the minimum number of the TV to select a language. The system displays the menu and subtitles in message, the message disappears. Step 7: Performing the Quick Setup ...

Operating Instructions (Main Stereo System)
Page 29
.... 2 Press X/x to select then press ENTER. [SETUP], The options for [SETUP] appear. 1 2 ( 2 7 ) 1 8 ( 3 4 ) : : DVD VIDEO QUICK QUICK CUSTOM RESET BNR 3 Press X/x to change each setting, see "Using the Setup Display" (page 70). SPEAKER SETUP SIZE: DISTANCE: LEVEL(FRONT): LEVEL(...setting range changes depending on the front speaker setting. 11 Press X/x to 23 ft). To recall the Quick Setup display 1 Press DISPLAY when the system is finished. Quick Setup is in any Step. 29US The Quick Setup display appears. Getting Started SPEAKER SETUP SIZE: DISTANCE: LEVEL(FRONT): LEVEL(SURROUND...
.... 2 Press X/x to select then press ENTER. [SETUP], The options for [SETUP] appear. 1 2 ( 2 7 ) 1 8 ( 3 4 ) : : DVD VIDEO QUICK QUICK CUSTOM RESET BNR 3 Press X/x to change each setting, see "Using the Setup Display" (page 70). SPEAKER SETUP SIZE: DISTANCE: LEVEL(FRONT): LEVEL(...setting range changes depending on the front speaker setting. 11 Press X/x to 23 ft). To recall the Quick Setup display 1 Press DISPLAY when the system is finished. Quick Setup is in any Step. 29US The Quick Setup display appears. Getting Started SPEAKER SETUP SIZE: DISTANCE: LEVEL(FRONT): LEVEL(SURROUND...
Operating Instructions (Main Stereo System)
Page 31
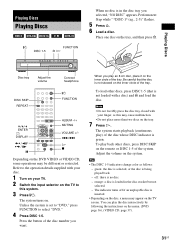
...play the disc interactively by following the instructions on . Place one disc on the system. Be careful that is set to "DVD," press FUNCTION to select "DVD." 4 Press DISC 1-5. Tip • The DISC 1-5 indicators change color as this system. 3 Press "/1. off if an unplayable disc is not skewed on the TV screen.... Refer to this may be different or restricted. The system turns on the menu. (DVD: page 36), (VIDEO CD: page 37). 31US When you want. You can play back other discs, press DISC 1-5 (that the disc is...
...play the disc interactively by following the instructions on . Place one disc on the system. Be careful that is set to "DVD," press FUNCTION to select "DVD." 4 Press DISC 1-5. Tip • The DISC 1-5 indicators change color as this system. 3 Press "/1. off if an unplayable disc is not skewed on the TV screen.... Refer to this may be different or restricted. The system turns on the menu. (DVD: page 36), (VIDEO CD: page 37). 31US When you want. You can play back other discs, press DISC 1-5 (that the disc is...

Operating Instructions (Main Stereo System)
Page 32
...stop playback. Note • If there is just noise produced by pressing "/1. 1 While playing a disc, press x to stop the disc, the system remembers the point where you stopped the disc. If "RESUME" does not appear, Resume Play is useful when you want to watch. 32US •..."RESUME" appears in the front panel display. during album*3 playback. *1 DVD VIDEOs/DVD-RWs/DVD-Rs only. *2 DVD VIDEOs/DVD-RWs/DVD-Rs/DVD+RWs only. *3 DATA CDs only. To save the power in standby mode Press "/1 while the system turns on the system. Stop play after pause X or H Go to the next chapter, ...
...stop playback. Note • If there is just noise produced by pressing "/1. 1 While playing a disc, press x to stop the disc, the system remembers the point where you stopped the disc. If "RESUME" does not appear, Resume Play is useful when you want to watch. 32US •..."RESUME" appears in the front panel display. during album*3 playback. *1 DVD VIDEOs/DVD-RWs/DVD-Rs only. *2 DVD VIDEOs/DVD-RWs/DVD-Rs/DVD+RWs only. *3 DATA CDs only. To save the power in standby mode Press "/1 while the system turns on the system. Stop play after pause X or H Go to the next chapter, ...


