Operating Instructions
Page 1
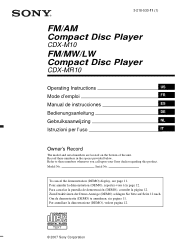
..., zie pagina 11. 3-218-533-11 (1) FM/AM Compact Disc Player CDX-M10 FM/MW/LW Compact Disc Player CDX-MR10 Operating Instructions US Mode d'emploi FR Manual de instrucciones ES Bedienungsanleitung DE Gebruiksaanwijzing NL Istruzioni per l'uso IT Owner's Record The model and serial numbers are located on the bottom of the unit. Pour annuler la démonstration (DEMO), reportez-vous à la page 12. Zum Deaktivieren...
..., zie pagina 11. 3-218-533-11 (1) FM/AM Compact Disc Player CDX-M10 FM/MW/LW Compact Disc Player CDX-MR10 Operating Instructions US Mode d'emploi FR Manual de instrucciones ES Bedienungsanleitung DE Gebruiksaanwijzing NL Istruzioni per l'uso IT Owner's Record The model and serial numbers are located on the bottom of the unit. Pour annuler la démonstration (DEMO), reportez-vous à la page 12. Zum Deaktivieren...
Operating Instructions
Page 2
... is located on , the user is connected. - The unit will increase eye hazard. However, there is turned off . 2 Increase the separation between the equipment and receiver. - For more of electrical and electronic equipment. CAUTION The use of optical instruments with the limits for help to radio communications. For installation and connections, see the supplied installation/connections manual. If you do not set the Auto Off function (page...
... is located on , the user is connected. - The unit will increase eye hazard. However, there is turned off . 2 Increase the separation between the equipment and receiver. - For more of electrical and electronic equipment. CAUTION The use of optical instruments with the limits for help to radio communications. For installation and connections, see the supplied installation/connections manual. If you do not set the Auto Off function (page...
Operating Instructions
Page 3
... Removing the unit 15 Specifications 16 Troubleshooting 17 Error displays/Messages 18 3 SET 11 Using optional equipment 12 Auxiliary audio equipment 12 Card remote commander RM-X114. . . . . . 12 Marine remote commander RM-X11M . . . 13 Additional Information Precautions 14 Notes on discs 14 Playback order of controls and basic operations Main unit 6 CD Display items 8 Repeat and shuffle play 8 Radio Storing and receiving stations 8 Storing automatically - EQ3 11 Adjusting setup items - BAL/FAD/SUB 11 Customizing the equalizer...
... Removing the unit 15 Specifications 16 Troubleshooting 17 Error displays/Messages 18 3 SET 11 Using optional equipment 12 Auxiliary audio equipment 12 Card remote commander RM-X114. . . . . . 12 Marine remote commander RM-X11M . . . 13 Additional Information Precautions 14 Notes on discs 14 Playback order of controls and basic operations Main unit 6 CD Display items 8 Repeat and shuffle play 8 Radio Storing and receiving stations 8 Storing automatically - EQ3 11 Adjusting setup items - BAL/FAD/SUB 11 Customizing the equalizer...
Operating Instructions
Page 4
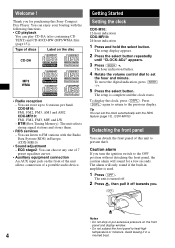
...). (CDX-MR10) Detaching the front panel You can store up to set the clock automatically with the Radio Data System (RDS) in amplifier is complete and the clock starts. BTM (Best Tuning Memory): The unit selects strong signal stations and stores them. • RDS services - You can play CD-DA (also containing CD TEXT) and CD-R/CD-RW (MP3/WMA files (page 15)). The setup display appears. 2 Press the select button repeatedly...
...). (CDX-MR10) Detaching the front panel You can store up to set the clock automatically with the Radio Data System (RDS) in amplifier is complete and the clock starts. BTM (Best Tuning Memory): The unit selects strong signal stations and stores them. • RDS services - You can play CD-DA (also containing CD TEXT) and CD-R/CD-RW (MP3/WMA files (page 15)). The setup display appears. 2 Press the select button repeatedly...

Operating Instructions
Page 5
Attaching the front panel Engage part A of the front panel with part B of the front panel. 5 A B Note Do not put anything on the inner surface of the unit, as illustrated, and push the left side into position until it clicks.
Attaching the front panel Engage part A of the front panel with part B of the front panel. 5 A B Note Do not put anything on the inner surface of the unit, as illustrated, and push the left side into position until it clicks.
Operating Instructions
Page 6
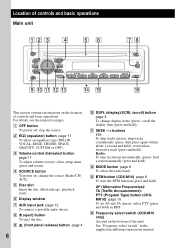
... supplied installation/connections manual. F Display window G AUX input jack page 12 To connect a portable audio device. find a station manually (press and hold ). D SOURCE button To power on the location of controls and basic operations. Radio: To tune in RDS. For details, see the respective pages. A OFF button To power off; L MODE button page 8 To select the radio band. select PTY (press and hold ). qa qs qd qf qg qh This section contains instructions on ; H Z (eject) button To eject the disc. B EQ3 (equalizer) button...
... supplied installation/connections manual. F Display window G AUX input jack page 12 To connect a portable audio device. find a station manually (press and hold ). D SOURCE button To power on the location of controls and basic operations. Radio: To tune in RDS. For details, see the respective pages. A OFF button To power off; L MODE button page 8 To select the radio band. select PTY (press and hold ). qa qs qd qf qg qh This section contains instructions on ; H Z (eject) button To eject the disc. B EQ3 (equalizer) button...
Operating Instructions
Page 7
store stations (press and hold ). (3): REP page 8 (4): SHUF page 8 (6): PAUSE To pause playback of children to prevent water entering. Keep the AUX cap out of the reach of a CD on this unit. O Number buttons CD: (1)/(2): ALBUM -/+ (during MP3/WMA playback) To skip albums (press); Radio: To receive stored stations (press); P Receptor for the card remote commander About AUX cap When not using the AUX input jack (7), use the supplied AUX cap to prevent accidental swallowing. 7 skip albums continuously (press and hold ). To cancel, press again.
store stations (press and hold ). (3): REP page 8 (4): SHUF page 8 (6): PAUSE To pause playback of children to prevent water entering. Keep the AUX cap out of the reach of a CD on this unit. O Number buttons CD: (1)/(2): ALBUM -/+ (during MP3/WMA playback) To skip albums (press); Radio: To receive stored stations (press); P Receptor for the card remote commander About AUX cap When not using the AUX input jack (7), use the supplied AUX cap to prevent accidental swallowing. 7 skip albums continuously (press and hold ). To cancel, press again.
Operating Instructions
Page 8
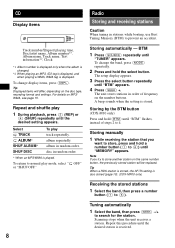
..., use Best Tuning Memory (BTM) to (6)). OFF" 8 Radio Storing and receiving stations Caution When tuning in random order. Tuning automatically 1 Select the band, then press (SEEK) -/+ to (6)) until the desired station is received. A beep sounds when the setting is displayed. Storing manually 1 While receiving the station that you try to normal play track repeatedly. The setup display appears. 3 Press the select button repeatedly until the desired setting appears. album repeatedly. CD Display items Track number/Elapsed playing time, Disc...
..., use Best Tuning Memory (BTM) to (6)). OFF" 8 Radio Storing and receiving stations Caution When tuning in random order. Tuning automatically 1 Select the band, then press (SEEK) -/+ to (6)) until the desired station is received. A beep sounds when the setting is displayed. Storing manually 1 While receiving the station that you try to normal play track repeatedly. The setup display appears. 3 Press the select button repeatedly until the desired setting appears. album repeatedly. CD Display items Track number/Elapsed playing time, Disc...
Operating Instructions
Page 9
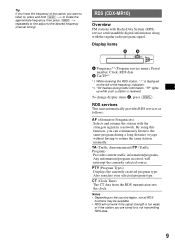
... A Frequency*1 (Program service name), Preset number, Clock, RDS data B TA/TP*2 *1 While receiving the RDS station, " *" is received. RDS services This unit automatically provides RDS services as follows: AF (Alternative Frequencies) Selects and retunes the station with the regular radio program signal. PTY (Program Types) Displays the currently received program type. Tip If you know the frequency of the frequency indication. *2 "TA" flashes during a long-distance voyage without having to the desired frequency (manual tuning). "TP" lights up...
... A Frequency*1 (Program service name), Preset number, Clock, RDS data B TA/TP*2 *1 While receiving the RDS station, " *" is received. RDS services This unit automatically provides RDS services as follows: AF (Alternative Frequencies) Selects and retunes the station with the regular radio program signal. PTY (Program Types) Displays the currently received program type. Tip If you know the frequency of the frequency indication. *2 "TA" flashes during a long-distance voyage without having to the desired frequency (manual tuning). "TP" lights up...
Operating Instructions
Page 10
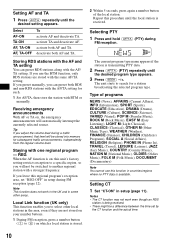
... your number buttons. 1 During FM reception, press a number button ((1) to (6)) on : this unit's factory setting restricts reception to a specific region, so you to search for each. 1 Set AF/TA, then store the station with the AF/ TA setting. deactivate both AF and TA. If you adjust the volume level during a traffic announcement, that level will be switched to another regional station with a stronger frequency. Note This function does not work...
... your number buttons. 1 During FM reception, press a number button ((1) to (6)) on : this unit's factory setting restricts reception to a specific region, so you to search for each. 1 Set AF/TA, then store the station with the AF/ TA setting. deactivate both AF and TA. If you adjust the volume level during a traffic announcement, that level will be switched to another regional station with a stronger frequency. Note This function does not work...
Operating Instructions
Page 11
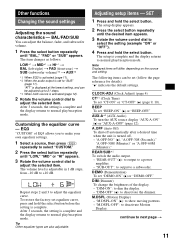
... (Dimmer) To change the brightness of EQ3 allows you to make your own equalizer settings. 1 Select a source, then press (EQ3) repeatedly to select "CUSTOM." 2 Press the select button repeatedly until "LOW," "MID" or "HI" appears. 3 Rotate the volume control dial to "SUB" (page 11). "DIM-ON": to a power amplifier. - The setup is turned off automatically after a desired time when the unit is complete and the display returns to +10 dB. "REAR...
... (Dimmer) To change the brightness of EQ3 allows you to make your own equalizer settings. 1 Select a source, then press (EQ3) repeatedly to select "CUSTOM." 2 Press the select button repeatedly until "LOW," "MID" or "HI" appears. 3 Rotate the volume control dial to "SUB" (page 11). "DIM-ON": to a power amplifier. - The setup is turned off automatically after a desired time when the unit is complete and the display returns to +10 dB. "REAR...
Operating Instructions
Page 12
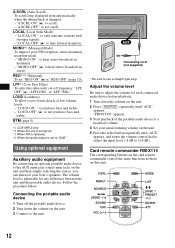
... changed. - Follow the procedure below: Connecting the portable audio device 1 Turn off frequency: "LPF OFF" (z), "LPF125Hz" or "LPF 78Hz." "A.SCRL-ON" (z): to reinforce bass and treble. - "LOCAL-ON" : to use a straight type plug. AUX AUX Connecting cord* (not supplied) * Be sure to only tune into stations with stronger signals. - DSPL MENU* SOURCE Card remote commander RM-X114 The corresponding buttons on the card remote commander control the same functions as those on the unit...
... changed. - Follow the procedure below: Connecting the portable audio device 1 Turn off frequency: "LPF OFF" (z), "LPF125Hz" or "LPF 78Hz." "A.SCRL-ON" (z): to reinforce bass and treble. - "LOCAL-ON" : to use a straight type plug. AUX AUX Connecting cord* (not supplied) * Be sure to only tune into stations with stronger signals. - DSPL MENU* SOURCE Card remote commander RM-X114 The corresponding buttons on the card remote commander control the same functions as those on the unit...
Operating Instructions
Page 13
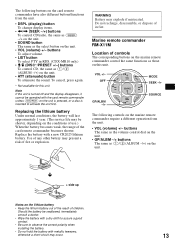
The following buttons on the card remote commander have also different buttons/functions from the unit. • DSPL (display) button To change display items. •
The following buttons on the card remote commander have also different buttons/functions from the unit. • DSPL (display) button To change display items. •
Operating Instructions
Page 14
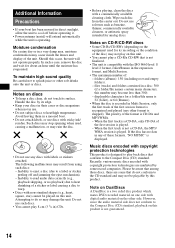
... the Compact Disc (CD) standard. Note on DualDiscs A DualDisc is a two sided disc product which mates DVD recorded material on one side with copyright protection technologies This product is operating. files (tracks) and folders contained in a disc: 300 (if a folder/file names contain many characters, this number may occur inside the lenses and display of the disc) may not play on this unit...
... the Compact Disc (CD) standard. Note on DualDiscs A DualDisc is a two sided disc product which mates DVD recorded material on one side with copyright protection technologies This product is operating. files (tracks) and folders contained in a disc: 300 (if a folder/file names contain many characters, this number may occur inside the lenses and display of the disc) may not play on this unit...
Operating Instructions
Page 15
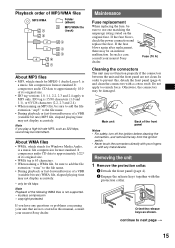
... playing time may not display accurately. In such a case, consult your nearest Sony dealer. In order to use one matching the amperage rating stated on the original fuse. copyright-protected If you play a high-bit-rate MP3, such as shown. Note If you have any metal device. If the fuse blows, check the power connection and replace the fuse. Fuse (10 A) Cleaning the connectors The unit may...
... playing time may not display accurately. In such a case, consult your nearest Sony dealer. In order to use one matching the amperage rating stated on the original fuse. copyright-protected If you play a high-bit-rate MP3, such as shown. Note If you have any metal device. If the fuse blows, check the power connection and replace the fuse. Fuse (10 A) Cleaning the connectors The unit may...
Operating Instructions
Page 16
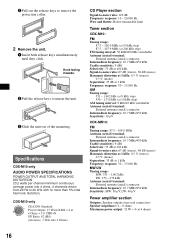
... antenna (aerial) connector Intermediate frequency: 10.7 MHz/450 kHz Sensitivity: MW: 30 µV, LW: 40 µV Power amplifier section Outputs: Speaker outputs (sure seal connectors) Speaker impedance: 4 - 8 ohms Maximum power output: 52 W × 4 (at 400 kHz Signal-to 20 kHz with no more than 5% total harmonic distortion. Specifications CDX-M10 only AUDIO POWER SPECIFICATIONS POWER OUTPUT AND TOTAL HARMONIC DISTORTION 23.2 watts per channel minimum continuous average power into 4 Ohms) CD Player section...
... antenna (aerial) connector Intermediate frequency: 10.7 MHz/450 kHz Sensitivity: MW: 30 µV, LW: 40 µV Power amplifier section Outputs: Speaker outputs (sure seal connectors) Speaker impedance: 4 - 8 ohms Maximum power output: 52 W × 4 (at 400 kHz Signal-to 20 kHz with no more than 5% total harmonic distortion. Specifications CDX-M10 only AUDIO POWER SPECIFICATIONS POWER OUTPUT AND TOTAL HARMONIC DISTORTION 23.2 watts per channel minimum continuous average power into 4 Ohms) CD Player section...
Operating Instructions
Page 17
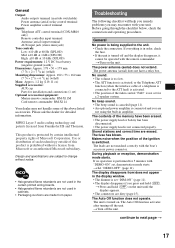
... unit is set "DIM-ON" (page 11). • The display disappears if you press and hold (OFF) on the unit until the display appears. • The connectors are dirty (page 15). General Output: Audio outputs terminal (rear/sub switchable) Power antenna (aerial) relay control terminal Power amplifier control terminal Inputs: Telephone ATT control terminal (CDX-MR10 only) Remote controller input terminal Antenna (aerial) input terminal AUX input jack (stereo mini jack) Tone controls: Low: ±10 dB at 60 Hz (XPLOD...
... unit is set "DIM-ON" (page 11). • The display disappears if you press and hold (OFF) on the unit until the display appears. • The connectors are dirty (page 15). General Output: Audio outputs terminal (rear/sub switchable) Power antenna (aerial) relay control terminal Power amplifier control terminal Inputs: Telephone ATT control terminal (CDX-MR10 only) Remote controller input terminal Antenna (aerial) input terminal AUX input jack (stereo mini jack) Tone controls: Low: ±10 dB at 60 Hz (XPLOD...
Operating Instructions
Page 18
...) control lead (blue) or accessory power supply lead (red) to check the connection. t Set "MONO-OFF" (page 12). Preset tuning is heard in Multi Session. - An FM program broadcast in stereo is not possible. • Store the correct frequency in monaural reception mode. The display items do not scroll. • For discs with the same PI (Program Identification) data ("PI SEEK" appears). t Install the unit at a station: Set...
...) control lead (blue) or accessory power supply lead (red) to check the connection. t Set "MONO-OFF" (page 12). Preset tuning is heard in Multi Session. - An FM program broadcast in stereo is not possible. • Store the correct frequency in monaural reception mode. The display items do not scroll. • For discs with the same PI (Program Identification) data ("PI SEEK" appears). t Install the unit at a station: Set...
Operating Instructions
Page 19
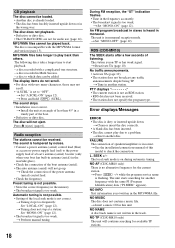
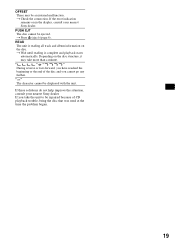
... do not help improve the situation, consult your nearest Sony dealer. t Check the connection. PUSH EJT The disc cannot be displayed with the unit. t Wait until reading is reading all track and album information on in the display, consult your nearest Sony dealer. "" The character cannot be ejected. t Press Z (eject) (page 6). OFFSET There may take the unit to be repaired because of...
... do not help improve the situation, consult your nearest Sony dealer. t Check the connection. PUSH EJT The disc cannot be displayed with the unit. t Wait until reading is reading all track and album information on in the display, consult your nearest Sony dealer. "" The character cannot be ejected. t Press Z (eject) (page 6). OFFSET There may take the unit to be repaired because of...


