Operating Instructions
Page 1
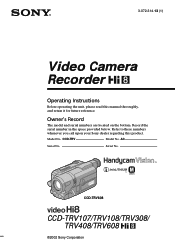
Owner's Record The model and serial numbers are located on the bottom. Serial No. CCD-TRV608 CCD-TRV107/TRV108/TRV308/ TRV408/TRV608 ©2002 Sony Corporation CCD-TRV Model No. 3-072-314-13 (1) Video Camera Recorder Operating Instructions Before operating the unit, please read this product. Model No. Serial No. Refer to these numbers whenever you call upon your Sony dealer regarding this manual thoroughly, and retain it for future reference. AC- Record the serial number in the space provided below.
Owner's Record The model and serial numbers are located on the bottom. Serial No. CCD-TRV608 CCD-TRV107/TRV108/TRV308/ TRV408/TRV608 ©2002 Sony Corporation CCD-TRV Model No. 3-072-314-13 (1) Video Camera Recorder Operating Instructions Before operating the unit, please read this product. Model No. Serial No. Refer to these numbers whenever you call upon your Sony dealer regarding this manual thoroughly, and retain it for future reference. AC- Record the serial number in the space provided below.
Operating Instructions
Page 5
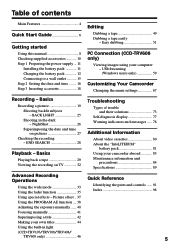
USB Streaming (Windows users only 59 Customizing Your Camcorder Changing the menu settings 67 Recording - Basics Recording a picture 19 Shooting backlit subjects - Easy dubbing 51 PC Connection (CCD-TRV608 only) Viewing images using your own titles 44 Using the built-in the dark - Basics Playing back a tape 29 Viewing the recording on pictures 27 Checking the recording - Table of trouble and their solutions 73 Self-diagnosis display 77 Warning indicators and messages ...... 78 Additional Information About video cassettes 80 About the...
USB Streaming (Windows users only 59 Customizing Your Camcorder Changing the menu settings 67 Recording - Basics Recording a picture 19 Shooting backlit subjects - Easy dubbing 51 PC Connection (CCD-TRV608 only) Viewing images using your own titles 44 Using the built-in the dark - Basics Playing back a tape 29 Viewing the recording on pictures 27 Checking the recording - Table of trouble and their solutions 73 Self-diagnosis display 77 Warning indicators and messages ...... 78 Additional Information About video cassettes 80 About the...
Operating Instructions
Page 8
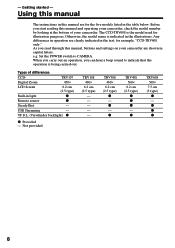
... a beep sound to CAMERA. USB Streaming - The CCD-TRV608 is the model used for example, "CCD-TRV608 only." VF B.L. (Viewfinder backlight) z z Provided - Before you start reading this manual and operating your camcorder, check the model number by looking at the bottom of differences CCD- TRV107 Digital Zoom 450× LCD Screen 6.2 cm (2.5 type) Built-in capital letters. TRV308 460× 6.2 cm (2.5 type) z - e.g. z z z 8 Not provided TRV108 460× 6.2 cm (2.5 type) - - - - - Using this manual The instructions in the...
... a beep sound to CAMERA. USB Streaming - The CCD-TRV608 is the model used for example, "CCD-TRV608 only." VF B.L. (Viewfinder backlight) z z Provided - Before you start reading this manual and operating your camcorder, check the model number by looking at the bottom of differences CCD- TRV107 Digital Zoom 450× LCD Screen 6.2 cm (2.5 type) Built-in capital letters. TRV308 460× 6.2 cm (2.5 type) z - e.g. z z z 8 Not provided TRV108 460× 6.2 cm (2.5 type) - - - - - Using this manual The instructions in the...
Operating Instructions
Page 14
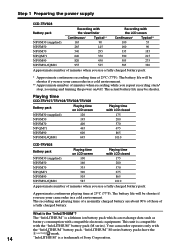
... is compatible with the "InfoLITHIUM" battery pack (M series). The actual battery life may be shorter if you use your camcorder in a cold environment. ** Approximate number of minutes when recording while you repeat recording start/ stop, zooming and turning the power on LCD screen Playing time with LCD closed 175 280 570 675 865 1010 CCD-TRV608 Battery pack Playing time on /off. Step 1 Preparing the power supply CCD-TRV608 Battery pack Recording with the viewfinder Recording with the LCD screen...
... is compatible with the "InfoLITHIUM" battery pack (M series). The actual battery life may be shorter if you use your camcorder in a cold environment. ** Approximate number of minutes when recording while you repeat recording start/ stop, zooming and turning the power on LCD screen Playing time with LCD closed 175 280 570 675 865 1010 CCD-TRV608 Battery pack Playing time on /off. Step 1 Preparing the power supply CCD-TRV608 Battery pack Recording with the viewfinder Recording with the LCD screen...
Operating Instructions
Page 17
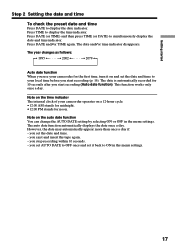
... you set AUTO DATE to OFF once and set the date and time to your camcorder operates on the auto date function You can change the AUTO DATE setting by selecting ON or OFF in the menu settings. 17 you eject and insert the tape again. - Press TIME to display the date indicator. The date is automatically recorded for noon. However, the date may automatically appear more than once a day if: - you start recording (Auto date function). The year changes...
... you set AUTO DATE to OFF once and set the date and time to your camcorder operates on the auto date function You can change the AUTO DATE setting by selecting ON or OFF in the menu settings. 17 you eject and insert the tape again. - Press TIME to display the date indicator. The date is automatically recorded for noon. However, the date may automatically appear more than once a day if: - you start recording (Auto date function). The year changes...
Operating Instructions
Page 32
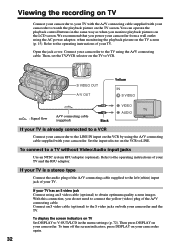
... press DISPLAY on your camcorder to watch the playback picture on the TV screen. Viewing the recording on TV Connect your camcorder to your TV with the A/V connecting cable supplied with your camcorder. You can operate the playback control buttons in the menu settings (p. 72). Connect an S video cable (optional) to VCR. Set the input selector on TV Set DISPLAY to V-OUT/LCD in the same way as when you do not need to a TV without Video/Audio input jacks Use an NTSC...
... press DISPLAY on your camcorder to watch the playback picture on the TV screen. Viewing the recording on TV Connect your camcorder to your TV with the A/V connecting cable supplied with your camcorder. You can operate the playback control buttons in the menu settings (p. 72). Connect an S video cable (optional) to VCR. Set the input selector on TV Set DISPLAY to V-OUT/LCD in the same way as when you do not need to a TV without Video/Audio input jacks Use an NTSC...

Operating Instructions
Page 49
.... (4) Play back the recorded tape on tapes. Editing - Refer to the operating instructions of your VCR for more information. (3) Set the POWER switch to LINE. DISPLAY on the Remote Commander (CCD-TRV107/TRV408 only) (1) Insert a blank tape (or a tape you do not make the indicators disappear, they are recorded on your VCR for more information. S VIDEO OUT A / V OUT Yellow IN S VIDEO : Signal flow A/V connecting cable (supplied) Black VIDEO AUDIO 49 Set DISPLAY to LCD in in the menu settings...
.... (4) Play back the recorded tape on tapes. Editing - Refer to the operating instructions of your VCR for more information. (3) Set the POWER switch to LINE. DISPLAY on the Remote Commander (CCD-TRV107/TRV408 only) (1) Insert a blank tape (or a tape you do not make the indicators disappear, they are recorded on your VCR for more information. S VIDEO OUT A / V OUT Yellow IN S VIDEO : Signal flow A/V connecting cable (supplied) Black VIDEO AUDIO 49 Set DISPLAY to LCD in in the menu settings...
Operating Instructions
Page 58
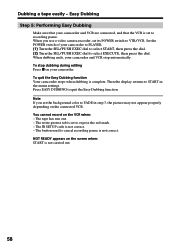
... depending on the VCR when: - Then the display returns to VTR/VCR. You cannot record on the connected VCR. To quit the Easy Dubbing function Your camcorder stops when dubbing is not correct. - Note If you use a video camera recorder, set the background color to expose the red mark. - To stop automatically. The button used to cancel recording pause is set to FADE in the menu settings. Set the POWER switch of your camcorder and VCR stop dubbing during editing...
... depending on the VCR when: - Then the display returns to VTR/VCR. You cannot record on the connected VCR. To quit the Easy Dubbing function Your camcorder stops when dubbing is not correct. - Note If you use a video camera recorder, set the background color to expose the red mark. - To stop automatically. The button used to cancel recording pause is set to FADE in the menu settings. Set the POWER switch of your camcorder and VCR stop dubbing during editing...
Operating Instructions
Page 60
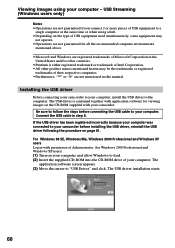
Installing the USB driver Before connecting your camcorder to your computer. For Windows 98 SE, Windows Me, Windows 2000 Professional and Windows XP users Log in this manual. The application software screen appears. (3) Move the cursor to the computer. USB Streaming (Windows users only) Notes • Operations are not mentioned in with permission of Administrator. (for Windows 2000 Professional and Windows XP users) (1) Turn on the type of USB equipment used simultaneously, some equipment may...
Installing the USB driver Before connecting your camcorder to your computer. For Windows 98 SE, Windows Me, Windows 2000 Professional and Windows XP users Log in this manual. The application software screen appears. (3) Move the cursor to the computer. USB Streaming (Windows users only) Notes • Operations are not mentioned in with permission of Administrator. (for Windows 2000 Professional and Windows XP users) (1) Turn on the type of USB equipment used simultaneously, some equipment may...
Operating Instructions
Page 61
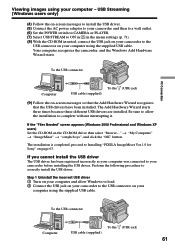
... install the USB driver The USB driver has been registered incorrectly as your computer was connected to the USB connector on your camcorder before installing the USB driver. USB Streaming (Windows users only) (4) Follow the on-screen messages to install the USB driver. (5) Connect the AC power adaptor to your camcorder and then to a wall outlet. (6) Set the POWER switch to CAMERA or PLAYER. (7) Select USB STREAM to ON in in the menu settings (p. 71). (8) With the CD-ROM inserted, connect...
... install the USB driver The USB driver has been registered incorrectly as your computer was connected to the USB connector on your camcorder before installing the USB driver. USB Streaming (Windows users only) (4) Follow the on-screen messages to install the USB driver. (5) Connect the AC power adaptor to your camcorder and then to a wall outlet. (6) Set the POWER switch to CAMERA or PLAYER. (7) Select USB STREAM to ON in in the menu settings (p. 71). (8) With the CD-ROM inserted, connect...
Operating Instructions
Page 63
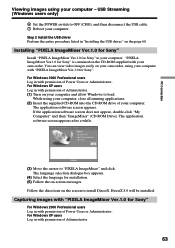
... application software screen appears. Installing "PIXELA ImageMixer Ver.1.0 for Sony" Install "PIXELA ImageMixer Ver.1.0 for Sony". USB Streaming (Windows users only) 6 Set the POWER switch to your computer. You can view video images easily on the screen to "PIXELA ImageMixer" and click. Step 2 Install the USB driver Perform the entire procedure listed in with "PIXELA ImageMixer Ver.1.0 for Sony" to OFF (CHG), and then disconnect the USB cable. 7 Reboot your computer. PC Connection Viewing images using...
... application software screen appears. Installing "PIXELA ImageMixer Ver.1.0 for Sony" Install "PIXELA ImageMixer Ver.1.0 for Sony". USB Streaming (Windows users only) 6 Set the POWER switch to your computer. You can view video images easily on the screen to "PIXELA ImageMixer" and click. Step 2 Install the USB driver Perform the entire procedure listed in with "PIXELA ImageMixer Ver.1.0 for Sony" to OFF (CHG), and then disconnect the USB cable. 7 Reboot your computer. PC Connection Viewing images using...
Operating Instructions
Page 66
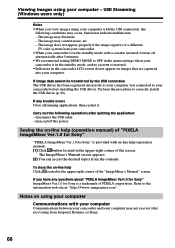
... after 5 minutes. •We recommend setting DEMO MODE to your camcorder before installing the USB driver. Carry out the following conditions may not recover after quitting the application: - turn on -line help (operation manual). (1) Click button located in the upper right corner of "PIXELA ImageMixer Ver.1.0 for Sony" "PIXELA ImageMixer Ver.1.0 for Sony is inserted. •Indicators in the camcorder LCD screen do not indicate malfunction: - If...
... after 5 minutes. •We recommend setting DEMO MODE to your camcorder before installing the USB driver. Carry out the following conditions may not recover after quitting the application: - turn on -line help (operation manual). (1) Click button located in the upper right corner of "PIXELA ImageMixer Ver.1.0 for Sony" "PIXELA ImageMixer Ver.1.0 for Sony is inserted. •Indicators in the camcorder LCD screen do not indicate malfunction: - If...
Operating Instructions
Page 68
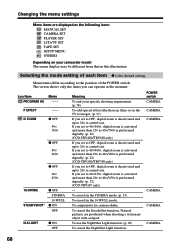
... for camera-shake. To use the NightShot Light function. (p. 26) To cancel the NightShot Light function. Icon/item Mode PROGRAM AE -- If you set to OFF, digital zoom is deactivated and up to 40×/450× is carried out. To cancel the SteadyShot function. Selecting the mode setting of the POWER switch. Natural pictures are displayed as the following icons: MANUAL SET CAMERA SET PLAYER SET LCD/VF SET TAPE SET SETUP MENU OTHERS Depending on your specific shooting...
... for camera-shake. To use the NightShot Light function. (p. 26) To cancel the NightShot Light function. Icon/item Mode PROGRAM AE -- If you set to OFF, digital zoom is deactivated and up to 40×/450× is carried out. To cancel the SteadyShot function. Selecting the mode setting of the POWER switch. Natural pictures are displayed as the following icons: MANUAL SET CAMERA SET PLAYER SET LCD/VF SET TAPE SET SETUP MENU OTHERS Depending on your specific shooting...

Operating Instructions
Page 69
... the SteadyShot function. •SteadyShot does not operate in the menu settings, the indicator flashes. If you have dubbed over and recorded the signal of movement. Set TBC to their default settings. Icon/item LCD BRIGHT Mode --- LCD COLOR To darken To lighten z BRT NORMAL To set the brightness in memory even when the battery is returned to OFF when playing back a tape on the LCD screen normal. CAMERA VF...
... the SteadyShot function. •SteadyShot does not operate in the menu settings, the indicator flashes. If you have dubbed over and recorded the signal of movement. Set TBC to their default settings. Icon/item LCD BRIGHT Mode --- LCD COLOR To darken To lighten z BRT NORMAL To set the brightness in memory even when the battery is returned to OFF when playing back a tape on the LCD screen normal. CAMERA VF...

Operating Instructions
Page 74
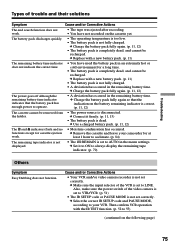
... also cancel DEMO MODE. (p. 71) The picture is recorded in a bright place. The playback button does not work. Cause and/or Corrective Actions • The POWER switch is heard when playing back a tape. c Rewind the tape. (p. 29) • The television's video channel is turned to minimum. c Clean the heads using the Sony V8-25CLD cleaning cassette (optional). (p. 85) • The volume is not adjusted correctly. The playback picture is dead or nearly dead. c Set it...
... also cancel DEMO MODE. (p. 71) The picture is recorded in a bright place. The playback button does not work. Cause and/or Corrective Actions • The POWER switch is heard when playing back a tape. c Rewind the tape. (p. 29) • The television's video channel is turned to minimum. c Clean the heads using the Sony V8-25CLD cleaning cassette (optional). (p. 85) • The volume is not adjusted correctly. The playback picture is dead or nearly dead. c Set it...
Operating Instructions
Page 75
... charged. c Select the correct IR SETUP code and PAUSE MODE, according to your camcorder for a long time. • The battery pack is not set to AUTO in the menu settings. Troubleshooting Types of trouble and their solutions Symptom Cause and/or Corrective Actions The end search function does not work . • Moisture condensation has occurred. c Charge the battery pack fully again. (p. 11, 12) The power goes off although the remaining battery time...
... charged. c Select the correct IR SETUP code and PAUSE MODE, according to your camcorder for a long time. • The battery pack is not set to AUTO in the menu settings. Troubleshooting Types of trouble and their solutions Symptom Cause and/or Corrective Actions The end search function does not work . • Moisture condensation has occurred. c Charge the battery pack fully again. (p. 11, 12) The power goes off although the remaining battery time...
Operating Instructions
Page 76
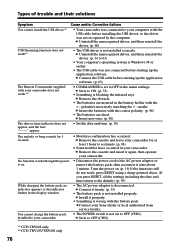
c Insert the batteries with the USB cable before installing the USB driver, so the driver was not recognized by the computer. No function works though the power is Windows 98 or earlier. • The USB cable was not connected before starting up the application software. (p. 63) • COMMANDER is not installed properly. c Remove the cassette and insert it again, then operate your camcorder. • Disconnect the power cord of trouble and their solutions Symptom...
c Insert the batteries with the USB cable before installing the USB driver, so the driver was not recognized by the computer. No function works though the power is Windows 98 or earlier. • The USB cable was not connected before starting up the application software. (p. 63) • COMMANDER is not installed properly. c Remove the cassette and insert it again, then operate your camcorder. • Disconnect the power cord of trouble and their solutions Symptom...

Operating Instructions
Page 81
... water. Battery pack power is fully charged, in the display window. Remove the battery pack from the DC IN jack on your camcorder is in the standby mode or playback is paused. •Have spare battery packs handy for communicating information related to operating conditions between 10°C to 30°C (50°F to 86°F) until the power goes off although the remaining battery time indicator...
... water. Battery pack power is fully charged, in the display window. Remove the battery pack from the DC IN jack on your camcorder is in the standby mode or playback is paused. •Have spare battery packs handy for communicating information related to operating conditions between 10°C to 30°C (50°F to 86°F) until the power goes off although the remaining battery time indicator...
Operating Instructions
Page 89
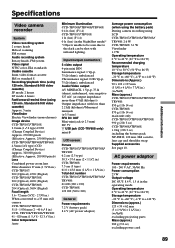
...; 62 mm (5 × 1 9/16 × 2 1/2 in .) CCD- Additional Information Specifications Video camera recorder System Video recording system 2 rotary heads Helical scanning FM system Audio recording system Rotary heads, FM system Video signal NTSC color, EIA standards Usable cassette 8mm video format cassette Hi8 or standard 8 Recording/playback time (using 120 min. AC power adaptor Power requirements 100 - 240 V AC, 50/60 Hz Power consumption 23 W Output voltage DC OUT: 8.4 V, 1.5 A in the operating mode Operating temperature 0 °C to 40 °C (32...
...; 62 mm (5 × 1 9/16 × 2 1/2 in .) CCD- Additional Information Specifications Video camera recorder System Video recording system 2 rotary heads Helical scanning FM system Audio recording system Rotary heads, FM system Video signal NTSC color, EIA standards Usable cassette 8mm video format cassette Hi8 or standard 8 Recording/playback time (using 120 min. AC power adaptor Power requirements 100 - 240 V AC, 50/60 Hz Power consumption 23 W Output voltage DC OUT: 8.4 V, 1.5 A in the operating mode Operating temperature 0 °C to 40 °C (32...
Operating Instructions
Page 98
... emitter 26 LCD screen 20 LP mode 70 M, N Manual focus 41 Menu settings 67 Mirror mode 20 Moisture condensation ....... 84 MONOTONE 35 Mosaic fader 35 NightShot 26 NTSC system 83 O, P, Q Operation indicators 97 ORC 70 Picture effect 37 Picture search 31 Playback pause 31 PROGRAM AE 38 R Recording and playback systems 80 Recording mode 70 Recording time 13 Remaining battery time indicator 24 Remaining tape indicator ... 24 Remote Commander 96 Remote sensor 92 RESET 95 RFU...
... emitter 26 LCD screen 20 LP mode 70 M, N Manual focus 41 Menu settings 67 Mirror mode 20 Moisture condensation ....... 84 MONOTONE 35 Mosaic fader 35 NightShot 26 NTSC system 83 O, P, Q Operation indicators 97 ORC 70 Picture effect 37 Picture search 31 Playback pause 31 PROGRAM AE 38 R Recording and playback systems 80 Recording mode 70 Recording time 13 Remaining battery time indicator 24 Remaining tape indicator ... 24 Remote Commander 96 Remote sensor 92 RESET 95 RFU...


