Operating Instructions
Page 5
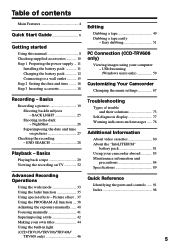
... PC Connection (CCD-TRV608 only) Viewing images using your computer - NightShot 26 Superimposing the date and time on TV 32 Troubleshooting Types of contents Main Features 4 Quick Start Guide 6 Getting started Using this manual 8 Checking supplied accessories 10 Step 1 Preparing the power supply ... 11 Installing the battery pack 11 Charging the battery pack 12 Connecting to a wall outlet 15 Step 2 Setting the date and time ........ 16 Step 3 Inserting a cassette 18 Editing Dubbing a tape 49 Dubbing a tape...
... PC Connection (CCD-TRV608 only) Viewing images using your computer - NightShot 26 Superimposing the date and time on TV 32 Troubleshooting Types of contents Main Features 4 Quick Start Guide 6 Getting started Using this manual 8 Checking supplied accessories 10 Step 1 Preparing the power supply ... 11 Installing the battery pack 11 Charging the battery pack 12 Connecting to a wall outlet 15 Step 2 Setting the date and time ........ 16 Step 3 Inserting a cassette 18 Editing Dubbing a tape 49 Dubbing a tape...
Operating Instructions
Page 8
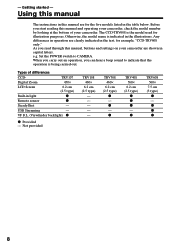
... settings on your camcorder. Types of your camcorder are clearly indicated in the text, for the five models listed in capital letters. USB Streaming - Before you can hear a beep sound to CAMERA. TRV107 Digital Zoom 450× LCD Screen 6.2 cm (2.5 type) Built-in this manual and operating your camcorder, check the model number by looking at the bottom of differences CCD- VF B.L. (Viewfinder backlight) z z Provided - Getting started - Using this manual The instructions in light z Remote...
... settings on your camcorder. Types of your camcorder are clearly indicated in the text, for the five models listed in capital letters. USB Streaming - Before you can hear a beep sound to CAMERA. TRV107 Digital Zoom 450× LCD Screen 6.2 cm (2.5 type) Built-in this manual and operating your camcorder, check the model number by looking at the bottom of differences CCD- VF B.L. (Viewfinder backlight) z z Provided - Getting started - Using this manual The instructions in light z Remote...
Operating Instructions
Page 17
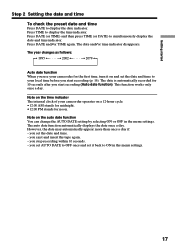
... camcorder operates on the time indicator The internal clock of your camcorder for the first time, turn it back to your local time before you start recording (p. 16). Press TIME to display the date indicator. The auto date function automatically displays the date once a day. Getting started Step 2 Setting the date and time To check the preset date and time Press DATE to display the time indicator. t 2079 T Auto date function When you set AUTO DATE to simultaneously display the date and time indicator. Press DATE...
... camcorder operates on the time indicator The internal clock of your camcorder for the first time, turn it back to your local time before you start recording (p. 16). Press TIME to display the date indicator. The auto date function automatically displays the date once a day. Getting started Step 2 Setting the date and time To check the preset date and time Press DATE to display the time indicator. t 2079 T Auto date function When you set AUTO DATE to simultaneously display the date and time indicator. Press DATE...

Operating Instructions
Page 21
... the auto date function is working. After recording (1) Set the POWER switch to adjust the brightness of the LCD screen. Some of the backlight. Adjusting the brightness of the LCD screen (1) In CAMERA mode, select LCD BRIGHT in in light accidentally. 21 MENU 1 LCD/VF SET LCD BR I G HT LCD B. in the mirror mode •The STBY indicator appears as Xz and REC as z. Basics Recording a picture During recording in the mirror mode DATE and TIME on your camcorder to avoid turning on...
... the auto date function is working. After recording (1) Set the POWER switch to adjust the brightness of the LCD screen. Some of the backlight. Adjusting the brightness of the LCD screen (1) In CAMERA mode, select LCD BRIGHT in in light accidentally. 21 MENU 1 LCD/VF SET LCD BR I G HT LCD B. in the mirror mode •The STBY indicator appears as Xz and REC as z. Basics Recording a picture During recording in the mirror mode DATE and TIME on your camcorder to avoid turning on...
Operating Instructions
Page 32
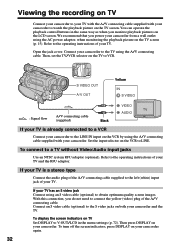
... a TV without Video/Audio input jacks Use an NTSC system RFU adaptor (optional). Refer to the operating instructions of your camcorder. With this connection, you power your camcorder from a wall outlet using the A/V connecting cable supplied with your camcorder to watch the playback picture on the TV screen. To turn off the screen indicators, press DISPLAY on your camcorder to the TV using an S video cable (optional) to obtain optimum quality screen images. Connect your camcorder again. 32 S VIDEO OUT...
... a TV without Video/Audio input jacks Use an NTSC system RFU adaptor (optional). Refer to the operating instructions of your camcorder. With this connection, you power your camcorder from a wall outlet using the A/V connecting cable supplied with your camcorder to watch the playback picture on the TV screen. To turn off the screen indicators, press DISPLAY on your camcorder to the TV using an S video cable (optional) to obtain optimum quality screen images. Connect your camcorder again. 32 S VIDEO OUT...
Operating Instructions
Page 49
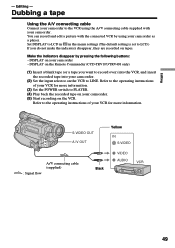
... S VIDEO : Signal flow A/V connecting cable (supplied) Black VIDEO AUDIO 49 Set DISPLAY to LCD in in the menu settings (The default setting is set to LINE. Editing - Refer to the operating instructions of your VCR for more information. (3) Set the POWER switch to the VCR using your camcorder as a player. Make the indicators disappear by using the A/V connecting cable supplied with the connected VCR by pressing the following buttons: - Refer to the operating instructions of your camcorder. (2) Set the input selector on the VCR...
... S VIDEO : Signal flow A/V connecting cable (supplied) Black VIDEO AUDIO 49 Set DISPLAY to LCD in in the menu settings (The default setting is set to LINE. Editing - Refer to the operating instructions of your VCR for more information. (3) Set the POWER switch to the VCR using your camcorder as a player. Make the indicators disappear by using the A/V connecting cable supplied with the connected VCR by pressing the following buttons: - Refer to the operating instructions of your camcorder. (2) Set the input selector on the VCR...
Operating Instructions
Page 58
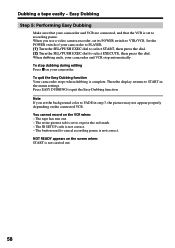
The write-protect tab is set its POWER switch to expose the red mark. - Note If you use a video camera recorder, set to cancel recording pause is not carried out. 58 The IR SETUP code is complete. The tape has run out. - Easy Dubbing Step 5: Performing Easy Dubbing Make sure that your camcorder and VCR are connected, and that the VCR is set the background color to START in step 3, the...
The write-protect tab is set its POWER switch to expose the red mark. - Note If you use a video camera recorder, set to cancel recording pause is not carried out. 58 The IR SETUP code is complete. The tape has run out. - Easy Dubbing Step 5: Performing Easy Dubbing Make sure that your camcorder and VCR are connected, and that the VCR is set the background color to START in step 3, the...
Operating Instructions
Page 60
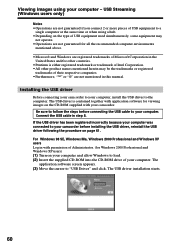
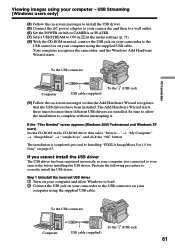
... together with application software for viewing images on the type of USB equipment used simultaneously, some equipment may be the trademarks or registered trademarks of USB equipment to "USB Driver" and click. The USB driver installation starts. 60 Connect the USB cable in this manual. Be sure to follow the steps before installing the USB driver, reinstall the USB driver following the procedure on your computer and allow Windows to load. (2) Insert...
... together with application software for viewing images on the type of USB equipment used simultaneously, some equipment may be the trademarks or registered trademarks of USB equipment to "USB Driver" and click. The USB driver installation starts. 60 Connect the USB cable in this manual. Be sure to follow the steps before installing the USB driver, reinstall the USB driver following the procedure on your computer and allow Windows to load. (2) Insert...
Operating Instructions
Page 61
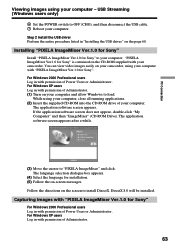
... on-screen messages to install the USB driver. (5) Connect the AC power adaptor to your camcorder and then to a wall outlet. (6) Set the POWER switch to CAMERA or PLAYER. (7) Select USB STREAM to ON in in the menu settings (p. 71). (8) With the CD-ROM inserted, connect the USB jack on your camcorder to your camcorder before installing the USB driver. The Add Hardware Wizard starts three times because three different USB drivers are installed. If the "Files Needed" screen appears (Windows...
... on-screen messages to install the USB driver. (5) Connect the AC power adaptor to your camcorder and then to a wall outlet. (6) Set the POWER switch to CAMERA or PLAYER. (7) Select USB STREAM to ON in in the menu settings (p. 71). (8) With the CD-ROM inserted, connect the USB jack on your camcorder to your camcorder before installing the USB driver. The Add Hardware Wizard starts three times because three different USB drivers are installed. If the "Files Needed" screen appears (Windows...
Operating Instructions
Page 63
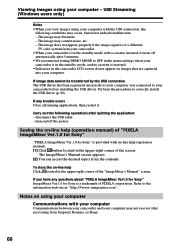
... then disconnect the USB cable. 7 Reboot your computer with "PIXELA ImageMixer Ver.1.0 for Sony" is contained on your computer and allow Windows to load. While using your computer - Capturing images with permission of Power Users or Adminisitrator. PC Connection Viewing images using your computer, close all running applications. (2) Insert the supplied CD-ROM into the CD-ROM drive of your computer. The application software screen appears after a while...
... then disconnect the USB cable. 7 Reboot your computer with "PIXELA ImageMixer Ver.1.0 for Sony" is contained on your computer and allow Windows to load. While using your computer - Capturing images with permission of Power Users or Adminisitrator. PC Connection Viewing images using your computer, close all running applications. (2) Insert the supplied CD-ROM into the CD-ROM drive of your computer. The application software screen appears after a while...
Operating Instructions
Page 66
... setting DEMO MODE to your camcorder before installing the USB driver. The ImageMixer's Manual screen appears. (2) You can access the desired topics from the contents. disconnect the USB cable - If you view images using your computer. Carry out the following conditions may not recover after quitting the application: - Viewing images using your computer with the USB connection, the following operations after recovering from Suspend, Resume, or Sleep. 66 If image data cannot be transferred...
... setting DEMO MODE to your camcorder before installing the USB driver. The ImageMixer's Manual screen appears. (2) You can access the desired topics from the contents. disconnect the USB cable - If you view images using your computer. Carry out the following conditions may not recover after quitting the application: - Viewing images using your computer with the USB connection, the following operations after recovering from Suspend, Resume, or Sleep. 66 If image data cannot be transferred...
Operating Instructions
Page 68
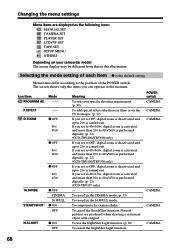
...; is carried out. To compensate for camera-shake. To cancel the SteadyShot function. POWER switch CAMERA CAMERA CAMERA CAMERA CAMERA CAMERA 68 Changing the menu settings Menu items are produced when shooting a stationary object with a tripod. P EFFECT -- The screen shows only the items you set to OFF, digital zoom is deactivated and up to 20× is carried out. Selecting the mode setting of the POWER switch. If you can operate at the moment.
...; is carried out. To compensate for camera-shake. To cancel the SteadyShot function. POWER switch CAMERA CAMERA CAMERA CAMERA CAMERA CAMERA 68 Changing the menu settings Menu items are produced when shooting a stationary object with a tripod. P EFFECT -- The screen shows only the items you set to OFF, digital zoom is deactivated and up to 20× is carried out. Selecting the mode setting of the POWER switch. If you can operate at the moment.
Operating Instructions
Page 69
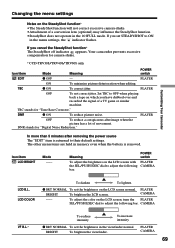
... on the LCD screen normal. PLAYER CAMERA 69 Customizing Your Camcorder Changing the menu settings Notes on the SteadyShot function* •The SteadyShot function will not correct excessive camera-shake. •Attachment of a conversion lens (optional) may influence the SteadyShot function. •SteadyShot does not operate in memory even when the battery is returned to adjust the following bar. Meaning POWER switch To adjust the brightness on the LCD screen with...
... on the LCD screen normal. PLAYER CAMERA 69 Customizing Your Camcorder Changing the menu settings Notes on the SteadyShot function* •The SteadyShot function will not correct excessive camera-shake. •Attachment of a conversion lens (optional) may influence the SteadyShot function. •SteadyShot does not operate in memory even when the battery is returned to adjust the following bar. Meaning POWER switch To adjust the brightness on the LCD screen with...
Operating Instructions
Page 70
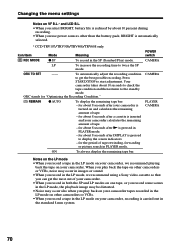
... of tape rewinding, forwarding or picture search in the LP mode on your camcorder, we recommend using a Sony video cassette so that you can get the best possible recording. Press START/STOP to twice the SP mode. When you play back on your camcorder tapes recorded in the LP mode on other camcorders or VCRs. •When you record a tape in the SP (Standard Play) mode. Changing the menu settings Notes on VF B.L.* and LCD B.L. •...
... of tape rewinding, forwarding or picture search in the LP mode on your camcorder, we recommend using a Sony video cassette so that you can get the best possible recording. Press START/STOP to twice the SP mode. When you play back on your camcorder tapes recorded in the LP mode on other camcorders or VCRs. •When you record a tape in the SP (Standard Play) mode. Changing the menu settings Notes on VF B.L.* and LCD B.L. •...
Operating Instructions
Page 74
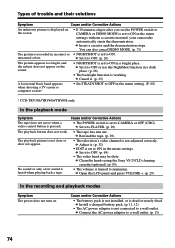
... cancel DEMO MODE. (p. 71) The picture is recorded in incorrect or • NIGHTSHOT is set to OFF in the menu setting. (P. 68) * CCD-TRV308/TRV408/TRV608 only In the playback mode Symptom The tape does not move when a video control button is set to ON in the menu settings without a cassette inserted, your camcorder automatically starts the demonstration. No sound or only a low sound is not clear or does not appear. c Open the LCD...
... cancel DEMO MODE. (p. 71) The picture is recorded in incorrect or • NIGHTSHOT is set to OFF in the menu setting. (P. 68) * CCD-TRV308/TRV408/TRV608 only In the playback mode Symptom The tape does not move when a video control button is set to ON in the menu settings without a cassette inserted, your camcorder automatically starts the demonstration. No sound or only a low sound is not clear or does not appear. c Open the LCD...

Operating Instructions
Page 75
... your camcorder for cassette ejection work . • The tape was ejected after recording. • You have used the battery pack in the remaining battery time. c Replace with a new battery pack. (p. 11) • The battery pack is not fully charged. c Charge the battery pack fully again. (p. 11, 12) • The battery pack is set correctly. c Remove the cassette and leave your VCR. c Select the correct IR SETUP code and PAUSE MODE, according to AUTO in the remaining battery time. Troubleshooting Types of trouble...
... your camcorder for cassette ejection work . • The tape was ejected after recording. • You have used the battery pack in the remaining battery time. c Replace with a new battery pack. (p. 11) • The battery pack is not fully charged. c Charge the battery pack fully again. (p. 11, 12) • The battery pack is set correctly. c Remove the cassette and leave your VCR. c Select the correct IR SETUP code and PAUSE MODE, according to AUTO in the remaining battery time. Troubleshooting Types of trouble...
Operating Instructions
Page 76
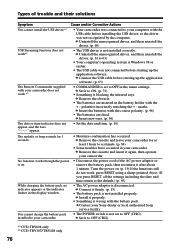
... Sony service facility. • The POWER switch is not set to 63) • Your computer's operating system is wrong with the correct polarity. (p. 96) • The batteries are inserted in the display window. c Contact your camcorder. • Disconnect the power cord of trouble and their solutions Symptom Cause and/or Corrective Actions You cannot install the USB driver.*1) USB Streaming function does not work*1) The Remote Commander supplied with the + - c Connect...
... Sony service facility. • The POWER switch is not set to 63) • Your computer's operating system is wrong with the correct polarity. (p. 96) • The batteries are inserted in the display window. c Contact your camcorder. • Disconnect the power cord of trouble and their solutions Symptom Cause and/or Corrective Actions You cannot install the USB driver.*1) USB Streaming function does not work*1) The Remote Commander supplied with the + - c Connect...

Operating Instructions
Page 81
... the cable from your camcorder and store it is used in high temperatures for communicating information related to operating conditions between 10°C to 30°C (50°F to 86°F) until the power goes off although the remaining battery time indicator indicates that the battery pack has enough power to use of your camcorder, and displays the remaining battery time in CAMERA (standby) mode without a cassette...
... the cable from your camcorder and store it is used in high temperatures for communicating information related to operating conditions between 10°C to 30°C (50°F to 86°F) until the power goes off although the remaining battery time indicator indicates that the battery pack has enough power to use of your camcorder, and displays the remaining battery time in CAMERA (standby) mode without a cassette...
Operating Instructions
Page 89
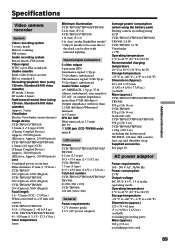
... Video recording system 2 rotary heads Helical scanning FM system Audio recording system Rotary heads, FM system Video signal NTSC color, EIA standards Usable cassette 8mm video format cassette Hi8 or standard 8 Recording/playback time (using 120 min. Viewfinder Electric Viewfinder (monochrome) Image device CCD-TRV107/TRV108: 3.0 mm (1 / 6 type) CCD (Charge Coupled Device) Approx. 270 000 pixels (Effective: Approx. 250 000 pixels) CCD-TRV308/TRV408/TRV608: 4.5mm (1/4 type) CCD (Charge Coupled Device) Approx. 320 000 pixels (Effective: Approx. 200 000 pixels) Lens Combined power zoom lens...
... Video recording system 2 rotary heads Helical scanning FM system Audio recording system Rotary heads, FM system Video signal NTSC color, EIA standards Usable cassette 8mm video format cassette Hi8 or standard 8 Recording/playback time (using 120 min. Viewfinder Electric Viewfinder (monochrome) Image device CCD-TRV107/TRV108: 3.0 mm (1 / 6 type) CCD (Charge Coupled Device) Approx. 270 000 pixels (Effective: Approx. 250 000 pixels) CCD-TRV308/TRV408/TRV608: 4.5mm (1/4 type) CCD (Charge Coupled Device) Approx. 320 000 pixels (Effective: Approx. 200 000 pixels) Lens Combined power zoom lens...
Operating Instructions
Page 98
... emitter 26 LCD screen 20 LP mode 70 M, N Manual focus 41 Menu settings 67 Mirror mode 20 Moisture condensation ....... 84 MONOTONE 35 Mosaic fader 35 NightShot 26 NTSC system 83 O, P, Q Operation indicators 97 ORC 70 Picture effect 37 Picture search 31 Playback pause 31 PROGRAM AE 38 R Recording and playback systems 80 Recording mode 70 Recording time 13 Remaining battery time indicator 24 Remaining tape indicator ... 24 Remote Commander 96 Remote sensor 92 RESET 95 RFU...
... emitter 26 LCD screen 20 LP mode 70 M, N Manual focus 41 Menu settings 67 Mirror mode 20 Moisture condensation ....... 84 MONOTONE 35 Mosaic fader 35 NightShot 26 NTSC system 83 O, P, Q Operation indicators 97 ORC 70 Picture effect 37 Picture search 31 Playback pause 31 PROGRAM AE 38 R Recording and playback systems 80 Recording mode 70 Recording time 13 Remaining battery time indicator 24 Remaining tape indicator ... 24 Remote Commander 96 Remote sensor 92 RESET 95 RFU...


