
XL-E80 Operation Manual
Page 15
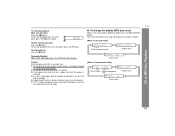
... the button is damaged, dirty, or loaded upside down, the disc will change the display (MP3 discs only) While in one disc tray. To remove the disc: While in the playback mode] Track number Elapsed playback time Folder name Track name CD or MP3 disc Playback XL-E80 15 " If TV or radio...
... the button is damaged, dirty, or loaded upside down, the disc will change the display (MP3 discs only) While in one disc tray. To remove the disc: While in the playback mode] Track number Elapsed playback time Folder name Track name CD or MP3 disc Playback XL-E80 15 " If TV or radio...

XL-E80 Operation Manual
Page 21
...cause malfunctions. In this case, wait until "TAPE" appears on . 2 Press the FUNCTION button until the power is restored. button. " Before loading a tape into the cassette compartment, tighten the slack with the side to be played facing toward you. 5 Close the cassette compartment by pushing the... engaged with the remote control, press the TAPE button. 3 Open the cassette compart- button to turn the power on the display. Tape Playback XL-E80 21 " Even if the ( ) button is performed using the remote control, press the button. Fast forward/rewind: To advance the tape, ...
...cause malfunctions. In this case, wait until "TAPE" appears on . 2 Press the FUNCTION button until the power is restored. button. " Before loading a tape into the cassette compartment, tighten the slack with the side to be played facing toward you. 5 Close the cassette compartment by pushing the... engaged with the remote control, press the TAPE button. 3 Open the cassette compart- button to turn the power on the display. Tape Playback XL-E80 21 " Even if the ( ) button is performed using the remote control, press the button. Fast forward/rewind: To advance the tape, ...
XL-E80 Operation Manual
Page 22
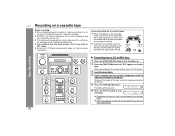
XL-E80 Recording on a cassette tape Before recording: " When recording important selections, make sure that the erase-prevention tabs are not removed. " For recording, use metal or CrO tapes. Cassettes have removable tabs that the desired material is properly recorded. Recording will stop automatically. 22 " Playback of this unit. " SHARP... on the tape without the tab. When operating with the remote control, press the CD button. 3 Load the desired disc. 4 Load a cassette into the cassette compartment with the side to be adjusted with adhesive tape to ensure that prevent...
XL-E80 Recording on a cassette tape Before recording: " When recording important selections, make sure that the erase-prevention tabs are not removed. " For recording, use metal or CrO tapes. Cassettes have removable tabs that the desired material is properly recorded. Recording will stop automatically. 22 " Playback of this unit. " SHARP... on the tape without the tab. When operating with the remote control, press the CD button. 3 Load the desired disc. 4 Load a cassette into the cassette compartment with the side to be adjusted with adhesive tape to ensure that prevent...

XL-E80 Operation Manual
Page 23
The tape will To interrupt recording: Press the TAPE ( ) button. To stop . Tape Recording XL-E80 23 button is pressed again, the disc will stop recording: Press the button. To resume recording, press the ( ) button. Recording from the radio 1 ... side to be performed. 3 Press the TAPE ( ) button. To resume recording, press the ( ) button. To perform programmed recording: 1 Program tracks (see page 19). 2 Load a cassette into the cassette compartment with the side to be erased facing toward you. 2 Press the FUNCTION button until "TAPE" appears on which recording cannot...
The tape will To interrupt recording: Press the TAPE ( ) button. To stop . Tape Recording XL-E80 23 button is pressed again, the disc will stop recording: Press the button. To resume recording, press the ( ) button. Recording from the radio 1 ... side to be performed. 3 Press the TAPE ( ) button. To resume recording, press the ( ) button. To perform programmed recording: 1 Program tracks (see page 19). 2 Load a cassette into the cassette compartment with the side to be erased facing toward you. 2 Press the FUNCTION button until "TAPE" appears on which recording cannot...
XL-E80 Operation Manual
Page 24
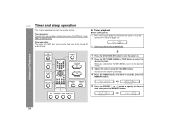
Timer playback Before setting timer: 1 Press the CLOCK button to check that the clock is set to the correct time. (Refer to page 13.) 2 Load a cassette or disc to select the desired function. Timer playback: The unit turns on . 2 Press the CD, TUNER (BAND) or TAPE button to ..., press the MEMORY button. 5 Press the PRESET ( or ) button to specify the hour to the desired station. 3 Adjust the volume using the VOLUME buttons. XL-E80 Timer and sleep operation This may be played. Sleep operation: The radio, CD, MP3 disc and cassette tape can all be turned off automatically. ! When...
Timer playback Before setting timer: 1 Press the CLOCK button to check that the clock is set to the correct time. (Refer to page 13.) 2 Load a cassette or disc to select the desired function. Timer playback: The unit turns on . 2 Press the CD, TUNER (BAND) or TAPE button to ..., press the MEMORY button. 5 Press the PRESET ( or ) button to specify the hour to the desired station. 3 Adjust the volume using the VOLUME buttons. XL-E80 Timer and sleep operation This may be played. Sleep operation: The radio, CD, MP3 disc and cassette tape can all be turned off automatically. ! When...

XL-E80 Operation Manual
Page 27
...audio output to this unit and the video output to a television. 2 Press the ON/STAND-BY button to the VIDEO/AUX IN jacks. XL-E80 Advanced Features 27 When operating with the side to connect the VCR, DVD, etc. Red To the line output jacks ! The connection cord ... RCA cord (not supplied) White VCR, DVD, etc. to turn the power on. 3 Press the FUNCTION button until "AUX" appears on a tape 1 Load a cassette into the cassette compartment with the remote control, press the VIDEO/AUX button. 4 Play the connected equipment. Purchase a commercially available cord as shown below...
...audio output to this unit and the video output to a television. 2 Press the ON/STAND-BY button to the VIDEO/AUX IN jacks. XL-E80 Advanced Features 27 When operating with the side to connect the VCR, DVD, etc. Red To the line output jacks ! The connection cord ... RCA cord (not supplied) White VCR, DVD, etc. to turn the power on. 3 Press the FUNCTION button until "AUX" appears on a tape 1 Load a cassette into the cassette compartment with the remote control, press the VIDEO/AUX button. 4 Play the connected equipment. Purchase a commercially available cord as shown below...

XL-E80 Operation Manual
Page 28
General Symptom Possible cause " The clock is not performed dards? " Is the disc loaded upside down? middle of the unit plugged in the mid- Move the antenna away from the AC power cord if it . (Refer to page 29.) " .... ! " If a power failure occurs during playback, the heads remain engaged with this product, check the following before calling your authorized SHARP dealer or service center. ! " Is the distance or angle incor- XL-E80 28 References Troubleshooting chart Many potential problems can be resolved by mode and then turn it a normal tape? (You cannot...
General Symptom Possible cause " The clock is not performed dards? " Is the disc loaded upside down? middle of the unit plugged in the mid- Move the antenna away from the AC power cord if it . (Refer to page 29.) " .... ! " If a power failure occurs during playback, the heads remain engaged with this product, check the following before calling your authorized SHARP dealer or service center. ! " Is the distance or angle incor- XL-E80 28 References Troubleshooting chart Many potential problems can be resolved by mode and then turn it a normal tape? (You cannot...
