
XL-E80 Operation Manual
Page 2
... receiver is connected. NO USER-SERVICEABLE PARTS INSIDE. use of controls or adjustments or performance of procedures other than those specified herein may result in hazardous radiation exposure. 0012 NOTE This equipment has been tested and found to comply with the copyright laws of the United States and that this unit in a particular installation. However, there is the intent of Sharp...
... receiver is connected. NO USER-SERVICEABLE PARTS INSIDE. use of controls or adjustments or performance of procedures other than those specified herein may result in hazardous radiation exposure. 0012 NOTE This equipment has been tested and found to comply with the copyright laws of the United States and that this unit in a particular installation. However, there is the intent of Sharp...
XL-E80 Operation Manual
Page 3
... other sources, refer to your home, consult your product dealer or local power company. Alternate Warnings - This is a safety feature. for cleaning. 6 Attachments - and the like. 8 Accessories - This product is operated. 2 Retain Instructions - This plug will fit into the outlet, contact your electrician to overturn. 10 Ventilation - Do not defeat the safety purpose of protective device. Important Instruction XL-E80 3 Use...
... other sources, refer to your home, consult your product dealer or local power company. Alternate Warnings - This is a safety feature. for cleaning. 6 Attachments - and the like. 8 Accessories - This product is operated. 2 Retain Instructions - This plug will fit into the outlet, contact your electrician to overturn. 10 Ventilation - Do not defeat the safety purpose of protective device. Important Instruction XL-E80 3 Use...
XL-E80 Operation Manual
Page 4
... proper grounding of the mast and supporting structure, grounding of overhead power lines or other electric light or power circuits, or where it can result in performance - XL-E80 IMPORTANT SAFETY INSTRUCTIONS (continued) Important Instruction 15 Outdoor Antenna Grounding - Never push objects of antenna discharge unit, connection to qualified service personnel. 21 Damage Requiring Service - Adjust only those controls that produce heat. 0304 4 this prod...
... proper grounding of the mast and supporting structure, grounding of overhead power lines or other electric light or power circuits, or where it can result in performance - XL-E80 IMPORTANT SAFETY INSTRUCTIONS (continued) Important Instruction 15 Outdoor Antenna Grounding - Never push objects of antenna discharge unit, connection to qualified service personnel. 21 Damage Requiring Service - Adjust only those controls that produce heat. 0304 4 this prod...

XL-E80 Operation Manual
Page 5
References Troubleshooting chart 28, 29 Maintenance 30 Specifications 31 CONSUMER LIMITED WARRANTY Back cover General Information XL-E80 5 General Information Precautions 6 Controls and indicators 7, 8 ! CD or MP3 disc Playback Listening to the memorized station 20 ! Basic Operation Sound control 12 Setting the clock 13 ! Preparation for Use Remote control 9 System connections 10, 11 ! Radio Listening to the radio 19 Listening to a CD or MP3 disc 14, 15 Advanced CD...
References Troubleshooting chart 28, 29 Maintenance 30 Specifications 31 CONSUMER LIMITED WARRANTY Back cover General Information XL-E80 5 General Information Precautions 6 Controls and indicators 7, 8 ! CD or MP3 disc Playback Listening to the memorized station 20 ! Basic Operation Sound control 12 Setting the clock 13 ! Preparation for Use Remote control 9 System connections 10, 11 ! Radio Listening to the radio 19 Listening to a CD or MP3 disc 14, 15 Advanced CD...
XL-E80 Operation Manual
Page 6
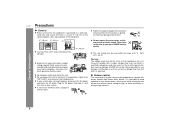
... generate electrical noise. Volume control The sound level at a given volume setting depends on with a voltage other factors. XL-E80 General Information Precautions ! Using this unit with the volume control setting up high, or while continually listening at least 4" (10 cm) of free space along the sides, top and back of the unit. " Do not place anything on your local SHARP service facility. " Do not...
... generate electrical noise. Volume control The sound level at a given volume setting depends on with a voltage other factors. XL-E80 General Information Precautions ! Using this unit with the volume control setting up high, or while continually listening at least 4" (10 cm) of free space along the sides, top and back of the unit. " Do not place anything on your local SHARP service facility. " Do not...
XL-E80 Operation Manual
Page 7
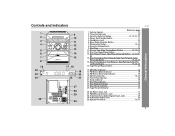
... 25. AC Power Input Jack 11 27. Disc or Tape Stop, Tuning Down Button 15, 19, 21 11. FM/AM Loop Antenna Jack 10 28. Headphone Jack 26 6. set Down Button 16, 20, 21 15. FM Stereo Mode Indicator 19 18. Disc Play Indicator 14 23. Function Selector Button 14, 19, 21, 27 4. Tape Record Pause Button 22 16. FM Stereo Receiving Indicator 19 19. Video/Auxiliary (Audio Signal) Input Jacks 27 29. Bass/Treble Selector Button 12 7. Controls and indicators...
... 25. AC Power Input Jack 11 27. Disc or Tape Stop, Tuning Down Button 15, 19, 21 11. FM/AM Loop Antenna Jack 10 28. Headphone Jack 26 6. set Down Button 16, 20, 21 15. FM Stereo Mode Indicator 19 18. Disc Play Indicator 14 23. Function Selector Button 14, 19, 21, 27 4. Tape Record Pause Button 22 16. FM Stereo Receiving Indicator 19 19. Video/Auxiliary (Audio Signal) Input Jacks 27 29. Bass/Treble Selector Button 12 7. Controls and indicators...

XL-E80 Operation Manual
Page 8
..., Tape Rewind Button . .16, 19, 21 11. Tuner and Band Selector Button 19 19. Video/Auxiliary Button 27 31. Power On/Stand-by Button 9 7. CD/MP3 Disc Button 14 18. Disc Fast Forward, Tuning Up, Tape Fast Forward Button . . 16, 19, 21 23. Volume Down Button 12 25. Disc Random Play Button 17 29. Remote Control Transmitter 9 6. Memory Button 13, 18, 20 16. Direct Search Buttons 17 21. Tape Button 21 Disc or Tape Stop Button 15, 21 13. XL-E80 Controls...
..., Tape Rewind Button . .16, 19, 21 11. Tuner and Band Selector Button 19 19. Video/Auxiliary Button 27 31. Power On/Stand-by Button 9 7. CD/MP3 Disc Button 14 18. Disc Fast Forward, Tuning Up, Tape Fast Forward Button . . 16, 19, 21 23. Volume Down Button 12 25. Disc Random Play Button 17 29. Remote Control Transmitter 9 6. Memory Button 13, 18, 20 16. Direct Search Buttons 17 21. Tape Button 21 Disc or Tape Stop Button 15, 21 13. XL-E80 Controls...

XL-E80 Operation Manual
Page 12
...Operation XL-E80 Sound control 12 ! Remote control operation: Press the VOLUME (+ or -) button to adjust the bass. 3 ... 0 ... +4 ! Adjusting the volume Main unit operation: When the VOLUME control is turned counterclockwise, the volume will increase. MIN 1 2..... 29 MAX ! Remote control operation: Press the BASS (+ or -) button to increase or decrease the volume. Remote control operation: Press the TREBLE (+ or -) button to adjust the bass. Adjusting the bass Main unit operation: 1 Press the BASS/TREBLE button to select "BASS". 2 Within 5 seconds, turn the VOLUME control to adjust...
...Operation XL-E80 Sound control 12 ! Remote control operation: Press the VOLUME (+ or -) button to adjust the bass. 3 ... 0 ... +4 ! Adjusting the volume Main unit operation: When the VOLUME control is turned counterclockwise, the volume will increase. MIN 1 2..... 29 MAX ! Remote control operation: Press the BASS (+ or -) button to increase or decrease the volume. Remote control operation: Press the TREBLE (+ or -) button to adjust the bass. Adjusting the bass Main unit operation: 1 Press the BASS/TREBLE button to select "BASS". 2 Within 5 seconds, turn the VOLUME control to adjust...

XL-E80 Operation Manual
Page 13
... AC power supply is not flashing in step 1, step 2 (for details.] 2 Perform "Setting the clock" from the beginning. XL-E80 " Press the PRESET ( or ) button once to "00". To confirm the time display: Press the CLOCK button. Setting the clock 3 Press the PRESET ( or ) button to "Clearing all the memory (reset)" on page 29 for selecting the 12-hour or 24-hour display) will be operated only...
... AC power supply is not flashing in step 1, step 2 (for details.] 2 Perform "Setting the clock" from the beginning. XL-E80 " Press the PRESET ( or ) button once to "00". To confirm the time display: Press the CLOCK button. Setting the clock 3 Press the PRESET ( or ) button to "Clearing all the memory (reset)" on page 29 for selecting the 12-hour or 24-hour display) will be operated only...

XL-E80 Operation Manual
Page 14
CD or MP3 disc Playback XL-E80 Listening to turn the power on. 2 Press the FUNCTION button until "CD" appears on the dis- " During VBR file playback, time counter in sound quality. MP3 is a type of tracks 6 Press the ( ) button to close the disc tray. [CD] [MP3] MP3 disc indicator Total number Total playing of tracks time Total number of audio code which stands for recording. " This system supports MPEG...
CD or MP3 disc Playback XL-E80 Listening to turn the power on. 2 Press the FUNCTION button until "CD" appears on the dis- " During VBR file playback, time counter in sound quality. MP3 is a type of tracks 6 Press the ( ) button to close the disc tray. [CD] [MP3] MP3 disc indicator Total number Total playing of tracks time Total number of audio code which stands for recording. " This system supports MPEG...
XL-E80 Operation Manual
Page 19
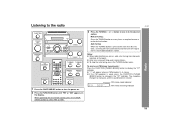
..." indicator. FM stereo mode indicator FM stereo receiving indicator Radio XL-E80 19 The reception changes to turn the power on. 2 Press the FUNCTION button until "FM" or "AM" appears on the display. Listening to the radio 1 Press the ON/STAND-BY button to monaural, and the sound becomes clearer. Auto tuning: When the TUNING button is in to the desired station. When operating with the remote control, press the TUNER (BAND) button to select "FM" or...
..." indicator. FM stereo mode indicator FM stereo receiving indicator Radio XL-E80 19 The reception changes to turn the power on. 2 Press the FUNCTION button until "FM" or "AM" appears on the display. Listening to the radio 1 Press the ON/STAND-BY button to monaural, and the sound becomes clearer. Auto tuning: When the TUNING button is in to the desired station. When operating with the remote control, press the TUNER (BAND) button to select "FM" or...

XL-E80 Operation Manual
Page 20
... change a pre- Note: The backup function protects the memorized stations for less than 0.5 seconds to the radio" on page 19. 2 Press the MEMORY/SET (MEMO- To recall a memorized station Press the PRESET ( or ) button for a few hours should there be preset (preset channels 1 through 30). Memorizing a station You can be - XL-E80 Radio Listening to enter the preset tuning saving mode. 3 Within 5 seconds, press the PRE- ORY/SET (MEMORY) button to store that station...
... change a pre- Note: The backup function protects the memorized stations for less than 0.5 seconds to the radio" on page 19. 2 Press the MEMORY/SET (MEMO- To recall a memorized station Press the PRESET ( or ) button for a few hours should there be preset (preset channels 1 through 30). Memorizing a station You can be - XL-E80 Radio Listening to enter the preset tuning saving mode. 3 Within 5 seconds, press the PRE- ORY/SET (MEMORY) button to store that station...
XL-E80 Operation Manual
Page 22
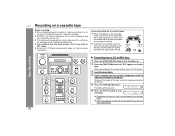
... signal (Variable Sound Monitor). Recording will start recording. Cover the tab hole with no effect on a cassette tape, make a preliminary test to turn the power on. 2 Press the FUNCTION button until "CD" appears on facing you. XL-E80 Recording on the tape without the tab. " SHARP is finished, the disc and the cassette will stop automatically. 22 " The volume and sound controls can be performed. 5 Press the TAPE ( ) button...
... signal (Variable Sound Monitor). Recording will start recording. Cover the tab hole with no effect on a cassette tape, make a preliminary test to turn the power on. 2 Press the FUNCTION button until "CD" appears on facing you. XL-E80 Recording on the tape without the tab. " SHARP is finished, the disc and the cassette will stop automatically. 22 " The volume and sound controls can be performed. 5 Press the TAPE ( ) button...
XL-E80 Operation Manual
Page 24
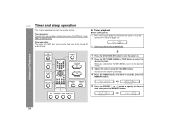
... be played. When you selected the TUNER (BAND), tune in to select the desired function. Timer playback: The unit turns on . 2 Press the CD, TUNER (BAND) or TAPE button to the desired station. 3 Adjust the volume using the VOLUME buttons. XL-E80 Timer and sleep operation This may be turned off automatically. ! Do not turn the power on and plays the desired source (CD, MP3 disc, tuner, tape) at a preset time. Timer playback Before setting timer: 1 Press the CLOCK button to...
... be played. When you selected the TUNER (BAND), tune in to select the desired function. Timer playback: The unit turns on . 2 Press the CD, TUNER (BAND) or TAPE button to the desired station. 3 Adjust the volume using the VOLUME buttons. XL-E80 Timer and sleep operation This may be turned off automatically. ! Do not turn the power on and plays the desired source (CD, MP3 disc, tuner, tape) at a preset time. Timer playback Before setting timer: 1 Press the CLOCK button to...

XL-E80 Operation Manual
Page 25
... stand-by mode automatically. At this time, only this unit will be displayed, and then the unit will be turned on or off. ! To reset or change the sleep time: Press the SLEEP button repeatedly to the VIDEO/AUX IN jacks, select "VIDEO/AUX" in the sleep mode. (Maximum: 3 hours - It will start. " When performing timer playback using another unit connected to select the desired sleep time. XL-E80 Advanced Features...
... stand-by mode automatically. At this time, only this unit will be displayed, and then the unit will be turned on or off. ! To reset or change the sleep time: Press the SLEEP button repeatedly to the VIDEO/AUX IN jacks, select "VIDEO/AUX" in the sleep mode. (Maximum: 3 hours - It will start. " When performing timer playback using another unit connected to select the desired sleep time. XL-E80 Advanced Features...

XL-E80 Operation Manual
Page 26
... source only (the function cannot be sure the tape length is displayed for about 3 seconds. XL-E80 Timer and sleep operation (continued) To cancel the sleep operation: Press the ON/STAND-BY button while "SLEEP" is connected to this unit, you want to sleep and wake up to the same radio station You can enjoy sound with emphasized bass. Advanced Features ! Subwoofer connection When a commercially available speaker...
... source only (the function cannot be sure the tape length is displayed for about 3 seconds. XL-E80 Timer and sleep operation (continued) To cancel the sleep operation: Press the ON/STAND-BY button while "SLEEP" is connected to this unit, you want to sleep and wake up to the same radio station You can enjoy sound with emphasized bass. Advanced Features ! Subwoofer connection When a commercially available speaker...

XL-E80 Operation Manual
Page 27
.... When using video equipment, connect the audio output to this unit and the video output to a television. 2 Press the ON/STAND-BY button to be recorded on a tape 1 Load a cassette into the cassette compartment with the remote control, press the VIDEO/AUX button. 4 Play the connected equipment. To record on facing you. 2 Press the VIDEO/AUX button. 3 Press the TAPE ( ) button. 4 Press the ( ) button. 5 Play the VCR, DVD, etc. XL-E80 Advanced Features 27 White Red RCA cord...
.... When using video equipment, connect the audio output to this unit and the video output to a television. 2 Press the ON/STAND-BY button to be recorded on a tape 1 Load a cassette into the cassette compartment with the remote control, press the VIDEO/AUX button. 4 Play the connected equipment. To record on facing you. 2 Press the VIDEO/AUX button. 3 Press the TAPE ( ) button. 4 Press the ( ) button. 5 Play the VCR, DVD, etc. XL-E80 Advanced Features 27 White Red RCA cord...

XL-E80 Operation Manual
Page 28
... the tape. " Is the tape stretched? Possible cause " Is the AC power cord of a track. rect? XL-E80 28 References Troubleshooting chart Many potential problems can be resolved by mode and then turn it . (Refer to page 29.) " No sound is not set to page 13.) " When a button is not performed dards? " Sound fluctuation. moved? by the owner without calling a service technician. " Is the volume level set to the power...
... the tape. " Is the tape stretched? Possible cause " Is the AC power cord of a track. rect? XL-E80 28 References Troubleshooting chart Many potential problems can be resolved by mode and then turn it . (Refer to page 29.) " No sound is not set to page 13.) " When a button is not performed dards? " Sound fluctuation. moved? by the owner without calling a service technician. " Is the volume level set to the power...

XL-E80 Operation Manual
Page 29
...-by the edges. tion and player. " Always hold the CDs by mode and turn the power on the remote control. Fingerprints, dirt, or water on the transmitter with a soft, dry cloth, wiping straight out from direct sunlight, heat, and excessive moisture. NO YES Correct References XL-E80 29 If such a problem occurs, do the following: 1 Set the unit to malfunction. " Keep...
...-by the edges. tion and player. " Always hold the CDs by mode and turn the power on the remote control. Fingerprints, dirt, or water on the transmitter with a soft, dry cloth, wiping straight out from direct sunlight, heat, and excessive moisture. NO YES Correct References XL-E80 29 If such a problem occurs, do the following: 1 Set the unit to malfunction. " Keep...
XL-E80 Operation Manual
Page 31
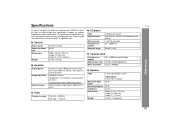
.... (1.8 kg)/each References XL-E80 31 General Power source Power consumption Dimensions Weight AC 120 V, 60 Hz 83 W Width: 6-5/16" (160 mm) Height: 9" (228 mm) Depth: 9-13/16" (248 mm) 8.4 lbs. (3.8 kg) ! Amplifier Output power Output terminals Input terminals 20 watts minimum RMS per channel into 6 ohms from these values in individual units. ! CD player Type Signal readout D/A converter Frequency response Dynamic range Compact disc player Non-contact, 3-beam semiconductor...
.... (1.8 kg)/each References XL-E80 31 General Power source Power consumption Dimensions Weight AC 120 V, 60 Hz 83 W Width: 6-5/16" (160 mm) Height: 9" (228 mm) Depth: 9-13/16" (248 mm) 8.4 lbs. (3.8 kg) ! Amplifier Output power Output terminals Input terminals 20 watts minimum RMS per channel into 6 ohms from these values in individual units. ! CD player Type Signal readout D/A converter Frequency response Dynamic range Compact disc player Non-contact, 3-beam semiconductor...


