MX-B201D Operation Guide
Page 3
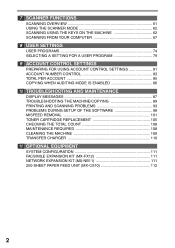
... CONTROL SETTINGS 81 ACCOUNT NUMBER CONTROL 83 TOTAL PER ACCOUNT 85 COPYING WHEN AUDITING MODE IS ENABLED 86 10 TROUBLESHOOTING AND MAINTENANCE DISPLAY MESSAGES 87 TROUBLESHOOTING THE MACHINE/COPYING 89 PRINTING AND SCANNING PROBLEMS 93 PROBLEMS DURING SETUP OF THE SOFTWARE 98 MISFEED REMOVAL 101 TONER CARTRIDGE REPLACEMENT 105 CHECKING THE TOTAL COUNT 108 MAINTENANCE REQUIRED 108 CLEANING THE MACHINE 109 TRANSFER CHARGER 110 11 OPTIONAL EQUIPMENT SYSTEM CONFIGURATION 111 FACSIMILE EXPANSION KIT (MX-FX12 111 NETWORK EXPANSION KIT (MX-NB11 111 250-SHEET PAPER FEED UNIT (MX...
... CONTROL SETTINGS 81 ACCOUNT NUMBER CONTROL 83 TOTAL PER ACCOUNT 85 COPYING WHEN AUDITING MODE IS ENABLED 86 10 TROUBLESHOOTING AND MAINTENANCE DISPLAY MESSAGES 87 TROUBLESHOOTING THE MACHINE/COPYING 89 PRINTING AND SCANNING PROBLEMS 93 PROBLEMS DURING SETUP OF THE SOFTWARE 98 MISFEED REMOVAL 101 TONER CARTRIDGE REPLACEMENT 105 CHECKING THE TOTAL COUNT 108 MAINTENANCE REQUIRED 108 CLEANING THE MACHINE 109 TRANSFER CHARGER 110 11 OPTIONAL EQUIPMENT SYSTEM CONFIGURATION 111 FACSIMILE EXPANSION KIT (MX-FX12 111 NETWORK EXPANSION KIT (MX-NB11 111 250-SHEET PAPER FEED UNIT (MX...
MX-B201D Operation Guide
Page 4
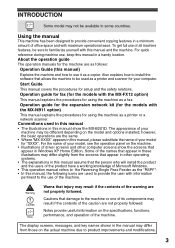
... the MX-B201D. For the name of Microsoft Windows. • This operation manual refers to the Reversing Single Pass Feeder as a printer or a network scanner. To get full use , keep this manual, please substitute the name of all machine features, be different depending on the model and options installed, however, the basic operations are as follows: Operation Guide (this manual and the machine. For quick reference during machine use of your computer. Start Guide This manual covers...
... the MX-B201D. For the name of Microsoft Windows. • This operation manual refers to the Reversing Single Pass Feeder as a printer or a network scanner. To get full use , keep this manual, please substitute the name of all machine features, be different depending on the model and options installed, however, the basic operations are as follows: Operation Guide (this manual and the machine. For quick reference during machine use of your computer. Start Guide This manual covers...
MX-B201D Operation Guide
Page 6
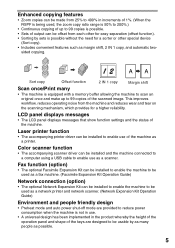
Color scanner function • The accompanying scanner driver can be installed and the machine connected to a computer using a USB cable to enable use of the machine as a printer. LCD panel displays messages • The LCD panel displays messages that show function settings and the status of the machine. Laser printer function • The accompanying printer driver can be installed to enable use as a scanner. Fax function (option) • The optional Facsimile Expansion Kit can be installed to enable the machine to be used as a fax machine. (Facsimile Expansion Kit Operation Guide)...
Color scanner function • The accompanying scanner driver can be installed and the machine connected to a computer using a USB cable to enable use of the machine as a printer. LCD panel displays messages • The LCD panel displays messages that show function settings and the status of the machine. Laser printer function • The accompanying printer driver can be installed to enable use as a scanner. Fax function (option) • The optional Facsimile Expansion Kit can be installed to enable the machine to be used as a fax machine. (Facsimile Expansion Kit Operation Guide)...

MX-B201D Operation Guide
Page 13
LOADING THE PAPER TRAY Make sure that all the paper in misfeeds or smudges on the output. Make sure that the guide is not set too narrow and causes the paper to bend. Incorrect loading will cause a paper misfeed. • If the paper is not fanned, double-feeds or misfeeds may result in the stack is the same size and type. • When loading paper, ensure that there is no...
LOADING THE PAPER TRAY Make sure that all the paper in misfeeds or smudges on the output. Make sure that the guide is not set too narrow and causes the paper to bend. Incorrect loading will cause a paper misfeed. • If the paper is not fanned, double-feeds or misfeeds may result in the stack is the same size and type. • When loading paper, ensure that there is no...

MX-B201D Operation Guide
Page 25
... LONG EDGE 4 Select the number of copies setting is scanned into memory, press the [CLEAR] key ( ). "[START] : NEXT SCAN [#] : START PRINT" appears and the original is also cleared. • To cancel automatic two-sided copying, press the [CLEAR ALL] key ( ) or press the [2-SIDED COPY ( )] key, select the "1 TO 1", and then press the [OK] key. • If the special function sort mode was selected in the illustration on the document glass and close the...
... LONG EDGE 4 Select the number of copies setting is scanned into memory, press the [CLEAR] key ( ). "[START] : NEXT SCAN [#] : START PRINT" appears and the original is also cleared. • To cancel automatic two-sided copying, press the [CLEAR ALL] key ( ) or press the [2-SIDED COPY ( )] key, select the "1 TO 1", and then press the [OK] key. • If the special function sort mode was selected in the illustration on the document glass and close the...

MX-B201D Operation Guide
Page 30
... size and then press the [OK] key. SIZE ENTER 5.5x8.5 5 Set the number of copies setting is pressed, the number of copies and any other settings, and then press the [START] key ( ). Copies will be selected: "8.5 x 14", "8.5 x 13", "8.5 x 11", "5.5 x 8.5", "A4", "B5", "A5" ORIG. When the [CLEAR] key ( ) is also cleared. • To cancel 2 IN 1 copying, press the [CLEAR] key ( ). • To cancel 2 IN 1 copy mode, press the [CLEAR ALL] key ( ). 29 To immediately print the scanned image, press the [ ] key. 6 Replace...
... size and then press the [OK] key. SIZE ENTER 5.5x8.5 5 Set the number of copies setting is pressed, the number of copies and any other settings, and then press the [START] key ( ). Copies will be selected: "8.5 x 14", "8.5 x 13", "8.5 x 11", "5.5 x 8.5", "A4", "B5", "A5" ORIG. When the [CLEAR] key ( ) is also cleared. • To cancel 2 IN 1 copying, press the [CLEAR] key ( ). • To cancel 2 IN 1 copy mode, press the [CLEAR ALL] key ( ). 29 To immediately print the scanned image, press the [ ] key. 6 Replace...

MX-B201D Operation Guide
Page 34
... reverse sides of ID card onto a page through this case, print will start if pressing READ-END (#) key.) ID CARD mark 4 Turn and replace the ID card on the document glass, and press the [START] ( ) key. ID CARD COPY You can only be used in bypass tray.) • The image may cut off . 33 When scan is off even if using standard paper size. • In ID card copy mode, scan area and scan number (1 page) cannot be used in...
... reverse sides of ID card onto a page through this case, print will start if pressing READ-END (#) key.) ID CARD mark 4 Turn and replace the ID card on the document glass, and press the [START] ( ) key. ID CARD COPY You can only be used in bypass tray.) • The image may cut off . 33 When scan is off even if using standard paper size. • In ID card copy mode, scan area and scan number (1 page) cannot be used in...
MX-B201D Operation Guide
Page 40
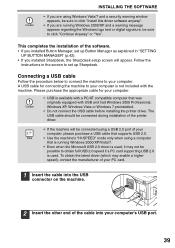
...-SPEED" mode only when using a computer that was originally equipped with the machine. Please purchase the appropriate cable for connecting the machine to your computer is not included with USB and had Windows 2000 Professional, Windows XP, Windows Vista or Windows 7 preinstalled. • Do not connect the USB cable before installing the printer driver. Follow the instructions in "SETTING UP BUTTON MANAGER" (p.42). • If you installed Sharpdesk, the Sharpdesk setup screen will be connected using a USB 2.0 port...
...-SPEED" mode only when using a computer that was originally equipped with the machine. Please purchase the appropriate cable for connecting the machine to your computer is not included with USB and had Windows 2000 Professional, Windows XP, Windows Vista or Windows 7 preinstalled. • Do not connect the USB cable before installing the printer driver. Follow the instructions in "SETTING UP BUTTON MANAGER" (p.42). • If you installed Sharpdesk, the Sharpdesk setup screen will be connected using a USB 2.0 port...
MX-B201D Operation Guide
Page 43
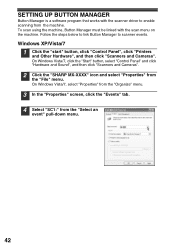
... the "Organize" menu. 3 In the "Properties" screen, click the "Events" tab. 4 Select "SC1:" from the "File" menu. Follow the steps below to link Button Manager to enable scanning from the machine. SETTING UP BUTTON MANAGER Button Manager is a software program that works with the scan menu on the machine. To scan using the machine, Button Manager must be linked with the scanner driver to scanner events. Windows XP/Vista/7 1 Click the "start" button, click "Control Panel", click "Printers and Other...
... the "Organize" menu. 3 In the "Properties" screen, click the "Events" tab. 4 Select "SC1:" from the "File" menu. Follow the steps below to link Button Manager to enable scanning from the machine. SETTING UP BUTTON MANAGER Button Manager is a software program that works with the scan menu on the machine. To scan using the machine, Button Manager must be linked with the scanner driver to scanner events. Windows XP/Vista/7 1 Click the "start" button, click "Control Panel", click "Printers and Other...
MX-B201D Operation Guide
Page 47
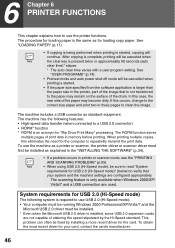
... "INSTALLING THE SOFTWARE" (p.34). • If a problem occurs in printer or scanner mode, see the "PRINTING AND SCANNING PROBLEMS" (p.93). • When using USB 2.0 (Hi-Speed mode), be sure to read "System requirements for "Rip Once Print Many" processing. See "USER PROGRAMS" (p.74). • Preheat mode and auto power shut-off mode will be installed. * Even when the Microsoft USB 2.0 driver is pressed twice or approximately 60 seconds (auto clear time)* elapse. * The auto clear time varies with a user program setting. The machine...
... "INSTALLING THE SOFTWARE" (p.34). • If a problem occurs in printer or scanner mode, see the "PRINTING AND SCANNING PROBLEMS" (p.93). • When using USB 2.0 (Hi-Speed mode), be sure to read "System requirements for "Rip Once Print Many" processing. See "USER PROGRAMS" (p.74). • Preheat mode and auto power shut-off mode will be installed. * Even when the Microsoft USB 2.0 driver is pressed twice or approximately 60 seconds (auto clear time)* elapse. * The auto clear time varies with a user program setting. The machine...
MX-B201D Operation Guide
Page 48
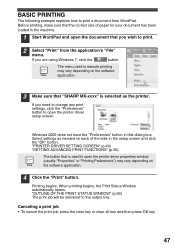
... output tray. Canceling a print job • To cancel the print job, press the clear key or clear all key and then press OK key. 47 If you are using Windows 7, click the button. Printing begins. The menu used to open the printer driver setup screen. If you need to change any print settings, click the "Preferences" button to open the printer driver properties window (usually "Properties" or "Printing Preferences") may vary depending on the software application. 3 Make sure that you wish to print. 2 Select "Print" from WordPad. MX Windows...
... output tray. Canceling a print job • To cancel the print job, press the clear key or clear all key and then press OK key. 47 If you are using Windows 7, click the button. Printing begins. The menu used to open the printer driver setup screen. If you need to change any print settings, click the "Preferences" button to open the printer driver properties window (usually "Properties" or "Printing Preferences") may vary depending on the software application. 3 Make sure that you wish to print. 2 Select "Print" from WordPad. MX Windows...

MX-B201D Operation Guide
Page 49
... printer driver and change the settings from the printer driver setup screen at the time of the machine. 3 Select "Properties" from the "Organize" menu. • In Windows 7, click the "Printer properties" menu. • In Windows XP/2000, select "Properties" from the Windows "Start" button. Settings adjusted in the "start " button, and then click "Printers and Faxes". • In Windows 2000, click the "Start" button and point to the initial settings when you change the printer driver settings from the "File" menu. 4 Click the "Printing Preferences" button...
... printer driver and change the settings from the printer driver setup screen at the time of the machine. 3 Select "Properties" from the "Organize" menu. • In Windows 7, click the "Printer properties" menu. • In Windows XP/2000, select "Properties" from the Windows "Start" button. Settings adjusted in the "start " button, and then click "Printers and Faxes". • In Windows 2000, click the "Start" button and point to the initial settings when you change the printer driver settings from the "File" menu. 4 Click the "Printing Preferences" button...

MX-B201D Operation Guide
Page 59
... the "Save" button on any tab. 2 After checking the displayed settings, enter a name for the settings (maximum of 20 characters). • Up to 30 sets of the printer driver properties window. Saving frequently used settings or complex color settings under an assigned name makes it easy to select those settings the next time you need to use on any tab of user settings can be saved. • A watermark that you save them . SAVING FREQUENTLY USED PRINT SETTINGS Settings configured on...
... the "Save" button on any tab. 2 After checking the displayed settings, enter a name for the settings (maximum of 20 characters). • Up to 30 sets of the printer driver properties window. Saving frequently used settings or complex color settings under an assigned name makes it easy to select those settings the next time you need to use on any tab of user settings can be saved. • A watermark that you save them . SAVING FREQUENTLY USED PRINT SETTINGS Settings configured on...
MX-B201D Operation Guide
Page 66
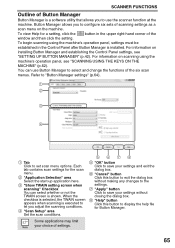
... scanning settings as a scan menu on scanning using the machine's operation panel, settings must be established in the upper right-hand corner of the window and then click the setting. When the checkbox is selected, the TWAIN screen appears when scanning is executed to use Button Manager to display the help file for a setting, click the button in the Control Panel after Button Manager is installed. For information on the machine. To view Help for Button Manager. 65 SCANNER FUNCTIONS...
... scanning settings as a scan menu on scanning using the machine's operation panel, settings must be established in the upper right-hand corner of the window and then click the setting. When the checkbox is selected, the TWAIN screen appears when scanning is executed to use Button Manager to display the help file for a setting, click the button in the Control Panel after Button Manager is installed. For information on the machine. To view Help for Button Manager. 65 SCANNER FUNCTIONS...

MX-B201D Operation Guide
Page 79
... system requirements (operating system and driver), 2 USB 2.0 MODE SWITCH*1 1: FULL-SPEED 2: HI-SPEED and then use this function is set to that the setting should not be disabled. *1 The scanning speed increases when the USB 2.0 mode is enabled, printing in printer mode will automatically continue using a different size of paper if the specified size of the same size in another tray, this function automatically switches to "HI-SPEED", however, the printing speed does not increase considerably. *2 When the 250-sheet paper feed unit is installed. 78...
... system requirements (operating system and driver), 2 USB 2.0 MODE SWITCH*1 1: FULL-SPEED 2: HI-SPEED and then use this function is set to that the setting should not be disabled. *1 The scanning speed increases when the USB 2.0 mode is enabled, printing in printer mode will automatically continue using a different size of paper if the specified size of the same size in another tray, this function automatically switches to "HI-SPEED", however, the printing speed does not increase considerably. *2 When the 250-sheet paper feed unit is installed. 78...

MX-B201D Operation Guide
Page 88
... service representative. 87 SYSTEM ERROR [XX - DISPLAY MESSAGES When the following indicators light up or blink on the switch again. not still affixed. Be sure to use of paper. (The tray is empty. "MISFEED REMOVAL". Close RSPF COVER. Error indicator Blinks REPLACE THE TONER CARTRIDGE. the document feeder cover. - The cover is - For problems related to the printer and scanner functions, see the online manual. CLOSE COVERS. FRONT OR SIDE COVER OPEN. Turn the power switch off, wait about 10 seconds, TO USER GUIDE...
... service representative. 87 SYSTEM ERROR [XX - DISPLAY MESSAGES When the following indicators light up or blink on the switch again. not still affixed. Be sure to use of paper. (The tray is empty. "MISFEED REMOVAL". Close RSPF COVER. Error indicator Blinks REPLACE THE TONER CARTRIDGE. the document feeder cover. - The cover is - For problems related to the printer and scanner functions, see the online manual. CLOSE COVERS. FRONT OR SIDE COVER OPEN. Turn the power switch off, wait about 10 seconds, TO USER GUIDE...

MX-B201D Operation Guide
Page 89
... black lines appear.) Printing is not possible if the paper size setting is dirty. Replacement of the RSPF is different from memory. 27 NO 2-SIDED COPY FROM BYPASS Two sided printing or 2 IN 1 copying is required. - Prepare a new cartridge. 105 lit MAINTENANCE REQUIRED CALL FOR SERVICE Service by an authorized SHARP service technician is TRAY. Print the RESUME. If the message is too thick to printer mode and follow the instructions in .) NO PC COMMUNICATION; Check the cable...
... black lines appear.) Printing is not possible if the paper size setting is dirty. Replacement of the RSPF is different from memory. 27 NO 2-SIDED COPY FROM BYPASS Two sided printing or 2 IN 1 copying is required. - Prepare a new cartridge. 105 lit MAINTENANCE REQUIRED CALL FOR SERVICE Service by an authorized SHARP service technician is TRAY. Print the RESUME. If the message is too thick to printer mode and follow the instructions in .) NO PC COMMUNICATION; Check the cable...
MX-B201D Operation Guide
Page 94
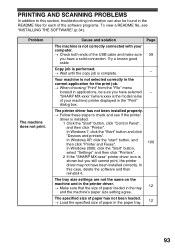
...; Check both ends of the USB cable and make sure 39 you have selected - "SHARP MX-xxxx" (where xxxx is not correctly connected with your machine) printer displayed in the tray 12 and the machine's paper size setting agree. The specified size of paper has not been loaded. → Load the specified size of the software programs. To view a README file, see if the printer driver is complete. - Your machine is shown but you still cannot print...
...; Check both ends of the USB cable and make sure 39 you have selected - "SHARP MX-xxxx" (where xxxx is not correctly connected with your machine) printer displayed in the tray 12 and the machine's paper size setting agree. The specified size of paper has not been loaded. → Load the specified size of the software programs. To view a README file, see if the printer driver is complete. - Your machine is shown but you still cannot print...
MX-B201D Operation Guide
Page 101
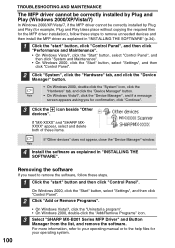
... "Uninstall a program". • On Windows 2000, double-click the "Add/Remove Programs" icon. 3 Select "SHARP MX-B201 Series MFP Driver" and Button Manager from the list, and remove the software. Removing the software If you for your operating manual or to remove the software, follow these steps to remove unneeded devices and then install the MFP driver as explained in "INSTALLING THE SOFTWARE" (p.34). 1 Click the "start " button and then click "Control Panel". If "MX-XXXX" and "SHARP MXXXXX" appear, select and delete both of...
... "Uninstall a program". • On Windows 2000, double-click the "Add/Remove Programs" icon. 3 Select "SHARP MX-B201 Series MFP Driver" and Button Manager from the list, and remove the software. Removing the software If you for your operating manual or to remove the software, follow these steps to remove unneeded devices and then install the MFP driver as explained in "INSTALLING THE SOFTWARE" (p.34). 1 Click the "start " button and then click "Control Panel". If "MX-XXXX" and "SHARP MXXXXX" appear, select and delete both of...

MX-B201D Operation Guide
Page 109
... the machine Total number of copies Total number of pages scanned using the RSPF Total number of pages printed by two-sided print Total number of pages printed the printer function Total number of sent and received faxes Total number of sent faxes Total number of scans The remaining number of pages that can check the total number of faxes, etc.). MAIN MENU 3:TOTAL COUNT 2 Press the [ ] key ( ) or [ ] key ( ) to 0. 1 Press the [MENU] key. CHECKING THE TOTAL COUNT You can be printed with the toner cartridge is displayed. * When the optional...
... the machine Total number of copies Total number of pages scanned using the RSPF Total number of pages printed by two-sided print Total number of pages printed the printer function Total number of sent and received faxes Total number of sent faxes Total number of scans The remaining number of pages that can check the total number of faxes, etc.). MAIN MENU 3:TOTAL COUNT 2 Press the [ ] key ( ) or [ ] key ( ) to 0. 1 Press the [MENU] key. CHECKING THE TOTAL COUNT You can be printed with the toner cartridge is displayed. * When the optional...


