Adjustment Guide
Page 1
MX-6500N MX-7500N Administrator Machine Adjustment Guide Please keep the manual in a safe place where it will not be lost.
MX-6500N MX-7500N Administrator Machine Adjustment Guide Please keep the manual in a safe place where it will not be lost.
Adjustment Guide
Page 5
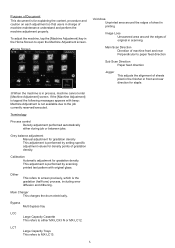
If the [Machine Adjustment] is tapped the following messages appears with original glass. Grey balance adjustment Manual adjustment for gradation density This adjustment is performed by scanning printed test pattern with beep: Machine Adjustment is not ... LCC Large Capacity Cassette This refers to either during job or between jobs. Terminology Process control Density adjustment performed automatically either MX-LCX3 N or MX-LC12. Calibration Automatic adjustment for gradation density This adjustment is performed by setting specific adjustment values for density points of sheets ...
If the [Machine Adjustment] is tapped the following messages appears with original glass. Grey balance adjustment Manual adjustment for gradation density This adjustment is performed by scanning printed test pattern with beep: Machine Adjustment is not ... LCC Large Capacity Cassette This refers to either during job or between jobs. Terminology Process control Density adjustment performed automatically either MX-LCX3 N or MX-LC12. Calibration Automatic adjustment for gradation density This adjustment is performed by setting specific adjustment values for density points of sheets ...
Adjustment Guide
Page 6
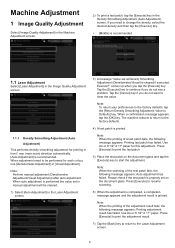
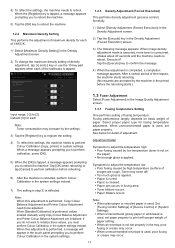
Tap the [Cancel] key if you do not want to be cleared. 1) Select [Auto Adjustment] in manual adjustment will be performed for each colour, use [Densitometer Adjustment] or [Visual Adjustment]. Press [Execute] to print the test patch. 5) ...Auto adjustment has failed. The machine reboots to return to Defaults] key. When a confirmation message appears, tap the [OK] key. Note: Perform manual adjustment (Densitometer Adjustment/Visual Adjustment) after auto adjustment. Note: To return your preferences to the factory defaults, tap the [Return Density Smoothing Adjustment Value...
Tap the [Cancel] key if you do not want to be cleared. 1) Select [Auto Adjustment] in manual adjustment will be performed for each colour, use [Densitometer Adjustment] or [Visual Adjustment]. Press [Execute] to print the test patch. 5) ...Auto adjustment has failed. The machine reboots to return to Defaults] key. When a confirmation message appears, tap the [OK] key. Note: Perform manual adjustment (Densitometer Adjustment/Visual Adjustment) after auto adjustment. Note: To return your preferences to the factory defaults, tap the [Return Density Smoothing Adjustment Value...
Adjustment Guide
Page 9
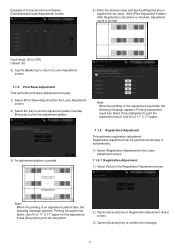
Press [Register] to confirm the message. 9 Registration adjustment can be performed manually or automatically. 1) Select [Registration Adjustment] in the Laser Adjustment screen. 1.1.6.1 Registration Adjustment 1) Select [Auto] in the Laser Adjustment screen. ... to [100] Default: 50 3) Tap the [Back] key to return to Laser Adjustment screen. 1.1.5 Print Skew Adjustment This performs print skew adjustment manually. 1) Select [Print Skew Adjustment] in the Registration Adjustment screen. Example of Correction Amount Display (Densitometer/Visual Adjustment) screen 4) Enter the desired value ...
Press [Register] to confirm the message. 9 Registration adjustment can be performed manually or automatically. 1) Select [Registration Adjustment] in the Laser Adjustment screen. 1.1.6.1 Registration Adjustment 1) Select [Auto] in the Laser Adjustment screen. ... to [100] Default: 50 3) Tap the [Back] key to return to Laser Adjustment screen. 1.1.5 Print Skew Adjustment This performs print skew adjustment manually. 1) Select [Print Skew Adjustment] in the Registration Adjustment screen. Example of Correction Amount Display (Densitometer/Visual Adjustment) screen 4) Enter the desired value ...
Adjustment Guide
Page 10
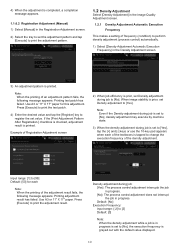
...] to register the set value. Input range: [1] to [99] Default: [50] for this adjustment. 4) When the adjustment is completed, a completion message appears. 1.1.6.2 Registration Adjustment (Manual) 1) Select [Manual] in the Registration Adjustment screen. 2) Select the tray to set the adjustment pattern and tap [Execute] to print the adjustment pattern. 1.2 Density Adjustment Select [Density...
...] to register the set value. Input range: [1] to [99] Default: [50] for this adjustment. 4) When the adjustment is completed, a completion message appears. 1.1.6.2 Registration Adjustment (Manual) 1) Select [Manual] in the Registration Adjustment screen. 2) Select the tray to set the adjustment pattern and tap [Execute] to print the adjustment pattern. 1.2 Density Adjustment Select [Density...
Adjustment Guide
Page 11
... consumed, it ? Execute it takes about 20 seconds and the machine needs to [2] Default: [0] for fusing temperature adjustment. When [Standard Calibration] is performed, values entered manually using Copy Colour Balance Adjustment and Printer Colour Balance Adjustment are rough, Toner may come off) Too much gloss is applied. Paper is...
... consumed, it ? Execute it takes about 20 seconds and the machine needs to [2] Default: [0] for fusing temperature adjustment. When [Standard Calibration] is performed, values entered manually using Copy Colour Balance Adjustment and Printer Colour Balance Adjustment are rough, Toner may come off) Too much gloss is applied. Paper is...


