Adjustment Guide
Page 2
Changing adjustment values provided by the Machine Adjustment without having sufficient knowledge may lead to unexpected incidents such as insufficient print quality or product performance, increase in toner consumption and influence on machine life. Caution The Machine Adjustment is provided assuming that an administrative user who has sufficient knowledge for machine maintenance and management and is responsible for them uses the adjustment.
Changing adjustment values provided by the Machine Adjustment without having sufficient knowledge may lead to unexpected incidents such as insufficient print quality or product performance, increase in toner consumption and influence on machine life. Caution The Machine Adjustment is provided assuming that an administrative user who has sufficient knowledge for machine maintenance and management and is responsible for them uses the adjustment.
Adjustment Guide
Page 11
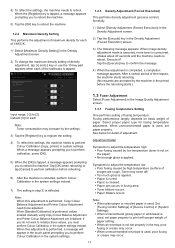
... To change the maximum density setting of density adjustment, tap [+] and [-] key or use the 10-key pad appears when each Note: Toner consumption may increase by the machine in the period before rebooting. 6) After the machine is rebooted, perform Colour Calibration in the system settings instead... for each of paper setting. When an envelope is not set paper property to perform Colour Calibration in fusing area. Toner blisters occurs. Paper blisters occurs. When unrecommended paper is used , set properly in the touch panel prompting you to reboot the ...
... To change the maximum density setting of density adjustment, tap [+] and [-] key or use the 10-key pad appears when each Note: Toner consumption may increase by the machine in the period before rebooting. 6) After the machine is rebooted, perform Colour Calibration in the system settings instead... for each of paper setting. When an envelope is not set paper property to perform Colour Calibration in fusing area. Toner blisters occurs. Paper blisters occurs. When unrecommended paper is used , set properly in the touch panel prompting you to reboot the ...
Adjustment Guide
Page 12
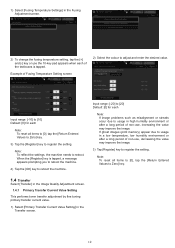
... to [0], tap the [Return Entered Values to Zero] key. 1.4 Transfer Select [Transfer] in the Image Quality Adjustment screen. 1.4.1 Primary Transfer Current Value Setting This performs toner transfer adjustment by fine tuning primary transfer current value. 1) Select [Primary Transfer Current Value Setting] in the Fusing Adjustment screen. 2) To change the fusing temperature...
... to [0], tap the [Return Entered Values to Zero] key. 1.4 Transfer Select [Transfer] in the Image Quality Adjustment screen. 1.4.1 Primary Transfer Current Value Setting This performs toner transfer adjustment by fine tuning primary transfer current value. 1) Select [Primary Transfer Current Value Setting] in the Fusing Adjustment screen. 2) To change the fusing temperature...
Adjustment Guide
Page 13
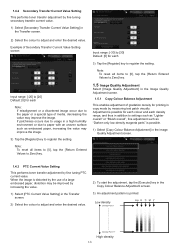
... parts" is possible. 1) Select [Copy Colour Balance Adjustment] in the Image Quality Adjustment screen. 1.4.3 PTC Current Value Setting This performs toner transfer adjustment by measuring test patch visually. Input range: [-30] to [30] Default: [0] for each density range, and thus in... setting. Low density Density Point 1 mix K C M Y Density Point 17 High density 13 1.4.2 Secondary Transfer Current Value Setting This performs toner transfer adjustment by increasing the value. 1) Select [PTC Current Value Setting] in the Transfer screen. 2) Select the colour to adjust and enter...
... parts" is possible. 1) Select [Copy Colour Balance Adjustment] in the Image Quality Adjustment screen. 1.4.3 PTC Current Value Setting This performs toner transfer adjustment by measuring test patch visually. Input range: [-30] to [30] Default: [0] for each density range, and thus in... setting. Low density Density Point 1 mix K C M Y Density Point 17 High density 13 1.4.2 Secondary Transfer Current Value Setting This performs toner transfer adjustment by increasing the value. 1) Select [PTC Current Value Setting] in the Transfer screen. 2) Select the colour to adjust and enter...


