Installation
Page 1
... PROJECTION MIRROR, NEVER TURN THE SYSTEM ON UNTIL THE INSTALLATION IS FINISHED. ADJUST PROJECTION MIRROR 6. Please read all the parts are included. Install the system following steps. 1. IF IT SHOULD, CONTACT A SERVICE. If any part is supplied in 3 packages and they need to install and place this system properly. BE CAREFUL NOT TO DROP ANY PART OR TOOL LIKE SCREW INTO THE SYSTEM. Rear Projection Display Installation Manual...
... PROJECTION MIRROR, NEVER TURN THE SYSTEM ON UNTIL THE INSTALLATION IS FINISHED. ADJUST PROJECTION MIRROR 6. Please read all the parts are included. Install the system following steps. 1. IF IT SHOULD, CONTACT A SERVICE. If any part is supplied in 3 packages and they need to install and place this system properly. BE CAREFUL NOT TO DROP ANY PART OR TOOL LIKE SCREW INTO THE SYSTEM. Rear Projection Display Installation Manual...

Installation
Page 2
... parts listed below (cabinets, Installation parts, and accessories) are included in 3 packages. Center Panel 1 Owner's Manual 1 Installation Manual (this figure in some models. Package 1 Top Cabinet : Refer to the steps 3 to the steps 2, 6 and 7 for installation. Package 1 Package 3 Package 2 u Actual packages may be differ from this brochure AC Power Cord Wireless Remote Control Unit 1 Wireless/Wired Remote Control Unit 1 Remote Control Cable 1 Batteries for details. Refer to the Owner's Manual for Remote Controls 4 VGA Cable...
... parts listed below (cabinets, Installation parts, and accessories) are included in 3 packages. Center Panel 1 Owner's Manual 1 Installation Manual (this figure in some models. Package 1 Top Cabinet : Refer to the steps 3 to the steps 2, 6 and 7 for installation. Package 1 Package 3 Package 2 u Actual packages may be differ from this brochure AC Power Cord Wireless Remote Control Unit 1 Wireless/Wired Remote Control Unit 1 Remote Control Cable 1 Batteries for details. Refer to the Owner's Manual for Remote Controls 4 VGA Cable...
Installation
Page 4
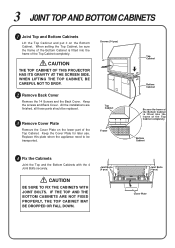
... installations are finished, all those parts should be replaced. 3 Remove Cover Plate Remove the Cover Plate on the Bottom Cabinet. CAUTION BE SURE TO FIX THE CABINETS WITH JOINT BOLTS. IF THE TOP AND THE BOTTOM CABINETS ARE NOT FIXED PROPERLY, THE TOP CABINET MAY BE DROPPED OR FALL DOWN. Keep the screws and Back Cover. Replace this plate when the appliance need...
... installations are finished, all those parts should be replaced. 3 Remove Cover Plate Remove the Cover Plate on the Bottom Cabinet. CAUTION BE SURE TO FIX THE CABINETS WITH JOINT BOLTS. IF THE TOP AND THE BOTTOM CABINETS ARE NOT FIXED PROPERLY, THE TOP CABINET MAY BE DROPPED OR FALL DOWN. Keep the screws and Back Cover. Replace this plate when the appliance need...
Installation
Page 6
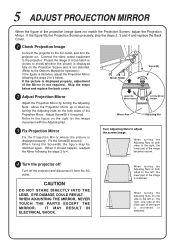
... for operation.) If the figure is stretched. Project the image of cross-hatch or circles to check whether the picutre is displayed fully on both sides to the left or the right, one side of the lower part of the projection image does not match the Projection Screen, adjust the Projection Mirror. If the picture is displayed properly, adjustment of the image becomes narrow. 4 Turn the projector off Turn...
... for operation.) If the figure is stretched. Project the image of cross-hatch or circles to check whether the picutre is displayed fully on both sides to the left or the right, one side of the lower part of the projection image does not match the Projection Screen, adjust the Projection Mirror. If the picture is displayed properly, adjustment of the image becomes narrow. 4 Turn the projector off Turn...
Owners Manual
Page 2
... have been prevented, if the owner had followed the instructions in the manual. NO USER-SERVICEABLE PARTS INSIDE EXCEPT LAMP REPLACEMENT. These limits are probably eager to work properly, see "TROUBLESHOOTING" section on page 43 and try the solution marked for each problem. This equipment generates, uses, and can often correct operating problems yourself. They were caused by problems with our projectors. SAFETY PRECAUTIONS WARNING: TO REDUCE...
... have been prevented, if the owner had followed the instructions in the manual. NO USER-SERVICEABLE PARTS INSIDE EXCEPT LAMP REPLACEMENT. These limits are probably eager to work properly, see "TROUBLESHOOTING" section on page 43 and try the solution marked for each problem. This equipment generates, uses, and can often correct operating problems yourself. They were caused by problems with our projectors. SAFETY PRECAUTIONS WARNING: TO REDUCE...

Owners Manual
Page 3
... and power line surges. When replacement parts are covered by the operating instructions as improper adjustment of other materials, and the bottom opening or removing covers may result in damage and will prevent damage due to persons. This will often require extensive work by persons walking on the marking label. Unplug this projector from the type of time, unplug it is provided. Use only...
... and power line surges. When replacement parts are covered by the operating instructions as improper adjustment of other materials, and the bottom opening or removing covers may result in damage and will prevent damage due to persons. This will often require extensive work by persons walking on the marking label. Unplug this projector from the type of time, unplug it is provided. Use only...
Owners Manual
Page 4
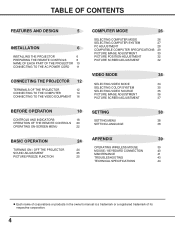
... ADJUSTMENT 32 PICTURE SCREEN ADJUSTMENT 32 VIDEO MODE 34 SELECTING VIDEO MODE 34 SELECTING COLOR SYSTEM 35 SELECTING VIDEO SOURCE 35 PICTURE IMAGE ADJUSTMENT 36 PICTURE SCREEN ADJUSTMENT 37 BEFORE OPERATION 18 SETTING 38 CONTROLS AND INDICATORS 18 SETTING MENU 38 OPERATION OF THE REMOTE CONTROLS 20 SETTING LANGUAGE 38 OPERATING ON-SCREEN MENU 22 BASIC OPERATION 24 APPENDIX 39 OPERATING WIRELESS MOUSE 39 TURNING ON / OFF THE PROJECTOR 24 MOUSE / KEYBOARD CONNECTION 40 SOUND ADJUSTMENT 25 MAINTENANCE 41 PICTURE FREEZE FUNCTION 25 TROUBLESHOOTING...
... ADJUSTMENT 32 PICTURE SCREEN ADJUSTMENT 32 VIDEO MODE 34 SELECTING VIDEO MODE 34 SELECTING COLOR SYSTEM 35 SELECTING VIDEO SOURCE 35 PICTURE IMAGE ADJUSTMENT 36 PICTURE SCREEN ADJUSTMENT 37 BEFORE OPERATION 18 SETTING 38 CONTROLS AND INDICATORS 18 SETTING MENU 38 OPERATION OF THE REMOTE CONTROLS 20 SETTING LANGUAGE 38 OPERATING ON-SCREEN MENU 22 BASIC OPERATION 24 APPENDIX 39 OPERATING WIRELESS MOUSE 39 TURNING ON / OFF THE PROJECTOR 24 MOUSE / KEYBOARD CONNECTION 40 SOUND ADJUSTMENT 25 MAINTENANCE 41 PICTURE FREEZE FUNCTION 25 TROUBLESHOOTING...
Owners Manual
Page 5
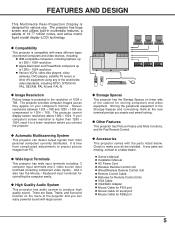
... Rear-Projection Display is higher than 1280 ´ 1024, reset it also has the Mouse / Keyboard input terminals for controlling the computer easily. The projector has large screen and utilizes built-in multimedia features, a palette of 1024 x 768. u High Quality Audio System This projector has audio system to make sure all are missing, contact to 1280 ´ 1024 resolution. Check to produce high quality sound. l Owner's Manual l Installation Manual l AC Power Cord...
... Rear-Projection Display is higher than 1280 ´ 1024, reset it also has the Mouse / Keyboard input terminals for controlling the computer easily. The projector has large screen and utilizes built-in multimedia features, a palette of 1024 x 768. u High Quality Audio System This projector has audio system to make sure all are missing, contact to 1280 ´ 1024 resolution. Check to produce high quality sound. l Owner's Manual l Installation Manual l AC Power Cord...
Owners Manual
Page 21
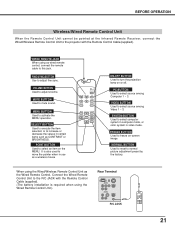
... the values in video mode. When using the Wired Remote Control Unit.) Rear Terminal R/C JACK 21 SELECT BUTTON Used to execute the item selected, or to turn the projection lamp on -screen image. VIDEO BUTTON Used to select computer system in computer mode, or color system in certain items such as a wireless mouse ON-OFF VOLUME FINE SYNC. SYSTEM BUTTON Used to select source among Computer 1 ~ 3. MENU BUTTON Used to mute sound. FREEZE BUTTON Used to move...
... the values in video mode. When using the Wired Remote Control Unit.) Rear Terminal R/C JACK 21 SELECT BUTTON Used to execute the item selected, or to turn the projection lamp on -screen image. VIDEO BUTTON Used to select computer system in computer mode, or color system in certain items such as a wireless mouse ON-OFF VOLUME FINE SYNC. SYSTEM BUTTON Used to select source among Computer 1 ~ 3. MENU BUTTON Used to mute sound. FREEZE BUTTON Used to move...
Owners Manual
Page 23
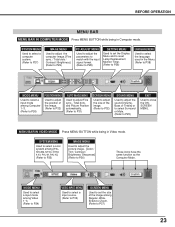
... MODE MENU Used to select a input mode among Video 1~3. (Refer to P34) VIDEO INPUT MENU Used to select a input source. (Refer to P35) SCREEN MENU Used to set the Display Menu and to reset Lamp Replacement Monitor Timer. (Refer to P38) LANGUAGE MENU Used to select the language used in the Menu. (Refer to P38) MODE MENU Used to select a input mode among [PAL, SECAM, NTSC, NTSC 4.43, PAL-M, PAL-N]. (Refer to P35) IMAGE MENU Used to adjust the picture image. [Color / Tint / Contrast / Brightness/ Sharpness] (Refer to close the...
... MODE MENU Used to select a input mode among Video 1~3. (Refer to P34) VIDEO INPUT MENU Used to select a input source. (Refer to P35) SCREEN MENU Used to set the Display Menu and to reset Lamp Replacement Monitor Timer. (Refer to P38) LANGUAGE MENU Used to select the language used in the Menu. (Refer to P38) MODE MENU Used to select a input mode among [PAL, SECAM, NTSC, NTSC 4.43, PAL-M, PAL-N]. (Refer to P35) IMAGE MENU Used to adjust the picture image. [Color / Tint / Contrast / Brightness/ Sharpness] (Refer to close the...
Owners Manual
Page 24
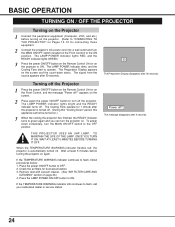
... message "Power off . THIS PROJECTOR USES AN UHP LAMP. Check the air filters for connecting those equipment. 2 Connect the projector's AC power cord into a wall outlet and turn the projector on. The LAMP POWER indicator dims, and the Cooling Fans start to flash, call your authorized dealer or service station. Press the LAMP POWER ON/OFF button to flash, follow procedures below: 1. Remove dust with vacuum cleaner. (See "AIR FILTER CARE AND CLEANING" section...
... message "Power off . THIS PROJECTOR USES AN UHP LAMP. Check the air filters for connecting those equipment. 2 Connect the projector's AC power cord into a wall outlet and turn the projector on. The LAMP POWER indicator dims, and the Cooling Fans start to flash, call your authorized dealer or service station. Press the LAMP POWER ON/OFF button to flash, follow procedures below: 1. Remove dust with vacuum cleaner. (See "AIR FILTER CARE AND CLEANING" section...

Owners Manual
Page 25
... the SELECT (REAR CLICK) button. To restore the sound to Off. Press the MUTE button to set the Mute to its previous level, press again or press Volume buttons. Move the arrow to and then press the SELECT (REAR CLICK) button. BASIC OPERATION SOUND ADJUSTMENT Direct Operation Sound Volume Adjustment Press the VOLUME (+/-) buttons (located on the Front Control or on -screen. Menu Operation 1 Press the MENU button and the ON-SCREEN MENU will appear. Volume Move the...
... the SELECT (REAR CLICK) button. To restore the sound to Off. Press the MUTE button to set the Mute to its previous level, press again or press Volume buttons. Move the arrow to and then press the SELECT (REAR CLICK) button. BASIC OPERATION SOUND ADJUSTMENT Direct Operation Sound Volume Adjustment Press the VOLUME (+/-) buttons (located on the Front Control or on -screen. Menu Operation 1 Press the MENU button and the ON-SCREEN MENU will appear. Volume Move the...

Owners Manual
Page 27
... on VGA, SVGA or XGA (refer to "COMPATIBLE COMPUTER SPECIFICATION" on the Front Control or the Remote Control Units.) 2 Press the POINT DOWN button and a red-arrow icon will appear. When selecting "Computer 1," "Computer 2," or "Computer 3", this mark is displayed as black, more computer system modes will be displayed. 27 Go PC adj. VGA 1 SYSTEM BOX It displays the SYSTEM being selected.
... on VGA, SVGA or XGA (refer to "COMPATIBLE COMPUTER SPECIFICATION" on the Front Control or the Remote Control Units.) 2 Press the POINT DOWN button and a red-arrow icon will appear. When selecting "Computer 1," "Computer 2," or "Computer 3", this mark is displayed as black, more computer system modes will be displayed. 27 Go PC adj. VGA 1 SYSTEM BOX It displays the SYSTEM being selected.

Owners Manual
Page 35
... projector, select "Y, Cb, Cr" in VIDEO SOURCE Menu. 1 Press the MENU button and the ON-SCREEN MENU will appear. Y, C When connecting the video equipment through VIDEO-Y and VIDEO-C terminals to select, and then press the SELECT (REAR CLICK) button. Another dialog box VIDEO SOURCE Menu will appear. 2 Press the POINT DOWN button and a red-arrow icon will appear. Video When the video source is from the video equipment with component video signal, like DVD player. VIDEO MODE...
... projector, select "Y, Cb, Cr" in VIDEO SOURCE Menu. 1 Press the MENU button and the ON-SCREEN MENU will appear. Y, C When connecting the video equipment through VIDEO-Y and VIDEO-C terminals to select, and then press the SELECT (REAR CLICK) button. Another dialog box VIDEO SOURCE Menu will appear. 2 Press the POINT DOWN button and a red-arrow icon will appear. Video When the video source is from the video equipment with component video signal, like DVD player. VIDEO MODE...

Owners Manual
Page 38
... DOWN button and a red-arrow icon will appear. SETTING LANGUAGE The language used in the "On" position, the OnScreen Displays always appear when adjustments are made. (The following displays disappear by using this function. Move the arrow to the item that you want to reset the lamp replacement monitor timer. When replacing the lamp, reset the lamp replacement monitor timer by switching this projector will produce a blue image without video noise on the screen when the video source...
... DOWN button and a red-arrow icon will appear. SETTING LANGUAGE The language used in the "On" position, the OnScreen Displays always appear when adjustments are made. (The following displays disappear by using this function. Move the arrow to the item that you want to reset the lamp replacement monitor timer. When replacing the lamp, reset the lamp replacement monitor timer by switching this projector will produce a blue image without video noise on the screen when the video source...

Owners Manual
Page 41
... : 1 Turn the power ON/OFF button to the OFF, and make sure the Cooling Fans stop to cooling. Remove dust from accumulating on the life of the Projector. 3 Remove the Air Filters from an authorized dealer or service station. AIR FILTER CARE AND CLEANING The Removable Air Filters prevent dust from the air filter by following instruction in the Center Panel Pull the Speaker Cover forward...
... : 1 Turn the power ON/OFF button to the OFF, and make sure the Cooling Fans stop to cooling. Remove dust from accumulating on the life of the Projector. 3 Remove the Air Filters from an authorized dealer or service station. AIR FILTER CARE AND CLEANING The Removable Air Filters prevent dust from the air filter by following instruction in the Center Panel Pull the Speaker Cover forward...
Owners Manual
Page 42
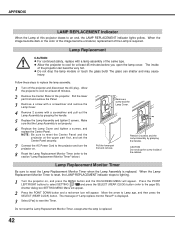
... not reset the Lamp Replacement Monitor Timer, except after the lamp is set the Center Panel securely. 7 Connect the AC Power Cord to the projector and turn the projector on , and press the MENU button and the ON-SCREEN MENU will appear. When the image become dark or the color of the image become very hot. l Do not drop the lamp module or touch the glass bulb! The glass can become unnatural, replacement of "Lamp replace monitor Reset?" Make...
... not reset the Lamp Replacement Monitor Timer, except after the lamp is set the Center Panel securely. 7 Connect the AC Power Cord to the projector and turn the projector on , and press the MENU button and the ON-SCREEN MENU will appear. When the image become dark or the color of the image become very hot. l Do not drop the lamp module or touch the glass bulb! The glass can become unnatural, replacement of "Lamp replace monitor Reset?" Make...
Owners Manual
Page 43
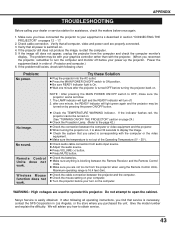
... the temperature is about 30 seconds to operate this projector. Maximum operating range is switched on the computer. l Adjust the audio source. l Check the mouse setting on by pressing the power ON/OFF button. Give the model number and explain the difficulty. Verify that all computer, video and power cord are used to display the image. Remote Control Units dose not work . The LAMP indicator will light and the READY indicator will advise...
... the temperature is about 30 seconds to operate this projector. Maximum operating range is switched on the computer. l Adjust the audio source. l Check the mouse setting on by pressing the power ON/OFF button. Give the model number and explain the difficulty. Verify that all computer, video and power cord are used to display the image. Remote Control Units dose not work . The LAMP indicator will light and the READY indicator will advise...

Owners Manual
Page 44
... Power Cord ´ 1 Remote Control Cable ´ 1 VGA Cable ´ 1 Mac / VGA Adapter ´ 1 Mouse Cable for PS / 2 Port ´ 1 Mouse Cable for Serial Port ´ 1 Mouse Cable for Macintosh Computer) ´ 1 10W ´ 2 (EIAJ) AC 100 ~ 120 V, 50 / 60 Hz 3.2 A (Max. APPENDIX SPECIFICATIONS Rear-Projection Display Type of Projector LCD Panel System Panel Resolution Number of Pixels Horizontal Resolution Projection Lens Projection Lamp Projection Image Size Scanning Frequency Color System Computer System Terminals (Computer) Terminals (Video) LCD Rear-Projection Display 1.3" TFT...
... Power Cord ´ 1 Remote Control Cable ´ 1 VGA Cable ´ 1 Mac / VGA Adapter ´ 1 Mouse Cable for PS / 2 Port ´ 1 Mouse Cable for Serial Port ´ 1 Mouse Cable for Macintosh Computer) ´ 1 10W ´ 2 (EIAJ) AC 100 ~ 120 V, 50 / 60 Hz 3.2 A (Max. APPENDIX SPECIFICATIONS Rear-Projection Display Type of Projector LCD Panel System Panel Resolution Number of Pixels Horizontal Resolution Projection Lens Projection Lamp Projection Image Size Scanning Frequency Color System Computer System Terminals (Computer) Terminals (Video) LCD Rear-Projection Display 1.3" TFT...

Owners Manual
Page 46
... warranty does not cover (A) the adjustment of customer-operated controls as explained in the information below for repair or reinstallation of LABOR and PARTS specified below. SANYO INDUSTRIAL VIDEO LCD PROJECTOR LIMITED WARRANTY OBLIGATIONS In order to obtain warranty service, the product must be obtained by calling the toll-free number listed below. M8EA) For product operation, authorized service center referral, service assistance or problem resolution, call CUSTOMER INFORMATION...
... warranty does not cover (A) the adjustment of customer-operated controls as explained in the information below for repair or reinstallation of LABOR and PARTS specified below. SANYO INDUSTRIAL VIDEO LCD PROJECTOR LIMITED WARRANTY OBLIGATIONS In order to obtain warranty service, the product must be obtained by calling the toll-free number listed below. M8EA) For product operation, authorized service center referral, service assistance or problem resolution, call CUSTOMER INFORMATION...

