Installation
Page 3
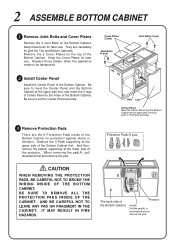
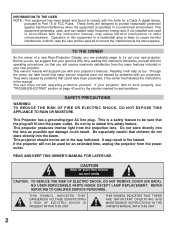
...first, and insert the 6 legs of Center Panel to set the Center Panel securely. Protection Pads (5 pcs) The back side of the projector. IT MAY RESULT IN FIRE HAZARDS. Replace those plates, when the appliance needs to the Bottom Cabinet. And then, remove the pad(A) supporting... at the upper part first and push in the Panel securely. 3 Remove Protection Pads There are necessary for protection against shock or vibration. Projector Pad(A) Pull the pad(A) to downward first and remove the pad. 2 ASSEMBLE BOTTOM CABINET 1 Remove Joint Bolts and Cover Plates Remove the ...
...first, and insert the 6 legs of Center Panel to set the Center Panel securely. Protection Pads (5 pcs) The back side of the projector. IT MAY RESULT IN FIRE HAZARDS. Replace those plates, when the appliance needs to the Bottom Cabinet. And then, remove the pad(A) supporting... at the upper part first and push in the Panel securely. 3 Remove Protection Pads There are necessary for protection against shock or vibration. Projector Pad(A) Pull the pad(A) to downward first and remove the pad. 2 ASSEMBLE BOTTOM CABINET 1 Remove Joint Bolts and Cover Plates Remove the ...
Installation
Page 4
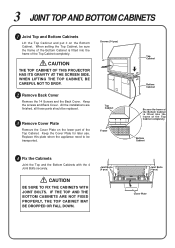
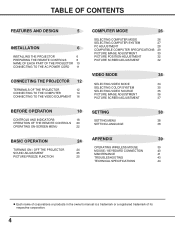
... Cover. CAUTION BE SURE TO FIX THE CABINETS WITH JOINT BOLTS. Joint Bolts (4 pcs) Joint Bolts (4 pcs) Cover Plate CAUTION THE TOP CABINET OF THIS PROJECTOR HAS ITS GRAVITY AT THE SCREEN SIDE. Frame Bottom Cabinet 4 Fix the Cabinets Joint the Top and the Bottom Cabinets with the 4 Joint Bolts securely...
... Cover. CAUTION BE SURE TO FIX THE CABINETS WITH JOINT BOLTS. Joint Bolts (4 pcs) Joint Bolts (4 pcs) Cover Plate CAUTION THE TOP CABINET OF THIS PROJECTOR HAS ITS GRAVITY AT THE SCREEN SIDE. Frame Bottom Cabinet 4 Fix the Cabinets Joint the Top and the Bottom Cabinets with the 4 Joint Bolts securely...
Installation
Page 6
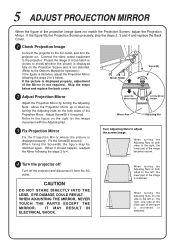
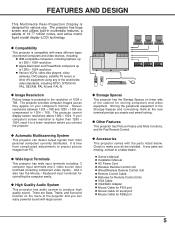
.... When turning the Adjusting Nuts on the both sides of the image is shortened or stretched. Project the image of the image becomes narrow. 4 Turn the projector off Turn off the projector and disconnect it from the AC outlet. Adjust Screw(B) if it should happen, readjust the Mirror... Adjusting Nuts on both sides to 4. If the figure fits the Projection Screen precisely, skip the steps 2, 3 and 4 and replace the Back Cover. 1 Check Projection Image Connect the projector to the AC outlet, and turn the projector on the right for operation.) If the figure is displayed properly. Skip...
.... When turning the Adjusting Nuts on the both sides of the image is shortened or stretched. Project the image of the image becomes narrow. 4 Turn the projector off Turn off the projector and disconnect it from the AC outlet. Adjust Screw(B) if it should happen, readjust the Mirror... Adjusting Nuts on both sides to 4. If the figure fits the Projection Screen precisely, skip the steps 2, 3 and 4 and replace the Back Cover. 1 Check Projection Image Connect the projector to the AC outlet, and turn the projector on the right for operation.) If the figure is displayed properly. Skip...
Owners Manual
Page 2
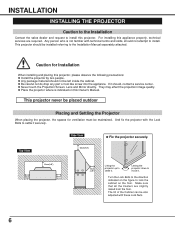
... protection against harmful interference when the equipment is a safety feature to Part 15 of a new Rear-Projection Display, you will receive maximum satisfaction from the projection lens. Be especially careful that could result. Before you with our projectors. This projector should not be sure that many features included in the manual. READ AND KEEP THIS...
... protection against harmful interference when the equipment is a safety feature to Part 15 of a new Rear-Projection Display, you will receive maximum satisfaction from the projection lens. Be especially careful that could result. Before you with our projectors. This projector should not be sure that many features included in the manual. READ AND KEEP THIS...

Owners Manual
Page 3
... instructions should be read before cleaning. Unplug this unit to lightning and power line surges. The openings should never be covered with the projector. Never spill liquid of time, unplug it is equipped with a cart or stand recommended by the manufacturer as opening should use a ...mounting kit approved by persons walking on the marking label. Do not expose this projector from AC power supply before the product is in damage and will prevent damage due to rain or use attachments not recommended by ...
... instructions should be read before cleaning. Unplug this unit to lightning and power line surges. The openings should never be covered with the projector. Never spill liquid of time, unplug it is equipped with a cart or stand recommended by the manufacturer as opening should use a ...mounting kit approved by persons walking on the marking label. Do not expose this projector from AC power supply before the product is in damage and will prevent damage due to rain or use attachments not recommended by ...
Owners Manual
Page 4
...CONTENTS FEATURES AND DESIGN 5 INSTALLATION 6 INSTALLING THE PROJECTOR 6 PREPARING THE REMOTE CONTROLS 8 NAME OF EACH PART OF THE PROJECTOR 10 CONNECTING TO THE AC POWER CORD 11 CONNECTING THE PROJECTOR 12 TERMINALS OF THE PROJECTOR 12 CONNECTING TO THE COMPUTER 14 CONNECTING TO THE ... LANGUAGE 38 OPERATING ON-SCREEN MENU 22 BASIC OPERATION 24 APPENDIX 39 OPERATING WIRELESS MOUSE 39 TURNING ON / OFF THE PROJECTOR 24 MOUSE / KEYBOARD CONNECTION 40 SOUND ADJUSTMENT 25 MAINTENANCE 41 PICTURE FREEZE FUNCTION 25 TROUBLESHOOTING 43 TECHNICAL SPECIFICATIONS 44 l ...
...CONTENTS FEATURES AND DESIGN 5 INSTALLATION 6 INSTALLING THE PROJECTOR 6 PREPARING THE REMOTE CONTROLS 8 NAME OF EACH PART OF THE PROJECTOR 10 CONNECTING TO THE AC POWER CORD 11 CONNECTING THE PROJECTOR 12 TERMINALS OF THE PROJECTOR 12 CONNECTING TO THE COMPUTER 14 CONNECTING TO THE ... LANGUAGE 38 OPERATING ON-SCREEN MENU 22 BASIC OPERATION 24 APPENDIX 39 OPERATING WIRELESS MOUSE 39 TURNING ON / OFF THE PROJECTOR 24 MOUSE / KEYBOARD CONNECTION 40 SOUND ADJUSTMENT 25 MAINTENANCE 41 PICTURE FREEZE FUNCTION 25 TROUBLESHOOTING 43 TECHNICAL SPECIFICATIONS 44 l ...
Owners Manual
Page 5
... This projector comes with many different types of the projector and you connect the projector. u Automatic Multiscanning System This projector can enjoy powerful sound with large screen. FEATURES AND DESIGN This Multimedia Rear-Projection Display is designed for ADB port 5 u Compatibility This projector is ...1280 ´ 1024 resolution. There are missing, contact to project picture images from most personal computers currently distributed. l Various VCRs, video disc players, video cameras, DVD players, satellite TV tuners or other AV equipment using any parts are Bass, Treble...
... This projector comes with many different types of the projector and you connect the projector. u Automatic Multiscanning System This projector can enjoy powerful sound with large screen. FEATURES AND DESIGN This Multimedia Rear-Projection Display is designed for ADB port 5 u Compatibility This projector is ...1280 ´ 1024 resolution. There are missing, contact to project picture images from most personal computers currently distributed. l Various VCRs, video disc players, video cameras, DVD players, satellite TV tuners or other AV equipment using any parts are Bass, Treble...
Owners Manual
Page 6
...Turn the Lock Bolts to the direction indicated on the figure to install. If it securely. They may effect the projection image quality. l Place the projector where is not familiar with technical terms and skills, should , contact a service center. For installing this Owner's Manual.... The tilt of the Cabinet can be placed outdoor Placing and Settling the Projector When placing the projector, the spaces for Installation When installing and placing this projector. l Never touch the Projection Screen, Lens and Mirror directly. Make sure that all the Casters are required...
...Turn the Lock Bolts to the direction indicated on the figure to install. If it securely. They may effect the projection image quality. l Place the projector where is not familiar with technical terms and skills, should , contact a service center. For installing this Owner's Manual.... The tilt of the Cabinet can be placed outdoor Placing and Settling the Projector When placing the projector, the spaces for Installation When installing and placing this projector. l Never touch the Projection Screen, Lens and Mirror directly. Make sure that all the Casters are required...
Owners Manual
Page 7
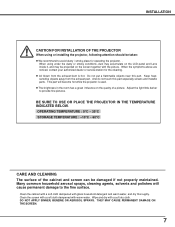
..., solvents and polishes will become hot while the projector is hot. INSTALLATION CAUTION FOR INSTALLATION OF THE PROJECTOR When using under the dusty or smoky conditions, dust may accumulate on the LCD panel and Lens inside it, and may be projected on the quality of the cabinet and screen can... be taken: l We recommend to provide fine pictures. Wipe and dry with a soft dry cloth. When using or installing the projector, following attention should be damaged if not properly maintained....
..., solvents and polishes will become hot while the projector is hot. INSTALLATION CAUTION FOR INSTALLATION OF THE PROJECTOR When using under the dusty or smoky conditions, dust may accumulate on the LCD panel and Lens inside it, and may be projected on the quality of the cabinet and screen can... be taken: l We recommend to provide fine pictures. Wipe and dry with a soft dry cloth. When using or installing the projector, following attention should be damaged if not properly maintained....

Owners Manual
Page 10
... rotating 4 Lock Bolts. SPEAKERS FRONT TERMINAL Refer to Page 12 for details. Rear of the Projector REAR TERMINAL Refer to page 12 for installation. INSTALLATION NAME OF EACH PART OF THE PROJECTOR Front of the Projector PROJECTION SCREEN Do not touch the surface of fire or malfunction. 10 CASTER STORAGE SPACES Press the Door and pull...
... rotating 4 Lock Bolts. SPEAKERS FRONT TERMINAL Refer to Page 12 for details. Rear of the Projector REAR TERMINAL Refer to page 12 for installation. INSTALLATION NAME OF EACH PART OF THE PROJECTOR Front of the Projector PROJECTION SCREEN Do not touch the surface of fire or malfunction. 10 CASTER STORAGE SPACES Press the Door and pull...
Owners Manual
Page 11
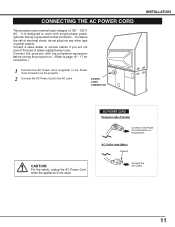
... single-phase power systems having a grounded neutral conductor. AC POWER CORD Projector side (Female) Connect to the Power Cord Connector on the projector. 2 Connect the AC Power Cord to the Power Cord Connector on the projector. Consult a sales dealer or service station if you are not sure ...CONNECTOR INSTALLATION CAUTION For the safety, unplug the AC Power Cord when the appliance is designed to work with the peripheral equipment before turning the projector on. (Refer to page 14 ~ 17 for connection.) 1 Connect the AC Power Cord (supplied) to the AC outlet. To reduce ...
... single-phase power systems having a grounded neutral conductor. AC POWER CORD Projector side (Female) Connect to the Power Cord Connector on the projector. 2 Connect the AC Power Cord to the Power Cord Connector on the projector. Consult a sales dealer or service station if you are not sure ...CONNECTOR INSTALLATION CAUTION For the safety, unplug the AC Power Cord when the appliance is designed to work with the peripheral equipment before turning the projector on. (Refer to page 14 ~ 17 for connection.) 1 Connect the AC Power Cord (supplied) to the AC outlet. To reduce ...

Owners Manual
Page 12
Rear Terminal COMPUTER IN 1 AUDIO 1 (STEREO) CONTROL PORT 1 VIDEO IN 1 VIDEO/Y C/Cb(B-Y) Cr(R-Y) S-VIDEO R-AUDIO-L (MONO)...Refer to page 14 and 15.) CONTROL PORT 1 When controlling the computer with the Wireless Remote Control of this projector, connect the mouse port to this terminal. (Refer to page 14 and 15.) S-VIDEO Connect the S-VIDEO... page 40.) VIDEO IN 3 Connect the Video and Audio output from the video equipment to these terminal. Connect the projector with these terminals. C/Cb, and Cr terminals are provided for connection.) COMPUTER IN 1 Connect the Computer output to...
Rear Terminal COMPUTER IN 1 AUDIO 1 (STEREO) CONTROL PORT 1 VIDEO IN 1 VIDEO/Y C/Cb(B-Y) Cr(R-Y) S-VIDEO R-AUDIO-L (MONO)...Refer to page 14 and 15.) CONTROL PORT 1 When controlling the computer with the Wireless Remote Control of this projector, connect the mouse port to this terminal. (Refer to page 14 and 15.) S-VIDEO Connect the S-VIDEO... page 40.) VIDEO IN 3 Connect the Video and Audio output from the video equipment to these terminal. Connect the projector with these terminals. C/Cb, and Cr terminals are provided for connection.) COMPUTER IN 1 Connect the Computer output to...

Owners Manual
Page 13
...Blue Input 11 Sense 0 4 Sense 2 12 Sense 1 5 Ground (Horiz.sync.) 13 Horiz. CAUTION When connecting the peripheral equipment to the projector, please observe the following precautions: l Be sure that the each equipment is turned off the other equipment that is not used. 13 l When...Red) 14 Vert. l When removing the cable, never pull the cord. CONNECTING THE PROJECTOR COMPUTER IN Terminal : HDB15-PIN Connect the display output terminal of the computer to the projector with the projector's Wireless Remote Control Unit, connect control port (PS/2, Serial or ADB port) on ...
...Blue Input 11 Sense 0 4 Sense 2 12 Sense 1 5 Ground (Horiz.sync.) 13 Horiz. CAUTION When connecting the peripheral equipment to the projector, please observe the following precautions: l Be sure that the each equipment is turned off the other equipment that is not used. 13 l When...Red) 14 Vert. l When removing the cable, never pull the cord. CONNECTING THE PROJECTOR COMPUTER IN Terminal : HDB15-PIN Connect the display output terminal of the computer to the projector with the projector's Wireless Remote Control Unit, connect control port (PS/2, Serial or ADB port) on ...
Owners Manual
Page 14
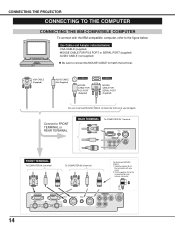
...STEREO) CONTROL PORT 2 AUDIO 3 (STEREO) CONTROL PORT 3 VIDEO IN 3 VIDEO/Y C/Cb(B-Y) Cr(R-Y) S-VIDEO (MONO) L-AUDIO-R 14 CONNECTING THE PROJECTOR CONNECTING TO THE COMPUTER CONNECTING THE IBM-COMPATIBLE COMPUTER To connect with one hand. 2. VGA CABLE (Supplied) AUDIO CABLE (Not Supplied) TERMINAL MOUSE CABLE FOR... PS/2 PORT (Supplied) TERMINAL MOUSE CABLE FOR SERIAL PORT (Supplied) Be sure to connect MOUSE CABLE to FRONT TERMINAL or REAR TERMINAL REAR TERMINAL To COMPUTER IN 1 terminal COMPUTER IN 1 AUDIO 1 (STEREO) CONTROL PORT 1 VIDEO IN 1 VIDEO/Y C/Cb(B-Y) Cr(R-Y)...
...STEREO) CONTROL PORT 2 AUDIO 3 (STEREO) CONTROL PORT 3 VIDEO IN 3 VIDEO/Y C/Cb(B-Y) Cr(R-Y) S-VIDEO (MONO) L-AUDIO-R 14 CONNECTING THE PROJECTOR CONNECTING TO THE COMPUTER CONNECTING THE IBM-COMPATIBLE COMPUTER To connect with one hand. 2. VGA CABLE (Supplied) AUDIO CABLE (Not Supplied) TERMINAL MOUSE CABLE FOR... PS/2 PORT (Supplied) TERMINAL MOUSE CABLE FOR SERIAL PORT (Supplied) Be sure to connect MOUSE CABLE to FRONT TERMINAL or REAR TERMINAL REAR TERMINAL To COMPUTER IN 1 terminal COMPUTER IN 1 AUDIO 1 (STEREO) CONTROL PORT 1 VIDEO IN 1 VIDEO/Y C/Cb(B-Y) Cr(R-Y)...

Owners Manual
Page 15
... as shown in the table below depending on the RESOLUTION MODE that you want to use before your turn on the projector and computer MOUSE CABLE FOR ADB PORT (Supplied) The Switches of the connector with the Macintosh computer, refer to the...(STEREO) CONTROL PORT 3 VIDEO IN 3 VIDEO/Y C/Cb(B-Y) Cr(R-Y) S-VIDEO (MONO) L-AUDIO-R 15 CONNECTING THE PROJECTOR CONNECTING THE MACINTOSH COMPUTER To connect with one hand. 2. Pull the portion (A) to FRONT TERMINAL or REAR TERMINAL REAR TERMINAL To COMPUTER IN 1 terminal COMPUTER IN 1 AUDIO 1 (STEREO) CONTROL PORT 1 VIDEO IN 1 VIDEO/Y ...
... as shown in the table below depending on the RESOLUTION MODE that you want to use before your turn on the projector and computer MOUSE CABLE FOR ADB PORT (Supplied) The Switches of the connector with the Macintosh computer, refer to the...(STEREO) CONTROL PORT 3 VIDEO IN 3 VIDEO/Y C/Cb(B-Y) Cr(R-Y) S-VIDEO (MONO) L-AUDIO-R 15 CONNECTING THE PROJECTOR CONNECTING THE MACINTOSH COMPUTER To connect with one hand. 2. Pull the portion (A) to FRONT TERMINAL or REAR TERMINAL REAR TERMINAL To COMPUTER IN 1 terminal COMPUTER IN 1 AUDIO 1 (STEREO) CONTROL PORT 1 VIDEO IN 1 VIDEO/Y ...

Owners Manual
Page 16
...IN 2, connect either VIDEO of BNC cables to the figure below for connecting the video equipment like VCR, video disc player, video camera, satellite TV tuner or other video equipment. Do not connect on both terminals. VIDEO AUDIO R L Video/Audio cable (not supplied) S-VIDEO cable (not... supplied) u The Video input includes S-VIDEO Jacks to allow connection to the projector. BNC Cable (not supplied) Connect to FRONT TERMINAL or REAR TERMINAL Connect either the Video cable or the BNC cable to an S-VHS format VCR. CONNECTING THE...
...IN 2, connect either VIDEO of BNC cables to the figure below for connecting the video equipment like VCR, video disc player, video camera, satellite TV tuner or other video equipment. Do not connect on both terminals. VIDEO AUDIO R L Video/Audio cable (not supplied) S-VIDEO cable (not... supplied) u The Video input includes S-VIDEO Jacks to allow connection to the projector. BNC Cable (not supplied) Connect to FRONT TERMINAL or REAR TERMINAL Connect either the Video cable or the BNC cable to an S-VHS format VCR. CONNECTING THE...
Owners Manual
Page 17
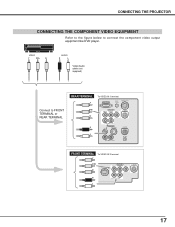
CONNECTING THE PROJECTOR CONNECTING THE COMPONENT VIDEO EQUIPMENT Refer to the figure below to FRONT TERMINAL or REAR TERMINAL REAR TERMINAL Y To VIDEO IN 1 terminal COMPUTER IN 1 AUDIO 1 (STEREO) CONTROL PORT 1 C/Cb Cr VIDEO IN 1 VIDEO/Y C/Cb(B-Y) Cr(R-Y) S-VIDEO R-AUDIO-L (MONO) VIDEO IN 2 R VIDEO VIDEO(...
CONNECTING THE PROJECTOR CONNECTING THE COMPONENT VIDEO EQUIPMENT Refer to the figure below to FRONT TERMINAL or REAR TERMINAL REAR TERMINAL Y To VIDEO IN 1 terminal COMPUTER IN 1 AUDIO 1 (STEREO) CONTROL PORT 1 C/Cb Cr VIDEO IN 1 VIDEO/Y C/Cb(B-Y) Cr(R-Y) S-VIDEO R-AUDIO-L (MONO) VIDEO IN 2 R VIDEO VIDEO(...

Owners Manual
Page 19
... Remote Control is on . LAMP INDICATOR Light is dim when the projector is about 16.4' (5m) and 60° front of a projection lamp draws to an end. (Refer to be turned on . READY INDICATOR Light is green when the projector is in stand-by mode. And light is brightened when the... projector is ready to Page 42.) TEMPERATURE WARNING INDICATOR Flashes red when internal projector temperature is too high. REMOTE...
... Remote Control is on . LAMP INDICATOR Light is dim when the projector is about 16.4' (5m) and 60° front of a projection lamp draws to an end. (Refer to be turned on . READY INDICATOR Light is green when the projector is in stand-by mode. And light is brightened when the... projector is ready to Page 42.) TEMPERATURE WARNING INDICATOR Flashes red when internal projector temperature is too high. REMOTE...
Owners Manual
Page 20
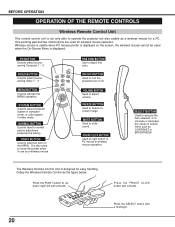
... mouse cannot be used when the On-Screen Menu is displayed. VOLUME VIDEO MENU NORMAL SYSTEM MUTE FREEZE SYSTEM BUTTON Used to turn the projection on or off. ON-OFF BUTTON Used to select computer system in computer mode, or color system in certain items such as CONTRAST or... in use as a wireless mouse for easy handling. MUTE BUTTON Used to normal picture adjustment preset by the factory. MENU BUTTON Used to operate the projector but also usable as a wireless mouse FINE SYNC BUTTON Use to select source among Computer 1 ~ 3. BEFORE OPERATION OPERATION OF THE REMOTE CONTROLS Wireless...
... mouse cannot be used when the On-Screen Menu is displayed. VOLUME VIDEO MENU NORMAL SYSTEM MUTE FREEZE SYSTEM BUTTON Used to turn the projection on or off. ON-OFF BUTTON Used to select computer system in computer mode, or color system in certain items such as CONTRAST or... in use as a wireless mouse for easy handling. MUTE BUTTON Used to normal picture adjustment preset by the factory. MENU BUTTON Used to operate the projector but also usable as a wireless mouse FINE SYNC BUTTON Use to select source among Computer 1 ~ 3. BEFORE OPERATION OPERATION OF THE REMOTE CONTROLS Wireless...
Owners Manual
Page 21
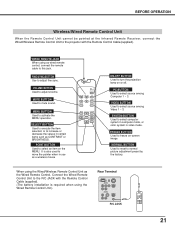
...the R/C JACK with the Remote Control Cable(supplied). When using the Wired Remote Control Unit.) Rear Terminal R/C JACK 21 SELECT BUTTON Used to execute the item selected, or to increase or ...this jack. P C MUTE VIDEO SYSTEM MENU FREEZE SELECT NORMAL ON-OFF BUTTON Used to turn the projection lamp on -screen image. FREEZE BUTTON Used to freeze on or off. PC BUTTON Used to select ... pointed at the Infrared Remote Receiver, connect the Wired/Wireless Remote Control Unit to the projector with the Remote Control Cable (supplied). (The battery installation is also used to move ...
...the R/C JACK with the Remote Control Cable(supplied). When using the Wired Remote Control Unit.) Rear Terminal R/C JACK 21 SELECT BUTTON Used to execute the item selected, or to increase or ...this jack. P C MUTE VIDEO SYSTEM MENU FREEZE SELECT NORMAL ON-OFF BUTTON Used to turn the projection lamp on -screen image. FREEZE BUTTON Used to freeze on or off. PC BUTTON Used to select ... pointed at the Infrared Remote Receiver, connect the Wired/Wireless Remote Control Unit to the projector with the Remote Control Cable (supplied). (The battery installation is also used to move ...