Sanyo PLC-XR70N - 70" Rear Projection TV Support and Manuals
Get Help and Manuals for this Sanyo item
View All Support Options Below
Free Sanyo PLC-XR70N manuals!
Problems with Sanyo PLC-XR70N?
Ask a Question
Free Sanyo PLC-XR70N manuals!
Problems with Sanyo PLC-XR70N?
Ask a Question
Most Recent Sanyo PLC-XR70N Questions

Can I Buy A Replacement Remote For A Tv? I Can't Get The Channel To Change On Tv
(Posted by coakes 10 years ago)

How Do I Set Up Stereo Sound On My Sanyo Led Tv
Stereo mode is not allowing as an option
Stereo mode is not allowing as an option
(Posted by wrjlarthur 10 years ago)
Popular Sanyo PLC-XR70N Manual Pages
Installation - Page 1
...
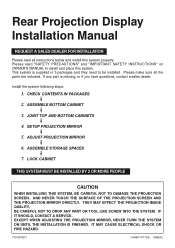
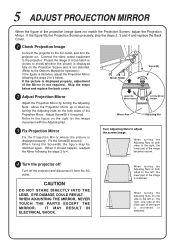
Please read "SAFETY PRECAUTIONS" and "IMPORTANT SAFETY INSTRUCTIONS" on OWNER'S MANUAL to be installed. ADJUST PROJECTION MIRROR
6. AND NEVER TOUCH THE SURFACE OF THE PROJECTION SCREEN AND THE PROJECTION MIRROR DIRECTLY. BE CAREFUL NOT TO DROP ANY PART OR TOOL LIKE SCREW INTO THE SYSTEM. SETUP PROJECTION MIRROR
5. THEY MAY EFFECT THE PROJECTION IMAGE QUALITY. This system is missing, or...
Installation - Page 2

....
Package 1
Package 3
Package 2
u Actual packages may be differ in quantity in some models. Package 1 Top Cabinet : Refer to the steps 3 to the steps 2, 6 and 7 for details. Qty.
Refer to the Owner's Manual for installation. Make sure all the parts listed below (cabinets, Installation parts, and accessories) are included in 3 packages. 1 CHECK CONTENTS IN PACKAGES
This system...
Installation - Page 3
...
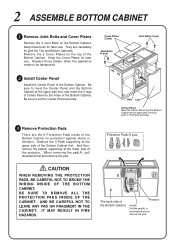
Install the Center Panel to be transported. Remove the 4 Pads supporting at the upper part first, and insert the 6 legs of Center Panel to meet the Center Panel and the Bottom Cabinet at the upper side of the Bottom Cabinet first.
Replace ... inside of the Bottom Cabinet. Be sure to downward first and remove the pad. Projector
Pad(A) Pull the pad(A) to set the Center Panel securely.
Installation - Page 4
...setting... the installations are finished, all those parts should be transported. Replace this plate when the appliance need to be replaced.
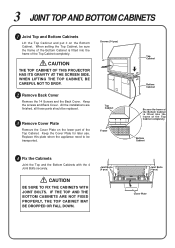
3... Remove Cover Plate
Remove the Cover Plate on the Bottom Cabinet.
CAUTION
BE SURE TO FIX THE CABINETS WITH JOINT BOLTS.
CAUTION
THE TOP CABINET OF THIS PROJECTOR...
Installation - Page 6
... RESULT IN
ELECTRICAL SHOCK.
If the figure fits the Projection Screen precisely, skip the steps 2, 3 and 4 and replace the Back Cover.
1 Check Projection Image
Connect the projector to the left , the lower part of the Projection Mirror. If the picture is shortened or stretched. Move the Projection Mirror up or down by turning the Adjusting Nuts. Adjust...
Owners Manual - Page 2
... your new projector. This Projector has a grounding-type AC line plug.
REFER SERVICING TO QUALIFIED SERVICE PERSONNEL. Operation of FCC Rules.
Do not stare directly into the beam. NO USER-SERVICEABLE PARTS INSIDE EXCEPT LAMP REPLACEMENT. Be especially careful that children do , we have been prevented, if the owner had followed the instructions in the manual. SAFETY...
Owners Manual - Page 4
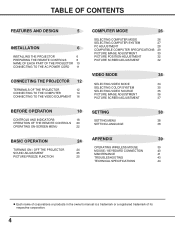
... CONTROLS 20
SETTING LANGUAGE
38
OPERATING ON-SCREEN MENU
22
BASIC OPERATION
24
APPENDIX
39
OPERATING WIRELESS MOUSE
39
TURNING ON / OFF THE PROJECTOR
24
MOUSE / KEYBOARD CONNECTION
40
SOUND ADJUSTMENT
25
MAINTENANCE
41
PICTURE FREEZE FUNCTION
25
TROUBLESHOOTING
43
TECHNICAL SPECIFICATIONS
44
l Each name of corporations or products in the owner's manual is a trademark...
Owners Manual - Page 6
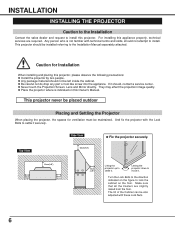
For installing this appliance properly, technical services are slightly raised from the floor.
This projector should not attempt to install. l Be careful not do drop any part or tool like screw into the appliance.
Top View
Side View
20cm(7.8")
u Fix the projector securely.
20cm (7.8")
10cm(3.9")
20cm (7.8")
10cm (3.9")
Lifting the projector up to the Installation Manual ...
Owners Manual - Page 27

... some computers.)
Note : The projector may be displayed.
27 Another ...setting. (Setting of computer based on VGA, SVGA or XGA (refer to "COMPATIBLE COMPUTER SPECIFICATION" on the ON-SCREEN MENU.
1 Press the MENU button and the ON-SCREEN MENU will appear.
Move the arrow to this mark is set correctly. (Refer to TROUBLESHOOTING on page 43.)
Selecting Computer System Manually
To set...
Owners Manual - Page 28
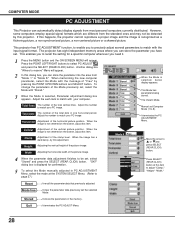
... The number of the total vertical lines. Manual set , select "Stored" and press the SELECT...Projector can store the parameter into the area from the standard ones and may not be set Computer Mode (1 to "Mode 8."
Vertical Clamp Height Width
Adjustment of the clamp level. Adjusting the vertical height of the Mode previously set .
When the image is displayed for a specific...
Owners Manual - Page 31
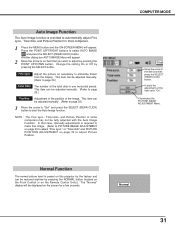
... or Off by pressing the SELECT button. This item can be adjusted manually. (Refer to adjust Picture Position. or "Total dots" and PICTURE POSITION ADJUSTMENT on this projector by the factory and can be displayed on the item set to start the Auto Image function. Normal Function
The normal picture level is preset...
Owners Manual - Page 42
...
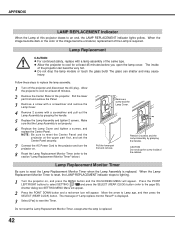
of the projector can shatter and may cause
injury. Lamp Replacement Monitor Timer
Be sure to cool for at least 45 minutes.
2 Remove the Center Panel of the cabinet. Do not reset the Lamp Replacement Monitor Timer, except after the lamp is replaced. Pull the lower part first and remove.
The glass can become unnatural, replacement of the Lamp is set the Center...
Owners Manual - Page 43
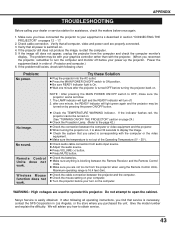
... before your power up the projector. Give the model number and explain the difficulty. Verify that service is blocking between the projector and the computer. Problem:
No power. after one minute after following chart. l Press VOLUME (+) button. l Check the mouse setting on page 24.)
l Check the Projection Lamp. (Refer to turn the computer and monitor off . 2. If after the...
Owners Manual - Page 44

APPENDIX
SPECIFICATIONS
Rear-Projection Display
Type of Projector LCD Panel System Panel Resolution Number of Pixels Horizontal Resolution Projection Lens Projection Lamp Projection Image Size Scanning Frequency Color System Computer System Terminals (Computer)
Terminals (Video)
LCD Rear-Projection Display
1.3" TFT Active Matrix type ´ 3
1,024 ´ 768 dots
2,359,296 ( 786,432 {1,024...
Owners Manual - Page 46

... to obtain warranty service, the product must be obtained by calling the toll-free number listed below. THIS WARRANTY APPLIES ONLY TO THE ORIGINAL RETAIL USER.
LABOR
PARTS
LAMP
1YEAR
1YEAR
90DAYS
EXCLUSIONS
This warranty does not cover (A) the adjustment of customer-operated controls as explained in the appropriate model's instruction manual, or (B) the repair of LABOR and...
Sanyo PLC-XR70N Reviews
We have not received any reviews for Sanyo yet.