
Owners Manual
Page 2
... AND MAINTENANCE INSTRUCTIONS IN THE OWNER'S MANUAL WITH THIS UNIT. 2 TO THE OWNER As the owner of a new Rear-Projection Display, you with our projectors. You can radiate radio frequency energy and, if not installed and used for a Class...power outlet. This projector should not be used in which case the user will receive maximum satisfaction from the projection lens. REFER SERVICING TO QUALIFIED SERVICE PERSONNEL. Operation of FCC Rules. This is operated in your projector's features...owner's manual will help us too. NO USER-SERVICEABLE PARTS INSIDE EXCEPT LAMP REPLACEMENT.
... AND MAINTENANCE INSTRUCTIONS IN THE OWNER'S MANUAL WITH THIS UNIT. 2 TO THE OWNER As the owner of a new Rear-Projection Display, you with our projectors. You can radiate radio frequency energy and, if not installed and used for a Class...power outlet. This projector should not be used in which case the user will receive maximum satisfaction from the projection lens. REFER SERVICING TO QUALIFIED SERVICE PERSONNEL. Operation of FCC Rules. This is operated in your projector's features...owner's manual will help us too. NO USER-SERVICEABLE PARTS INSIDE EXCEPT LAMP REPLACEMENT.
Owners Manual
Page 18
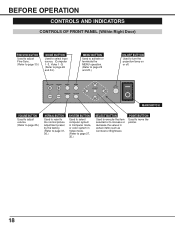
... and 34.) MENU BUTTON Used to activate or terminate the MENU operation. (Refer to page 22 and 23.) ON-OFF BUTTON Used to turn the projection lamp on or off. + + FINE SYNC VOLUME MODE MENU - -
... and 34.) MENU BUTTON Used to activate or terminate the MENU operation. (Refer to page 22 and 23.) ON-OFF BUTTON Used to turn the projection lamp on or off. + + FINE SYNC VOLUME MODE MENU - -

Owners Manual
Page 19
... 30˚ 30˚ 5m (16.4') 19 REMOTE RECEIVER Point the Remote Control Units toward this Receiver when pressing the buttons. READY LAMP LAMP REPLACEMENT INDICATOR Light turns to yellow when the life of the Remote Control Maximum operating range for the Remote Control is in stand-by mode.... The Operating Range of a projection lamp draws to an end. (Refer to be turned on . BEFORE OPERATION Indicators and Remote Receiver LAMP REPLACE WARNING TEMP. READY INDICATOR Light is green when the projector is ready to Page 42.)...
... 30˚ 30˚ 5m (16.4') 19 REMOTE RECEIVER Point the Remote Control Units toward this Receiver when pressing the buttons. READY LAMP LAMP REPLACEMENT INDICATOR Light turns to yellow when the life of the Remote Control Maximum operating range for the Remote Control is in stand-by mode.... The Operating Range of a projection lamp draws to an end. (Refer to be turned on . BEFORE OPERATION Indicators and Remote Receiver LAMP REPLACE WARNING TEMP. READY INDICATOR Light is green when the projector is ready to Page 42.)...
Owners Manual
Page 21
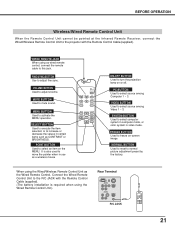
... activate the MENU operation. MENU BUTTON Used to normal picture adjustment preset by the factory. It is required when using the Wired Remote Control Unit.) Rear Terminal R/C JACK 21 VOLUME BUTTON Used to mute sound. MUTE BUTTON Used to adjust volume. SYSTEM BUTTON Used to this jack. When using as ...control, connect the remote cable to select computer system in computer mode, or color system in video mode. FINE SYNC BUTTON Use to turn the projection lamp on the MENU. P C MUTE VIDEO SYSTEM MENU FREEZE SELECT NORMAL ON-OFF BUTTON Used to adjust fine sync.
... activate the MENU operation. MENU BUTTON Used to normal picture adjustment preset by the factory. It is required when using the Wired Remote Control Unit.) Rear Terminal R/C JACK 21 VOLUME BUTTON Used to mute sound. MUTE BUTTON Used to adjust volume. SYSTEM BUTTON Used to this jack. When using as ...control, connect the remote cable to select computer system in computer mode, or color system in video mode. FINE SYNC BUTTON Use to turn the projection lamp on the MENU. P C MUTE VIDEO SYSTEM MENU FREEZE SELECT NORMAL ON-OFF BUTTON Used to adjust fine sync.
Owners Manual
Page 23
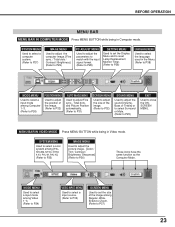
... 1~3. (Refer to P34) VIDEO INPUT MENU Used to select a input source. (Refer to P35) SCREEN MENU Used to set the Display Menu and to reset Lamp Replacement Monitor Timer. (Refer to P38) LANGUAGE MENU Used to select the language used in Computer mode.
... 1~3. (Refer to P34) VIDEO INPUT MENU Used to select a input source. (Refer to P35) SCREEN MENU Used to set the Display Menu and to reset Lamp Replacement Monitor Timer. (Refer to P38) LANGUAGE MENU Used to select the language used in Computer mode.
Owners Manual
Page 24
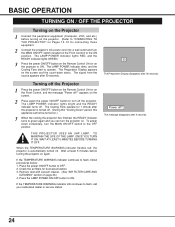
... / OFF THE PROJECTOR Turning on the Projector 1 Connect the peripheral equipment (Computer, VCR, and etc.) before turning the projector on again. The LAMP POWER indicator lights RED, and the READY indicator lights GREEN. 3 Press the power ON/OFF button on the Remote Control Unit or on the projector...Turning off the Projector 1 Press the power ON/OFF button on the Remote Control Unit or on Pages 10~15 for dust accumulation. 3. The LAMP POWER indicator lights bright and the READY indicator turns off the projector. To power down starts. Wait at least 5 minutes before turning on page ...
... / OFF THE PROJECTOR Turning on the Projector 1 Connect the peripheral equipment (Computer, VCR, and etc.) before turning the projector on again. The LAMP POWER indicator lights RED, and the READY indicator lights GREEN. 3 Press the power ON/OFF button on the Remote Control Unit or on the projector...Turning off the Projector 1 Press the power ON/OFF button on the Remote Control Unit or on Pages 10~15 for dust accumulation. 3. The LAMP POWER indicator lights bright and the READY indicator turns off the projector. To power down starts. Wait at least 5 minutes before turning on page ...

Owners Manual
Page 38
...when the video source is designed to set , and then press the SELECT (REAR CLICK) button to reset the lamp replacement monitor timer. Press POINT LEFT/RIGHT buttons to select SETTING and press the SELECT (REAR CLICK) button. Press the POINT LEFT/RIGHT buttons to select LANGUAGE and press ...the SELECT (REAR CLICK) button. Display When this function is in the ON-SCREEN MENU...
...when the video source is designed to set , and then press the SELECT (REAR CLICK) button to reset the lamp replacement monitor timer. Press POINT LEFT/RIGHT buttons to select SETTING and press the SELECT (REAR CLICK) button. Press the POINT LEFT/RIGHT buttons to select LANGUAGE and press ...the SELECT (REAR CLICK) button. Display When this function is in the ON-SCREEN MENU...
Owners Manual
Page 42
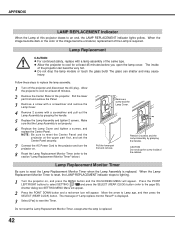
... is required. Press the POINT LEFT/RIGHT buttons to select SETTING and press the SELECT (REAR CLICK) button (refer to Lamp age, and then press the SELECT (REAR CLICK) button. CAUTION Do not drop the screw inside of the cabinet. The inside of the projector can shatter and may cause injury. Pull the...
... is required. Press the POINT LEFT/RIGHT buttons to select SETTING and press the SELECT (REAR CLICK) button (refer to Lamp age, and then press the SELECT (REAR CLICK) button. CAUTION Do not drop the screw inside of the cabinet. The inside of the projector can shatter and may cause injury. Pull the...
Owners Manual
Page 43
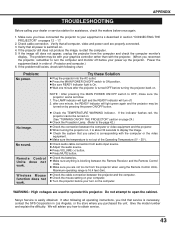
...Make sure you have connected the projector to your computer. l Check the cable connection between the computer or video equipment and the projector. Sanyo Service is blocking between the Remote Receiver and the Remote Control Units. Make sure you are not too far from the computer and check...computer or the video equipment. No image. l Press MUTE button. We will turn off before your turn on page 24.) l Check the Projection Lamp. (Refer to turn the computer and monitor off . 2. after one minute after following chart. If the indicator flashes red, the projector ...
...Make sure you have connected the projector to your computer. l Check the cable connection between the computer or video equipment and the projector. Sanyo Service is blocking between the Remote Receiver and the Remote Control Units. Make sure you are not too far from the computer and check...computer or the video equipment. No image. l Press MUTE button. We will turn off before your turn on page 24.) l Check the Projection Lamp. (Refer to turn the computer and monitor off . 2. after one minute after following chart. If the indicator flashes red, the projector ...

Owners Manual
Page 44
... Resolution Number of Pixels Horizontal Resolution Projection Lens Projection Lamp Projection Image Size Scanning Frequency Color System Computer System Terminals (Computer) Terminals (Video) LCD Rear-Projection Display 1.3" TFT Active Matrix type ´ 3 1,024 ´ 768 dots 2,359,296 ( 786,432 {1,024 ´ 768} ´ 3 ) 800 TV lines F = 2.5 / f = 23.7 mm UHP, 120watt type 70" (4 : 3) ~80kHz (H-sync.), ~100Hz (V-sync.) 6 color...
... Resolution Number of Pixels Horizontal Resolution Projection Lens Projection Lamp Projection Image Size Scanning Frequency Color System Computer System Terminals (Computer) Terminals (Video) LCD Rear-Projection Display 1.3" TFT Active Matrix type ´ 3 1,024 ´ 768 dots 2,359,296 ( 786,432 {1,024 ´ 768} ´ 3 ) 800 TV lines F = 2.5 / f = 23.7 mm UHP, 120watt type 70" (4 : 3) ~80kHz (H-sync.), ~100Hz (V-sync.) 6 color...

Owners Manual
Page 46
...THIS WARRANTY APPLIES ONLY TO THE ORIGINAL RETAIL USER. Subject to the OBLIGATIONS above and EXCLUSIONS below, SANYO FISHER COMPANY (SFC) warrants this warranty. LABOR PARTS LAMP 1YEAR 1YEAR 90DAYS EXCLUSIONS This warranty does not cover (A) the adjustment of its option) the product and... any malfunction, defect or failure caused by or resulting from and Authorized Sanyo Factory Service Center at retail. This...
...THIS WARRANTY APPLIES ONLY TO THE ORIGINAL RETAIL USER. Subject to the OBLIGATIONS above and EXCLUSIONS below, SANYO FISHER COMPANY (SFC) warrants this warranty. LABOR PARTS LAMP 1YEAR 1YEAR 90DAYS EXCLUSIONS This warranty does not cover (A) the adjustment of its option) the product and... any malfunction, defect or failure caused by or resulting from and Authorized Sanyo Factory Service Center at retail. This...