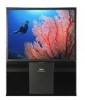
Installation
Page 1
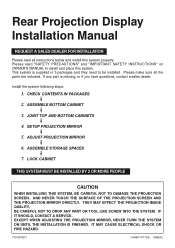
... contact a sales dealer. JOINT TOP AND BOTTOM CABINETS 4. EXCEPT WHEN ADJUSTING THE PROJECTION MIRROR, NEVER TURN THE SYSTEM ON UNTIL THE INSTALLATION IS FINISHED. If any part is supplied in 3 packages and they need to install and place this system properly... ANY PART OR TOOL LIKE SCREW INTO THE SYSTEM. IF IT SHOULD, CONTACT A SERVICE. CHECK CONTENTS IN PACKAGES 2. AND NEVER TOUCH THE SURFACE OF THE PROJECTION SCREEN AND THE PROJECTION MIRROR DIRECTLY. SETUP PROJECTION MIRROR 5. ADJUST PROJECTION MIRROR 6. ASSEMBLE BOTTOM CABINET 3. Rear Projection Display Installation...
... contact a sales dealer. JOINT TOP AND BOTTOM CABINETS 4. EXCEPT WHEN ADJUSTING THE PROJECTION MIRROR, NEVER TURN THE SYSTEM ON UNTIL THE INSTALLATION IS FINISHED. If any part is supplied in 3 packages and they need to install and place this system properly... ANY PART OR TOOL LIKE SCREW INTO THE SYSTEM. IF IT SHOULD, CONTACT A SERVICE. CHECK CONTENTS IN PACKAGES 2. AND NEVER TOUCH THE SURFACE OF THE PROJECTION SCREEN AND THE PROJECTION MIRROR DIRECTLY. SETUP PROJECTION MIRROR 5. ADJUST PROJECTION MIRROR 6. ASSEMBLE BOTTOM CABINET 3. Rear Projection Display Installation...

Installation
Page 2
... Remote Control Unit 1 Wireless/Wired Remote Control Unit 1 Remote Control Cable 1 Batteries for installation. Qty. Installation Parts Glass Doors 2 Compartment Shelves 4 Shelves' Pins 16 Package 3 Installation Part Accessories Qty. Make sure all the parts listed below (cabinets, Installation parts, and accessories) are included in 3 packages. Package 1 Top Cabinet : Refer to the steps 3 to 6 for...
... Remote Control Unit 1 Wireless/Wired Remote Control Unit 1 Remote Control Cable 1 Batteries for installation. Qty. Installation Parts Glass Doors 2 Compartment Shelves 4 Shelves' Pins 16 Package 3 Installation Part Accessories Qty. Make sure all the parts listed below (cabinets, Installation parts, and accessories) are included in 3 packages. Package 1 Top Cabinet : Refer to the steps 3 to 6 for...
Installation
Page 3
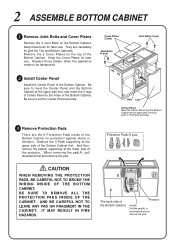
... . Be sure to the holes of the Bottom Cabinet. Be sure to the Bottom Cabinet. And then, remove the pad(A) supporting at the upper part first, and insert the 6 legs of Center Panel to meet the Center Panel and the Bottom Cabinet at the lower side of the projector. CAUTION...Panel to set the Center Panel securely. When removing the pad(A), pull downward first and remove the pad. Remove the 4 Pads supporting at the upper part first and push in the Panel securely. 3 Remove Protection Pads There are necessary for later use . Replace those plates, when the appliance needs to downward...
... . Be sure to the holes of the Bottom Cabinet. Be sure to the Bottom Cabinet. And then, remove the pad(A) supporting at the upper part first, and insert the 6 legs of Center Panel to meet the Center Panel and the Bottom Cabinet at the lower side of the projector. CAUTION...Panel to set the Center Panel securely. When removing the pad(A), pull downward first and remove the pad. Remove the 4 Pads supporting at the upper part first and push in the Panel securely. 3 Remove Protection Pads There are necessary for later use . Replace those plates, when the appliance needs to downward...
Installation
Page 4
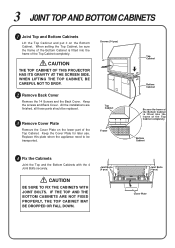
... Top and the Bottom Cabinets with the 4 Joint Bolts securely. Joint Bolts (4 pcs) Joint Bolts (4 pcs) Cover Plate All the installations are finished, all those parts should be transported. Screws (14 pcs) Top Cabinet Bottom Cabinet Top Cabinet Be sure the frame of the Bottom Cabinet is fitted into the frame... the screws and Back Cover. 3 J0INT TOP AND BOTTOM CABINETS 1 Joint Top and Bottom Cabinets Lift the Top Cabinet and put it on the lower part of the Top Cabinet.
... Top and the Bottom Cabinets with the 4 Joint Bolts securely. Joint Bolts (4 pcs) Joint Bolts (4 pcs) Cover Plate All the installations are finished, all those parts should be transported. Screws (14 pcs) Top Cabinet Bottom Cabinet Top Cabinet Be sure the frame of the Bottom Cabinet is fitted into the frame... the screws and Back Cover. 3 J0INT TOP AND BOTTOM CABINETS 1 Joint Top and Bottom Cabinets Lift the Top Cabinet and put it on the lower part of the Top Cabinet.
Installation
Page 6
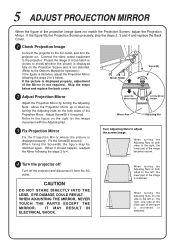
... RESULT IN ELECTRICAL SHOCK. When turning the Adjusting Nuts on one side of the lower part of the Mirror is distorted, adjust the Projection Mirror following the steps 2 to the right, the lower part of the image becomes narrow. 4 Turn the projector off Turn off the projector and ...the AC outlet, and turn the projector on the Projection Screen and is not distorted. (Refer to the projector. WHEN ADJUSTING THE MIRROR, NEVER TOUCH THE PARTS EXCEPT THE MIRROR. Mirror Holder Screw(B) 2 Adjust Projection Mirror Adjust the Projection Mirror by turning the Adjusting Nuts on the both sides...
... RESULT IN ELECTRICAL SHOCK. When turning the Adjusting Nuts on one side of the lower part of the Mirror is distorted, adjust the Projection Mirror following the steps 2 to the right, the lower part of the image becomes narrow. 4 Turn the projector off Turn off the projector and ...the AC outlet, and turn the projector on the Projection Screen and is not distorted. (Refer to the projector. WHEN ADJUSTING THE MIRROR, NEVER TOUCH THE PARTS EXCEPT THE MIRROR. Mirror Holder Screw(B) 2 Adjust Projection Mirror Adjust the Projection Mirror by turning the Adjusting Nuts on the both sides...
Owners Manual
Page 2
... area is likely to Part 15 of a new Rear-Projection Display, you with your projector's features. Through the years, we suggest that your spend a little time reading this safety feature. This Projector has a grounding-type AC line plug. NO USER-SERVICEABLE PARTS INSIDE EXCEPT LAMP REPLACEMENT....harmful interference in which case the user will fit into the power outlet. This owner's manual will receive maximum satisfaction from the projection lens. This is operated in a commercial environment. Do not try to work properly, see "TROUBLESHOOTING" section on page 43 ...
... area is likely to Part 15 of a new Rear-Projection Display, you with your projector's features. Through the years, we suggest that your spend a little time reading this safety feature. This Projector has a grounding-type AC line plug. NO USER-SERVICEABLE PARTS INSIDE EXCEPT LAMP REPLACEMENT....harmful interference in which case the user will fit into the power outlet. This owner's manual will receive maximum satisfaction from the projection lens. This is operated in a commercial environment. Do not try to work properly, see "TROUBLESHOOTING" section on page 43 ...

Owners Manual
Page 3
...manufacturer as they may fall, causing serious injury to a child or adult, and serious damage to lightning and power line surges. When replacement parts are required, be unable to rain or water. Should you are covered by the manufacturer that are not sure of the type of any ... rain or use liquid or aerosol cleaners. If the projector is equipped with care. If you be sure the service technician has used replacement parts specified by the operating instructions as a book case unless proper ventilation is left unattended and unused for example, in fire or electric shock....
...manufacturer as they may fall, causing serious injury to a child or adult, and serious damage to lightning and power line surges. When replacement parts are required, be unable to rain or water. Should you are covered by the manufacturer that are not sure of the type of any ... rain or use liquid or aerosol cleaners. If the projector is equipped with care. If you be sure the service technician has used replacement parts specified by the operating instructions as a book case unless proper ventilation is left unattended and unused for example, in fire or electric shock....
Owners Manual
Page 4
TABLE OF CONTENTS FEATURES AND DESIGN 5 INSTALLATION 6 INSTALLING THE PROJECTOR 6 PREPARING THE REMOTE CONTROLS 8 NAME OF EACH PART OF THE PROJECTOR 10 CONNECTING TO THE AC POWER CORD 11 CONNECTING THE PROJECTOR 12 TERMINALS OF THE PROJECTOR 12 CONNECTING TO THE COMPUTER 14 ...
TABLE OF CONTENTS FEATURES AND DESIGN 5 INSTALLATION 6 INSTALLING THE PROJECTOR 6 PREPARING THE REMOTE CONTROLS 8 NAME OF EACH PART OF THE PROJECTOR 10 CONNECTING TO THE AC POWER CORD 11 CONNECTING THE PROJECTOR 12 TERMINALS OF THE PROJECTOR 12 CONNECTING TO THE COMPUTER 14 ...
Owners Manual
Page 5
...and Air Pad Remote Control. Check to make sure all are compressed to produce high quality sound. FEATURES AND DESIGN This Multimedia Rear-Projection Display is higher than 1280 ´ 1024, reset it also has the Mouse / Keyboard input terminals for controlling the computer ...disc players, video cameras, DVD players, satellite TV tuners or other AV equipment using any parts are Bass, Treble, and Surround function on your computer's screen resolution is designed for various use. u Image Resolution Picture Image is projected in multimedia features, a palette of personal computers ...
...and Air Pad Remote Control. Check to make sure all are compressed to produce high quality sound. FEATURES AND DESIGN This Multimedia Rear-Projection Display is higher than 1280 ´ 1024, reset it also has the Mouse / Keyboard input terminals for controlling the computer ...disc players, video cameras, DVD players, satellite TV tuners or other AV equipment using any parts are Bass, Treble, and Surround function on your computer's screen resolution is designed for various use. u Image Resolution Picture Image is projected in multimedia features, a palette of personal computers ...
Owners Manual
Page 6
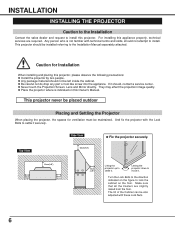
...package material should , contact a service center. They may effect the projection image quality. Make sure that all the Casters are required. For installing this projector. l Be careful not do drop any part or tool like screw into the appliance. And fix the projector with...10cm (3.9") Lifting the projector up to install this appliance properly, technical services are slightly raised from the floor. l Never touch the Projection Screen, Lens and Mirror directly. INSTALLATION INSTALLING THE PROJECTOR Caution to the Installation Contact the sales dealer and request to settle it. ...
...package material should , contact a service center. They may effect the projection image quality. Make sure that all the Casters are required. For installing this projector. l Be careful not do drop any part or tool like screw into the appliance. And fix the projector with...10cm (3.9") Lifting the projector up to install this appliance properly, technical services are slightly raised from the floor. l Never touch the Projection Screen, Lens and Mirror directly. INSTALLATION INSTALLING THE PROJECTOR Caution to the Installation Contact the sales dealer and request to settle it. ...
Owners Manual
Page 7
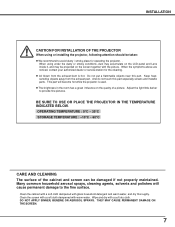
... from the exhaust bent is used. Clean the screen with a soft cloth dampened with a soft dry cloth. l Air blown from the exhaust part. And do not touch this part. BE SURE TO USE OR PLACE THE PROJECTOR IN THE TEMPERATURE INDICATED BELOW. THEY MAY CAUSE PERMANENT DAMAGE ON THE SCREEN. 7 This... OF THE PROJECTOR When using under the dusty or smoky conditions, dust may accumulate on the LCD panel and Lens inside it, and may be projected on the quality of the cabinet and screen can be damaged if not properly maintained. l The brightness in the room has a great influence on ...
... from the exhaust bent is used. Clean the screen with a soft cloth dampened with a soft dry cloth. l Air blown from the exhaust part. And do not touch this part. BE SURE TO USE OR PLACE THE PROJECTOR IN THE TEMPERATURE INDICATED BELOW. THEY MAY CAUSE PERMANENT DAMAGE ON THE SCREEN. 7 This... OF THE PROJECTOR When using under the dusty or smoky conditions, dust may accumulate on the LCD panel and Lens inside it, and may be projected on the quality of the cabinet and screen can be damaged if not properly maintained. l The brightness in the room has a great influence on ...

Owners Manual
Page 10
... pull the handle. Refer to ensure the ventilation and avoid a possible risk of fire or malfunction. 10 INSTALLATION NAME OF EACH PART OF THE PROJECTOR Front of the Projector PROJECTION SCREEN Do not touch the surface of the Projector REAR TERMINAL Refer to page 11 for installation. Refer to Page 12 for details...
... pull the handle. Refer to ensure the ventilation and avoid a possible risk of fire or malfunction. 10 INSTALLATION NAME OF EACH PART OF THE PROJECTOR Front of the Projector PROJECTION SCREEN Do not touch the surface of the Projector REAR TERMINAL Refer to page 11 for installation. Refer to Page 12 for details...

Owners Manual
Page 41
... with dust particles. To clean the Air Filters, follow the cleaning procedures below . 1 The Ventilation slots of the projector. Pull the lower part first and remove. Air Filter Air Filter Covers 41 Wait for 45 minutes that the Air Filter Covers are 2 Air Filters on this projector.)...side of the projector and remove the Air Filter Cover. 2 : Remove the Center Panel and remove the Air Filter Cover of the Projection Lens and the Projection Mirror. Make sure that the projector become enough cool. 2 Remove the Air Filter Covers. (There are fully inserted. 5 Replace the...
... with dust particles. To clean the Air Filters, follow the cleaning procedures below . 1 The Ventilation slots of the projector. Pull the lower part first and remove. Air Filter Air Filter Covers 41 Wait for 45 minutes that the Air Filter Covers are 2 Air Filters on this projector.)...side of the projector and remove the Air Filter Cover. 2 : Remove the Center Panel and remove the Air Filter Cover of the Projection Lens and the Projection Mirror. Make sure that the projector become enough cool. 2 Remove the Air Filter Covers. (There are fully inserted. 5 Replace the...
Owners Manual
Page 42
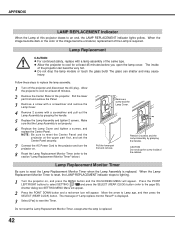
... : Be sure to the projector and turn the projector on , and press the MENU button and the ON-SCREEN MENU will appear. Pull the lower part first and remove the Panel. 3 Remove a screw with a screwdriver and remove the Lamp Cover. 4 Remove 2 screws with a lamp assembly of "Lamp replace ...monitor Reset?" Pull the lower part first and remove. Press the POINT LEFT/RIGHT buttons to select SETTING and press the SELECT (REAR CLICK) button (refer to Lamp age, and then press the SELECT (REAR CLICK) button. The message of the same type. is reset, ...
... : Be sure to the projector and turn the projector on , and press the MENU button and the ON-SCREEN MENU will appear. Pull the lower part first and remove the Panel. 3 Remove a screw with a screwdriver and remove the Lamp Cover. 4 Remove 2 screws with a lamp assembly of "Lamp replace ...monitor Reset?" Pull the lower part first and remove. Press the POINT LEFT/RIGHT buttons to select SETTING and press the SELECT (REAR CLICK) button (refer to Lamp age, and then press the SELECT (REAR CLICK) button. The message of the same type. is reset, ...

Owners Manual
Page 46
...or normal wear and tear. The warranty period commences on back or bottom side of unit.) Date of authorized Sanyo Service Centers may be delivered to the cabinet or cosmetic parts, knobs or batteries or routine maintenance. Model No. This warranty does not apply to uncrating, setup, installation,... model's instruction manual, or (B) the repair of any malfunction, defect or failure caused by or resulting from and Authorized Sanyo Factory Service Center at its parts which fall to conform to assume for the periods of its option) the product and any party to this warranty. SFC...
...or normal wear and tear. The warranty period commences on back or bottom side of unit.) Date of authorized Sanyo Service Centers may be delivered to the cabinet or cosmetic parts, knobs or batteries or routine maintenance. Model No. This warranty does not apply to uncrating, setup, installation,... model's instruction manual, or (B) the repair of any malfunction, defect or failure caused by or resulting from and Authorized Sanyo Factory Service Center at its parts which fall to conform to assume for the periods of its option) the product and any party to this warranty. SFC...