

Owners Manual
Page 2
... circuits as contact with liquids, such as power-supply cord or plug is provided to call the CATV system installer's attention to grounding electrodes, and requirements for replacement of the obsolete outlet. 15. A grounding-type plug has two blades and a third grounding prong. In the U.S. Use only with the cart, stand, tripod, bracket, or table specified by the manufacturer, or sold with...
... circuits as contact with liquids, such as power-supply cord or plug is provided to call the CATV system installer's attention to grounding electrodes, and requirements for replacement of the obsolete outlet. 15. A grounding-type plug has two blades and a third grounding prong. In the U.S. Use only with the cart, stand, tripod, bracket, or table specified by the manufacturer, or sold with...

Owners Manual
Page 3
... Laboratories. "Dolby" is Listed by Underwriter's Laboratories Inc. HDMI, the HDMI Logo and High-Definition Multimedia Interface are designed to radio communications. "As an Energy Star® Partner, Sanyo Manufacturing Corporation has determined that improper modifications or unauthorized changes to operate the unit. This symbol on , the user is designed and manufactured to Part 15 of our resources...
... Laboratories. "Dolby" is Listed by Underwriter's Laboratories Inc. HDMI, the HDMI Logo and High-Definition Multimedia Interface are designed to radio communications. "As an Energy Star® Partner, Sanyo Manufacturing Corporation has determined that improper modifications or unauthorized changes to operate the unit. This symbol on , the user is designed and manufactured to Part 15 of our resources...
Owners Manual
Page 4
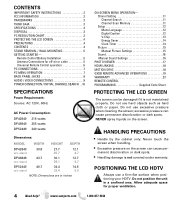
...cable 5 Universal Remote Control operation 6 PC CONNECTIONS 7 PC MENU OPERATION 7 BACK PANEL JACKS 8 AUDIO / VIDEO CONNECTIONS 9 POWER CONNECTION / INITIAL CHANNEL SEARCH . .10 SPECIFICATIONS Power Requirement: Source: AC 120V, 60Hz AC Power Consumption: DP42849 216 watts DP46849 255 watts DP52449 240 watts Dimensions: MODEL WIDTH HEIGHT DEPTH DP42849 w/o stand 39.8 27.7 25.7 12.1 4.7 DP46849 w/o stand 43.7 30.1 28.1 12.7 4.7 DP52449 w/o stand 49.7 34.4 32.4 14.6 5.0 NOTE: Dimensions are in a confined area. Do not position the unit in inches ON-SCREEN MENU OPERATION...
...cable 5 Universal Remote Control operation 6 PC CONNECTIONS 7 PC MENU OPERATION 7 BACK PANEL JACKS 8 AUDIO / VIDEO CONNECTIONS 9 POWER CONNECTION / INITIAL CHANNEL SEARCH . .10 SPECIFICATIONS Power Requirement: Source: AC 120V, 60Hz AC Power Consumption: DP42849 216 watts DP46849 255 watts DP52449 240 watts Dimensions: MODEL WIDTH HEIGHT DEPTH DP42849 w/o stand 39.8 27.7 25.7 12.1 4.7 DP46849 w/o stand 43.7 30.1 28.1 12.7 4.7 DP52449 w/o stand 49.7 34.4 32.4 14.6 5.0 NOTE: Dimensions are in a confined area. Do not position the unit in inches ON-SCREEN MENU OPERATION...
Owners Manual
Page 5
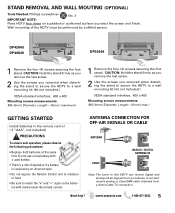
... a wall mounting kit (kit not included.) VESA standard interface: 400 x 400 Mounting screws measurements: M6 (6mm) Diameter, Length-16mm (max.) GETTING STARTED Install batteries in this HDTV can also receive analog or ClearQAM cable channels from an antenna. Wall mounting of explosion if a battery is replaced by a skilled person. DP42849 DP46849 DP52449 1 Remove the four (4) screws securing the foot stand. ANTENNA CONNECTION FOR OFF-AIR SIGNALS OR CABLE ANTENNA CABLE ANALOG / DIGITAL ANTENNA IN Note: The tuner in the remote control...
... a wall mounting kit (kit not included.) VESA standard interface: 400 x 400 Mounting screws measurements: M6 (6mm) Diameter, Length-16mm (max.) GETTING STARTED Install batteries in this HDTV can also receive analog or ClearQAM cable channels from an antenna. Wall mounting of explosion if a battery is replaced by a skilled person. DP42849 DP46849 DP52449 1 Remove the four (4) screws securing the foot stand. ANTENNA CONNECTION FOR OFF-AIR SIGNALS OR CABLE ANTENNA CABLE ANALOG / DIGITAL ANTENNA IN Note: The tuner in the remote control...
Owners Manual
Page 7
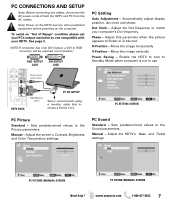
...-877-5032 7 Sets predetermined values to the Sound parameters. Stereo mini audio cable HDTV BACK PC OR LAPTOP RGB Monitor cable Sanyo recommends using a monitor cable that includes a Ferrite Core. Manual - Adjust the HDTV's Bass and Treble settings. PC CONNECTIONS AND SETUP Note: Before connecting any other peripheral equipment before powering on the HDTV and any cables, disconnect the AC power cords of Range" condition please set your PC's output resolution to one compatible with your computer...
...-877-5032 7 Sets predetermined values to the Sound parameters. Stereo mini audio cable HDTV BACK PC OR LAPTOP RGB Monitor cable Sanyo recommends using a monitor cable that includes a Ferrite Core. Manual - Adjust the HDTV's Bass and Treble settings. PC CONNECTIONS AND SETUP Note: Before connecting any other peripheral equipment before powering on the HDTV and any cables, disconnect the AC power cords of Range" condition please set your PC's output resolution to one compatible with your computer...
Owners Manual
Page 8
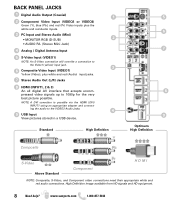
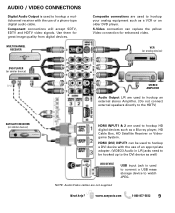
... signals and HD equipment. 8 Need help? NOTE: A DVI conection is possible via the HDMI (DVI) INPUT1 using an appropriate adapter and connect- ing the audio to 1080p for the very best picture possible. BACK PANEL JACKS 1 Digital Audio Output (Coaxial) 1 2 Component Video Input (VIDEO2 or VIDEO3) Green (Y), blue (Pb), and red (Pr) Video inputs plus the white and red Audio inputs. 3 PC Input and Stereo Audio (Mini) • MONITOR RGB (D-SUB) 2 • AUDIO R/L (Stereo Mini Jack) 4 Analog / Digital Antenna Input 5 S-Video Input (VIDEO1) NOTE: An S-Video connection...
... signals and HD equipment. 8 Need help? NOTE: A DVI conection is possible via the HDMI (DVI) INPUT1 using an appropriate adapter and connect- ing the audio to 1080p for the very best picture possible. BACK PANEL JACKS 1 Digital Audio Output (Coaxial) 1 2 Component Video Input (VIDEO2 or VIDEO3) Green (Y), blue (Pb), and red (Pr) Video inputs plus the white and red Audio inputs. 3 PC Input and Stereo Audio (Mini) • MONITOR RGB (D-SUB) 2 • AUDIO R/L (Stereo Mini Jack) 4 Analog / Digital Antenna Input 5 S-Video Input (VIDEO1) NOTE: An S-Video connection...
Owners Manual
Page 9
... video. HDMI (DVI) INPUT1 can replace the yellow Video connection for great image quality from digital devices. S-Video connection can be hooked up to the DVI device as well) USB DEVICE NOTE: Audio/Video cables are not supplied USB input jack is used to watch JPEG. Need help? VCR (or analog device) DVD PLAYER (or similar device) DVI STEREO AMPLIFIER Audio Output L/R are used to hookup an external stereo Amplifier. (Do not connect external speakers directly to the HDTV) SATELLITE RECEIVER...
... video. HDMI (DVI) INPUT1 can replace the yellow Video connection for great image quality from digital devices. S-Video connection can be hooked up to the DVI device as well) USB DEVICE NOTE: Audio/Video cables are not supplied USB input jack is used to watch JPEG. Need help? VCR (or analog device) DVD PLAYER (or similar device) DVI STEREO AMPLIFIER Audio Output L/R are used to hookup an external stereo Amplifier. (Do not connect external speakers directly to the HDTV) SATELLITE RECEIVER...
Owners Manual
Page 10
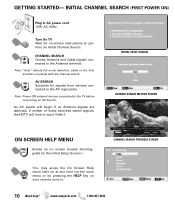
... HDTV will tune to the AV input jacks. Note: "Auto" detects the mode detection, Cable or Air, first, and then proceeds with the channel search. INITIAL SETUP SCREEN CHANNEL SEARCH METHOD SCREEN ON SCREEN HELP MENU Access an on screen trouble shooting guide (in AC power cord 120V AC, 60Hz Turn On TV Wait for signals from devices connected to input Video1. INITIAL CHANNEL SEARCH (FIRST POWER ON) Plug in the Initial Setup Screen.) You may acces the On Screen Help menu...
... HDTV will tune to the AV input jacks. Note: "Auto" detects the mode detection, Cable or Air, first, and then proceeds with the channel search. INITIAL SETUP SCREEN CHANNEL SEARCH METHOD SCREEN ON SCREEN HELP MENU Access an on screen trouble shooting guide (in AC power cord 120V AC, 60Hz Turn On TV Wait for signals from devices connected to input Video1. INITIAL CHANNEL SEARCH (FIRST POWER ON) Plug in the Initial Setup Screen.) You may acces the On Screen Help menu...
Owners Manual
Page 11
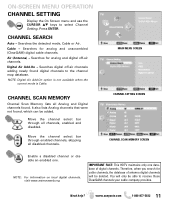
...) digital cable channels. ON-SCREEN MENU OPERATION CHANNEL SETTING Display the On Screen menu and use the CURSOR LM keys to the channel map database. Air (Antenna) - Digital Air Add-On - It also lists Analog channels that were not found . Move the channel select bar through enabled channels, skipping all channels, enabled and disabled. MAIN MENU SCREEN CHANNEL SETTING SCREEN CHANNEL SCAN MEMORY SCREEN Enable a disabled channel or disable an enabled one database of antenna digital channels will only be able to receive those ClearQAM channels your cable company...
...) digital cable channels. ON-SCREEN MENU OPERATION CHANNEL SETTING Display the On Screen menu and use the CURSOR LM keys to the channel map database. Air (Antenna) - Digital Air Add-On - It also lists Analog channels that were not found . Move the channel select bar through enabled channels, skipping all channels, enabled and disabled. MAIN MENU SCREEN CHANNEL SETTING SCREEN CHANNEL SCAN MEMORY SCREEN Enable a disabled channel or disable an enabled one database of antenna digital channels will only be able to receive those ClearQAM channels your cable company...
Owners Manual
Page 12
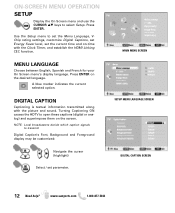
... Setup. Use the Setup menu to open these captions (digital or analog) and superimpose them on -time with the picture and sound. Press ENTER on the desired language. DIGITAL CAPTION Captioning is textual information transmitted along with the Clock Timer, and establish the HDMI Linking CEC function. Digital Caption's Font, Background and Foreground display may be customized: Navigate the cursor (highlight) Select / set the current time and on the screen. ON-SCREEN MENU OPERATION SETUP Display...
... Setup. Use the Setup menu to open these captions (digital or analog) and superimpose them on -time with the picture and sound. Press ENTER on the desired language. DIGITAL CAPTION Captioning is textual information transmitted along with the Clock Timer, and establish the HDMI Linking CEC function. Digital Caption's Font, Background and Foreground display may be customized: Navigate the cursor (highlight) Select / set the current time and on the screen. ON-SCREEN MENU OPERATION SETUP Display...
Owners Manual
Page 14
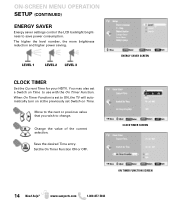
... set a Switch on Time to save power consumption. Save the desired Time entry. When On Timer Function is set Switch on at the previously set to change. Change the value of the current selection. ENERGY SAVER SCREEN CLOCK TIMER SCREEN ON TIMER FUNCTION SCREEN 14 Need help? The higher the level number, the more brightness reduction and higher power saving. LEVEL 1 LEVEL 2 LEVEL 3 CLOCK TIMER Set the Current Time for your HDTV. Set the On Timer...
... set a Switch on Time to save power consumption. Save the desired Time entry. When On Timer Function is set Switch on at the previously set to change. Change the value of the current selection. ENERGY SAVER SCREEN CLOCK TIMER SCREEN ON TIMER FUNCTION SCREEN 14 Need help? The higher the level number, the more brightness reduction and higher power saving. LEVEL 1 LEVEL 2 LEVEL 3 CLOCK TIMER Set the Current Time for your HDTV. Set the On Timer...
Owners Manual
Page 15
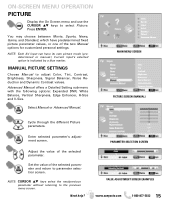
... personal settings. Select Manual or Advanced Manual. You may choose between Movie, Sports, News, Game, and Standard, which have its own picture mode (predetermined or manual.) Current input's selected option is indicated by a blue marker. Need help? Press ENTER. Advanced Manual offers a Detailed Setting sub-menu with the following options: Expanded DNR, White Balance, Vertical Sharpness, Edge Enhancer, H-Size and V-Size. ON-SCREEN MENU OPERATION PICTURE Display the On Screen menu and use the...
... personal settings. Select Manual or Advanced Manual. You may choose between Movie, Sports, News, Game, and Standard, which have its own picture mode (predetermined or manual.) Current input's selected option is indicated by a blue marker. Need help? Press ENTER. Advanced Manual offers a Detailed Setting sub-menu with the following options: Expanded DNR, White Balance, Vertical Sharpness, Edge Enhancer, H-Size and V-Size. ON-SCREEN MENU OPERATION PICTURE Display the On Screen menu and use the...
Owners Manual
Page 17
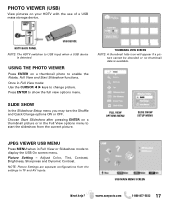
... TV and AV inputs. SLIDE SHOW In the Slideshow Setup menu you may turn the Shuffle and Quick Change options ON or OFF. USB MAIN MENU SCREEN Need help? USB DEVICE HDTV BACK PANEL NOTE: The HDTV switches to start the slideshow from the settings in Full View mode: Use the CURSOR keys to display the USB On screen menu. Adjust Color, Tint, Contrast, Brightness, Sharpness and Dynamic Contrast. THUMBNAIL VIEW SCREEN NOTE: A thumbnail hide icon will appear if a picture...
... TV and AV inputs. SLIDE SHOW In the Slideshow Setup menu you may turn the Shuffle and Quick Change options ON or OFF. USB MAIN MENU SCREEN Need help? USB DEVICE HDTV BACK PANEL NOTE: The HDTV switches to start the slideshow from the settings in Full View mode: Use the CURSOR keys to display the USB On screen menu. Adjust Color, Tint, Contrast, Brightness, Sharpness and Dynamic Contrast. THUMBNAIL VIEW SCREEN NOTE: A thumbnail hide icon will appear if a picture...
Owners Manual
Page 18
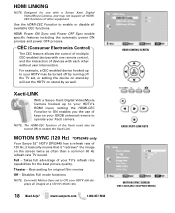
..., a CEC-enabled device hooked up to your HDTV's HDMI input, setting the HDMI-CEC Function to ON enables you the use with a Sanyo Xacti Digital VIdeo/Movie Camera, and may be turned ON to enable the Xacti-Link. Best setting for the best picture quality. www.sanyoctv.com 1-800-877-5032 HDMI LINKING SCREEN GXDB XACTI-LINK KEYS MOTION SYNC SCREEN (ONLY AVAILABLE ON DP52449 MODEL) Full - Takes full...
..., a CEC-enabled device hooked up to your HDTV's HDMI input, setting the HDMI-CEC Function to ON enables you the use with a Sanyo Xacti Digital VIdeo/Movie Camera, and may be turned ON to enable the Xacti-Link. Best setting for the best picture quality. www.sanyoctv.com 1-800-877-5032 HDMI LINKING SCREEN GXDB XACTI-LINK KEYS MOTION SYNC SCREEN (ONLY AVAILABLE ON DP52449 MODEL) Full - Takes full...
Owners Manual
Page 19
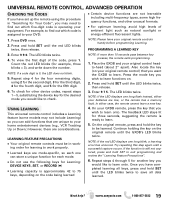
... four remaining digits, using the procedure in work properly. Need help? NOTE: Please have completed learning all data learned. Continue holding the key on your equipment. NOTE: If the red LED displays one long flash instead, either case, the remote cannot learn onto. Press and hold SET until the LED blinks twice to exit programming and review the "Learning Feature Precautions". 6. USING LEARNING This universal remote control includes a Learning...
... four remaining digits, using the procedure in work properly. Need help? NOTE: Please have completed learning all data learned. Continue holding the key on your equipment. NOTE: If the red LED displays one long flash instead, either case, the remote cannot learn onto. Press and hold SET until the LED blinks twice to exit programming and review the "Learning Feature Precautions". 6. USING LEARNING This universal remote control includes a Learning...
Owners Manual
Page 20
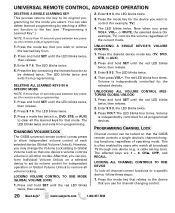
... device mode key (TV, DVD, STB, or AUX). 2. Enter 9 9 3. Press and hold SET until the LED blinks twice, then release. 2. Press the mode key that one device (e.g., a cable set its original programming for the mode you select. Press 9 7 6. Press VOL+.The LED blinks four times. The affected keys are 1 - 0, CHL, CHM, and RECALL. Enter 9 7 6. CHANGING VOLUME LOCK The GXDB universal remote control comes preset to a specific device, follow these steps: 1. UNLOCKING A SINGLE DEVICE'S VOLUME CONTROL...
... device mode key (TV, DVD, STB, or AUX). 2. Enter 9 9 3. Press and hold SET until the LED blinks twice, then release. 2. Press the mode key that one device (e.g., a cable set its original programming for the mode you select. Press 9 7 6. Press VOL+.The LED blinks four times. The affected keys are 1 - 0, CHL, CHM, and RECALL. Enter 9 7 6. CHANGING VOLUME LOCK The GXDB universal remote control comes preset to a specific device, follow these steps: 1. UNLOCKING A SINGLE DEVICE'S VOLUME CONTROL...
Owners Manual
Page 21
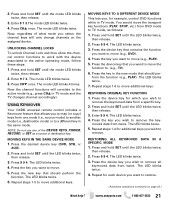
... DVD mode to TV mode, as a source or destination key. Press the key in TV mode and the TV changes channel accordingly). form the function (e.g., PLAY). Press and hold SET until the LED blinks twice, then release. 2. Press the device key you want to move (e.g., PLAY). 5. UNLOCKING CHANNEL LOCKS To unlock Channel Lock and thus allow the channel control functions to work with the device associated to remove all keymoved data from one mode (i.e., source mode) to another mode...
... DVD mode to TV mode, as a source or destination key. Press the key in TV mode and the TV changes channel accordingly). form the function (e.g., PLAY). Press and hold SET until the LED blinks twice, then release. 2. Press the device key you want to move (e.g., PLAY). 5. UNLOCKING CHANNEL LOCKS To unlock Channel Lock and thus allow the channel control functions to work with the device associated to remove all keymoved data from one mode (i.e., source mode) to another mode...
Quik 'N Easy Setup Guide
Page 1
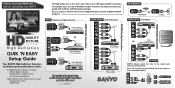
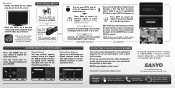
... Cable service - HDMI cable The quality of the output jack, connector, and input jack. Off-air digital antenna - HD external equipment High Definition AV connections are free digital broadcast signals available with HD programs. HDMI Optimum High Definition COMPONENT High Definition RF TERMINAL COMPOSITE Standard GOOD Quality Connections BETTER Quality Connections BEST Quality Connections QUALITY PICTURE High Definition QUIK 'N EASY Setup Guide Your SANYO High Definition Television can improve your picture quality with a HD box and HD program...
... Cable service - HDMI cable The quality of the output jack, connector, and input jack. Off-air digital antenna - HD external equipment High Definition AV connections are free digital broadcast signals available with HD programs. HDMI Optimum High Definition COMPONENT High Definition RF TERMINAL COMPOSITE Standard GOOD Quality Connections BETTER Quality Connections BEST Quality Connections QUALITY PICTURE High Definition QUIK 'N EASY Setup Guide Your SANYO High Definition Television can improve your picture quality with a HD box and HD program...
Quik 'N Easy Setup Guide
Page 2
... your HDTV's remote) NOTE: Tune to your Satellite or Cable service channels using your owner's manual. NOTE: To ensure safe operation please follow the Battery Installation precautions in case return or repair is hooked up to your preferences. Searches for digital off-air channels and adds new ones to assist you receive Satellite or Cable service through a Set Top Box (receiver), please hook it . Channel Search You may add (enable) or remove (disable) channels to...
... your HDTV's remote) NOTE: Tune to your Satellite or Cable service channels using your owner's manual. NOTE: To ensure safe operation please follow the Battery Installation precautions in case return or repair is hooked up to your preferences. Searches for digital off-air channels and adds new ones to assist you receive Satellite or Cable service through a Set Top Box (receiver), please hook it . Channel Search You may add (enable) or remove (disable) channels to...

GXDB Remote Guide
Page 1
... TV viewing. Pressing "0" key sets SLEEP the Off Timer. Displays the on -screen menu and return to activate the first of the audio output. + to open the Input List menu. Switch from one Video input source to the USB input. XACTI MENU W T Activate Xacti functions when Xacti camera connected via HDMI. Displays the Switch On Time banner. Enable / disable digital CC caption options CC1-CC6 (digital) or CC1-CC4 CAPTION (analog). ON TIMER Displays the On-screen Help menu with your HDTV. Check Battery Installation information in the menu screens...
... TV viewing. Pressing "0" key sets SLEEP the Off Timer. Displays the on -screen menu and return to activate the first of the audio output. + to open the Input List menu. Switch from one Video input source to the USB input. XACTI MENU W T Activate Xacti functions when Xacti camera connected via HDMI. Displays the Switch On Time banner. Enable / disable digital CC caption options CC1-CC6 (digital) or CC1-CC4 CAPTION (analog). ON TIMER Displays the On-screen Help menu with your HDTV. Check Battery Installation information in the menu screens...


