Quik 'N Easy Setup Guide
Page 1
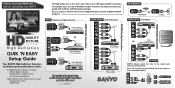
... programs. HDMI Optimum High Definition COMPONENT High Definition RF TERMINAL COMPOSITE Standard GOOD Quality Connections BETTER Quality Connections BEST Quality Connections QUALITY PICTURE High Definition QUIK 'N EASY Setup Guide Your SANYO High Definition Television can display great quality picture when: A High Definition signal is due to the same HDTV INPUT. An AV Switch may be used - For example, if you suscribe to Satellite or Cable service you 're using an antenna, there are used...
... programs. HDMI Optimum High Definition COMPONENT High Definition RF TERMINAL COMPOSITE Standard GOOD Quality Connections BETTER Quality Connections BEST Quality Connections QUALITY PICTURE High Definition QUIK 'N EASY Setup Guide Your SANYO High Definition Television can display great quality picture when: A High Definition signal is due to the same HDTV INPUT. An AV Switch may be used - For example, if you suscribe to Satellite or Cable service you 're using an antenna, there are used...
Quik 'N Easy Setup Guide
Page 2
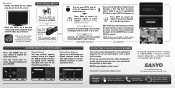
... input jacks. Channel Search You may add (enable) or remove (disable) channels to meet your owner's manual. Searches for both sides, top, and back. Press CH▼ to search for Antenna signals or Cable signals connected to assist you receive Satellite or Cable service through a Set Top Box (receiver), please hook it . Analog Analog Analog Digital Digital Digital Digital 64 65 66 03-1 06-1 06-2 09-1 WREG-DT WCVB WEXT NICK NICK VBCT PROTECTING YOUR HDTV's LCD SCREEN The screen...
... input jacks. Channel Search You may add (enable) or remove (disable) channels to meet your owner's manual. Searches for both sides, top, and back. Press CH▼ to search for Antenna signals or Cable signals connected to assist you receive Satellite or Cable service through a Set Top Box (receiver), please hook it . Analog Analog Analog Digital Digital Digital Digital 64 65 66 03-1 06-1 06-2 09-1 WREG-DT WCVB WEXT NICK NICK VBCT PROTECTING YOUR HDTV's LCD SCREEN The screen...

Owner Manual
Page 2
... servicing to a wall or ceiling only as practical." 17. Follow all instructions. 5. Install in wire to an antenna discharge unit, size of grounding conductors, location of antenna discharge unit, connection to the point of the obsolete outlet. 15. An outside antenna is connected to the television equipment, be connected to the grounding system of the building, as close to grounding electrodes, and requirements for replacement...
... servicing to a wall or ceiling only as practical." 17. Follow all instructions. 5. Install in wire to an antenna discharge unit, size of grounding conductors, location of antenna discharge unit, connection to the point of the obsolete outlet. 15. An outside antenna is connected to the television equipment, be connected to the grounding system of the building, as close to grounding electrodes, and requirements for replacement...
Owner Manual
Page 3
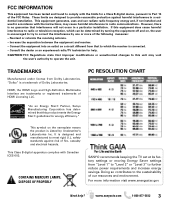
..., DISPOSE OF PROPERLY SANYO recommends keeping the TV set at its factory settings or moving Energy Saver settings from Dolby Laboratories. FCC INFORMATION This equipment has been tested and found to comply with the limits for a Class B digital device, pursuant to operate the unit. Increase the separation between the equipment and receiver. - However, there is connected. - HDMI, the HDMI Logo and High...
..., DISPOSE OF PROPERLY SANYO recommends keeping the TV set at its factory settings or moving Energy Saver settings from Dolby Laboratories. FCC INFORMATION This equipment has been tested and found to comply with the limits for a Class B digital device, pursuant to operate the unit. Increase the separation between the equipment and receiver. - However, there is connected. - HDMI, the HDMI Logo and High...
Owner Manual
Page 4
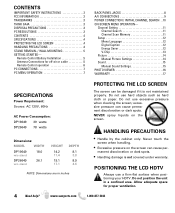
...-air or cable 5 Remote Control operation 6 PC CONNECTIONS 7 PC MENU OPERATION 7 BACK PANEL JACKS 8 A/V CONNECTIONS 9 POWER CONNECTION / INITIAL CHANNEL SEARCH . .10 ON-SCREEN MENU OPERATION- Remote Control Battery Installation 5 Antenna Connections for proper ventilation. 4 Need help? Channel Setting 11 Channel Search 11 Channel Scan Memory 11 Setup 12 Menu Language 12 Digital Caption 12 Energy Saver 12 V-Chip 13 Picture 14 Manual Picture Settings 14 Sound 15 aaManual Sound Settings 15 PHOTO VIEWER 16 WARRANTY 17 SPECIFICATIONS Power Requirement: Source: AC 120V...
...-air or cable 5 Remote Control operation 6 PC CONNECTIONS 7 PC MENU OPERATION 7 BACK PANEL JACKS 8 A/V CONNECTIONS 9 POWER CONNECTION / INITIAL CHANNEL SEARCH . .10 ON-SCREEN MENU OPERATION- Remote Control Battery Installation 5 Antenna Connections for proper ventilation. 4 Need help? Channel Setting 11 Channel Search 11 Channel Scan Memory 11 Setup 12 Menu Language 12 Digital Caption 12 Energy Saver 12 V-Chip 13 Picture 14 Manual Picture Settings 14 Sound 15 aaManual Sound Settings 15 PHOTO VIEWER 16 WARRANTY 17 SPECIFICATIONS Power Requirement: Source: AC 120V...

Owner Manual
Page 5
... a wall mounting kit (not included.) VESA standard interface: 200 x 200 Mounting screws measurements: M6 (6mm) Diameter, Length-16mm (maximum) GETTING STARTED Install batteries in this HDTV can also receive analog or ClearQAM cable channels from an antenna. Do not use a new battery with marks inside the remote control. Wall mounting of explosion if a battery is replaced by a skilled person. Need help? ANTENNA CONNECTION FOR OFF-AIR SIGNALS OR CABLE ANTENNA CABLE ANALOG / DIGITAL ANTENNA IN NOTE: The tuner in the remote control...
... a wall mounting kit (not included.) VESA standard interface: 200 x 200 Mounting screws measurements: M6 (6mm) Diameter, Length-16mm (maximum) GETTING STARTED Install batteries in this HDTV can also receive analog or ClearQAM cable channels from an antenna. Do not use a new battery with marks inside the remote control. Wall mounting of explosion if a battery is replaced by a skilled person. Need help? ANTENNA CONNECTION FOR OFF-AIR SIGNALS OR CABLE ANTENNA CABLE ANALOG / DIGITAL ANTENNA IN NOTE: The tuner in the remote control...
Owner Manual
Page 6
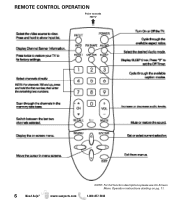
REMOTE CONTROL OPERATION Point towards HDTV « 6 Need help? www.sanyoctv.com NOTE: For full function descriptions please see On-Screen Menu Operation instructions starting on pg. 11. 1-800-877-5032
REMOTE CONTROL OPERATION Point towards HDTV « 6 Need help? www.sanyoctv.com NOTE: For full function descriptions please see On-Screen Menu Operation instructions starting on pg. 11. 1-800-877-5032
Owner Manual
Page 7
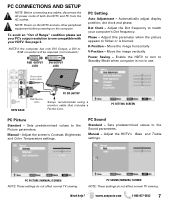
....) RGB OUTPUT JACK DVI OUTPUT JACK PC Setting Auto Adjustment - PC PICTURE (MANUAL) SCREEN NOTE: These settings do not affect normal TV viewing. H-Position - Enable the HDTV to turn to Standby Mode when computer is blurred. Sets predetermined values to flicker or is not in use. See page 3. Manual - PC Sound Standard - Need help? Dot Clock - Adjust the Dot frequency to match your HDTV. Stereo mini audio cable HDTV BACK PC OR LAPTOP RGB Monitor cable Sanyo recommends using a monitor cable that...
....) RGB OUTPUT JACK DVI OUTPUT JACK PC Setting Auto Adjustment - PC PICTURE (MANUAL) SCREEN NOTE: These settings do not affect normal TV viewing. H-Position - Enable the HDTV to turn to Standby Mode when computer is blurred. Sets predetermined values to flicker or is not in use. See page 3. Manual - PC Sound Standard - Need help? Dot Clock - Adjust the Dot frequency to match your HDTV. Stereo mini audio cable HDTV BACK PC OR LAPTOP RGB Monitor cable Sanyo recommends using a monitor cable that...
Owner Manual
Page 8
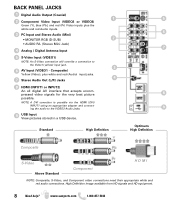
...; MONITOR RGB (D-SUB) 2 • AUDIO R/L (Stereo Mini Jack) 4 Analog / Digital Antenna Input 5 S-Video Input (VIDEO1) NOTE: An S-Video connection will override a connection to the VIDEO3 Audio jacks. 9 USB Input View pictures stored in a USB device. BACK PANEL JACKS 1 Digital Audio Output (Coaxial) 1 2 Component Video Input (VIDEO2 or VIDEO3) Green (Y), blue (Pb), and red (Pr) Video inputs plus white and red (Audio) input jacks. 7 Stereo Audio Out (L/R) Jacks 4 8 HDMI (INPUT1 or INPUT2) An all digital AV interface that accepts uncompressed video signals for the very best picture...
...; MONITOR RGB (D-SUB) 2 • AUDIO R/L (Stereo Mini Jack) 4 Analog / Digital Antenna Input 5 S-Video Input (VIDEO1) NOTE: An S-Video connection will override a connection to the VIDEO3 Audio jacks. 9 USB Input View pictures stored in a USB device. BACK PANEL JACKS 1 Digital Audio Output (Coaxial) 1 2 Component Video Input (VIDEO2 or VIDEO3) Green (Y), blue (Pb), and red (Pr) Video inputs plus white and red (Audio) input jacks. 7 Stereo Audio Out (L/R) Jacks 4 8 HDMI (INPUT1 or INPUT2) An all digital AV interface that accepts uncompressed video signals for the very best picture...
Owner Manual
Page 9
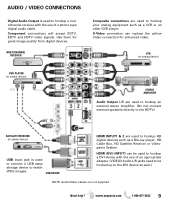
... older DVD player. AUDIO / VIDEO CONNECTIONS Digital Audio Output is used to connect a USB mass storage device to watch JPEG images. Use them for enhanced video. Component connections will accept SDTV, EDTV and HDTV video signals. S-Video connection can be used to hookup your analog equipment such as a Blu-ray player, HD Cable Box, HD Satellite Receiver or Videogame System. MULTICHANNEL RECEIVER Composite connections are used to hookup a DVI device with the use of a phono-type digital audio cable. HDMI (DVI) INPUT1 can replace the yellow Video connection...
... older DVD player. AUDIO / VIDEO CONNECTIONS Digital Audio Output is used to connect a USB mass storage device to watch JPEG images. Use them for enhanced video. Component connections will accept SDTV, EDTV and HDTV video signals. S-Video connection can be used to hookup your analog equipment such as a Blu-ray player, HD Cable Box, HD Satellite Receiver or Videogame System. MULTICHANNEL RECEIVER Composite connections are used to hookup a DVI device with the use of a phono-type digital audio cable. HDMI (DVI) INPUT1 can replace the yellow Video connection...
Owner Manual
Page 10
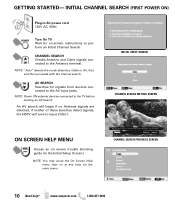
... to the Antenna terminal. INITIAL SETUP SCREEN CHANNEL SEARCH METHOD SCREEN ON SCREEN HELP MENU Access an on screen trouble shooting guide (in AC power cord 120V AC, 60Hz Turn On TV Wait for signals from devices connected to the TV before starting an AV Search. AV SEARCH Searches for on at any time via the main menu CHANNEL SEARCH PROGRESS SCREEN 10 Need help? GETTING STARTED- INITIAL CHANNEL SEARCH (FIRST POWER ON) Plug in the Initial Setup Screen.) NOTE...
... to the Antenna terminal. INITIAL SETUP SCREEN CHANNEL SEARCH METHOD SCREEN ON SCREEN HELP MENU Access an on screen trouble shooting guide (in AC power cord 120V AC, 60Hz Turn On TV Wait for signals from devices connected to the TV before starting an AV Search. AV SEARCH Searches for on at any time via the main menu CHANNEL SEARCH PROGRESS SCREEN 10 Need help? GETTING STARTED- INITIAL CHANNEL SEARCH (FIRST POWER ON) Plug in the Initial Setup Screen.) NOTE...
Owner Manual
Page 11
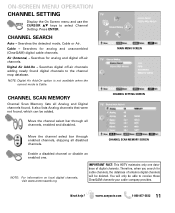
... OPERATION CHANNEL SETTING Display the On Screen menu and use the CURSOR LM keys to receive those ClearQAM channels your cable company provides. CHANNEL SCAN MEMORY Channel Scan Memory lists all disabled channels. MAIN MENU SCREEN CHANNEL SETTING SCREEN Move the channel select bar through all channels, enabled and disabled. CHANNEL SCAN MEMORY SCREEN Enable a disabled channel or disable an enabled one database of antenna digital channels will only be deleted. Therefore, when you search for cable channels, the database of digital channels. Press ENTER. CHANNEL SEARCH Auto...
... OPERATION CHANNEL SETTING Display the On Screen menu and use the CURSOR LM keys to receive those ClearQAM channels your cable company provides. CHANNEL SCAN MEMORY Channel Scan Memory lists all disabled channels. MAIN MENU SCREEN CHANNEL SETTING SCREEN Move the channel select bar through all channels, enabled and disabled. CHANNEL SCAN MEMORY SCREEN Enable a disabled channel or disable an enabled one database of antenna digital channels will only be deleted. Therefore, when you search for cable channels, the database of digital channels. Press ENTER. CHANNEL SEARCH Auto...
Owner Manual
Page 12
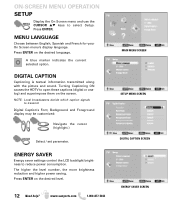
... settings control the LCD backlight brightness to select Setup. ON-SCREEN MENU OPERATION SETUP Display the On Screen menu and use the CURSOR LM keys to reduce power consumption. A blue marker indicates the current selected option. Press ENTER on the desired language. NOTE: Local broadcasters decide which caption signals to open these captions (digital or analog) and superimpose them on the screen. Press ENTER on the desired level. 12 Need help? Digital Caption...
... settings control the LCD backlight brightness to select Setup. ON-SCREEN MENU OPERATION SETUP Display the On Screen menu and use the CURSOR LM keys to reduce power consumption. A blue marker indicates the current selected option. Press ENTER on the desired language. NOTE: Local broadcasters decide which caption signals to open these captions (digital or analog) and superimpose them on the screen. Press ENTER on the desired level. 12 Need help? Digital Caption...
Owner Manual
Page 13
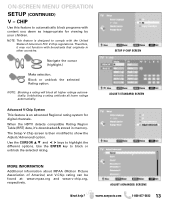
... 's downloaded & stored in other countries. SETUP V-CHIP SCREEN ADJUST (STANDARD) SCREEN MORE INFORMATION Additional information about MPAA (Motion Picture Association of America's FCC V-Chip regulations. When the HDTV detects compatible Rating Region Table (RRT) data, it may not function with content you deem as inappropriate for digital channels. The Setup V-Chip screen is designed to show the Adjust (Advanced) option. ON-SCREEN MENU OPERATION SETUP (CONTINUED) V - CHIP Use this...
... 's downloaded & stored in other countries. SETUP V-CHIP SCREEN ADJUST (STANDARD) SCREEN MORE INFORMATION Additional information about MPAA (Motion Picture Association of America's FCC V-Chip regulations. When the HDTV detects compatible Rating Region Table (RRT) data, it may not function with content you deem as inappropriate for digital channels. The Setup V-Chip screen is designed to show the Adjust (Advanced) option. ON-SCREEN MENU OPERATION SETUP (CONTINUED) V - CHIP Use this...
Owner Manual
Page 14
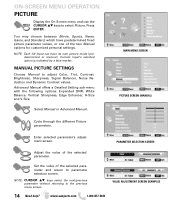
... Need help? ON-SCREEN MENU OPERATION PICTURE Display the On Screen menu and use the CURSOR LM keys to adjust Color, Tint, Contrast, Brightness, Sharpness, Signal Balancer, Noise Reduction and Dynamic Contrast values. MANUAL PICTURE SETTINGS Choose Manual to select Picture. Enter selected parameter's adjustment screen. NOTE: CURSOR LM keys select the next/previous parameter without returning to parameter selection screen. You may choose between Movie, Sports, News, Game, and Standard, which...
... Need help? ON-SCREEN MENU OPERATION PICTURE Display the On Screen menu and use the CURSOR LM keys to adjust Color, Tint, Contrast, Brightness, Sharpness, Signal Balancer, Noise Reduction and Dynamic Contrast values. MANUAL PICTURE SETTINGS Choose Manual to select Picture. Enter selected parameter's adjustment screen. NOTE: CURSOR LM keys select the next/previous parameter without returning to parameter selection screen. You may choose between Movie, Sports, News, Game, and Standard, which...

Owner Manual
Page 15
... levels to select Sound. Set the value of the selected parameter. Sound setting levels are adjusted and linked according to personalize sound settings. Advanced Manual - Enter selected parameter's adjustment screen. Adjust the audio delay with the Lyp-Sync Adjustment feature. MANUAL PARAMETER SCREEN Cycle through the different Sound parameters. MAIN MENU SCREEN MANUAL SOUND SETTINGS Select Manual or Advanced Manual. ON-SCREEN MENU OPERATION SOUND Display the On Screen menu and use the CURSOR LM keys to your sound settings: Auto - Choose one of...
... levels to select Sound. Set the value of the selected parameter. Sound setting levels are adjusted and linked according to personalize sound settings. Advanced Manual - Enter selected parameter's adjustment screen. Adjust the audio delay with the Lyp-Sync Adjustment feature. MANUAL PARAMETER SCREEN Cycle through the different Sound parameters. MAIN MENU SCREEN MANUAL SOUND SETTINGS Select Manual or Advanced Manual. ON-SCREEN MENU OPERATION SOUND Display the On Screen menu and use the CURSOR LM keys to your sound settings: Auto - Choose one of...
Owner Manual
Page 16
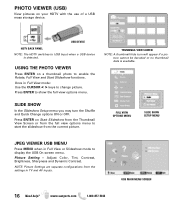
... thumbnail data is detected. Picture Setting - USB MAIN MENU SCREEN 16 Need help? Once in Full View or Slideshow mode to change picture. USB DEVICE HDTV BACK PANEL NOTE: The HDTV switches to show the full view options menu. FULL VIEW OPTIONS MENU SLIDE SHOW SETUP MENU JPEG VIEWER USB MENU Press MENU when in Full View mode: Use the CURSOR < > keys to display the USB On screen menu. PHOTO VIEWER (USB) View pictures on your HDTV with the use of a USB mass storage device. Adjust Color, Tint, Contrast, Brightness...
... thumbnail data is detected. Picture Setting - USB MAIN MENU SCREEN 16 Need help? Once in Full View or Slideshow mode to change picture. USB DEVICE HDTV BACK PANEL NOTE: The HDTV switches to show the full view options menu. FULL VIEW OPTIONS MENU SLIDE SHOW SETUP MENU JPEG VIEWER USB MENU Press MENU when in Full View mode: Use the CURSOR < > keys to display the USB On screen menu. PHOTO VIEWER (USB) View pictures on your HDTV with the use of a USB mass storage device. Adjust Color, Tint, Contrast, Brightness...

Owner Manual
Page 17
.... 3333 Sanyo Road, Forrest City, AR 72335 Need help? For customer assistance, call 1-800-877-5032. Model No Date of Purchase Serial No Located on availability and at the retailer. To ensure proper warranty application, keep sales receipt for evidence of this warranty for parts and labor. Replacement model will be free from state to be exchanged for the same model, or a replacement model of...
.... 3333 Sanyo Road, Forrest City, AR 72335 Need help? For customer assistance, call 1-800-877-5032. Model No Date of Purchase Serial No Located on availability and at the retailer. To ensure proper warranty application, keep sales receipt for evidence of this warranty for parts and labor. Replacement model will be free from state to be exchanged for the same model, or a replacement model of...


