Owners Manual
Page 4
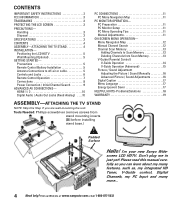
screen LCD HDTV. Positioning the LCD HDTV 5 Wall Mounting (Optional 5 GETTING STARTED- I'm your new Sanyo Wide- HDMI 1 / 2 10 Digital Audio / Audio Out Jacks (Fixed Analog) . . . .10 PC CONNECTIONS 11 PC Menu Navigation Map 11 PC MONITOR OPERATION- Tools Needed: ... ADVANCED AV CONNECTIONS- PC Preparation 11 PC Monitor Setup 11 PC Menu Operating Tips 11 Manual Adjustments 11 ON-SCREEN MENU OPERATION- Handling 3 Disposal 3 SPECIFICATIONS 3 CONTENTS 4 ASSEMBLY-ATTACHING THE TV STAND 4 INSTALLATION- Precautions 5 Remote Control Battery Installation 5 Antenna ...
screen LCD HDTV. Positioning the LCD HDTV 5 Wall Mounting (Optional 5 GETTING STARTED- I'm your new Sanyo Wide- HDMI 1 / 2 10 Digital Audio / Audio Out Jacks (Fixed Analog) . . . .10 PC CONNECTIONS 11 PC Menu Navigation Map 11 PC MONITOR OPERATION- Tools Needed: ... ADVANCED AV CONNECTIONS- PC Preparation 11 PC Monitor Setup 11 PC Menu Operating Tips 11 Manual Adjustments 11 ON-SCREEN MENU OPERATION- Handling 3 Disposal 3 SPECIFICATIONS 3 CONTENTS 4 ASSEMBLY-ATTACHING THE TV STAND 4 INSTALLATION- Precautions 5 Remote Control Battery Installation 5 Antenna ...
Owners Manual
Page 5
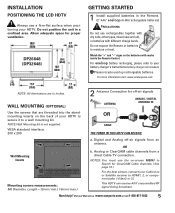
...ventilation. Match the "+" and "-" signs on -screen MENU to Search for off -air signals from a direct Cable TV connection. NOTE:Wall Mounting kit is not supplied. OR b. Analog or ClearQAM cable channels from an antenna. DP26648 (DP32648) GETTING STARTED 1 Install supplied batteries in ...the Remote. (2 "AAA" eneloop Ni-MH rechargeable batteries) PRECAUTIONS Do not use rechargeables together with dry cells, other types, mixed new and old, or batteries with marks inside the Remote Control. INSTALLATION POSITIONING THE LCD...
...ventilation. Match the "+" and "-" signs on -screen MENU to Search for off -air signals from a direct Cable TV connection. NOTE:Wall Mounting kit is not supplied. OR b. Analog or ClearQAM cable channels from an antenna. DP26648 (DP32648) GETTING STARTED 1 Install supplied batteries in ...the Remote. (2 "AAA" eneloop Ni-MH rechargeable batteries) PRECAUTIONS Do not use rechargeables together with dry cells, other types, mixed new and old, or batteries with marks inside the Remote Control. INSTALLATION POSITIONING THE LCD...
Owners Manual
Page 7
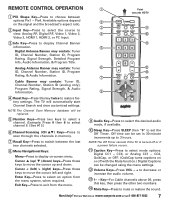
...30-minute increments up and down. Exit Key-Press to exit from the menu system, when required. Off time can be changed using the menu settings. 12 Volume Keys-Press VOL - + to decrease or increase the audio volume. 13 1- - The TV will be set the Off Timer. Cursor < (left and right. ...NOTE:The Off Timer cancels if the TV is turned off or if a power failure occurs....
...30-minute increments up and down. Exit Key-Press to exit from the menu system, when required. Off time can be changed using the menu settings. 12 Volume Keys-Press VOL - + to decrease or increase the audio volume. 13 1- - The TV will be set the Off Timer. Cursor < (left and right. ...NOTE:The Off Timer cancels if the TV is turned off or if a power failure occurs....
Owners Manual
Page 11
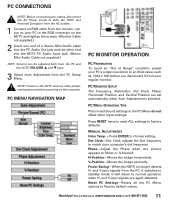
...not supplied.) HINT: Volume can be adjusted both from the PC and the HDTV VOLUME L and M keys. 3 Select Auto Adjustment from the PC Setup Menu. and V-sync signals from the PC, it from your PC's output resolution to an XGA value, such as, 1024 x 768, before powering on ...Dot Clock, Phase, Horizontal Position, and Vertical Position are again detected. It will return to Factory default values. Reset PC Settings-Resets all the PC Menu options to normal operation when H- Power Saving-When the HDTV no longer detects H- and V-sync signals are set automatically when Auto Adjustment is blurred....
...not supplied.) HINT: Volume can be adjusted both from the PC and the HDTV VOLUME L and M keys. 3 Select Auto Adjustment from the PC Setup Menu. and V-sync signals from the PC, it from your PC's output resolution to an XGA value, such as, 1024 x 768, before powering on ...Dot Clock, Phase, Horizontal Position, and Vertical Position are again detected. It will return to Factory default values. Reset PC Settings-Resets all the PC Menu options to normal operation when H- Power Saving-When the HDTV no longer detects H- and V-sync signals are set automatically when Auto Adjustment is blurred....
Owners Manual
Page 12
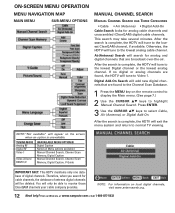
...search is unavailable. After the search is complete, the HDTV will tune to normal TV viewing. After the search is complete, the HDTV will only be deleted. You will exit the menu system and return to the lowest Digital channel or the lowest analog channel. This...) digital cable channels. Otherwise, the HDTV will be able to the lowest ClearQAM channel, if available. ON-SCREEN MENU OPERATION MENU NAVIGATION MAP MANUAL CHANNEL SEARCH MAIN MENU SUB-MENU OPTIONS MANUAL CHANNEL SEARCH HAS THREE CATEGORIES • Cable • Air (Antenna) • Digital Add-On Cable...
...search is unavailable. After the search is complete, the HDTV will tune to normal TV viewing. After the search is complete, the HDTV will only be deleted. You will exit the menu system and return to the lowest Digital channel or the lowest analog channel. This...) digital cable channels. Otherwise, the HDTV will be able to the lowest ClearQAM channel, if available. ON-SCREEN MENU OPERATION MENU NAVIGATION MAP MANUAL CHANNEL SEARCH MAIN MENU SUB-MENU OPTIONS MANUAL CHANNEL SEARCH HAS THREE CATEGORIES • Cable • Air (Antenna) • Digital Add-On Cable...
Owners Manual
Page 13
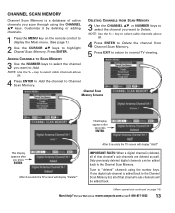
...seconds the TV screen will display "Delete?" This Display appears after you press ENTER. Tune to the Channel Scan Memory list, all of that channel's sub-channels will be added back to the Channel Scan Memory. NOTE: Use the 1- - Only previously deleted digital channels can be added back. (Menu operations .... Visit our Web site at www.sanyoctv.com or Call 1-800-877-5032 13 Customize it by deleting or adding channels. 1 Press the MENU key on page 14.) Need help? DELETING CHANNELS FROM SCAN MEMORY 3 Use the CHANNEL LM or NUMBER keys to select the channel you want...
...seconds the TV screen will display "Delete?" This Display appears after you press ENTER. Tune to the Channel Scan Memory list, all of that channel's sub-channels will be added back to the Channel Scan Memory. NOTE: Use the 1- - Only previously deleted digital channels can be added back. (Menu operations .... Visit our Web site at www.sanyoctv.com or Call 1-800-877-5032 13 Customize it by deleting or adding channels. 1 Press the MENU key on page 14.) Need help? DELETING CHANNELS FROM SCAN MEMORY 3 Use the CHANNEL LM or NUMBER keys to select the channel you want...
Owners Manual
Page 14
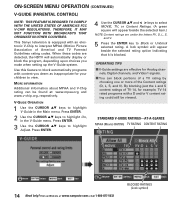
... block the program, depending upon choices you deem as inappropriate for your children to interpret MPAA (Motion Picture Association of America) and TV Parental Guidelines rating codes. Visit our Web site at : www.mpaa.org and www.v-chip.org, respectively. A lock symbol will...NOTE: THIS FEATURE IS DESIGNED TO COMPLY WITH THE UNITED STATES OF AMERICA'S FCC V-CHIP REGULATIONS. This Sanyo television is blocked. Press ENTER. 3 Use the CURSOR LM keys to highlight On, in the Main menu. nels, Digital channels, and Video1 signals. I V-Guide settings are under the letters FV, D, L, ...
... block the program, depending upon choices you deem as inappropriate for your children to interpret MPAA (Motion Picture Association of America) and TV Parental Guidelines rating codes. Visit our Web site at : www.mpaa.org and www.v-chip.org, respectively. A lock symbol will...NOTE: THIS FEATURE IS DESIGNED TO COMPLY WITH THE UNITED STATES OF AMERICA'S FCC V-CHIP REGULATIONS. This Sanyo television is blocked. Press ENTER. 3 Use the CURSOR LM keys to highlight On, in the Main menu. nels, Digital channels, and Video1 signals. I V-Guide settings are under the letters FV, D, L, ...
Owners Manual
Page 15
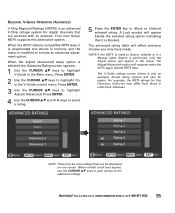
...again detects RRT5 data. For example, the RRT5 ratings for digital channels that it is downloaded and stored in the V-Guide control menu. Your new Sanyo HDTV supports this alternative system. Press ENTER. 3 Use the CURSOR LM keys to Block or Unblock selected rating. When the Adjust...keys to the additional ratings. When vertical scroll bars appear, use the CURSOR LM keys to gain access to highlight V-Guide in the Main menu. REGIONAL V-GUIDE OPERATION (ADVANCED) V-Chip Regional Ratings 5 (RRT5) is an advanced V-Chip ratings system for San Francisco, California may ...
...again detects RRT5 data. For example, the RRT5 ratings for digital channels that it is downloaded and stored in the V-Guide control menu. Your new Sanyo HDTV supports this alternative system. Press ENTER. 3 Use the CURSOR LM keys to Block or Unblock selected rating. When the Adjust...keys to the additional ratings. When vertical scroll bars appear, use the CURSOR LM keys to gain access to highlight V-Guide in the Main menu. REGIONAL V-GUIDE OPERATION (ADVANCED) V-Chip Regional Ratings 5 (RRT5) is an advanced V-Chip ratings system for San Francisco, California may ...
Owners Manual
Page 16
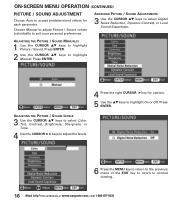
...ENTER. 2 Use the CURSOR LM keys to highlight On or Off. Press ENTER. 4 Press the right CURSOR > key for each parameter. ON-SCREEN MENU OPERATION (CONTINUED) PICTURE / SOUND ADJUSTMENT Choose Auto to normal viewing. 16 Need help? ADJUSTING THE PICTURE / SOUND LEVELS 3 Use the CURSOR LM keys... Color, Tint, Contrast, Brightness, Sharpness, or Tone. 4 Use the CURSOR < > keys to adjust the levels. 6 Press the MENU key to return to the previous menu or the EXIT key to return to accept predetermined values for options. 5 Use the LM keys to highlight Manual. ADVANCED PICTURE / SOUND...
...ENTER. 2 Use the CURSOR LM keys to highlight On or Off. Press ENTER. 4 Press the right CURSOR > key for each parameter. ON-SCREEN MENU OPERATION (CONTINUED) PICTURE / SOUND ADJUSTMENT Choose Auto to normal viewing. 16 Need help? ADJUSTING THE PICTURE / SOUND LEVELS 3 Use the CURSOR LM keys... Color, Tint, Contrast, Brightness, Sharpness, or Tone. 4 Use the CURSOR < > keys to adjust the levels. 6 Press the MENU key to return to the previous menu or the EXIT key to return to accept predetermined values for options. 5 Use the LM keys to highlight Manual. ADVANCED PICTURE / SOUND...
Owners Manual
Page 17
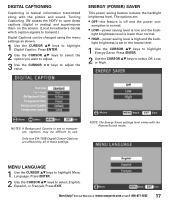
...lower than normal. • HIGH-power saving level is low and the back- light brightness is set to transparent, captions may be changed using the menu settings as shown. 1 Use the CURSOR LM keys to open these settings. NOTE: The Energy Saver settings level varies with the picture and sound. DIGITAL... sumption is normal. • LOW-power saving level is high and the back- Press EXIT. Turning Captioning ON causes the HDTV to highlight Digital Caption. MENU LANGUAGE 1 Use the CURSOR LM keys to select Off, Low, or High. Press ENTER. 2 Use the CURSOR LM keys to highlight...
...lower than normal. • HIGH-power saving level is low and the back- light brightness is set to transparent, captions may be changed using the menu settings as shown. 1 Use the CURSOR LM keys to open these settings. NOTE: The Energy Saver settings level varies with the picture and sound. DIGITAL... sumption is normal. • LOW-power saving level is high and the back- Press EXIT. Turning Captioning ON causes the HDTV to highlight Digital Caption. MENU LANGUAGE 1 Use the CURSOR LM keys to select Off, Low, or High. Press ENTER. 2 Use the CURSOR LM keys to highlight...
Service Manual
Page 1
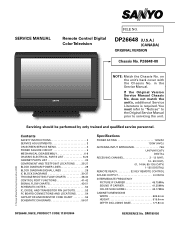
...Original Version Service Manual Chassis No. P26648-00 NOTE: Match the Chassis No. Contents SAFETY INSTRUCTIONS 2 SERVICE ADJUSTMENTS 3 ON-SCREEN SERVICE MENU 4 POWER FAILURE CIRCUIT 5 MECHANICAL DISASSEMBLY 6-8 CHASSIS ELECTRICAL PARTS LIST 9-23 CABINET PARTS LIST 24 COMPONENT AND TESTPOINT LOCATIONS . . ... CARRIEr 42.17MHz CABINET DIMENSIONS WIDTH 665.5mm HEIGHT 515.6mm DEPTH INCLUDING BASE 177.8mm © Sanyo Manufacturing Corporation 2008 DP26648, N6CE, PRODUCT CODE 113013904 REFERENCE No. Servicing should be performed by only trained and qualified service personnel...
...Original Version Service Manual Chassis No. P26648-00 NOTE: Match the Chassis No. Contents SAFETY INSTRUCTIONS 2 SERVICE ADJUSTMENTS 3 ON-SCREEN SERVICE MENU 4 POWER FAILURE CIRCUIT 5 MECHANICAL DISASSEMBLY 6-8 CHASSIS ELECTRICAL PARTS LIST 9-23 CABINET PARTS LIST 24 COMPONENT AND TESTPOINT LOCATIONS . . ... CARRIEr 42.17MHz CABINET DIMENSIONS WIDTH 665.5mm HEIGHT 515.6mm DEPTH INCLUDING BASE 177.8mm © Sanyo Manufacturing Corporation 2008 DP26648, N6CE, PRODUCT CODE 113013904 REFERENCE No. Servicing should be performed by only trained and qualified service personnel...
Service Manual
Page 3
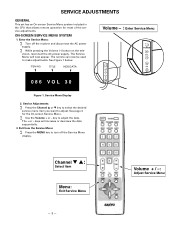
...the Volume (-) button on the tele- Channel M L: Select Item Menu: Exit Service Menu - 3 - Enter the Service Menu: ∑ Turn off the Service Menu display. ITEM NO. Exit from the Service Menu: ∑ Press the MENU key to adjust the data. SERVICE ADJUSTMENTS GENERAL This set has an ...adjustments. keys will now appear. The + or - The Service Menu will increase or decrease the data sequentially. 3. See Figure 1 below. Volume + / -: Adjust Service Menu vision, reconnect the AC power supply. ON-SCREEN SERVICE MENU SYSTEM 1. The remote can now be used to adjust. TITLE ...
...the Volume (-) button on the tele- Channel M L: Select Item Menu: Exit Service Menu - 3 - Enter the Service Menu: ∑ Turn off the Service Menu display. ITEM NO. Exit from the Service Menu: ∑ Press the MENU key to adjust the data. SERVICE ADJUSTMENTS GENERAL This set has an ...adjustments. keys will now appear. The + or - The Service Menu will increase or decrease the data sequentially. 3. See Figure 1 below. Volume + / -: Adjust Service Menu vision, reconnect the AC power supply. ON-SCREEN SERVICE MENU SYSTEM 1. The remote can now be used to adjust. TITLE ...

Service Manual
Page 4
No. PROGRAM CODES The microprossesor used in gray box area is fixed. If this program code is wrong the TV will not operate properly. Note 2. Option Data 2 (NO. 088 OP2) should be set according to confirm they are the same as below. Do not change... for correct operating. • Data in this program code is wrong the TV will not operate properly. -4- To ensure proper operation and the correct features for On-Screen Service Menu access and adjustments. See 087 above . Option Data 1 (NO. 087 OP1) should be correct. If this model...
No. PROGRAM CODES The microprossesor used in gray box area is fixed. If this program code is wrong the TV will not operate properly. Note 2. Option Data 2 (NO. 088 OP2) should be set according to confirm they are the same as below. Do not change... for correct operating. • Data in this program code is wrong the TV will not operate properly. -4- To ensure proper operation and the correct features for On-Screen Service Menu access and adjustments. See 087 above . Option Data 1 (NO. 087 OP1) should be correct. If this model...


