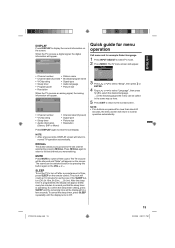
Quik 'N Easy Setup Guide
Page 1
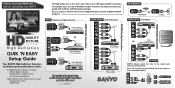
... or Cable service - Part No. 1JC6P1P0338-- See reverse side for your picture quality with HD programs. HDMI Optimum High Definition COMPONENT High Definition RF TERMINAL COMPOSITE Standard GOOD Quality Connections BETTER Quality Connections BEST Quality Connections QUALITY PICTURE High Definition QUIK 'N EASY Setup Guide Your SANYO High Definition Television can improve your HDTV's initial setup! S-VIDEO NOTES: Always match the color of the signal being received and correct HD connections make the difference! Component cables...
... or Cable service - Part No. 1JC6P1P0338-- See reverse side for your picture quality with HD programs. HDMI Optimum High Definition COMPONENT High Definition RF TERMINAL COMPOSITE Standard GOOD Quality Connections BETTER Quality Connections BEST Quality Connections QUALITY PICTURE High Definition QUIK 'N EASY Setup Guide Your SANYO High Definition Television can improve your HDTV's initial setup! S-VIDEO NOTES: Always match the color of the signal being received and correct HD connections make the difference! Component cables...
Quik 'N Easy Setup Guide
Page 2
... remote control. HDMI, the HDMI Logo and High-Definition Multimedia Interface are trademarks or registered trademarks of our Service associates will be damaged if it up to it. Press CH▼ to search for signals from the Input List (hold INPUT key on your receiver and its remote. Analog 0 Digital 0 ADMINISTRATING YOUR CHANNELS Press the MENU key on your HDTV's remote) NOTE: Tune to your Satellite or Cable service channels using...
... remote control. HDMI, the HDMI Logo and High-Definition Multimedia Interface are trademarks or registered trademarks of our Service associates will be damaged if it up to it. Press CH▼ to search for signals from the Input List (hold INPUT key on your receiver and its remote. Analog 0 Digital 0 ADMINISTRATING YOUR CHANNELS Press the MENU key on your HDTV's remote) NOTE: Tune to your Satellite or Cable service channels using...

Owners manual
Page 4
... THIS PRODUCT AT TIMES. Record the model number and serial number. REFER SERVICING TO QUALIFIED SERVICE PERSONNEL. NO USER-SERVICEABLE PARTS INSIDE. If this equipment. Connect the equipment into an outlet on the rear of electric shock. Consult the dealer or an experienced radio/TV technician for a Class B digital device, pursuant to provide reasonable protection against harmful interference in a particular installation. Changes or modifications not...
... THIS PRODUCT AT TIMES. Record the model number and serial number. REFER SERVICING TO QUALIFIED SERVICE PERSONNEL. NO USER-SERVICEABLE PARTS INSIDE. If this equipment. Connect the equipment into an outlet on the rear of electric shock. Consult the dealer or an experienced radio/TV technician for a Class B digital device, pursuant to provide reasonable protection against harmful interference in a particular installation. Changes or modifications not...
Owners manual
Page 5
... be fatal. 17) Do not overload wall outlets and extension cords, as they may touch dangerous voltage points or short out parts that could result in wire to an antenna discharge unit, size of grounding conductors, location of NEC-NATIONAL ELECTRICAL CODE S2898A POWER SERVICE GROUNDING ELECTRODE SYSTEM (NEC ART 250, PART H) antenna discharge unit, connection to grounding electrodes, and requirements for...
... be fatal. 17) Do not overload wall outlets and extension cords, as they may touch dangerous voltage points or short out parts that could result in wire to an antenna discharge unit, size of grounding conductors, location of NEC-NATIONAL ELECTRICAL CODE S2898A POWER SERVICE GROUNDING ELECTRODE SYSTEM (NEC ART 250, PART H) antenna discharge unit, connection to grounding electrodes, and requirements for...
Owners manual
Page 6
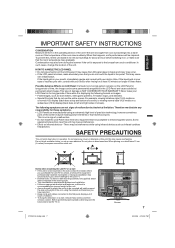
... follow the instructions when making home entertainment enjoyable and safe. Read the owner's manual of the other hazards. 21) Upon completion of time. WALL MOUNTING: IF YOU DECIDE TO WALL MOUNT YOUR FLAT PANEL DISPLAY, ALWAYS: Use a mount that has been recommended by the display manufacturer and/or listed by the display and wall mount manufacturers. Don't place flat panel displays on the proper stands or installed according to making any service or repairs to...
... follow the instructions when making home entertainment enjoyable and safe. Read the owner's manual of the other hazards. 21) Upon completion of time. WALL MOUNTING: IF YOU DECIDE TO WALL MOUNT YOUR FLAT PANEL DISPLAY, ALWAYS: Use a mount that has been recommended by the display manufacturer and/or listed by the display and wall mount manufacturers. Don't place flat panel displays on the proper stands or installed according to making any service or repairs to...
Owners manual
Page 7
... and bottom of damage is not a sign of the screen may be missing picture elements or have the equipment professionally installed. Possible Adverse Effects on LCD Panel: If a fixed (non-moving) pattern remains on for these screws and then remove a stand. Therefore we disclaim any covers or blankets on . 37I0521A_EnSp.indb 7 Bracket holes Screws 7 3/24/09 4:19:54 PM There may cause...
... and bottom of damage is not a sign of the screen may be missing picture elements or have the equipment professionally installed. Possible Adverse Effects on LCD Panel: If a fixed (non-moving) pattern remains on for these screws and then remove a stand. Therefore we disclaim any covers or blankets on . 37I0521A_EnSp.indb 7 Bracket holes Screws 7 3/24/09 4:19:54 PM There may cause...
Owners manual
Page 9
...:57 PM When a component with high quality picture. • On-Screen 3 Language Display - The component video in jacks and S-video in Dolby Digital decoder is connected, Dolby Digital sound can be programmed for hearing impaired viewers. • Picture Adjustments Using The Remote Control - Connect the AC cord into this unit. • Video Input Jacks - THIS MAY CAUSE ELECTRICAL SHOCK. • IF YOU NEED TO REPLACE THE SUPPLIED AC ADAPTER OR AC CORD, THE SPECIFIED ONE IS...
...:57 PM When a component with high quality picture. • On-Screen 3 Language Display - The component video in jacks and S-video in Dolby Digital decoder is connected, Dolby Digital sound can be programmed for hearing impaired viewers. • Picture Adjustments Using The Remote Control - Connect the AC cord into this unit. • Video Input Jacks - THIS MAY CAUSE ELECTRICAL SHOCK. • IF YOU NEED TO REPLACE THE SUPPLIED AC ADAPTER OR AC CORD, THE SPECIFIED ONE IS...
Owners manual
Page 10
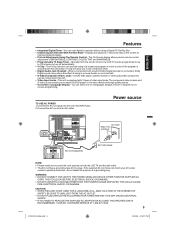
... stand 8 How to remove the stand 8 Features 9 Power source 9 Contents 10 Parts and functions 11 Remote control 12 Antenna connections 13 Cable TV connections 14 Connections to other equipment 15 TV operation Starting setup 18 TV operation 18 Quick guide for menu operation 19 Convenience functions 20 Memorizing channels 21 Checking the digital-signal strength 22 Labeling channels 22 Labeling video inputs 22 Setting the V-Chip 23 Closed Caption 24 CC advanced 24 Setting the picture size 25 Additional information Reception disturbances 26 Troubleshooting 27 Specifications...
... stand 8 How to remove the stand 8 Features 9 Power source 9 Contents 10 Parts and functions 11 Remote control 12 Antenna connections 13 Cable TV connections 14 Connections to other equipment 15 TV operation Starting setup 18 TV operation 18 Quick guide for menu operation 19 Convenience functions 20 Memorizing channels 21 Checking the digital-signal strength 22 Labeling channels 22 Labeling video inputs 22 Setting the V-Chip 23 Closed Caption 24 CC advanced 24 Setting the picture size 25 Additional information Reception disturbances 26 Troubleshooting 27 Specifications...
Owners manual
Page 12
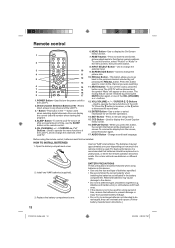
... to display the Closed Caption menu screen. 16.DISPLAY Button - Open the battery compartment cover. SLEEP Button - Use to their factory preset positions. The batteries may cause damage to operate the menu functions of time, use this function, select "Picture" or "Audio" in this button again to return to turn off the sound, press this button. 8.INPUT SELECT Button - Remote control 1 2 3 10 4 11 5 12 13 6 14 7 15 8 16 9 17 1.POWER Button - Press to reset the On-Screen picture adjustments to change the external input. 9.SCREEN SIZE Button -
... to display the Closed Caption menu screen. 16.DISPLAY Button - Open the battery compartment cover. SLEEP Button - Use to their factory preset positions. The batteries may cause damage to operate the menu functions of time, use this function, select "Picture" or "Audio" in this button again to return to turn off the sound, press this button. 8.INPUT SELECT Button - Remote control 1 2 3 10 4 11 5 12 13 6 14 7 15 8 16 9 17 1.POWER Button - Press to reset the On-Screen picture adjustments to change the external input. 9.SCREEN SIZE Button -
Owners manual
Page 14
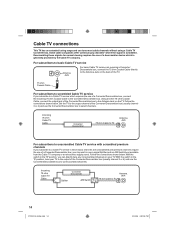
.... Set the TV to the output channel of the Converter/Descrambler box (usually channel 3 or 4) and use the Converter/Descrambler box to use a signal Splitter and an A/B Switch box (available from the Cable TV company or an electronics supply store). Incoming 75 ohm Cable TV Cable Converter/ Descrambler 75 ohm Cable to TV Antenna Jack For subscribers to unscrambled Cable TV service with scrambled premium channels If you subscribe to a Cable...
.... Set the TV to the output channel of the Converter/Descrambler box (usually channel 3 or 4) and use the Converter/Descrambler box to use a signal Splitter and an A/B Switch box (available from the Cable TV company or an electronics supply store). Incoming 75 ohm Cable TV Cable Converter/ Descrambler 75 ohm Cable to TV Antenna Jack For subscribers to unscrambled Cable TV service with scrambled premium channels If you subscribe to a Cable...
Owners manual
Page 15
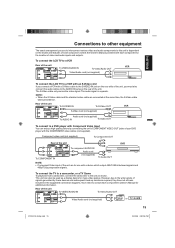
... the model and features of each component. Check the Owner's Manual provided with a device which output 480i/1080i interlaced signals and 480p/720p progressive signals. Component video cord (not supplied) To Component OUT Y Rear of the unit Pb Pr To component AUDIO IN Audio cord To COMPONENT IN (not supplied) To Audio OUT DVD NOTE: • Component Video input of the unit are connected at the same time, the S-Video cable takes precedence. To connect the LCD TV to a VCR Rear of...
... the model and features of each component. Check the Owner's Manual provided with a device which output 480i/1080i interlaced signals and 480p/720p progressive signals. Component video cord (not supplied) To Component OUT Y Rear of the unit Pb Pr To component AUDIO IN Audio cord To COMPONENT IN (not supplied) To Audio OUT DVD NOTE: • Component Video input of the unit are connected at the same time, the S-Video cable takes precedence. To connect the LCD TV to a VCR Rear of...

Owners manual
Page 16
... analog audio cords required. to -DVI adapter cable, it transfers only video signal. To receive the picture you must select the corresponding audio input source (HDMI or DVI) on the external component. DVI adapter cable (HDMI type A connector) (not supplied) Audio cord (not supplied) DVI device To DVI output NOTE: • When using HDMI to connect your HDMI or DVI devices, you must change the output resolution on the menu screen (see the image with no sound output if connected to the unit The HDMI input receives digital audio and uncompressed video...
... analog audio cords required. to -DVI adapter cable, it transfers only video signal. To receive the picture you must select the corresponding audio input source (HDMI or DVI) on the external component. DVI adapter cable (HDMI type A connector) (not supplied) Audio cord (not supplied) DVI device To DVI output NOTE: • When using HDMI to connect your HDMI or DVI devices, you must change the output resolution on the menu screen (see the image with no sound output if connected to the unit The HDMI input receives digital audio and uncompressed video...

Owners manual
Page 18
... analog channel or a digital channel. The volume level will be displayed on the screen. As the volume level increases, so do not have not subscribed, "Digital channel is encrypted" will be available on either format. • If a channel is made! 1 To turn on the TV, press POWER. (POWER indicator on the front of the unit changes green. If the volume decreases, the number of blue bars also decreases. 3 Set the Signal Type...
... analog channel or a digital channel. The volume level will be displayed on the screen. As the volume level increases, so do not have not subscribed, "Digital channel is encrypted" will be available on either format. • If a channel is made! 1 To turn on the TV, press POWER. (POWER indicator on the front of the unit changes green. If the volume decreases, the number of blue bars also decreases. 3 Set the Signal Type...
Owners manual
Page 19
... Program Information is operating. The sound can be switched back on the following pages the menu can be displayed for each press of time, press SLEEP on the remote control. When the TV receives a digital signal, the digital information will appear. 14 Analog Cable Sleep Timer Off Mono Full 480i • Channel number • V-Chip rating • Sleep timer • Audio information (Stereo, SAP or Mono) • Channel label (if preset) • Signal type • Picture size • Resolution...
... Program Information is operating. The sound can be switched back on the following pages the menu can be displayed for each press of time, press SLEEP on the remote control. When the TV receives a digital signal, the digital information will appear. 14 Analog Cable Sleep Timer Off Mono Full 480i • Channel number • V-Chip rating • Sleep timer • Audio information (Stereo, SAP or Mono) • Channel label (if preset) • Signal type • Picture size • Resolution...

Owners manual
Page 20
... Signal Auto Ch Memory Ch Label Closed Caption Language Video Label Auto Shut Off*1 On/Off Reset Setup hint You can choose from the DVD player connected with analog audio cords, select this setting. The multi-channel TV sound (MTS) feature provides high-fidelity stereo sound. MTS also can transmit a second audio program (SAP) containing a second language or other menu options. Bright and dynamic picture (factory-set) Standard picture quality (factory-set) Movie-like picture setting (factory-set) Your personal preferences (set...
... Signal Auto Ch Memory Ch Label Closed Caption Language Video Label Auto Shut Off*1 On/Off Reset Setup hint You can choose from the DVD player connected with analog audio cords, select this setting. The multi-channel TV sound (MTS) feature provides high-fidelity stereo sound. MTS also can transmit a second audio program (SAP) containing a second language or other menu options. Bright and dynamic picture (factory-set) Standard picture quality (factory-set) Movie-like picture setting (factory-set) Your personal preferences (set...
Owners manual
Page 21
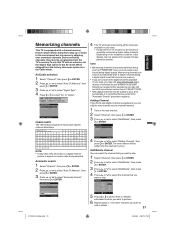
... factory, this TV with a channel memory feature which allows channels to skip up or down to the next channel set into memory, skipping over unwanted channels. To use this menu option is in the new channel. 2 Select "Channel",...digital signal to set that you may call our toll-free customer service line at 1-800-877-5032. • New digital channels may visit www.antennaweb.org to receive a list based on screen after being selected. VHF/UHF channels Cable - Add/Delete CH 2 3 3-001 3-002 4 Signal Analog Analog Digital Digital Analog Add Add Delete Add Delete : Select : Adjust...
... factory, this TV with a channel memory feature which allows channels to skip up or down to the next channel set into memory, skipping over unwanted channels. To use this menu option is in the new channel. 2 Select "Channel",...digital signal to set that you may call our toll-free customer service line at 1-800-877-5032. • New digital channels may visit www.antennaweb.org to receive a list based on screen after being selected. VHF/UHF channels Cable - Add/Delete CH 2 3 3-001 3-002 4 Signal Analog Analog Digital Digital Analog Add Add Delete Add Delete : Select : Adjust...

Owners manual
Page 22
...; Signal meter feature is not available for other channel.You can choose any four characters to select "Ch Label", then press or ENTER. VCR DVD DTV SAT CBL HD : Adjust : Uses the default label name : Video cassette recorder : DVD video : Digital TV set-top box : Satellite box : Cable box : HDMI device (only for HDMI inputs) 37I0521A_EnSp.indb 22 3/24/09 4:20:21 PM Labeling channels Channel label appear with the channel number display...
...; Signal meter feature is not available for other channel.You can choose any four characters to select "Ch Label", then press or ENTER. VCR DVD DTV SAT CBL HD : Adjust : Uses the default label name : Video cassette recorder : DVD video : Digital TV set-top box : Satellite box : Cable box : HDMI device (only for HDMI inputs) 37I0521A_EnSp.indb 22 3/24/09 4:20:21 PM Labeling channels Channel label appear with the channel number display...

Owners manual
Page 23
... and enter your password, then press ENTER. Your original remote control will be set to confirm, then press ENTER. To set the V-Chip 1 Select "Lock" menu, then press or ENTER. 2 Use Number buttons (0-9) to enter your password (4 digits) using Number buttons (0-9), then press ENTER. 5 Enter the same password again to restrict children from viewing or hearing violent scenes or pictures that you may set this data is changed, the V-Chip...
... and enter your password, then press ENTER. Your original remote control will be set to confirm, then press ENTER. To set the V-Chip 1 Select "Lock" menu, then press or ENTER. 2 Use Number buttons (0-9) to enter your password (4 digits) using Number buttons (0-9), then press ENTER. 5 Enter the same password again to restrict children from viewing or hearing violent scenes or pictures that you may set this data is changed, the V-Chip...
Owners manual
Page 27
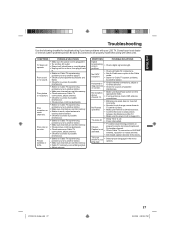
... picture. Consult your LCD TV. Poor color or no sound. No CATV reception. • Check all connections are set into memory. • Check picture control adjustments. • Check antenna or Cable TV connections, adjust antenna. • Check for sources of possible interference. Poor picture or no obstructions between the Remote and the TV. • Make sure the power cord is scrambling signal. • Adjust antenna. POSSIBLE SOLUTIONS • Make sure the power cord is plugged...
... picture. Consult your LCD TV. Poor color or no sound. No CATV reception. • Check all connections are set into memory. • Check picture control adjustments. • Check antenna or Cable TV connections, adjust antenna. • Check for sources of possible interference. Poor picture or no obstructions between the Remote and the TV. • Make sure the power cord is scrambling signal. • Adjust antenna. POSSIBLE SOLUTIONS • Make sure the power cord is plugged...
Owners manual
Page 28
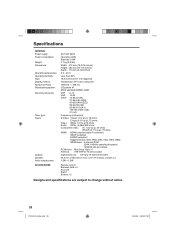
Specifications GENERAL Power supply: Power consumption: Weight: Dimensions: Operating temperature: Operating humidity: Type: Display method: Number of Pixels: Broadcasting system: Receiving channels: Tuner type: Inputs: Outputs: Speaker: Audio output power: ACCESSORIES AC 120V 60Hz Operation: 29W Stand by: 0.8W 3.7 kg (8.2 lbs) Width: 472 mm (18-9/16 inches) Height: 362 mm (14-1/4 inches) Depth: 174 mm (6-7/8 inches) 5˚C - 40˚C Less than 80% 18.5 inches (470.1 mm diagonal) Transmission TFT color LCD panel 1366 (H) × 768 (V) US system M ATSC standard (8VSB), QAM VHF ...
Specifications GENERAL Power supply: Power consumption: Weight: Dimensions: Operating temperature: Operating humidity: Type: Display method: Number of Pixels: Broadcasting system: Receiving channels: Tuner type: Inputs: Outputs: Speaker: Audio output power: ACCESSORIES AC 120V 60Hz Operation: 29W Stand by: 0.8W 3.7 kg (8.2 lbs) Width: 472 mm (18-9/16 inches) Height: 362 mm (14-1/4 inches) Depth: 174 mm (6-7/8 inches) 5˚C - 40˚C Less than 80% 18.5 inches (470.1 mm diagonal) Transmission TFT color LCD panel 1366 (H) × 768 (V) US system M ATSC standard (8VSB), QAM VHF ...


