User Manual (user Manual) (ver.1.0) (English)
Page 10
... battery and memory card 17 Charging the battery and turning on your camera ...... 18 Charging the battery 18 Turning on your camera 18 Performing the initial setup 19 Learning icons 21 Selecting options or menus 22 Using [MENU 22 Using [Fn 24 Setting the display and sound 25 Setting the display type 25 Setting the sound 26 Capturing photos 27 Zooming 28 Reducing camera shake (OIS 30 Tips for getting a clearer photo 31 Extended functions 33 Using the Smart Auto mode...
... battery and memory card 17 Charging the battery and turning on your camera ...... 18 Charging the battery 18 Turning on your camera 18 Performing the initial setup 19 Learning icons 21 Selecting options or menus 22 Using [MENU 22 Using [Fn 24 Setting the display and sound 25 Setting the display type 25 Setting the sound 26 Capturing photos 27 Zooming 28 Reducing camera shake (OIS 30 Tips for getting a clearer photo 31 Extended functions 33 Using the Smart Auto mode...

User Manual (user Manual) (ver.1.0) (English)
Page 11
... Using tracking auto focus 65 Adjusting the focus area 66 Using Face Detection 67 Detecting faces 67 Capturing a self portrait shot 68 Capturing a smile shot 68 Detecting eye blinking 69 Using Smart Face Recognition 69 Registering faces as your favorites (My Star 70 Adjusting brightness and color 72 Adjusting the exposure manually (EV 72 Changing the metering option 73 Selecting a White Balance Setting 74 Using burst modes 77 Capturing photos in the High-speed burst mode...
... Using tracking auto focus 65 Adjusting the focus area 66 Using Face Detection 67 Detecting faces 67 Capturing a self portrait shot 68 Capturing a smile shot 68 Detecting eye blinking 69 Using Smart Face Recognition 69 Registering faces as your favorites (My Star 70 Adjusting brightness and color 72 Adjusting the exposure manually (EV 72 Changing the metering option 73 Selecting a White Balance Setting 74 Using burst modes 77 Capturing photos in the High-speed burst mode...

User Manual (user Manual) (ver.1.0) (English)
Page 12
...;les by connecting the camera as a removable disk 106 Disconnecting the camera (for Windows XP 107 Transferring files to your Mac computer 108 Printing photos with a PictBridge photo printer ....... 109 Settings 110 Settings menu 111 Accessing the settings menu 111 Sound 112 Display 112 Settings 113 Appendixes 116 Error messages 117 Camera maintenance 118 Cleaning your camera 118 Using or storing the camera 119 About memory cards 120 About the battery 123 Before contacting a service center 127 Camera specifi...
...;les by connecting the camera as a removable disk 106 Disconnecting the camera (for Windows XP 107 Transferring files to your Mac computer 108 Printing photos with a PictBridge photo printer ....... 109 Settings 110 Settings menu 111 Accessing the settings menu 111 Sound 112 Display 112 Settings 113 Appendixes 116 Error messages 117 Camera maintenance 118 Cleaning your camera 118 Using or storing the camera 119 About memory cards 120 About the battery 123 Before contacting a service center 127 Camera specifi...
User Manual (user Manual) (ver.1.0) (English)
Page 13
Unpacking 13 Camera layout 14 Inserting the battery and memory card ... 17 Charging the battery and turning on your camera 18 Charging the battery 18 Turning on your camera's layout, icons, and basic functions for getting a clearer photo 31 Basic functions Learn about your camera 18 Performing the initial setup 19 Learning icons 21 Selecting options or menus 22 Using [MENU 22 Using [Fn 24 Setting the display and sound 25 Setting the display type 25 Setting the sound 26 Capturing photos 27 Zooming 28 Reducing camera shake (OIS 30 Tips for shooting.
Unpacking 13 Camera layout 14 Inserting the battery and memory card ... 17 Charging the battery and turning on your camera 18 Charging the battery 18 Turning on your camera's layout, icons, and basic functions for getting a clearer photo 31 Basic functions Learn about your camera 18 Performing the initial setup 19 Learning icons 21 Selecting options or menus 22 Using [MENU 22 Using [Fn 24 Setting the display and sound 25 Setting the display type 25 Setting the sound 26 Capturing photos 27 Zooming 28 Reducing camera shake (OIS 30 Tips for shooting.
User Manual (user Manual) (ver.1.0) (English)
Page 17
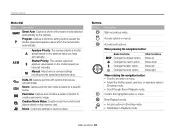
... the shutter speed, aperture, or exposure value in Shooting mode. • Scroll through files in Playback mode. M Manual: Adjust various camera settings including shutter speed and aperture value. c Change the macro option. Confirm the highlighted option or menu. G Aperture Priority: The camera selects a shutter A speed based on the aperture value you have set manually. d s R K v DUAL IS: Capture a photo with options that reduce camera shake. Buttons Button Description Start recording a video. When pressing the navigation button: Basic functions D Change the display...
... the shutter speed, aperture, or exposure value in Shooting mode. • Scroll through files in Playback mode. M Manual: Adjust various camera settings including shutter speed and aperture value. c Change the macro option. Confirm the highlighted option or menu. G Aperture Priority: The camera selects a shutter A speed based on the aperture value you have set manually. d s R K v DUAL IS: Capture a photo with options that reduce camera shake. Buttons Button Description Start recording a video. When pressing the navigation button: Basic functions D Change the display...
User Manual (user Manual) (ver.1.0) (English)
Page 22
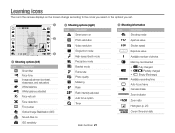
... on ISO sensitivity 2 Shooting options (right) Icon Description Smart zoom on Photo resolution Video resolution Single shot mode High-speed burst mode Precapture mode Bracket mode Frame rate Photo quality Metering Flash Flash intensity adjusted Auto focus option Timer Basic functions 21 3 Shooting information Icon Description Shooting mode Aperture value Shutter speed Exposure value Available number of photos Memory card inserted • : Fully charged • : Partially charged • : Empty (Recharge) Available recording time Auto focus frame Camera...
... on ISO sensitivity 2 Shooting options (right) Icon Description Smart zoom on Photo resolution Video resolution Single shot mode High-speed burst mode Precapture mode Bracket mode Frame rate Photo quality Metering Flash Flash intensity adjusted Auto focus option Timer Basic functions 21 3 Shooting information Icon Description Shooting mode Aperture value Shutter speed Exposure value Available number of photos Memory card inserted • : Fully charged • : Partially charged • : Empty (Recharge) Available recording time Auto focus frame Camera...
User Manual (user Manual) (ver.1.0) (English)
Page 32
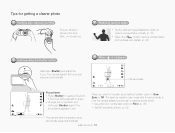
... d mode to Fill in. (p. 60) • Set ISO sensitivity options. (p. 62) The camera sets the aperture value and shutter speed automatically. When is blocking the lens, flash, or microphone. When you shoot in red. Basic functions 31 The camera adjusts the focus and exposure automatically. The aperture remains open longer and it may be harder to hold the camera steady long enough to capture a clear photo. • Use a tripod or set...
... d mode to Fill in. (p. 60) • Set ISO sensitivity options. (p. 62) The camera sets the aperture value and shutter speed automatically. When is blocking the lens, flash, or microphone. When you shoot in red. Basic functions 31 The camera adjusts the focus and exposure automatically. The aperture remains open longer and it may be harder to hold the camera steady long enough to capture a clear photo. • Use a tripod or set...

User Manual (user Manual) (ver.1.0) (English)
Page 38
... MPO file formats. • In 3D Photo mode, the resolution is automatically set to . • In 3D Photo mode, some shooting options are not available. • You can view an MPO file that supports the 3D effect only on a 3D TV or 3D monitor. On your camera's display, you can view only JPEG files. • Use proper 3D glasses when...
... MPO file formats. • In 3D Photo mode, the resolution is automatically set to . • In 3D Photo mode, some shooting options are not available. • You can view an MPO file that supports the 3D effect only on a 3D TV or 3D monitor. On your camera's display, you can view only JPEG files. • Use proper 3D glasses when...

User Manual (user Manual) (ver.1.0) (English)
Page 39
... Old Film Ripple Full Moon Old Record Magazine Sunny Day Set 6 Press [m] to return to Shooting mode. 7 Align your photos. In Magic Frame mode, the resolution is automatically set to save a photo using the HDR mode, an afterimage may take longer to . Using the Scene mode • The HDR effect may be affected by camera shake, lighting, movement of the photos will change according to the frame you...
... Old Film Ripple Full Moon Old Record Magazine Sunny Day Set 6 Press [m] to return to Shooting mode. 7 Align your photos. In Magic Frame mode, the resolution is automatically set to save a photo using the HDR mode, an afterimage may take longer to . Using the Scene mode • The HDR effect may be affected by camera shake, lighting, movement of the photos will change according to the frame you...
User Manual (user Manual) (ver.1.0) (English)
Page 51
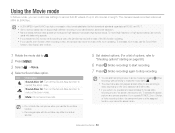
... to record the zoom noise. See Steps 3 and 4 below. 1 Rotate the mode dial to reduce the zoom noise. Using the Movie mode In Movie mode, you operate POWER, Zoom, Shutter, or Video recording button, the camera will carry out the assigned function, even when the screen is a high-compression video format established by pressing (Video recording) without having to rotate the mode dial to v. • The video frame size may record the noise of the zoom operating. The camera saves recorded videos as...
... to record the zoom noise. See Steps 3 and 4 below. 1 Rotate the mode dial to reduce the zoom noise. Using the Movie mode In Movie mode, you operate POWER, Zoom, Shutter, or Video recording button, the camera will carry out the assigned function, even when the screen is a high-compression video format established by pressing (Video recording) without having to rotate the mode dial to v. • The video frame size may record the noise of the zoom operating. The camera saves recorded videos as...
User Manual (user Manual) (ver.1.0) (English)
Page 55
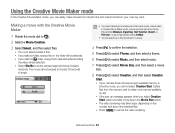
... up message appears when you select a video, every photo captured while recording the video will be selected. • If you select Creation Start, select a smaller movie size in length. Using the Creative Movie Maker mode In the Creative Movie Maker mode, you cannot select Creation Start. Extended functions 54 Making a movie with some Smart Filter effects (Miniature, Vignetting, Half Tone Dot, Sketch, or Fish-eye), or some high-speed videos...
... up message appears when you select a video, every photo captured while recording the video will be selected. • If you select Creation Start, select a smaller movie size in length. Using the Creative Movie Maker mode In the Creative Movie Maker mode, you cannot select Creation Start. Extended functions 54 Making a movie with some Smart Filter effects (Miniature, Vignetting, Half Tone Dot, Sketch, or Fish-eye), or some high-speed videos...

User Manual (user Manual) (ver.1.0) (English)
Page 57
... focus area 66 Using Face Detection 67 Detecting faces 67 Capturing a self portrait shot 68 Capturing a smile shot 68 Detecting eye blinking 69 Using Smart Face Recognition 69 Registering faces as your favorites (My Star 70 Adjusting brightness and color 72 Adjusting the exposure manually (EV) ...... 72 Changing the metering option 73 Selecting a White Balance Setting ......... 74 Using burst modes 77 Capturing photos in the High-speed burst mode 77 Capturing photos in Shooting mode. Shooting...
... focus area 66 Using Face Detection 67 Detecting faces 67 Capturing a self portrait shot 68 Capturing a smile shot 68 Detecting eye blinking 69 Using Smart Face Recognition 69 Registering faces as your favorites (My Star 70 Adjusting brightness and color 72 Adjusting the exposure manually (EV) ...... 72 Changing the metering option 73 Selecting a White Balance Setting ......... 74 Using burst modes 77 Capturing photos in the High-speed burst mode 77 Capturing photos in Shooting mode. Shooting...
User Manual (user Manual) (ver.1.0) (English)
Page 102
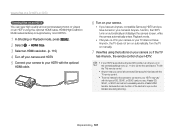
... the camera's settings menu (p. 114) to control the camera and TV with the TV's remote control. • Anynet+ lets you control all connected Samsung A/V devices with the TV remote control. • The time it takes for the camera to connect to your HDTV may vary with the type of the card is to your HDTV with the optional HDMI cable. 6 Turn on your camera's Anynet+ function, the HDTV turns on manually. 7 View files using...
... the camera's settings menu (p. 114) to control the camera and TV with the TV's remote control. • Anynet+ lets you control all connected Samsung A/V devices with the TV remote control. • The time it takes for the camera to connect to your HDTV may vary with the type of the card is to your HDTV with the optional HDMI cable. 6 Turn on your camera's Anynet+ function, the HDTV turns on manually. 7 View files using...

User Manual (user Manual) (ver.1.0) (English)
Page 103
... can view photos captured in 3D Photo or 3D Panorama mode on a 3D TV. 1 In Shooting or Playback mode, press [m]. 2 Select n “ HDMI Size. 3 Select an HDMI resolution. (p. 115) 4 Turn off in 3D on TVs that do not support the file format. • Use proper 3D glasses when you have turned on your camera's Anynet+ function, the 3D TV turns on automatically and displays the camera screen, while the camera...
... can view photos captured in 3D Photo or 3D Panorama mode on a 3D TV. 1 In Shooting or Playback mode, press [m]. 2 Select n “ HDMI Size. 3 Select an HDMI resolution. (p. 115) 4 Turn off in 3D on TVs that do not support the file format. • Use proper 3D glasses when you have turned on your camera's Anynet+ function, the 3D TV turns on automatically and displays the camera screen, while the camera...
User Manual (user Manual) (ver.1.0) (English)
Page 115
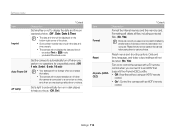
... remote control. Formatting will delete all files, including protected files. (No, Yes) Errors can occur if you use a memory card formatted by another brand of the photo. • Some printer models may not print the date and time properly. • The camera will not display the date and time if: - Settings 114 you focus. (Off, On*) Item Format * Default Description Format the internal memory and the memory card. you select Panorama mode Set the camera to automatically turn off when the camera is connected...
... remote control. Formatting will delete all files, including protected files. (No, Yes) Errors can occur if you use a memory card formatted by another brand of the photo. • Some printer models may not print the date and time properly. • The camera will not display the date and time if: - Settings 114 you focus. (Off, On*) Item Format * Default Description Format the internal memory and the memory card. you select Panorama mode Set the camera to automatically turn off when the camera is connected...

User Manual (user Manual) (ver.1.0) (English)
Page 116
...; PAL (supports only BDGHI): Australia, Austria, Belgium, China, Denmark, England, Finland, Germany, Italy, Kuwait, Malaysia, Netherlands, New Zealand, Norway, Singapore, Spain, Sweden, Switzerland, Thailand Item USB PC Software * Default Description Select the mode to use when you connect the camera to a computer or printer with a USB cable. • Select: Manually select the USB mode when you connect your camera to a device. • Computer*: Connect your camera to a TV...
...; PAL (supports only BDGHI): Australia, Austria, Belgium, China, Denmark, England, Finland, Germany, Italy, Kuwait, Malaysia, Netherlands, New Zealand, Norway, Singapore, Spain, Sweden, Switzerland, Thailand Item USB PC Software * Default Description Select the mode to use when you connect the camera to a computer or printer with a USB cable. • Select: Manually select the USB mode when you connect your camera to a device. • Computer*: Connect your camera to a TV...
User Manual (user Manual) (ver.1.0) (English)
Page 118
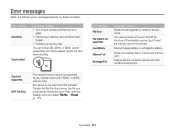
... inserted memory card. Unlock the card when shooting. DCF Full Error The inserted memory card is not supported by your memory card. Low Battery Memory Full No Image File Suggested remedies Delete the damaged file or contact a service center. Format the memory card on again. • Remove your computer and format the card. Appendixes 117 Capture photos or insert a memory card that contains some photos. Insert a SD, SDHC, or SDXC memory card. Error message Card Error Card Locked Suggested remedies • Turn off your camera...
... inserted memory card. Unlock the card when shooting. DCF Full Error The inserted memory card is not supported by your memory card. Low Battery Memory Full No Image File Suggested remedies Delete the damaged file or contact a service center. Format the memory card on again. • Remove your computer and format the card. Appendixes 117 Capture photos or insert a memory card that contains some photos. Insert a SD, SDHC, or SDXC memory card. Error message Card Error Card Locked Suggested remedies • Turn off your camera...

User Manual (user Manual) (ver.1.0) (English)
Page 128
... if needed. • Batteries are consumable parts that the battery is inserted. • Ensure that must be in Power save mode. (p. 112) • The camera may turn on . • Charge the battery. • Make sure that may have attempted the suggested remedy and are still having trouble with your device, contact your pocket. • Using the flash or recording videos depletes the battery quickly. Before contacting a service center...
... if needed. • Batteries are consumable parts that the battery is inserted. • Ensure that must be in Power save mode. (p. 112) • The camera may turn on . • Charge the battery. • Make sure that may have attempted the suggested remedy and are still having trouble with your device, contact your pocket. • Using the flash or recording videos depletes the battery quickly. Before contacting a service center...
User Manual (user Manual) (ver.1.0) (English)
Page 141
... Display 118 Lens 118 Connecting to a computer Mac 108 Windows 103 Contrast Playback mode 98 Shooting mode 82 D Date/Time Set 113 Deleting files 89 Digital Print Order Format (DOF) 98 Digital zoom 28 Disconnecting the camera 107 Display brightness 112 Display type 25 DUAL IS mode 46 E Editing photos 95 Editing videos Capturing 94 Trimming 93 Enlarging 90 Error messages 117 Exposure 72 F Face Detection 67 Flash Auto 61 Fill in 61 Intensity 61 Off 60 Red-eye 61 Red-eye Fix...
... Display 118 Lens 118 Connecting to a computer Mac 108 Windows 103 Contrast Playback mode 98 Shooting mode 82 D Date/Time Set 113 Deleting files 89 Digital Print Order Format (DOF) 98 Digital zoom 28 Disconnecting the camera 107 Display brightness 112 Display type 25 DUAL IS mode 46 E Editing photos 95 Editing videos Capturing 94 Trimming 93 Enlarging 90 Error messages 117 Exposure 72 F Face Detection 67 Flash Auto 61 Fill in 61 Intensity 61 Off 60 Red-eye 61 Red-eye Fix...
User Manual (user Manual) (ver.1.0) (English)
Page 143
... Shot mode 39 Blink Detection 69 Face Detection 67 Red-eye 61 Red-eye fix 61 Self portrait 68 Smart Face Recognition 69 Smile Shot 68 Shutter button 14 Shutter Priority mode 44 Slide show 92 Smart Album 87 Smart Auto mode 34 Smart Face Recognition 69 Smart Filter Playback mode 96 Shooting mode 80 Smart Scene Detection mode 53 Smart zoom 29 Smile Shot 68 Sound settings 26 Status lamp 15 T Thumbnails 88 Timer Shooting mode...
... Shot mode 39 Blink Detection 69 Face Detection 67 Red-eye 61 Red-eye fix 61 Self portrait 68 Smart Face Recognition 69 Smile Shot 68 Shutter button 14 Shutter Priority mode 44 Slide show 92 Smart Album 87 Smart Auto mode 34 Smart Face Recognition 69 Smart Filter Playback mode 96 Shooting mode 80 Smart Scene Detection mode 53 Smart zoom 29 Smile Shot 68 Sound settings 26 Status lamp 15 T Thumbnails 88 Timer Shooting mode...


