

User Manual
Page 5
... with unshielded or improperly shielded electronic equipment, such as pacemakers, hearing aids, medical devices, and other electronic devices. Never use only Samsung-approved devices or accessories. You must plug the small end of your files. Your camera emits radio frequency (RF) signals ...result from the camera case. To prevent unwanted interference, use a damaged charger, battery, or memory card. If you force the connectors, improperly connect cables, or improperly install batteries and memory cards, you can be damaged or erased. Do not use the camera if the screen is not...
... with unshielded or improperly shielded electronic equipment, such as pacemakers, hearing aids, medical devices, and other electronic devices. Never use only Samsung-approved devices or accessories. You must plug the small end of your files. Your camera emits radio frequency (RF) signals ...result from the camera case. To prevent unwanted interference, use a damaged charger, battery, or memory card. If you force the connectors, improperly connect cables, or improperly install batteries and memory cards, you can be damaged or erased. Do not use the camera if the screen is not...
User Manual
Page 6
... to set the options in this manual are not allowed to play back photos or videos, and edit photos. Also, learn how to connect your computer or TV. Appendixes 127 Get information about your camera's settings. Extended functions 42 Learn how to your camera to capture a ...photo and record a video by selecting a mode. Wireless network 101 Learn how to connect to wireless local area networks (WLANs) and use . • You are the property of their respective owners. • Camera specifications or contents of...
... to set the options in this manual are not allowed to play back photos or videos, and edit photos. Also, learn how to connect your computer or TV. Appendixes 127 Get information about your camera's settings. Extended functions 42 Learn how to your camera to capture a ...photo and record a video by selecting a mode. Wireless network 101 Learn how to connect to wireless local area networks (WLANs) and use . • You are the property of their respective owners. • Camera specifications or contents of...
User Manual
Page 9
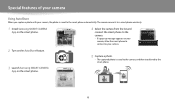
... a smart phone wirelessly. 1 Install Samsung SMART CAMERA App on the smart phone. 4 Select the camera from the list and connect the smart phone to the camera. • If a pop-up message appears on the smart phone. 5 Capture a photo. • The captured photo is ... S pecial features of your camera Using AutoShare When you capture a photo with your camera. 2 Turn on the AutoShare feature. 3 Launch Samsung SMART CAMERA App on your camera, allow the smart phone to connect to your camera, the photo is saved to the camera, and then transferred to the smart phone automatically.
... a smart phone wirelessly. 1 Install Samsung SMART CAMERA App on the smart phone. 4 Select the camera from the list and connect the smart phone to the camera. • If a pop-up message appears on the smart phone. 5 Capture a photo. • The captured photo is ... S pecial features of your camera Using AutoShare When you capture a photo with your camera. 2 Turn on the AutoShare feature. 3 Launch Samsung SMART CAMERA App on your camera, allow the smart phone to connect to your camera, the photo is saved to the camera, and then transferred to the smart phone automatically.
User Manual
Page 10
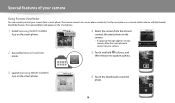
...select files to transfer from the list and connect the smart phone to the camera. • If a pop-up message appears on your camera, allow the smart phone to connect to your camera to smart phones that support the MobileLink feature. 1 Install Samsung SMART CAMERA App on the smart phone. ...4 Select the camera from the camera. 3 Launch Samsung SMART CAMERA App on the smart phone. 6 On the smart ...
...select files to transfer from the list and connect the smart phone to the camera. • If a pop-up message appears on your camera, allow the smart phone to connect to your camera to smart phones that support the MobileLink feature. 1 Install Samsung SMART CAMERA App on the smart phone. ...4 Select the camera from the camera. 3 Launch Samsung SMART CAMERA App on the smart phone. 6 On the smart ...
User Manual
Page 11
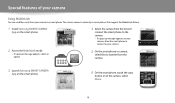
... captured photo will appear on the smart phone. 1 Install Samsung SMART CAMERA App on the smart phone. 4 Select the camera from the list and connect the smart phone to the camera. • If a ... 10 Use the smart phone as a remote shutter release with the Remote Viewfinder feature. The camera connects to a smart phone wirelessly. S pecial features of your camera Using Remote Viewfinder You can remotely control... and then release it to capture a photo. 3 Launch Samsung SMART CAMERA App on your camera, allow the smart phone to connect to your camera from a smart phone.
... captured photo will appear on the smart phone. 1 Install Samsung SMART CAMERA App on the smart phone. 4 Select the camera from the list and connect the smart phone to the camera. • If a ... 10 Use the smart phone as a remote shutter release with the Remote Viewfinder feature. The camera connects to a smart phone wirelessly. S pecial features of your camera Using Remote Viewfinder You can remotely control... and then release it to capture a photo. 3 Launch Samsung SMART CAMERA App on your camera, allow the smart phone to connect to your camera from a smart phone.
User Manual
Page 14
... • Deleting all files on the memory 83 • Viewing files as a slide show 85 • Viewing files on a TV 92 • Connecting your camera to a computer 93 • Sending photos or videos via email 112 • Using photo or video sharing websites 115 •...
... • Deleting all files on the memory 83 • Viewing files as a slide show 85 • Viewing files on a TV 92 • Connecting your camera to a computer 93 • Sending photos or videos via email 112 • Using photo or video sharing websites 115 •...
User Manual
Page 17
... OS computer 94 Using programs on a computer 95 Installing i-Launcher 95 Using i-Launcher ...96 Wireless network ...101 Connecting to a WLAN and configuring network settings 102 Connecting to a WLAN 102 Using the login browser 103 Network connection tips 104 Entering text ...105 Saving files to a smart phone automatically 106 Sending photos or videos to...
... OS computer 94 Using programs on a computer 95 Installing i-Launcher 95 Using i-Launcher ...96 Wireless network ...101 Connecting to a WLAN and configuring network settings 102 Connecting to a WLAN 102 Using the login browser 103 Network connection tips 104 Entering text ...105 Saving files to a smart phone automatically 106 Sending photos or videos to...
User Manual
Page 18
Contents Settings ...121 Settings menu ...122 Accessing the settings menu 122 Sound ...123 Display ...123 Connectivity ...124 General ...125 Appendixes ...127 Error messages ...128 Camera maintenance 130 Cleaning your camera 130 Using or storing the camera 131 About memory cards 132 About the battery 135 Before contacting a service center 139 Camera specifications 142 Glossary ...146 Index ...151 17
Contents Settings ...121 Settings menu ...122 Accessing the settings menu 122 Sound ...123 Display ...123 Connectivity ...124 General ...125 Appendixes ...127 Error messages ...128 Camera maintenance 130 Cleaning your camera 130 Using or storing the camera 131 About memory cards 132 About the battery 135 Before contacting a service center 139 Camera specifications 142 Glossary ...146 Index ...151 17

User Manual
Page 22
...; In Playback mode: Zoom in on part of focus, or there is a problem charging the battery, when the camera is connecting to WLAN or sending a photo • Steady: When the camera is connected to a computer, charging the battery, or when the image is out of a photo or view files as thumbnails, or...
...; In Playback mode: Zoom in on part of focus, or there is a problem charging the battery, when the camera is connecting to WLAN or sending a photo • Steady: When the camera is connected to a computer, charging the battery, or when the image is out of a photo or view files as thumbnails, or...
User Manual
Page 28
... information Icon Description Current date Current time Available number of photos Memory card inserted • : Fully charged • : Partially charged • : Empty (Recharge) • : Charging (Connected with the charger) Aperture value Shutter speed Available recording time Auto focus frame Camera shake Zoom indicator Photo resolution when the Intelli zoom is on...
... information Icon Description Current date Current time Available number of photos Memory card inserted • : Fully charged • : Partially charged • : Empty (Recharge) • : Charging (Connected with the charger) Aperture value Shutter speed Available recording time Auto focus frame Camera shake Zoom indicator Photo resolution when the Intelli zoom is on...

User Manual
Page 79
... Transferring files to the computer 93 Transferring files to your Windows OS computer 93 Transferring files to your computer or TV. Also, learn how to connect your camera to play back photos or videos, and edit photos. Playback/Editing Learn how to your Mac OS computer ......... 94 Using programs on a computer...
... Transferring files to the computer 93 Transferring files to your Windows OS computer 93 Transferring files to your computer or TV. Also, learn how to connect your camera to play back photos or videos, and edit photos. Playback/Editing Learn how to your Mac OS computer ......... 94 Using programs on a computer...
User Manual
Page 93
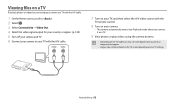
...; Video Out. 4 Select the video signal output for your country or region. (p. 124) 5 Turn off your camera and TV. 6 Connect your camera to your TV settings. Audio Video 7 Turn on your TV, and then select the A/V video source with the TV remote control. 8 Turn on ...your camera. • The camera automatically enters into Playback mode when you connect it to a TV. 9 View photos or play videos using the camera buttons. • Depending on the TV model, you may see some digital noise or...
...; Video Out. 4 Select the video signal output for your country or region. (p. 124) 5 Turn off your camera and TV. 6 Connect your camera to your TV settings. Audio Video 7 Turn on your TV, and then select the A/V video source with the TV remote control. 8 Turn on ...your camera. • The camera automatically enters into Playback mode when you connect it to a TV. 9 View photos or play videos using the camera buttons. • Depending on the TV model, you may see some digital noise or...
User Manual
Page 94
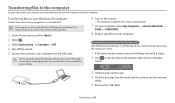
... removed safely. 5 Remove the USB cable. Transferring files to your Windows OS computer Connect the camera to your computer as a removable disk. 1 On the Home screen, scroll to . 2 Select . 3 Select Connectivity → i-Launcher → Off. 4 Turn off the camera. 5 Connect the camera to your computer with the USB cable. If the cable is... the tool bar at the bottom right of your computer. The manufacturer is not responsible for you to the computer. Transferring files to the computer Connect the camera to a computer to transfer files from the camera's memory card to...
... removed safely. 5 Remove the USB cable. Transferring files to your Windows OS computer Connect the camera to your computer as a removable disk. 1 On the Home screen, scroll to . 2 Select . 3 Select Connectivity → i-Launcher → Off. 4 Turn off the camera. 5 Connect the camera to your computer with the USB cable. If the cable is... the tool bar at the bottom right of your computer. The manufacturer is not responsible for you to the computer. Transferring files to the computer Connect the camera to a computer to transfer files from the camera's memory card to...
User Manual
Page 95
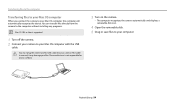
...responsible for any programs. Mac OS 10.5 or later is reversed, it may damage your computer. If the cable is supported. 1 Turn off the camera. 2 Connect your camera to your Mac OS computer with the USB cable. Playback/Editing 94 You must plug the small end of data. 3 Turn on the.... 4 Open the removable disk. 5 Drag or save files to your files. Transferring files to the computer Transferring files to your Mac OS computer When you connect the camera to your camera. You can transfer files directly from the camera to the computer without installing any loss of the USB cable into...
...responsible for any programs. Mac OS 10.5 or later is reversed, it may damage your computer. If the cable is supported. 1 Turn off the camera. 2 Connect your camera to your Mac OS computer with the USB cable. Playback/Editing 94 You must plug the small end of data. 3 Turn on the.... 4 Open the removable disk. 5 Drag or save files to your files. Transferring files to the computer Transferring files to your Mac OS computer When you connect the camera to your camera. You can transfer files directly from the camera to the computer without installing any loss of the USB cable into...
User Manual
Page 96
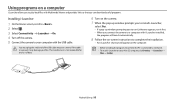
... instructions to complete the installation. • An i-Launcher shortcut will appear on the computer. • Before installing the program, ensure that the PC is connected to a network. • To install i-Launcher on the camera. 7 When the pop-up window prompts you to install i-Launcher, select Yes. •...; If a pop-up window prompting you connect the camera to a computer with the USB cable. Playback/Editing 95 The manufacturer is reversed, it first. • When you to run iLinker.exe...
... instructions to complete the installation. • An i-Launcher shortcut will appear on the computer. • Before installing the program, ensure that the PC is connected to a network. • To install i-Launcher on the camera. 7 When the pop-up window prompts you to install i-Launcher, select Yes. •...; If a pop-up window prompting you connect the camera to a computer with the USB cable. Playback/Editing 95 The manufacturer is reversed, it first. • When you to run iLinker.exe...
User Manual
Page 97
... of your computer does not meet the requirements, videos may not play back files with Multimedia Viewer. i-Launcher provides a link for any damage that you connect the camera to download the PC Auto Backup program. • The requirements are available. You can view files with Multimedia Viewer and provides a link to...
... of your computer does not meet the requirements, videos may not play back files with Multimedia Viewer. i-Launcher provides a link for any damage that you connect the camera to download the PC Auto Backup program. • The requirements are available. You can view files with Multimedia Viewer and provides a link to...
User Manual
Page 102
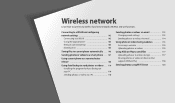
Wireless network Learn how to connect to online storage 117 Viewing photos or videos on your PC 110 Sending photos or videos to a PC 110 Sending photos or videos via email ... AllShare Play to send files 117 Uploading photos to wireless local area networks (WLANs) and use functions. Connecting to a WLAN and configuring network settings 102 Connecting to a WLAN 102 Using the login browser 103 Network connection tips 104 Entering text 105 Saving files to a smart phone automatically ... ... 106 Sending photos or videos to...
Wireless network Learn how to connect to online storage 117 Viewing photos or videos on your PC 110 Sending photos or videos to a PC 110 Sending photos or videos via email ... AllShare Play to send files 117 Uploading photos to wireless local area networks (WLANs) and use functions. Connecting to a WLAN and configuring network settings 102 Connecting to a WLAN 102 Using the login browser 103 Network connection tips 104 Entering text 105 Saving files to a smart phone automatically ... ... 106 Sending photos or videos to...

User Manual
Page 103
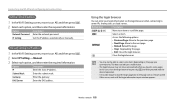
... AP name must be in a range of a WLAN. Wi-Fi Setting Refresh Samsung 1 Samsung 2 Samsung 3 Samsung 4 Back Manual • Select Refresh to refresh connectable APs. • Select Add wireless network to add the AP manually. You can also configure network settings. You can also connect to . 2 Select , , , or . 3 Press [ ], and then select Wi-Fi Setting. •...
... AP name must be in a range of a WLAN. Wi-Fi Setting Refresh Samsung 1 Samsung 2 Samsung 3 Samsung 4 Back Manual • Select Refresh to refresh connectable APs. • Select Add wireless network to add the AP manually. You can also configure network settings. You can also connect to . 2 Select , , , or . 3 Press [ ], and then select Wi-Fi Setting. •...
User Manual
Page 104
... Setting Set the IP address automatically or manually. Using the login browser You can enter your login information via the login browser when connecting to . Subnet Mask Enter the subnet mask. In this occurs, wait until the login information input window appears. If this case,... close automatically after you connected to some pages. Wireless network 103 This does not indicate a malfunction. • The login browser may not close the login browser by ...
... Setting Set the IP address automatically or manually. Using the login browser You can enter your login information via the login browser when connecting to . Subnet Mask Enter the subnet mask. In this occurs, wait until the login information input window appears. If this case,... close automatically after you connected to some pages. Wireless network 103 This does not indicate a malfunction. • The login browser may not close the login browser by ...
User Manual
Page 105
...8226; The WLAN feature of your camera must insert a memory card to use the Wi-Fi features. • The quality of the network connection will be determined by the AP. • The further the distance between your camera and the AP, the longer it will vary based on... adjusting network settings may differ, depending on network conditions. • Do not access a network that you are not authorized to use. • Before you connect to a network, ensure your network administrator or network service provider. • If a WLAN requires authentication from the available AP list. • A login...
...8226; The WLAN feature of your camera must insert a memory card to use the Wi-Fi features. • The quality of the network connection will be determined by the AP. • The further the distance between your camera and the AP, the longer it will vary based on... adjusting network settings may differ, depending on network conditions. • Do not access a network that you are not authorized to use. • Before you connect to a network, ensure your network administrator or network service provider. • If a WLAN requires authentication from the available AP list. • A login...

