
User Manual
Page 9
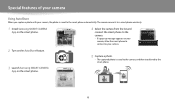
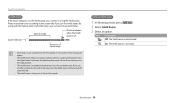
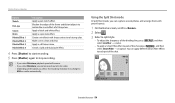
... you capture a photo with your camera. 2 Turn on the AutoShare feature. 3 Launch Samsung SMART CAMERA App on the smart phone. 5 Capture a photo. • The captured photo is saved to the smart phone. 8 The camera connects to a smart phone wirelessly. 1 Install Samsung SMART CAMERA App on the smart phone. 4 Select the camera from the list and connect the...
... you capture a photo with your camera. 2 Turn on the AutoShare feature. 3 Launch Samsung SMART CAMERA App on the smart phone. 5 Capture a photo. • The captured photo is saved to the smart phone. 8 The camera connects to a smart phone wirelessly. 1 Install Samsung SMART CAMERA App on the smart phone. 4 Select the camera from the list and connect the...
User Manual
Page 10
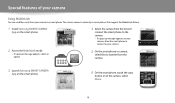
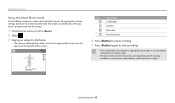
The camera connects wirelessly to smart phones that support the MobileLink feature. 1 Install Samsung SMART CAMERA App on the smart phone. 4 Select the camera from the camera. 3 Launch Samsung SMART CAMERA App on the smart phone. 6 On the smart phone, touch the copy button or on your camera, allow the smart phone to connect to your camera. 2 Access the MobileLink...
The camera connects wirelessly to smart phones that support the MobileLink feature. 1 Install Samsung SMART CAMERA App on the smart phone. 4 Select the camera from the camera. 3 Launch Samsung SMART CAMERA App on the smart phone. 6 On the smart phone, touch the copy button or on your camera, allow the smart phone to connect to your camera. 2 Access the MobileLink...
User Manual
Page 11
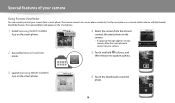
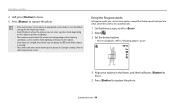
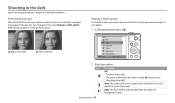
... Viewfinder You can remotely control your camera. 2 Access the Remote Viewfinder mode. 5 Touch and hold to focus, and then release it to capture a photo. 3 Launch Samsung SMART CAMERA App on the smart phone. 6 Touch the thumbnail to a smart phone wirelessly. Use the smart phone as a remote shutter release with the Remote Viewfinder feature.
... Viewfinder You can remotely control your camera. 2 Access the Remote Viewfinder mode. 5 Touch and hold to focus, and then release it to capture a photo. 3 Launch Samsung SMART CAMERA App on the smart phone. 6 Touch the thumbnail to a smart phone wirelessly. Use the smart phone as a remote shutter release with the Remote Viewfinder feature.
User Manual
Page 15
... Reducing camera shake (OIS 39 Tips for getting a clearer photo 40 Extended functions ...42 Using Basic modes ...43 Using the Smart Auto mode 43 Using the Program mode 44 Using the Smart Movie mode 45 Using the Movie mode 46 Using the Scene mode 47 Using the Live Panorama mode 48 Using...
... Reducing camera shake (OIS 39 Tips for getting a clearer photo 40 Extended functions ...42 Using Basic modes ...43 Using the Smart Auto mode 43 Using the Program mode 44 Using the Smart Movie mode 45 Using the Movie mode 46 Using the Scene mode 47 Using the Live Panorama mode 48 Using...
User Manual
Page 17
...Starting Playback mode 79 Viewing photos ...83 Playing a video ...86 Editing a photo ...88 Resizing photos ...88 Rotating a photo ...88 Applying Smart Filter effects 89 Adjusting your photos 90 Viewing files on a TV 92 Transferring files to the computer 93 Transferring files to your Windows OS ...WLAN 102 Using the login browser 103 Network connection tips 104 Entering text ...105 Saving files to a smart phone automatically 106 Sending photos or videos to a smart phone 107 Using a smart phone as a remote shutter release 108 Using Auto Backup to send photos or videos 110 Installing the...
...Starting Playback mode 79 Viewing photos ...83 Playing a video ...86 Editing a photo ...88 Resizing photos ...88 Rotating a photo ...88 Applying Smart Filter effects 89 Adjusting your photos 90 Viewing files on a TV 92 Transferring files to the computer 93 Transferring files to your Windows OS ...WLAN 102 Using the login browser 103 Network connection tips 104 Entering text ...105 Saving files to a smart phone automatically 106 Sending photos or videos to a smart phone 107 Using a smart phone as a remote shutter release 108 Using Auto Backup to send photos or videos 110 Installing the...
User Manual
Page 29
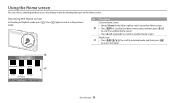
... Home screen. • Press [ / ] repeatedly to switch to another Home screen. Accessing the Home screen In Shooting or Playback mode, press [ ]. Album Basic 1 Wi-Fi Smart Auto Program Smart Movie Movie 2 Scene Live Settings Panorama Back Page Move Basic functions 28
... Home screen. • Press [ / ] repeatedly to switch to another Home screen. Accessing the Home screen In Shooting or Playback mode, press [ ]. Album Basic 1 Wi-Fi Smart Auto Program Smart Movie Movie 2 Scene Live Settings Panorama Back Page Move Basic functions 28
User Manual
Page 30
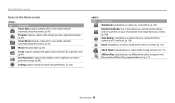
... a photo with a scene mode selected automatically by the camera. (p. 43) Program: Capture a photo with settings you have adjusted manually. (p. 44) Smart Movie: Record a video with a scene mode selected automatically by the camera. (p. 45) Movie: Record a video. (p. 46) Scene: Capture a ...settings to match your preferences. (p. 122) Icon Description MobileLink: Send photos or videos to a smart phone. (p. 107) Remote Viewfinder: Use a smart phone as a remote shutter release and see a preview on your smart phone of an image from your camera. (p. 108) Auto Backup: Send photos or videos that...
... a photo with a scene mode selected automatically by the camera. (p. 43) Program: Capture a photo with settings you have adjusted manually. (p. 44) Smart Movie: Record a video with a scene mode selected automatically by the camera. (p. 45) Movie: Record a video. (p. 46) Scene: Capture a ...settings to match your preferences. (p. 122) Icon Description MobileLink: Send photos or videos to a smart phone. (p. 107) Remote Viewfinder: Use a smart phone as a remote shutter release and see a preview on your smart phone of an image from your camera. (p. 108) Auto Backup: Send photos or videos that...
User Manual
Page 37
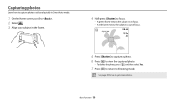
See page 40 for tips to Shooting mode. Basic functions 36 Capturing photos Learn how to capture photos easily and quickly in Smart Auto mode. 1 On the Home screen, scroll to . 2 Select . 3 Align your subject in the frame. 4 Half-press [Shutter] to focus. • A green frame means the subject is in focus. • A red frame means the subject is out of focus. 5 Press [Shutter] to capture a photo. 6 Press [ ] to view the captured photo. • To delete the photo, press [ ], and then select Yes. 7 Press [ ] to return to get clearer photos.
See page 40 for tips to Shooting mode. Basic functions 36 Capturing photos Learn how to capture photos easily and quickly in Smart Auto mode. 1 On the Home screen, scroll to . 2 Select . 3 Align your subject in the frame. 4 Half-press [Shutter] to focus. • A green frame means the subject is in focus. • A red frame means the subject is out of focus. 5 Press [Shutter] to capture a photo. 6 Press [ ] to view the captured photo. • To delete the photo, press [ ], and then select Yes. 7 Press [ ] to return to get clearer photos.
User Manual
Page 39
..., the photo quality may be turned off automatically. • The Intelli zoom is always on Zoom indicator Intelli range • Intelli zoom is on in Smart Auto mode. Capturing photos Intelli zoom If the zoom indicator is in the Intelli range, your camera is deactivated. Icon Description Off: The Intelli zoom...
..., the photo quality may be turned off automatically. • The Intelli zoom is always on Zoom indicator Intelli range • Intelli zoom is on in Smart Auto mode. Capturing photos Intelli zoom If the zoom indicator is in the Intelli range, your camera is deactivated. Icon Description Off: The Intelli zoom...

User Manual
Page 43
Extended functions Learn how to capture a photo and record a video by selecting a mode. Using Basic modes 43 Using the Smart Auto mode 43 Using the Program mode 44 Using the Smart Movie mode 45 Using the Movie mode 46 Using the Scene mode 47 Using the Live Panorama mode 48 Using Scene modes 50 Using the Beauty Shot mode 50 Using the Night Shot mode 51 Using the Close-up Shot mode 51 Using the Magic Frame mode 52 Using the Photo Filter mode 52 Using the Movie Filter mode 53 Using the Split Shot mode 54 Using the Motion Photo mode 55
Extended functions Learn how to capture a photo and record a video by selecting a mode. Using Basic modes 43 Using the Smart Auto mode 43 Using the Program mode 44 Using the Smart Movie mode 45 Using the Movie mode 46 Using the Scene mode 47 Using the Live Panorama mode 48 Using Scene modes 50 Using the Beauty Shot mode 50 Using the Night Shot mode 51 Using the Close-up Shot mode 51 Using the Magic Frame mode 52 Using the Photo Filter mode 52 Using the Movie Filter mode 53 Using the Split Shot mode 54 Using the Motion Photo mode 55
User Manual
Page 44
You can also use the Scene mode and the Live Panorama mode. The Smart Auto mode is stabilized or on the type of scene it detects. The icons are not familiar with spot lighting Extended functions 43 An appropriate ... a scene. Using Basic modes Capture photos or record videos using a tripod) Indoors, dark Partially lit Close-up photos of the screen. Using the Smart Auto mode In Smart Auto mode, your subject in the dark) Actively moving subjects Fireworks (when using basic modes. Icon Description Landscapes Scenes with bright white backgrounds Landscapes...
You can also use the Scene mode and the Live Panorama mode. The Smart Auto mode is stabilized or on the type of scene it detects. The icons are not familiar with spot lighting Extended functions 43 An appropriate ... a scene. Using Basic modes Capture photos or record videos using a tripod) Indoors, dark Partially lit Close-up photos of the screen. Using the Smart Auto mode In Smart Auto mode, your subject in the dark) Actively moving subjects Fireworks (when using basic modes. Icon Description Landscapes Scenes with bright white backgrounds Landscapes...
User Manual
Page 45
... focus. 5 Press [Shutter] to capture the photo. • If the camera does not recognize an appropriate scene mode, it uses the default settings for the Smart Auto mode. • Even if it changes settings often to capture the photo.
... focus. 5 Press [Shutter] to capture the photo. • If the camera does not recognize an appropriate scene mode, it uses the default settings for the Smart Auto mode. • Even if it changes settings often to capture the photo.
User Manual
Page 46
Using Basic modes Using the Smart Movie mode In Smart Movie mode, your subject in the frame. • The camera automatically selects a scene. Extended functions 45 An appropriate scene icon will appear at the top ... the Home screen, scroll to . 2 Select . 3 Align your camera automatically chooses the appropriate camera settings based on the scene it uses the default settings for Smart Movie mode. • The camera may not select the correct scene depending on the shooting conditions, such as camera shake, lighting, and distance to stop...
Using Basic modes Using the Smart Movie mode In Smart Movie mode, your subject in the frame. • The camera automatically selects a scene. Extended functions 45 An appropriate scene icon will appear at the top ... the Home screen, scroll to . 2 Select . 3 Align your camera automatically chooses the appropriate camera settings based on the scene it uses the default settings for Smart Movie mode. • The camera may not select the correct scene depending on the shooting conditions, such as camera shake, lighting, and distance to stop...
User Manual
Page 55
... split style. • To adjust the sharpness of the dividing line, press [ ], and then select Line Blur → a value. • To apply a Smart Filter effect to or smaller automatically. Create a cold and monotone effect. 4 Press [Shutter] to start recording. 5 Press [Shutter] again to stop recording. •...; If you select Miniature, you cannot record sound in the video. • Depending on the option you can apply different Smart Filter effects to imitate the visual effect of the shot. Using Scene modes Option Sketch Fish-eye Classic Retro Palette Effect 1 Palette...
... split style. • To adjust the sharpness of the dividing line, press [ ], and then select Line Blur → a value. • To apply a Smart Filter effect to or smaller automatically. Create a cold and monotone effect. 4 Press [Shutter] to start recording. 5 Press [Shutter] again to stop recording. •...; If you select Miniature, you cannot record sound in the video. • Depending on the option you can apply different Smart Filter effects to imitate the visual effect of the shot. Using Scene modes Option Sketch Fish-eye Classic Retro Palette Effect 1 Palette...
User Manual
Page 62
... camera will fire automatically when the subject or background is dark. Auto: The flash will select a proper flash setting for the scene it detects in Smart Auto mode. Refer to capture photos at night or in Slow Sync Red-eye Fix Exit Select 2 Select an option. Preventing red-eye When the...
... camera will fire automatically when the subject or background is dark. Auto: The flash will select a proper flash setting for the scene it detects in Smart Auto mode. Refer to capture photos at night or in Slow Sync Red-eye Fix Exit Select 2 Select an option. Preventing red-eye When the...
User Manual
Page 71
... ACB ▲ With ACB 1 In Shooting mode, press [ ]. 2 Select ACB. 3 Select an option. Changing the metering option The metering mode refers to appear dark in Smart Auto mode. • The ACB feature is not available when you select. 1 In Shooting mode, press [ ]. 2 Select Metering. 3 Select an option. Spot: • Your camera...
... ACB ▲ With ACB 1 In Shooting mode, press [ ]. 2 Select ACB. 3 Select an option. Changing the metering option The metering mode refers to appear dark in Smart Auto mode. • The ACB feature is not available when you select. 1 In Shooting mode, press [ ]. 2 Select Metering. 3 Select an option. Spot: • Your camera...
User Manual
Page 77
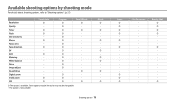
... Quality Timer Flash ISO sensitivity Macro Focus area Face detection EV ACB Metering White balance Drive Image adjust Sound Alive Digital zoom Intelli zoom OIS Smart Auto O O O O O O O O Program O O O O O O O O O O O O O O O O O Smart Movie O O O O O: The option is not available.
... Quality Timer Flash ISO sensitivity Macro Focus area Face detection EV ACB Metering White balance Drive Image adjust Sound Alive Digital zoom Intelli zoom OIS Smart Auto O O O O O O O O Program O O O O O O O O O O O O O O O O O Smart Movie O O O O O: The option is not available.

User Manual
Page 79
... videos in Playback mode ... ... 79 Starting Playback mode 79 Viewing photos 83 Playing a video 86 Editing a photo 88 Resizing photos 88 Rotating a photo 88 Applying Smart Filter effects 89 Adjusting your photos 90 Viewing files on a TV 92 Transferring files to the computer 93 Transferring files to your Windows OS computer...
... videos in Playback mode ... ... 79 Starting Playback mode 79 Viewing photos 83 Playing a video 86 Editing a photo 88 Resizing photos 88 Rotating a photo 88 Applying Smart Filter effects 89 Adjusting your photos 90 Viewing files on a TV 92 Transferring files to the computer 93 Transferring files to your Windows OS computer...

User Manual
Page 90
...Editing 89 Apply an oil painting effect. Blacken the edges of the frame and distort objects to the left, and then select a photo. 4 Select Smart Filter → an option. Apply a halftone effect. Hide facial imperfections or apply dreamy effects. Apply a vintage film effect. Apply a sepia tone ...your photos. 1 On the Home screen, scroll to . 2 Select . 3 Rotate [Zoom] to imitate the visual effect of a fisheye lens. Smart Filter : Normal Back Option Normal Miniature Vignetting Set Description No effect Apply a tilt-shift effect to save. Apply a pen sketch effect. Option Ink ...
...Editing 89 Apply an oil painting effect. Blacken the edges of the frame and distort objects to the left, and then select a photo. 4 Select Smart Filter → an option. Apply a halftone effect. Hide facial imperfections or apply dreamy effects. Apply a vintage film effect. Apply a sepia tone ...your photos. 1 On the Home screen, scroll to . 2 Select . 3 Rotate [Zoom] to imitate the visual effect of a fisheye lens. Smart Filter : Normal Back Option Normal Miniature Vignetting Set Description No effect Apply a tilt-shift effect to save. Apply a pen sketch effect. Option Ink ...
User Manual
Page 91
... left , and then select a photo. 4 Select an adjusting option. If the center of a photo is dark, you can adjust brightness, contrast, and saturation and apply Smart Filter effects at the same time. • You cannot apply the ACB, Face Retouch, and Red-eye Fix effects at the same time. Adjusting dark...
... left , and then select a photo. 4 Select an adjusting option. If the center of a photo is dark, you can adjust brightness, contrast, and saturation and apply Smart Filter effects at the same time. • You cannot apply the ACB, Face Retouch, and Red-eye Fix effects at the same time. Adjusting dark...


