

User Manual
Page 22
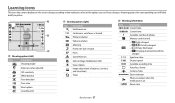
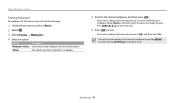
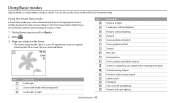
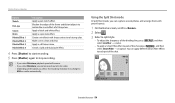
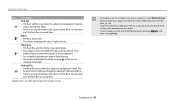
...in on part of a photo or view files as thumbnails, or adjust the volume Attaching the strap Display Buttons (See the table below) Button Description Basic functions Change the display option. Enter Playback mode. Zoom button • In Shooting mode: Zoom in or out • In Playback mode:... Zoom in focus Button Description Start a preset Wi-Fi function. (p. 22) Access the Home screen. (p. 28) Access options or menus. Change the flash option. Delete files in ...
...in on part of a photo or view files as thumbnails, or adjust the volume Attaching the strap Display Buttons (See the table below) Button Description Basic functions Change the display option. Enter Playback mode. Zoom button • In Shooting mode: Zoom in or out • In Playback mode:... Zoom in focus Button Description Start a preset Wi-Fi function. (p. 22) Access the Home screen. (p. 28) Access options or menus. Change the flash option. Delete files in ...
User Manual
Page 28
...option, the corresponding icon will blink briefly in yellow. 1 2 3 1 Shooting options (left) Icon Description Shooting mode Exposure value adjusted ISO sensitivity White balance Face detection Face tone Burst option AutoShare On 2 Shooting option (right) ...second) Flash Sound Alive on Optical Image Stabilization (OIS) Focus Option Image adjustment (sharpness, contrast, and saturation) Timer 3 Shooting information Icon Description Current date Current time Available number of photos Memory card inserted • : Fully charged • : Partially charged • : Empty (...
...option, the corresponding icon will blink briefly in yellow. 1 2 3 1 Shooting options (left) Icon Description Shooting mode Exposure value adjusted ISO sensitivity White balance Face detection Face tone Burst option AutoShare On 2 Shooting option (right) ...second) Flash Sound Alive on Optical Image Stabilization (OIS) Focus Option Image adjustment (sharpness, contrast, and saturation) Timer 3 Shooting information Icon Description Current date Current time Available number of photos Memory card inserted • : Fully charged • : Partially charged • : Empty (...
User Manual
Page 29
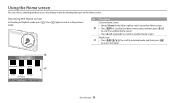
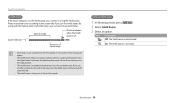
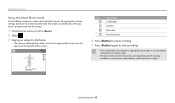
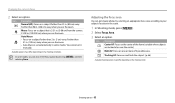
Description Current Home screen • Rotate [Zoom] to the left or right to switch to another Home screen. 1 • Press [ ] to scroll to the Home screen ...
Description Current Home screen • Rotate [Zoom] to the left or right to switch to another Home screen. 1 • Press [ ] to scroll to the Home screen ...
User Manual
Page 30
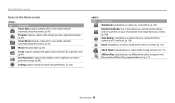
Using the Home screen Icons on the Home screen Icon Description Smart Auto: Capture a photo with a scene mode selected automatically by the camera. (p. 43) Program: Capture a photo with settings you have adjusted manually. (p. 44) Smart...specific scene. (p. 47) Live Panorama: Capture and combine a series of photos to create a panoramic image. (p. 48) Settings: Adjust settings to match your preferences. (p. 122) Icon Description MobileLink: Send photos or videos to a smart phone. (p. 107) Remote Viewfinder: Use a smart phone as a remote shutter release and see a preview on your smart phone...
Using the Home screen Icons on the Home screen Icon Description Smart Auto: Capture a photo with a scene mode selected automatically by the camera. (p. 43) Program: Capture a photo with settings you have adjusted manually. (p. 44) Smart...specific scene. (p. 47) Live Panorama: Capture and combine a series of photos to create a panoramic image. (p. 48) Settings: Adjust settings to match your preferences. (p. 122) Icon Description MobileLink: Send photos or videos to a smart phone. (p. 107) Remote Viewfinder: Use a smart phone as a remote shutter release and see a preview on your smart phone...
User Manual
Page 31
Using the Home screen Icon Description Beauty Shot: Capture a portrait with options to hide facial imperfections. (p. 50) Night Shot: Capture a night scene by adjusting shutter speed. (p. 51) Close-up Shot: Capture ... preset layouts. (p. 54) Motion Photo: Capture and combine a series of photos, and then select an area to be animated to create a GIF animation. (p. 55) Icon Description Album: View files as thumbnails. (p. 80) Photo Editor: Edit photos with various effects. (p. 88) Basic functions 30
Using the Home screen Icon Description Beauty Shot: Capture a portrait with options to hide facial imperfections. (p. 50) Night Shot: Capture a night scene by adjusting shutter speed. (p. 51) Close-up Shot: Capture ... preset layouts. (p. 54) Motion Photo: Capture and combine a series of photos, and then select an area to be animated to create a GIF animation. (p. 55) Icon Description Album: View files as thumbnails. (p. 80) Photo Editor: Edit photos with various effects. (p. 88) Basic functions 30
User Manual
Page 32
... also set a specified area as wallpaper. Album Set a photo you have captured as wallpaper by pressing [ ], and then selecting Set Wallpaper in Playback mode. Option Description Wallpaper Gallery Select the desired wallpaper from the default gallery. Basic functions 31
... also set a specified area as wallpaper. Album Set a photo you have captured as wallpaper by pressing [ ], and then selecting Set Wallpaper in Playback mode. Option Description Wallpaper Gallery Select the desired wallpaper from the default gallery. Basic functions 31
User Manual
Page 36
On The camera emits sounds. Basic functions 35 Option Description Off The camera does not emit any sounds. Setting the display and sound Setting the sound Turn the sound your camera emits when you perform functions on or off. 1 On the Home screen, scroll to . 2 Select . 3 Select Sound → Beep Sound. 4 Select an option.
On The camera emits sounds. Basic functions 35 Option Description Off The camera does not emit any sounds. Setting the display and sound Setting the sound Turn the sound your camera emits when you perform functions on or off. 1 On the Home screen, scroll to . 2 Select . 3 Select Sound → Beep Sound. 4 Select an option.
User Manual
Page 39
... indicator is in the Intelli range, your camera is using both the Optical zoom and Intelli zoom, you can zoom in Smart Auto mode. Icon Description Off: The Intelli zoom is always on in up to the zoom ratio if you use the Intelli zoom. Optical range Photo resolution when the...
... indicator is in the Intelli range, your camera is using both the Optical zoom and Intelli zoom, you can zoom in Smart Auto mode. Icon Description Off: The Intelli zoom is always on in up to the zoom ratio if you use the Intelli zoom. Optical range Photo resolution when the...
User Manual
Page 40
Icon Description Off: OIS is slow (for example, when you capture night scenes) -- the shutter speed is deactivated. the battery is too much camera shake -- you capture a ...
Icon Description Off: OIS is slow (for example, when you capture night scenes) -- the shutter speed is deactivated. the battery is too much camera shake -- you capture a ...
User Manual
Page 44
.... The Smart Auto mode is stabilized or on the type of the screen. The icons are not familiar with spot lighting Extended functions 43 Icon Description Landscapes Scenes with bright white backgrounds Landscapes at night Icon Description Portraits at the top left of scene it detects.
.... The Smart Auto mode is stabilized or on the type of the screen. The icons are not familiar with spot lighting Extended functions 43 Icon Description Landscapes Scenes with bright white backgrounds Landscapes at night Icon Description Portraits at the top left of scene it detects.
User Manual
Page 46
... 45 Using Basic modes Using the Smart Movie mode In Smart Movie mode, your subject in the frame. • The camera automatically selects a scene. Icon Description Landscapes Sunsets Blue skies Forested areas 4 Press [Shutter] to start recording. 5 Press [Shutter] again to . 2 Select . 3 Align your camera automatically chooses the appropriate camera settings...
... 45 Using Basic modes Using the Smart Movie mode In Smart Movie mode, your subject in the frame. • The camera automatically selects a scene. Icon Description Landscapes Sunsets Blue skies Forested areas 4 Press [Shutter] to start recording. 5 Press [Shutter] again to . 2 Select . 3 Align your camera automatically chooses the appropriate camera settings...
User Manual
Page 49
... underexposure of subjects caused by sunlight reflected from printed or electronic documents. 4 Align your subject in a single photo. Extended functions 48 Using Basic modes Option Description Landscape Capture still-life scenes and landscapes. Capture and combine a series of the scene you can capture a wide panoramic scene in the frame, and then...
... underexposure of subjects caused by sunlight reflected from printed or electronic documents. 4 Align your subject in a single photo. Extended functions 48 Using Basic modes Option Description Landscape Capture still-life scenes and landscapes. Capture and combine a series of the scene you can capture a wide panoramic scene in the frame, and then...
User Manual
Page 54
... cameras. Option Miniature Vignetting Ink Painting Oil Painting Cartoon Cross Filter Sketch Soft Focus Fish-eye Old Film Half Tone Dot Classic Retro Zooming Shot Description Apply a tilt-shift effect to imitate the visual effect of a fisheye lens. Using Scene modes 3 Select an effect. Hide facial imperfections or ...effect. Blacken the edges of the frame and distort objects to make the subject appear in miniature. Option Miniature Vignetting Half Tone Dot Description Apply a tilt-shift effect to imitate the visual effect of a cross filter. Apply a watercolor painting effect.
... cameras. Option Miniature Vignetting Ink Painting Oil Painting Cartoon Cross Filter Sketch Soft Focus Fish-eye Old Film Half Tone Dot Classic Retro Zooming Shot Description Apply a tilt-shift effect to imitate the visual effect of a fisheye lens. Using Scene modes 3 Select an effect. Hide facial imperfections or ...effect. Blacken the edges of the frame and distort objects to make the subject appear in miniature. Option Miniature Vignetting Half Tone Dot Description Apply a tilt-shift effect to imitate the visual effect of a cross filter. Apply a watercolor painting effect.
User Manual
Page 55
... and strong color. Make scenes clean and clear. Using Scene modes Option Sketch Fish-eye Classic Retro Palette Effect 1 Palette Effect 2 Palette Effect 3 Palette Effect 4 Description Apply a pen sketch effect. Blacken the edges of the frame and distort objects to each part of a fisheye lens. Create a cold and monotone effect. 4 Press...
... and strong color. Make scenes clean and clear. Using Scene modes Option Sketch Fish-eye Classic Retro Palette Effect 1 Palette Effect 2 Palette Effect 3 Palette Effect 4 Description Apply a pen sketch effect. Blacken the edges of the frame and distort objects to each part of a fisheye lens. Create a cold and monotone effect. 4 Press...

User Manual
Page 59
When you increase the resolution, your photo or video will also increase. Icon Description 4608 X 3456: Print on A1 paper. 4608 X 3072: Print on A1 paper in wide ratio (3:2). 4608 X 2592 : Print on A1 paper in panorama ratio (16:9) ... be printed on larger paper or displayed on a web page. Setting the photo resolution 1 In Shooting mode, press [ ]. 2 Select Photo Size. 3 Select an option. Icon Description 1280 X 720: HD files to play back on an HDTV. 640 X 480: SD files to change the image resolution and quality settings.
When you increase the resolution, your photo or video will also increase. Icon Description 4608 X 3456: Print on A1 paper. 4608 X 3072: Print on A1 paper in wide ratio (3:2). 4608 X 2592 : Print on A1 paper in panorama ratio (16:9) ... be printed on larger paper or displayed on a web page. Setting the photo resolution 1 In Shooting mode, press [ ]. 2 Select Photo Size. 3 Select an option. Icon Description 1280 X 720: HD files to play back on an HDTV. 640 X 480: SD files to change the image resolution and quality settings.
User Manual
Page 60
Icon Description Super Fine: Capture photos in normal quality. Shooting options 59 Normal: Capture photos in super high quality. Fine: Capture photos in the JPEG format. 1 In Shooting mode, press [ ]. 2 Select Quality. 3 Select an option. The camera compresses and saves the photos you capture in high quality. Selecting a resolution and quality Selecting a photo quality Set a photo quality setting. Higher image quality settings will result in larger file sizes.
Icon Description Super Fine: Capture photos in normal quality. Shooting options 59 Normal: Capture photos in super high quality. Fine: Capture photos in the JPEG format. 1 In Shooting mode, press [ ]. 2 Select Quality. 3 Select an option. The camera compresses and saves the photos you capture in high quality. Selecting a resolution and quality Selecting a photo quality Set a photo quality setting. Higher image quality settings will result in larger file sizes.
User Manual
Page 61
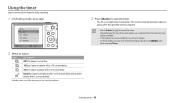
... timer to start the timer. • The AF-assist light/timer lamp blinks. Timer Off 10 Sec 2 Sec Double Exit Select 2 Select an option. Icon Description Off: The timer is not active. 10 Sec: Capture a photo after a 10-second delay. 2 Sec: Capture a photo after a 2-second delay. Double: Capture one photo after...
... timer to start the timer. • The AF-assist light/timer lamp blinks. Timer Off 10 Sec 2 Sec Double Exit Select 2 Select an option. Icon Description Off: The timer is not active. 10 Sec: Capture a photo after a 10-second delay. 2 Sec: Capture a photo after a 2-second delay. Double: Capture one photo after...
User Manual
Page 62
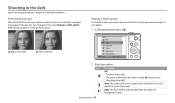
... a person in the dark, a red glow may appear in the person's eyes. Auto: The flash will display the shake warning shooting in low light. Icon Description Off: • The flash will not fire. • The camera will fire automatically when the subject or background is dark. Shooting options 61 Preventing red...
... a person in the dark, a red glow may appear in the person's eyes. Auto: The flash will display the shake warning shooting in low light. Icon Description Off: • The flash will not fire. • The camera will fire automatically when the subject or background is dark. Shooting options 61 Preventing red...
User Manual
Page 63
... flash fires twice when the subject or background is an interval between the 2 bursts of the flash. Shooting options 62 Shooting in the dark Icon Description Red-eye: • The flash will display the shake warning when you are shooting in low light. Do not move until the flash fires a second...
... flash fires twice when the subject or background is an interval between the 2 bursts of the flash. Shooting options 62 Shooting in the dark Icon Description Red-eye: • The flash will display the shake warning when you are shooting in low light. Do not move until the flash fires a second...
User Manual
Page 66
... (130 cm) away when you use the zoom. Shooting options 65 Multi AF: Focus on a subject farther than 51 in . (80 cm) away. Icon Description Normal (AF): Focus on one or more of the frame (suitable when subjects are located at or near the center). Farther than 2 in some modes... in . (5 cm) away. In some modes. Macro: Focus on the shooting conditions. Auto Macro: • Focus on the center of 9 possible areas. Icon Description Center AF: Focus on a subject farther than 98 in. (250 cm) away when you can also set the focus option by pressing [ selecting Focus. ], and...
... (130 cm) away when you use the zoom. Shooting options 65 Multi AF: Focus on a subject farther than 51 in . (80 cm) away. Icon Description Normal (AF): Focus on one or more of the frame (suitable when subjects are located at or near the center). Farther than 2 in some modes... in . (5 cm) away. In some modes. Macro: Focus on the shooting conditions. Auto Macro: • Focus on the center of 9 possible areas. Icon Description Center AF: Focus on a subject farther than 98 in. (250 cm) away when you can also set the focus option by pressing [ selecting Focus. ], and...