UN55D6050TF Picture Settings - Samsung
UN55D6050TF Picture Settings
View Results Below
Free Samsung UN55D6050TF manuals!
Problems with Samsung UN55D6050TF?
Ask a Question
Free Samsung UN55D6050TF manuals!
Problems with Samsung UN55D6050TF?
Ask a Question
Related Manual Pages


Similar Questions

Hi My Picture Setting Is Messed Up And Like To Reset It To Normal Viewing And I
I need to reset picture setting for normal viewing,could you plz help me what mode I should I select...
I need to reset picture setting for normal viewing,could you plz help me what mode I should I select...
(Posted by Anonymous-162802 6 years ago)

What Are The Best Picture Settings For My Samsung Unes6820fxzc Led Tv?
What are the best picture settings for my Samsung un55es6820fxzc tv? The picture is driving me crazy...
What are the best picture settings for my Samsung un55es6820fxzc tv? The picture is driving me crazy...
(Posted by krisbliss 11 years ago)

Related Terms
The following terms were also used when searching for UN55D6050TF Picture Settings - Samsung:- un55d6050tf for sale
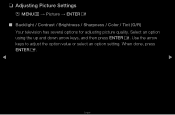
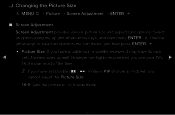
- un55d6050tf picture settings
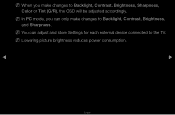
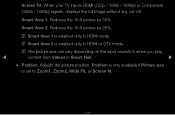
- un55d6050tf picture calibration settings
- un55d6050tf parts
- un55d6050tf not turning on
- un55d6050tf manual
- un55d6050tf main board
- un55d6050tf led tv settings
- un55d6050tf led hdtv
- un55d6050tf led
- un55d6050tf keyboard
- un55d6050tf power cord
- un55d6050tf firmware update
- un55d6050tf driver windows
- un55d6050tf cnet
- un55d6050tf calibration settings
- un55d6050tf calibration
- un55d6050tf best buy
- un55d6050tf amazon prime
- un55d6050tf amazon
- un55d6050tf 3d
- un55d6050tf samsung tv
- un55d6050tf wireless adapter
- un55d6050tf wall mount
- un55d6050tf tv shuts off
- un55d6050tf tv review
- un55d6050tf tv
- un55d6050tf stand
- un55d6050tf specs
- un55d6050tf specifications
- un55d6050tf skype
- un55d6050tf settings
- tv un55d6050tf
- un55d6050tf sale
- un55d6050tf reviews
- un55d6050tf review
- un55d6050tf remote control
- un55d6050tf remote codes
- un55d6050tf remote
- un55d6050tf prices
- un55d6050tf price
- un55d6050tf power supply
- samsung un55d6050tf calibration
- samsung un55d6050tf not turning on
- samsung un55d6050tf manual
- samsung un55d6050tf led tv settings
- samsung un55d6050tf led hdtv
- samsung un55d6050tf led
- samsung un55d6050tf keyboard
- samsung un55d6050tf for sale
- samsung un55d6050tf firmware update
- samsung un55d6050tf cnet
- samsung un55d6050tf calibration settings
- samsung un55d6050tf parts
- samsung un55d6050tf amazon prime
- samsung un55d6050tf 3d
- samsung un55d6050tf
- samsung tv un55d6050tf
- samsung smart tv un55d6050tf
- samsung model un55d6050tf
- samsung 55 un55d6050tf
- model un55d6050tf
- amazon un55d6050tf
- samsung un55d6050tf reviews
- smart tv un55d6050tf
- samsung un55d6050tf wall mount
- samsung un55d6050tf tv shuts off
- samsung un55d6050tf tv review
- samsung un55d6050tf tv
- samsung un55d6050tf stand
- samsung un55d6050tf specs
- samsung un55d6050tf specifications
- samsung un55d6050tf sale
- 55 un55d6050tf
- samsung un55d6050tf review
- samsung un55d6050tf remote control
- samsung un55d6050tf remote codes
- samsung un55d6050tf remote
- samsung un55d6050tf prices
- samsung un55d6050tf price
- samsung un55d6050tf power supply
- samsung un55d6050tf power cord
- samsung un55d6050tf picture settings