User Manual
Page 3
... 51 PROFILE Widget 53 Widget Gallery 53 Help Website 54 yy AllShare 55 About AllShare 55 Setting Up AllShare 55 Other Information yy Assembling the Cables 57 yy Installing the Wall Mount 58 yy Anti-theft Kensington Lock 59 yy Securing the TV to the Wall 60 yy Troubleshooting 61 yy...
... 51 PROFILE Widget 53 Widget Gallery 53 Help Website 54 yy AllShare 55 About AllShare 55 Setting Up AllShare 55 Other Information yy Assembling the Cables 57 yy Installing the Wall Mount 58 yy Anti-theft Kensington Lock 59 yy Securing the TV to the Wall 60 yy Troubleshooting 61 yy...
User Manual
Page 4
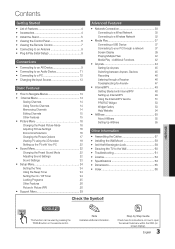
...Guide / Quick Setup Guide (M4 X L8) Blanking Bracket & Screw (1EA) (BN63-06543A) (M8 X L19) TV-Holder & Screw (1EA) (BN96-10788B) Cable Tie (BN61-05596A) Holder-Wire (3EA) (BN61-05373A) Holder-Wire stand (BN61-05491A) Holder-Ring (4EA) (BN61-05280A) Antenna Adapter (BN39-01154P) AV ...9998;The items' colors and shapes may vary depending on a USB device (p. 37). If any items are included with your TV and compatible Samsung mobile phones/devices through a network (p. 55). Getting Started List of Features yy Excellent Digital Interface & Networking: With a built-in Adapter (...
...Guide / Quick Setup Guide (M4 X L8) Blanking Bracket & Screw (1EA) (BN63-06543A) (M8 X L19) TV-Holder & Screw (1EA) (BN96-10788B) Cable Tie (BN61-05596A) Holder-Wire (3EA) (BN61-05373A) Holder-Wire stand (BN61-05491A) Holder-Ring (4EA) (BN61-05280A) Antenna Adapter (BN39-01154P) AV ...9998;The items' colors and shapes may vary depending on a USB device (p. 37). If any items are included with your TV and compatible Samsung mobile phones/devices through a network (p. 55). Getting Started List of Features yy Excellent Digital Interface & Networking: With a built-in Adapter (...

User Manual
Page 5
... persons lift and move the LED TV. Connect the Guide Stand to the Stand using four screws (M4 X L8) as shown. 01 Getting Started Input Cables (Sold Separately) HDMI HDMI-DVI See separate guide for installing the stand.
... persons lift and move the LED TV. Connect the Guide Stand to the Stand using four screws (M4 X L8) as shown. 01 Getting Started Input Cables (Sold Separately) HDMI HDMI-DVI See separate guide for installing the stand.
User Manual
Page 6
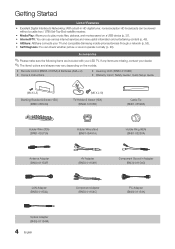
... power is still consumed even when the power button is on and lights up in standby mode for example). Getting Started ✎✎For best cable connection to this product, be sure to unplug the power cord. 6 English In the OSD, use the z buttons as you would use the ENTERE button... long periods of your TV's features. In the on-screen menu, use the ▼ and ▲ buttons on the remote control. In the OSD, use cables with objects other than your TV in standby mode. It is best to use the y buttons as below: yy Maximum thickness - 0.55 inches (14mm) Viewing...
... power is still consumed even when the power button is on and lights up in standby mode for example). Getting Started ✎✎For best cable connection to this product, be sure to unplug the power cord. 6 English In the OSD, use the z buttons as you would use the ENTERE button... long periods of your TV's features. In the on-screen menu, use the ▼ and ▲ buttons on the remote control. In the OSD, use cables with objects other than your TV in standby mode. It is best to use the y buttons as below: yy Maximum thickness - 0.55 inches (14mm) Viewing...
User Manual
Page 8
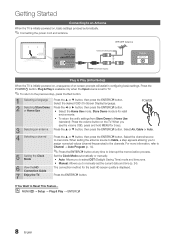
...sec. 3 Selecting an antenna Press the ▲ or ▼ button, then press the ENTERE button. Press the ENTERE button. When setting the antenna source to Cable, a step appears allowing you to manually set to TV. ✎✎To return to the previous step, press the Red button. 1 Selecting a language Press ...ENTERE button. Store Demo mode is initially powered on, basic settings proceed automatically. ✎✎Connecting the power cord and antenna. Select Air, Cable or Auto. 4 Selecting a channel 5 Setting the Clock Mode 6 View the HD Connection Guide 7 Enjoy the TV.
...sec. 3 Selecting an antenna Press the ▲ or ▼ button, then press the ENTERE button. Press the ENTERE button. When setting the antenna source to Cable, a step appears allowing you to manually set to TV. ✎✎To return to the previous step, press the Red button. 1 Selecting a language Press ...ENTERE button. Store Demo mode is initially powered on, basic settings proceed automatically. ✎✎Connecting the power cord and antenna. Select Air, Cable or Auto. 4 Selecting a channel 5 Setting the Clock Mode 6 View the HD Connection Guide 7 Enjoy the TV.
User Manual
Page 9
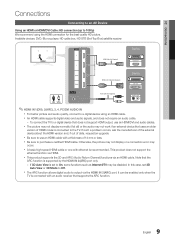
... with an audio receiver that uses an older version of HDMI mode is recommended. This product does not support the ethernet function via an HDMI cable. If such a problem occurs, ask the manufacturer of the external device about the HDMI version and, if out of 14 mm or less. xx This... product supports the 3D and ARC (Audio Return Channel) functions via HDMI. xx The ARC function allows digital audio to purchase a certified HDMI cable. xx Be sure to output via the HDMI IN 2(ARC) port. In this case, set to On, some functions such as Internet@TV may occur...
... with an audio receiver that uses an older version of HDMI mode is recommended. This product does not support the ethernet function via an HDMI cable. If such a problem occurs, ask the manufacturer of the external device about the HDMI version and, if out of 14 mm or less. xx This... product supports the 3D and ARC (Audio Return Channel) functions via HDMI. xx The ARC function allows digital audio to purchase a certified HDMI cable. xx Be sure to output via the HDMI IN 2(ARC) port. In this case, set to On, some functions such as Internet@TV may occur...

User Manual
Page 10
Connections Using a Component (up to 1080p) or Audio/Video (480i only) Cable Available devices: DVD, Blu-ray player, cable box, STB satellite receiver, VCR W R R B G Red White Red Blue Green Device W R Y Red White ...R W R B G AUDIO OUT VIDEO OUT R-AUDIO-L R W Y R W AV Adapter (Supplied) Component Adapter (Supplied) G B R Audio Cable (Not Supplied) Component Cable (Not Supplied) Audio Cable Video Cable (Not Supplied) (Not Supplied) R W Y ✎✎For better picture quality, the Component connection is recommended over the A/V connection. Using an EX...
Connections Using a Component (up to 1080p) or Audio/Video (480i only) Cable Available devices: DVD, Blu-ray player, cable box, STB satellite receiver, VCR W R R B G Red White Red Blue Green Device W R Y Red White ...R W R B G AUDIO OUT VIDEO OUT R-AUDIO-L R W Y R W AV Adapter (Supplied) Component Adapter (Supplied) G B R Audio Cable (Not Supplied) Component Cable (Not Supplied) Audio Cable Video Cable (Not Supplied) (Not Supplied) R W Y ✎✎For better picture quality, the Component connection is recommended over the A/V connection. Using an EX...

User Manual
Page 11
... theater receiver. If you can hear sound output from the TV's optical jack. When the source is a digital component such as a DVD / Blu-ray player / cable box / STB (Set-Top-Box) satellite receiver and is receiving a DTV signal, the TV will be heard from the home theater receiver. xx When an... a Digital Audio System is set to on, you want to hear 5.1 CH audio, connect the digital audio out jack from your DVD / Blu-ray player / cable box / STB satellite receiver directly to an amplifier or home theater. ✎✎AUDIO OUT: Connects to the audio input jacks on your amplifier/DVD...
... theater receiver. If you can hear sound output from the TV's optical jack. When the source is a digital component such as a DVD / Blu-ray player / cable box / STB (Set-Top-Box) satellite receiver and is receiving a DTV signal, the TV will be heard from the home theater receiver. xx When an... a Digital Audio System is set to on, you want to hear 5.1 CH audio, connect the digital audio out jack from your DVD / Blu-ray player / cable box / STB satellite receiver directly to an amplifier or home theater. ✎✎AUDIO OUT: Connects to the audio input jacks on your amplifier/DVD...

User Manual
Page 12
....500 108.000 85.500 106.500 136.750 146.250 89.040 128.943 148.500 ✎✎NOTE xx For HDMI/DVI cable connection, you must use the HDMI IN 1(DVI) jack. xx Separate and Composite modes are supported. xx The interlace mode is not supported.... 12 English Sync Polarity (H / V) +/-/+ -/-/-/- -/+ -/- +/+ Connections Using an HDMI/DVI cable or a D-sub cable Connecting to a PC HDMI to DVI Cable (Not Supplied) PC Adapter (Supplied) Audio Cable (Not Supplied) D-Sub Cable (Not Supplied) DVI OUT AUDIO OUT AUDIO OUT PC OUT Display Modes (D-Sub and HDMI/DVI Input...
....500 108.000 85.500 106.500 136.750 146.250 89.040 128.943 148.500 ✎✎NOTE xx For HDMI/DVI cable connection, you must use the HDMI IN 1(DVI) jack. xx Separate and Composite modes are supported. xx The interlace mode is not supported.... 12 English Sync Polarity (H / V) +/-/+ -/-/-/- -/+ -/- +/+ Connections Using an HDMI/DVI cable or a D-sub cable Connecting to a PC HDMI to DVI Cable (Not Supplied) PC Adapter (Supplied) Audio Cable (Not Supplied) D-Sub Cable (Not Supplied) DVI OUT AUDIO OUT AUDIO OUT PC OUT Display Modes (D-Sub and HDMI/DVI Input...
User Manual
Page 13
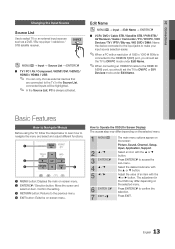
Edit Name OO MENUm → Input → Edit Name → ENTERE ■■ VCR / DVD / Cable STB / Satellite STB / PVR STB / AV Receiver / Game / Camcorder / PC / DVI PC / DVI... should set the TV to DVI PC mode under Edit Name. ✎✎When connecting an HDMI/DVI cable to the HDMI IN 1(DVI) port, you should set the TV to confirm the selection. Confirm the... activated. Press ENTERE to select TV or an external input sources such as a DVD / Blu-ray player / cable box / STB satellite receiver. Select an icon with the ▲ or ▼ button. 02 Connections Changing the...
Edit Name OO MENUm → Input → Edit Name → ENTERE ■■ VCR / DVD / Cable STB / Satellite STB / PVR STB / AV Receiver / Game / Camcorder / PC / DVI PC / DVI... should set the TV to DVI PC mode under Edit Name. ✎✎When connecting an HDMI/DVI cable to the HDMI IN 1(DVI) port, you should set the TV to confirm the selection. Confirm the... activated. Press ENTERE to select TV or an external input sources such as a DVD / Blu-ray player / cable box / STB satellite receiver. Select an icon with the ▲ or ▼ button. 02 Connections Changing the...

User Manual
Page 14
...menus may differ depending on the right. Auto Program ■■ Air: Air antenna signal. ■■ Cable: Cable antenna signal. ■■ Auto: Air and Cable antenna. 14 English The c mark appears to the left of signal source that is connected to Favorite or ...Air Add to next or previous page. A reserved Program. ¦¦ Memorizing Channels OO MENUm → Channel → ENTERE Antenna (Air / Cable) t Before your television can watch frequently as a Favorite. Basic Features Channel Menu ¦¦ Seeing Channels ¦¦ Using Favorite Channels OO ...
...menus may differ depending on the right. Auto Program ■■ Air: Air antenna signal. ■■ Cable: Cable antenna signal. ■■ Auto: Air and Cable antenna. 14 English The c mark appears to the left of signal source that is connected to Favorite or ...Air Add to next or previous page. A reserved Program. ¦¦ Memorizing Channels OO MENUm → Channel → ENTERE Antenna (Air / Cable) t Before your television can watch frequently as a Favorite. Basic Features Channel Menu ¦¦ Seeing Channels ¦¦ Using Favorite Channels OO ...

User Manual
Page 15
... Change a show you have reserved to watch. ✎✎ This deletes the highlighted or selected program(s). 15 English Begin with step 3 of cable system that exists in Repeat you can enter the date you want . ✎✎ NOTE xx All deleted channels will be shown on the channel... reserved to 20~30 minutes. Press the ◄ button to be reserved. Scroll up to watch . xx Reserved programs will be displayed in Cable mode. Press the ENTERE button. ✎✎This function is displayed here. xx Delete a channel from the Added Channels or Favorite menu in...
... Change a show you have reserved to watch. ✎✎ This deletes the highlighted or selected program(s). 15 English Begin with step 3 of cable system that exists in Repeat you can enter the date you want . ✎✎ NOTE xx All deleted channels will be shown on the channel... reserved to 20~30 minutes. Press the ◄ button to be reserved. Scroll up to watch . xx Reserved programs will be displayed in Cable mode. Press the ENTERE button. ✎✎This function is displayed here. xx Delete a channel from the Added Channels or Favorite menu in...
User Manual
Page 18
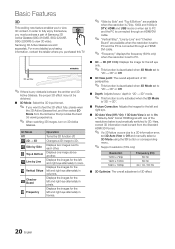
... screen. ✎✎ Available with HD 1080i / 720p signals in 16:9 mode. 4:3 : Sets the picture to an input on the TV. ■■ Size: Your cable box/satellite receiver may cause image retention(screen burn) which are not covered by your TV is weak, you are inputted. ✎✎NOTE xx...
... screen. ✎✎ Available with HD 1080i / 720p signals in 16:9 mode. 4:3 : Sets the picture to an input on the TV. ■■ Size: Your cable box/satellite receiver may cause image retention(screen burn) which are not covered by your TV is weak, you are inputted. ✎✎NOTE xx...
User Manual
Page 20
... Hz ■■ 3D Optimize: The overall adjustment of 3D perspective. ✎✎ This function is deactivated when 3D Mode set to view 3D content. Samsung 3D Active Glasses are available when the resolution is set to "2D → 3D" or Off. ■■ Depth: Adjusts focus / depth in "2D →... left and right eye alternately in DTV, HDMI and USB mode or when set to PC and the PC is connected through an HDMI/ DVI cable. ✎✎ "Frequency" displays the frequency (60Hz only) when the resolution is set to PC. ■■ 3D → 2D (Off / On): Displays the ...
... Hz ■■ 3D Optimize: The overall adjustment of 3D perspective. ✎✎ This function is deactivated when 3D Mode set to view 3D content. Samsung 3D Active Glasses are available when the resolution is set to "2D → 3D" or Off. ■■ Depth: Adjusts focus / depth in "2D →... left and right eye alternately in DTV, HDMI and USB mode or when set to PC and the PC is connected through an HDMI/ DVI cable. ✎✎ "Frequency" displays the frequency (60Hz only) when the resolution is set to PC. ■■ 3D → 2D (Off / On): Displays the ...
User Manual
Page 22
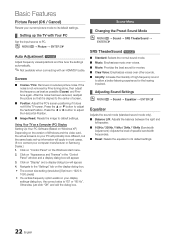
... picture so that it does not fit the TV screen. Click on "Appearance and Themes" in most cases. (If not, contact your computer manufacturer or Samsung Dealer.) 1. Navigate to the center of screen. ■■ Position: Adjust the PC's screen positioning if it is aligned to the "Settings" tab ...on your PC will probably look different, but the same basic set-up the TV with an HDMI/DVI cable. Press the ◄ or ► button to adjust the Horizontal-Position. ■■ Image Reset: Resets the image to its default settings. ¦¦...
... picture so that it does not fit the TV screen. Click on "Appearance and Themes" in most cases. (If not, contact your computer manufacturer or Samsung Dealer.) 1. Navigate to the center of screen. ■■ Position: Adjust the PC's screen positioning if it is aligned to the "Settings" tab ...on your PC will probably look different, but the same basic set-up the TV with an HDMI/DVI cable. Press the ◄ or ► button to adjust the Horizontal-Position. ■■ Image Reset: Resets the image to its default settings. ¦¦...
User Manual
Page 24
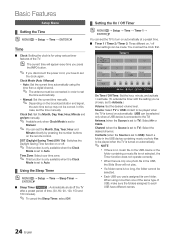
... Timer function does not operate correctly. Auto: Set the current time automatically using more than one photo file in order to TV): Select Air or Cable. Source: Select TV or USB content to be played when the TV is turned on the USB device or the folder containing a music file is... set the clock first. On Time ▲ Inactivate ▼ Off Time Inactivate Volume 10 Repeat Once Timer 1 00 00 am 00 Source TV 00 Antenna Cable am /pm manually. ✎✎ Available only when Clock Mode is no music file on automatically. (USB can set to be correct. Manual: Set the...
... Timer function does not operate correctly. Auto: Set the current time automatically using more than one photo file in order to TV): Select Air or Cable. Source: Select TV or USB content to be played when the TV is turned on the USB device or the folder containing a music file is... set the clock first. On Time ▲ Inactivate ▼ Off Time Inactivate Volume 10 Repeat Once Timer 1 00 00 am 00 Source TV 00 Antenna Cable am /pm manually. ✎✎ Available only when Clock Mode is no music file on automatically. (USB can set to be correct. Manual: Set the...
User Manual
Page 27
...melody plays when the TV is turned on or off or give permission to Default: This option sets each device's manual. 27 English Return to Samsung mobile phones/ devices. 03 Basic Features ■■ Digital Caption Options: (digital channels only) Size: Options include Default, Small, Standard and... the background color of the menu. ■■ Melody (Off / Low / Medium / High): Set so that support BD Wise through a HDMI cable. ■■ Menu Transparency (Bright / Dark): Set the Transparency of the caption. xx You cannot set by selecting the game menu. ✎✎...
...melody plays when the TV is turned on or off or give permission to Default: This option sets each device's manual. 27 English Return to Samsung mobile phones/ devices. 03 Basic Features ■■ Digital Caption Options: (digital channels only) Size: Options include Default, Small, Standard and... the background color of the menu. ■■ Melody (Off / Low / Medium / High): Set so that support BD Wise through a HDMI cable. ■■ Menu Transparency (Bright / Dark): Set the Transparency of the caption. xx You cannot set by selecting the game menu. ✎✎...
User Manual
Page 28
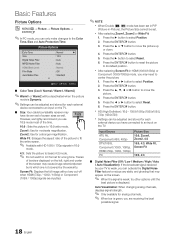
... video source simultaneously. Contact Samsung's Call Center for assistance (1-800-SAMSUNG). There may notice that the picture in PIP mode. If the problem persists, refer to the external device's user manual. ■■ Signal Information: (digital channels only) An HD channel's reception quality is either Air or Cable as the input source for...
... video source simultaneously. Contact Samsung's Call Center for assistance (1-800-SAMSUNG). There may notice that the picture in PIP mode. If the problem persists, refer to the external device's user manual. ■■ Signal Information: (digital channels only) An HD channel's reception quality is either Air or Cable as the input source for...

User Manual
Page 30
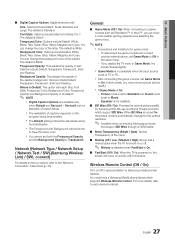
... your network requires a Static IP address. See the diagram below . The Modem Port on the Wall External Modem (ADSL / VDSL / Cable TV) TV Rear Panel Modem Cable (Not Supplied) LAN Cable (Not Supplied) LAN Adapter (Supplied) yy You can attach your TV to your LAN by connecting the LAN port on the... back of your TV to a IP Sharer which is connected to a network wall outlet using a Cat 5 cable. Advanced Features Network Connection You can set up your TV so that it can access the Internet through your computer. ✎✎ You can use...
... your network requires a Static IP address. See the diagram below . The Modem Port on the Wall External Modem (ADSL / VDSL / Cable TV) TV Rear Panel Modem Cable (Not Supplied) LAN Cable (Not Supplied) LAN Adapter (Supplied) yy You can attach your TV to your LAN by connecting the LAN port on the... back of your TV to a IP Sharer which is connected to a network wall outlet using a Cat 5 cable. Advanced Features Network Connection You can set up your TV so that it can access the Internet through your computer. ✎✎ You can use...
User Manual
Page 31
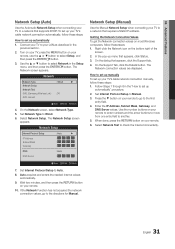
... Protocol Setup to set up menu that requires a Static IP address. Select Network Setup. In the pop-up your TV's cable network connection manually, follow these steps: 1. On the Support Tab, click the Details button. The Network screen appears. Network Network... Type : Wired ► Network Setup Network Test SWL (Samsung Wireless Link) : Off SWL connect U Move E Enter R Return 4. 04 Advanced Features Network Setup (Auto) Use the Automatic Network Setup...
... Protocol Setup to set up menu that requires a Static IP address. Select Network Setup. In the pop-up your TV's cable network connection manually, follow these steps: 1. On the Support Tab, click the Details button. The Network screen appears. Network Network... Type : Wired ► Network Setup Network Test SWL (Samsung Wireless Link) : Off SWL connect U Move E Enter R Return 4. 04 Advanced Features Network Setup (Auto) Use the Automatic Network Setup...

