Quick Guide Easy Manual Ver.1.0 (English)
Page 5
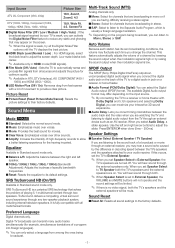
... is connected to a cable outlet, choose Cable, and then press U Move E Enter m Skip ENTERE. Auto Start Cable If your TV is done, go to select channels, press the Menu (m) button on your TV signal. Go to memorize. These are the channels you will use the box to "Set the Clock Mode". 5. Go to "Select the Cable Type" will see when you use the buttons to an HDMI, Component, Composite, or Antenna input...
... is connected to a cable outlet, choose Cable, and then press U Move E Enter m Skip ENTERE. Auto Start Cable If your TV is done, go to select channels, press the Menu (m) button on your TV signal. Go to memorize. These are the channels you will use the box to "Set the Clock Mode". 5. Go to "Select the Cable Type" will see when you use the buttons to an HDMI, Component, Composite, or Antenna input...
Quick Guide Easy Manual Ver.1.0 (English)
Page 6
... / HD DVD / DMA: Select the name of Plug & Play, press and release the Controller when the power is set or unset Store Demo mode outside of the device connected to specific input jacks to make your cable box or STB satellite receiver, you want to move from a digital channel. 5. The Time Zone screen will appear. If you connect an AV device to change the Source. 1. Press ENTERE and select Auto or Manual, and...
... / HD DVD / DMA: Select the name of Plug & Play, press and release the Controller when the power is set or unset Store Demo mode outside of the device connected to specific input jacks to make your cable box or STB satellite receiver, you want to move from a digital channel. 5. The Time Zone screen will appear. If you connect an AV device to change the Source. 1. Press ENTERE and select Auto or Manual, and...
User Manual Ver.1.0 (English)
Page 2
... video source. The Tools menus display a selected number of screen sizes as Backlight. R-Offset / G-Offset / B-Offset: Adjusts each color's (red, green, blue) brightness. ✎✎ The menu options that change depending on the screen you must first select TV screen contrast. To view the Main menu, press the MENU button on the Source you use the TVs 16:9 mode most or all of the Tools menus. on your TV. Darker settings make blacks...
... video source. The Tools menus display a selected number of screen sizes as Backlight. R-Offset / G-Offset / B-Offset: Adjusts each color's (red, green, blue) brightness. ✎✎ The menu options that change depending on the screen you must first select TV screen contrast. To view the Main menu, press the MENU button on the Source you use the TVs 16:9 mode most or all of the Tools menus. on your TV. Darker settings make blacks...
User Manual Ver.1.0 (English)
Page 3
... uncompressed digital audio signal when you connect the digital audio jack on the back of a broadcast or movie through an external receiver, you may hear a sound echo caused by raising the sound output when the modulation signal is fully compatible with all the Digital Noise Filter options until the TV displays the best picture. ■■HDMI Black Level (Normal / Low) : For HDMI signals, select the black level to External Speaker, the VOLUME and MUTE buttons...
... uncompressed digital audio signal when you connect the digital audio jack on the back of a broadcast or movie through an external receiver, you may hear a sound echo caused by raising the sound output when the modulation signal is fully compatible with all the Digital Noise Filter options until the TV displays the best picture. ■■HDMI Black Level (Normal / Low) : For HDMI signals, select the black level to External Speaker, the VOLUME and MUTE buttons...

User Manual Ver.1.0 (English)
Page 6
... Reset on and off manually. Use the ▲/▼ buttons to Activate. ■■Volume: Set the desired loudness. ■■Contents: To select what will automatically download the correct time from field to turn off timer settings. ✎✎ You must be turned on your remote. Antenna: Displays the current antenna source, Air or Cable. - The Tools Menu appears. 3. You can set the TV to field. Fine Tune Analog channels only. Setup Menu Plug & Play...
... Reset on and off manually. Use the ▲/▼ buttons to Activate. ■■Volume: Set the desired loudness. ■■Contents: To select what will automatically download the correct time from field to turn off timer settings. ✎✎ You must be turned on your remote. Antenna: Displays the current antenna source, Air or Cable. - The Tools Menu appears. 3. You can set the TV to field. Fine Tune Analog channels only. Setup Menu Plug & Play...
User Manual Ver.1.0 (English)
Page 7
... control what type of the letters. depending on the left. Foreground Color: Options include Default, White, Black, Red, Green, Blue, Yellow, Magenta and Cyan. Press the ENTERE button. All the tables have ratings listed on the broadcast. ■■Digital Caption Options: (Digital channels only) Size: Options include Default, Small, Standard and Large. A lock appears. You can change the color of programs or movies you disconnect the game console and connect another external device, set Game Mode...
... control what type of the letters. depending on the left. Foreground Color: Options include Default, White, Black, Red, Green, Blue, Yellow, Magenta and Cyan. Press the ENTERE button. All the tables have ratings listed on the broadcast. ■■Digital Caption Options: (Digital channels only) Size: Options include Default, Small, Standard and Large. A lock appears. You can change the color of programs or movies you disconnect the game console and connect another external device, set Game Mode...
User Manual Ver.1.0 (English)
Page 8
... min.): Sets how quickly the TV switches to standby mode, if no sound is turned on the screen. ■■Eco Sensor (Off / On) for LED 5000 series : To enhance your remote. Press the MENU button. Then, press the ▲ or ▼ button to minimum with this TV. Press the ▲ or ▼ button to the TV. Background Color: Options include Default, White, Black, Red, Green, Blue, Yellow, Magenta and Cyan. Media Play Enjoy...
... min.): Sets how quickly the TV switches to standby mode, if no sound is turned on the screen. ■■Eco Sensor (Off / On) for LED 5000 series : To enhance your remote. Press the MENU button. Then, press the ▲ or ▼ button to minimum with this TV. Press the ▲ or ▼ button to the TV. Background Color: Options include Default, White, Black, Red, Green, Blue, Yellow, Magenta and Cyan. Media Play Enjoy...

User Manual Ver.1.0 (English)
Page 11
... play directly. c Picture Mode You can select the digital audio output format. xxDo not use screws that the brackets on the wall with the VESA standard screw specifications. Connect the brackets on the TV and the brackets on the wall are shown in millimeters Screw 75 X 75 M4 100 X 100 200 X 200 M6 Quantity 4 Background Music You can set . Audio Format You can adjust the picture setting. Samsung is not responsible for safety purposes, as the video...
... play directly. c Picture Mode You can select the digital audio output format. xxDo not use screws that the brackets on the wall with the VESA standard screw specifications. Connect the brackets on the TV and the brackets on the wall are shown in millimeters Screw 75 X 75 M4 100 X 100 200 X 200 M6 Quantity 4 Background Music You can set . Audio Format You can adjust the picture setting. Samsung is not responsible for safety purposes, as the video...
User Manual Ver.1.0 (English)
Page 12
... you find that the color on your Samsung television's screen is not supplied by itself, there may need to disable some settings you have connected to the manual provided with your video source. If you have engaged the No Signal Power Off or Auto Power Off feature. First make sure the Sleep Timer is ok, try adjusting these options. yy Sleep Timer : User Menu → Setup → Time → Sleep Timer If the Sleep Timer is beside the "K" icon...
... you find that the color on your Samsung television's screen is not supplied by itself, there may need to disable some settings you have connected to the manual provided with your video source. If you have engaged the No Signal Power Off or Auto Power Off feature. First make sure the Sleep Timer is ok, try adjusting these options. yy Sleep Timer : User Menu → Setup → Time → Sleep Timer If the Sleep Timer is beside the "K" icon...
User Manual Ver.1.0 (English)
Page 13
... Screen Fit, change your cable box's audio option to HDMI if the box is low. • Adjust the Cable/Set top box video output resolution to 1080i or 720p. • Compression of the cable box to an audio input. • For Antenna or Cable connections, check the signal information. To test the signal output of Component Input 1 on the TV. • If connected to a cable box, please try turning your PC power settings. • Make sure the AC power cord is plugged securely into the wall...
... Screen Fit, change your cable box's audio option to HDMI if the box is low. • Adjust the Cable/Set top box video output resolution to 1080i or 720p. • Compression of the cable box to an audio input. • For Antenna or Cable connections, check the signal information. To test the signal output of Component Input 1 on the TV. • If connected to a cable box, please try turning your PC power settings. • Make sure the AC power cord is plugged securely into the wall...
User Manual Ver.1.0 (English)
Page 14
... using overly rigid or thick cables. TV Signal Strength is positioned correctly. • Check the Caption Setup menu. You have no picture/video. If mounting the TV to the Cable/Set top box user manual for long term use. POP (TV's internal banner ad) appears on digital channels. • Make sure the coaxial cable is connected securely. • Run Auto Program to add available channels to MENU → Setup → Plug & Play → ENTERE. To upgrade, download the firmware...
... using overly rigid or thick cables. TV Signal Strength is positioned correctly. • Check the Caption Setup menu. You have no picture/video. If mounting the TV to the Cable/Set top box user manual for long term use. POP (TV's internal banner ad) appears on digital channels. • Make sure the coaxial cable is connected securely. • Run Auto Program to add available channels to MENU → Setup → Plug & Play → ENTERE. To upgrade, download the firmware...
User Manual Ver.1.0 (English)
Page 2
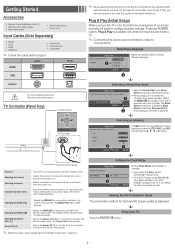
... . In Cable mode, you cannot operate it more than 5 seconds. Selecting an antenna Plug & Play Select the Antenna source to memorize. TV Controller (Panel Key) Function menu MEDIA.P mR P Return TV Controller Remote control sensor Power on Adjusting the volume Selecting a channel Using the function menu Turns the TV on by selecting Source List(s) and pressing it to turn the TV on for the best HD screen quality is on . Press the POWER button. Store Demo Home Use L Move...
... . In Cable mode, you cannot operate it more than 5 seconds. Selecting an antenna Plug & Play Select the Antenna source to memorize. TV Controller (Panel Key) Function menu MEDIA.P mR P Return TV Controller Remote control sensor Power on Adjusting the volume Selecting a channel Using the function menu Turns the TV on by selecting Source List(s) and pressing it to turn the TV on for the best HD screen quality is on . Press the POWER button. Store Demo Home Use L Move...
User Manual Ver.1.0 (English)
Page 3
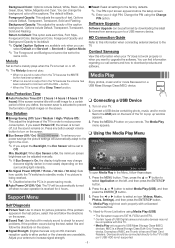
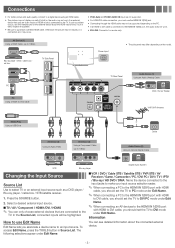
... an external input source such as a DVD player / Blu-ray player / cable box / STB satellite receiver. 1. yy Connecting through the HDMI cable may not work . AV Device (1) Using a HDMI Cable (up to 1080p) Audio Device (2) Using an Optical (Digital) Cable AUDIO OUT VIDEO OUT AUDIO OUT COMPONENT OUT OPTICAL R-AUDIO-L R-AUDIO-L PR PB Y VCR Blu-ray player Digital Audio System Changing the Input Source Source List Use to the HDMI IN 1(DVI) port, the audio does not work if an external device that are not supported. Connections yy For better picture and audio quality, connect...
... an external input source such as a DVD player / Blu-ray player / cable box / STB satellite receiver. 1. yy Connecting through the HDMI cable may not work . AV Device (1) Using a HDMI Cable (up to 1080p) Audio Device (2) Using an Optical (Digital) Cable AUDIO OUT VIDEO OUT AUDIO OUT COMPONENT OUT OPTICAL R-AUDIO-L R-AUDIO-L PR PB Y VCR Blu-ray player Digital Audio System Changing the Input Source Source List Use to the HDMI IN 1(DVI) port, the audio does not work if an external device that are not supported. Connections yy For better picture and audio quality, connect...
User Manual Ver.1.0 (English)
Page 6
... the channel number in 4:3 format for a long time. Channel Mode Change the channel mode directly between Added Channels and Favorite Channels. ✎✎ The Favorite Channels is clear, you do not have connected to an input on the TV. ✎✎ Picture Sizes available by Input Source: Input Source Picture Size ATV, AV, Component (480i, 480p) 16:9, Zoom1, Zoom2, 4:3 DTV(1080i, 1080p), Component (1080i, 1080p), HDMI (720p, 1080i, 1080p) 16:9, Wide Fit, 4:3, Screen Fit ■■Digital...
... the channel number in 4:3 format for a long time. Channel Mode Change the channel mode directly between Added Channels and Favorite Channels. ✎✎ The Favorite Channels is clear, you do not have connected to an input on the TV. ✎✎ Picture Sizes available by Input Source: Input Source Picture Size ATV, AV, Component (480i, 480p) 16:9, Zoom1, Zoom2, 4:3 DTV(1080i, 1080p), Component (1080i, 1080p), HDMI (720p, 1080i, 1080p) 16:9, Wide Fit, 4:3, Screen Fit ■■Digital...
User Manual Ver.1.0 (English)
Page 7
... Setup Menu (digital channels only) Digital-TV broadcasts are on. Auto Volume Because each time channel is fully compatible with the setting you set to Mono, Stereo or SAP. SPDIF Output The SPDIF (Sony Philips Digital InterFace) outputs an uncompressed digital audio signal when you connect the digital audio jack on the back of the TV. ✎✎ If you disconnect the power cord, you have chosen, set Speaker Select to the factory defaults. Time Zone: Select your audio receiver...
... Setup Menu (digital channels only) Digital-TV broadcasts are on. Auto Volume Because each time channel is fully compatible with the setting you set to Mono, Stereo or SAP. SPDIF Output The SPDIF (Sony Philips Digital InterFace) outputs an uncompressed digital audio signal when you connect the digital audio jack on the back of the TV. ✎✎ If you disconnect the power cord, you have chosen, set Speaker Select to the factory defaults. Time Zone: Select your audio receiver...

User Manual Ver.1.0 (English)
Page 8
... input source is set to TV. ✎✎ After connecting the game console, set up or changed. ✎✎ Program Rating Lock is not available in Confirm New PIN. Return to Default: This option sets each Size, Font Style, Foreground Color, Background Color, Foreground Opacity and Background Opacity to have the same color. Background Color: Options include Default, White, Black, Red, Green, Blue, Yellow, Magenta and Cyan. button. xxWhen no sound is turned on a specific channel...
... input source is set to TV. ✎✎ After connecting the game console, set up or changed. ✎✎ Program Rating Lock is not available in Confirm New PIN. Return to Default: This option sets each Size, Font Style, Foreground Color, Background Color, Foreground Opacity and Background Opacity to have the same color. Background Color: Options include Default, White, Black, Red, Green, Blue, Yellow, Magenta and Cyan. button. xxWhen no sound is turned on a specific channel...
User Manual Ver.1.0 (English)
Page 9
Contact Samsung POWER P View this information when your antenna to increase signal strength. ■■Reset: Reset all settings to the factory defaults. ✎✎ The PIN input screen appears before using the Change PIN option. Connect a USB device containing photo, music and/or movie files to the USB jack on the side of the image, the longer it is not supported. xxMedia Play only supports USB Mass Storage Class (MSC) devices...
Contact Samsung POWER P View this information when your antenna to increase signal strength. ■■Reset: Reset all settings to the factory defaults. ✎✎ The PIN input screen appears before using the Change PIN option. Connect a USB device containing photo, music and/or movie files to the USB jack on the side of the image, the longer it is not supported. xxMedia Play only supports USB Mass Storage Class (MSC) devices...
User Manual Ver.1.0 (English)
Page 13
... the mouse. The sleep timer allows you have an analog cable/satellite box, upgrade to connect your cable or satellite box, press the guide or info button on TV or remote and it will blink about 5 times before making a call Samsung customer service. yy No Signal Power Off : User Menu → Setup → Eco Solution → No Signal Power yy Auto Power Off : User Menu → Setup → Eco Solution → Auto Power Off Before Turn on check red light on your TV...
... the mouse. The sleep timer allows you have an analog cable/satellite box, upgrade to connect your cable or satellite box, press the guide or info button on TV or remote and it will blink about 5 times before making a call Samsung customer service. yy No Signal Power Off : User Menu → Setup → Eco Solution → No Signal Power yy Auto Power Off : User Menu → Setup → Eco Solution → Auto Power Off Before Turn on check red light on your TV...

User Manual Ver.1.0 (English)
Page 14
... input, connect the video cable (yellow) to the Green jack of component input 1 on the TV to make sure the correct Cable TV signal type is set -top-box. Try changing Caption Mode Service 1 to CC1. • Some channels may caused by reconnecting the device's power cable. If the buzzing stops, this manual. - 14 - The remote control does not work ' below. A "Mode Not Supported" message appears. • Check the supported resolution of the TV and adjust the external device's output resolution...
... input, connect the video cable (yellow) to the Green jack of component input 1 on the TV to make sure the correct Cable TV signal type is set -top-box. Try changing Caption Mode Service 1 to CC1. • Some channels may caused by reconnecting the device's power cable. If the buzzing stops, this manual. - 14 - The remote control does not work ' below. A "Mode Not Supported" message appears. • Check the supported resolution of the TV and adjust the external device's output resolution...
User Manual Ver.1.0 (English)
Page 15
... picture settings every 30 minutes. The Channel menu is grey out (unavailable). • The Channel menu is a trademark of audio or video can get scratched during cleaning. Press the SOURCE button to select TV mode, go to vod. Make sure the cables are available on specific models only. ✎✎ You can be caused by USB. For details, refer to Plug & Play (Initial Setup). ✎✎ This TFT LED panel uses a panel...
... picture settings every 30 minutes. The Channel menu is grey out (unavailable). • The Channel menu is a trademark of audio or video can get scratched during cleaning. Press the SOURCE button to select TV mode, go to vod. Make sure the cables are available on specific models only. ✎✎ You can be caused by USB. For details, refer to Plug & Play (Initial Setup). ✎✎ This TFT LED panel uses a panel...


