Samsung UN46D6900WF Research
View Results Below
Free Samsung UN46D6900WF manuals!
Problems with Samsung UN46D6900WF?
Ask a Question
Free Samsung UN46D6900WF manuals!
Problems with Samsung UN46D6900WF?
Ask a Question
Related Manual Pages


Similar Questions

Manual Please. How To Set Up Directv On This?
just got this tv and dont know how to hook it up to directv and my blue-ray.
just got this tv and dont know how to hook it up to directv and my blue-ray.
(Posted by whittlegirls 6 years ago)

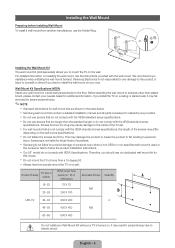
How Do I Remove The Base So I Can Mount The Tv On The Wall
(Posted by scottraugh 8 years ago)


Tv Turns Itself Off Automatically. Tv Screen Spots.
Recently the tv started to turn itself off almost daily and actually twice today. I would like to kn...
Recently the tv started to turn itself off almost daily and actually twice today. I would like to kn...
(Posted by schill0202 9 years ago)

Samsung Un46d6900wfxza, No Picture But Has Sound
What is the problem. I have that TV for 8 monts. It was open box when I bough it.
What is the problem. I have that TV for 8 monts. It was open box when I bough it.
(Posted by chadoss 11 years ago)
Related Terms
The following terms were also used when searching for Samsung UN46D6900WF Research:- un46d6900wf parts
- un46d6900wf review
- un46d6900wf repair
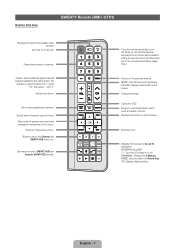
- un46d6900wf remote manual
- un46d6900wf remote
- un46d6900wf problems
- un46d6900wf price
- un46d6900wf picture setup
- un46d6900wf picture settings
- un46d6900wf review cnet
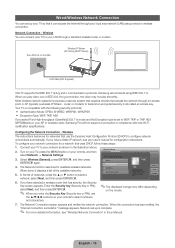
- un46d6900wf not playing file from network
- un46d6900wf no picture
- un46d6900wf manual
- un46d6900wf issues
- un46d6900wf hz
- un46d6900wf flickering fix
- un46d6900wf firmware update
- un46d6900wf firmware
- un46d6900wf wall mount
- un46d6900wfxza.
- un46d6900wfxza settings
- un46d6900wfxza samsung
- un46d6900wfxza problems
- un46d6900wfxza no picture
- un46d6900wfxza
- un46d6900wfx
- un46d6900wf weight
- un46d6900wf cnet
- un46d6900wf user manual
- un46d6900wf troubleshooting
- un46d6900wf stand
- un46d6900wf specs
- un46d6900wf service manual
- un46d6900wf samsung
- un46d6900wf reviews
- samsung un46d6900wf 46 3d led tv
- samsung un46d6900wf problems
- samsung un46d6900wf price
- samsung un46d6900wf picture setup
- samsung un46d6900wf parts
- samsung un46d6900wf no picture
- samsung un46d6900wf manual
- samsung un46d6900wf firmware update
- samsung un46d6900wf calibration
- samsung un46d6900wf remote
- samsung un46d6900wf 3d glasses
- samsung un46d6900wf
- samsung un46d6900
- samsung smart tv un46d6900wf
- samsung model un46d6900wf
- review of un46d6900wf
- review of samsung un46d6900wf
- smart tv un46d6900wf
- un46d6900wf calibration
- un46d6900wf calibrate
- un46d6900wf bestbuy
- un46d6900wf best buy
- un46d6900wf amazon
- un46d6900wf 46 3d led tv
- un46d6900wf 3d glasses
- un46d6900wf
- model un46d6900wf
- samsung un46d6900wfxza
- samsung un46d6900wfx
- samsung un46d6900wf user manual
- samsung un46d6900wf reviews
- samsung un46d6900wf review cnet
- samsung un46d6900wf review
- samsung un46d6900wf remote manual