Samsung UN46D6000SF Research

View Results Below
Free Samsung UN46D6000SF manuals!
Problems with Samsung UN46D6000SF?
Ask a Question
Free Samsung UN46D6000SF manuals!
Problems with Samsung UN46D6000SF?
Ask a Question
Related Manual Pages


Similar Questions

Overheating Or Getting Hot Only On The Top Of Tv
my old 2011 Samsung tv is getting hot on the top which has a line also appearing there. Is it safe t...
my old 2011 Samsung tv is getting hot on the top which has a line also appearing there. Is it safe t...
(Posted by Thornbirdsfreak 1 year ago)

Manual Please. How To Set Up Directv On This?
just got this tv and dont know how to hook it up to directv and my blue-ray.
just got this tv and dont know how to hook it up to directv and my blue-ray.
(Posted by whittlegirls 6 years ago)

How Do I Remove The Base So I Can Mount The Tv On The Wall
(Posted by scottraugh 8 years ago)

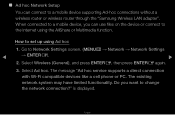
Can U Download A Web Browser For Samsung Un46d6000sf
(Posted by Marcke 9 years ago)

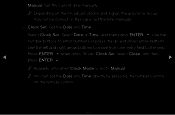
Picture Quality
What is the best calibration settings for this tv in a home environment.
What is the best calibration settings for this tv in a home environment.
(Posted by mtrevorrow 12 years ago)
Related Terms
The following terms were also used when searching for Samsung UN46D6000SF Research:- un55b6000vf
- un55b6000vfxza
- samsung un55b6000vfxza
- un55b6000vf manual
- 46 samsung un46d6000sf
- 46 un46d6000sf
- samsung un46d6000
- samsung un46d6000 stand
- samsung un46d6000sf
- samsung un46d6000sf 240
- samsung un46d6000sf 240 hz
- samsung un46d6000sf 46
- samsung un46d6000sf amazon
- samsung un46d6000sf apps
- samsung un46d6000sf audio output
- samsung un46d6000sf best buy
- samsung un46d6000sf best picture settings
- samsung un46d6000sf calibration
- samsung un46d6000sf change picture size
- samsung un46d6000sf controller
- samsung un46d6000sf dimensions
- samsung un46d6000sf firmware
- samsung un46d6000sf flashing light
- samsung un46d6000sf for sale
- samsung un46d6000sf full user manual
- samsung un46d6000sf internet
- samsung un46d6000sf internet wireless stick
- samsung un46d6000sf jitter
- samsung un46d6000sf led tv
- samsung un46d6000sf main board
- samsung un46d6000sf manual
- samsung un46d6000sf manual pdf
- samsung un46d6000sf no picture
- samsung un46d6000sf on sale
- samsung un46d6000sf parts
- samsung un46d6000sf pedestal base
- samsung un46d6000sf picture settings
- samsung un46d6000sf power cord
- samsung un46d6000sf power supply board
- samsung un46d6000sf price
- samsung un46d6000sf remote
- samsung un46d6000sf remote code
- samsung un46d6000sf remote control
- samsung un46d6000sf remote directv
- samsung un46d6000sf review
- samsung un46d6000sf reviews
- samsung un46d6000sf screen
- samsung un46d6000sf set up
- samsung un46d6000sf settings
- samsung un46d6000sf specifications
- samsung un46d6000sf specs
- samsung un46d6000sf stand
- samsung un46d6000sf tv
- samsung un46d6000sf tv screw size
- samsung un46d6000sf vesa
- samsung un46d6000sf wall mount
- samsung un46d6000sf web browser
- samsung un46d6000sf wireless adapter
- samsung un46d6000sf wireless lan adapter
- samsung un46d6000sfx
- un46d6000 stand
- un46d6000sf
- un46d6000sf 240
- un46d6000sf 240 hz
- un46d6000sf 240hz
- un46d6000sf 3d
- un46d6000sf 3d upgrade
- un46d6000sf 46
- un46d6000sf amazon
- un46d6000sf apps
- un46d6000sf audio output
- un46d6000sf base stand
- un46d6000sf best buy
- un46d6000sf best picture settings
- un46d6000sf bestbuy
- un46d6000sf box
- un46d6000sf calibration
- un46d6000sf calibration settings
- un46d6000sf change picture size
- un46d6000sf cnet
- un46d6000sf controller
- un46d6000sf dimensions
- un46d6000sf firmware
- un46d6000sf fix
- un46d6000sf flashing light
- un46d6000sf for sale
- un46d6000sf full user manual
- un46d6000sf internet
- un46d6000sf internet wireless stick
- un46d6000sf jitter
- un46d6000sf keyboard
- un46d6000sf lcd screen replacement for sale
- un46d6000sf led tv
- un46d6000sf main board
- un46d6000sf manual
- un46d6000sf manual pdf
- un46d6000sf menu problem
- un46d6000sf netflix
- un46d6000sf no picture
- un46d6000sf on sale
- un46d6000sf parts
- un46d6000sf parts list
- un46d6000sf pedestal base
- un46d6000sf picture settings
- un46d6000sf power board
- un46d6000sf power cord
- un46d6000sf power supply board
- un46d6000sf price
- un46d6000sf problems
- un46d6000sf refresh rate
- un46d6000sf release date
- un46d6000sf remote
- un46d6000sf remote code
- un46d6000sf remote control
- un46d6000sf remote directv
- un46d6000sf repair kit
- un46d6000sf review
- un46d6000sf reviews
- un46d6000sf samsung
- un46d6000sf samsung tv
- un46d6000sf screen
- un46d6000sf service manual
- un46d6000sf set up
- un46d6000sf settings
- un46d6000sf skype
- un46d6000sf sound bad
- un46d6000sf specifications
- un46d6000sf specs
- un46d6000sf stand
- un46d6000sf tv
- un46d6000sf tv screw size
- un46d6000sf user manual
- un46d6000sf vesa
- un46d6000sf wall mount
- un46d6000sf web browser
- un46d6000sf wireless adapter
- un46d6000sf wireless lan adapter
- un46d6000sfx