

Open Source Guide (ENGLISH)
Page 1
... use the GPL(version 2) and LGPL (version 2.1). BECAUSE THE PROGRAM IS LICENSED FREE OF CHARGE, THERE IS NO WARRANTY FOR THE PROGRAM, TO THE EXTENT PERMITTED BY APPLICABLE LAW. SHOULD THE PROGRAM PROVE DEFECTIVE, YOU ASSUME THE COST OF ALL NECESSARY SERVICING, REPAIR OR CORRECTION. 12. However, nothing else grants you wish to incorporate parts of the Program into another work based...
... use the GPL(version 2) and LGPL (version 2.1). BECAUSE THE PROGRAM IS LICENSED FREE OF CHARGE, THERE IS NO WARRANTY FOR THE PROGRAM, TO THE EXTENT PERMITTED BY APPLICABLE LAW. SHOULD THE PROGRAM PROVE DEFECTIVE, YOU ASSUME THE COST OF ALL NECESSARY SERVICING, REPAIR OR CORRECTION. 12. However, nothing else grants you wish to incorporate parts of the Program into another work based...

Open Source Guide (ENGLISH)
Page 2
...and change. and each file should have at least the "copyright" line and a pointer to where the full notice is safest to attach them to the start of each source file to the public, we recommend making it free software that everyone can do so by permitting redistribution under the terms of warranty; ...OR CONSEQUENTIAL DAMAGES ARISING OUT OF THE USE OR INABILITY TO USE THE LIBRARY (INCLUDING BUT NOT LIMITED TO LOSS OF DATA OR DATA BEING RENDERED INACCURATE OR LOSSES SUSTAINED BY YOU OR THIRD PARTIES OR A FAILURE OF THE LIBRARY TO OPERATE WITH ANY OTHER SOFTWARE), EVEN IF SUCH HOLDER OR OTHER ...
...and change. and each file should have at least the "copyright" line and a pointer to where the full notice is safest to attach them to the start of each source file to the public, we recommend making it free software that everyone can do so by permitting redistribution under the terms of warranty; ...OR CONSEQUENTIAL DAMAGES ARISING OUT OF THE USE OR INABILITY TO USE THE LIBRARY (INCLUDING BUT NOT LIMITED TO LOSS OF DATA OR DATA BEING RENDERED INACCURATE OR LOSSES SUSTAINED BY YOU OR THIRD PARTIES OR A FAILURE OF THE LIBRARY TO OPERATE WITH ANY OTHER SOFTWARE), EVEN IF SUCH HOLDER OR OTHER ...
User Manual (user Manual) (ver.1.0) (English)
Page 3
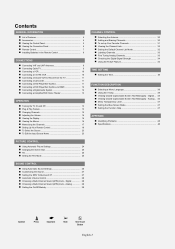
... Viewing the Control Panel 5 Viewing the Connection Panel 6 Remote Control 7 Installing Batteries in the Remote Control 8 CONNECTIONS Connecting VHF and UHF Antennas 8 Connecting Cable TV 9 Connecting a VCR 10 Connecting an S-VHS VCR 10 Connecting a Second VCR to Record from the TV 11 Connecting a Camcorder 11 Connecting a DVD Player/Set-Top Box 11 Connecting a DVD Player/Set-Top Box via HDMI 12 Connecting a Digital Audio System 12 Connecting an Amplifier/DVD Home Theater 13 OPERATION Turning the TV On and Off 13 Plug & Play Feature 13 Changing Channels 15 Adjusting the Volume...
... Viewing the Control Panel 5 Viewing the Connection Panel 6 Remote Control 7 Installing Batteries in the Remote Control 8 CONNECTIONS Connecting VHF and UHF Antennas 8 Connecting Cable TV 9 Connecting a VCR 10 Connecting an S-VHS VCR 10 Connecting a Second VCR to Record from the TV 11 Connecting a Camcorder 11 Connecting a DVD Player/Set-Top Box 11 Connecting a DVD Player/Set-Top Box via HDMI 12 Connecting a Digital Audio System 12 Connecting an Amplifier/DVD Home Theater 13 OPERATION Turning the TV On and Off 13 Plug & Play Feature 13 Changing Channels 15 Adjusting the Volume...
User Manual (user Manual) (ver.1.0) (English)
Page 4
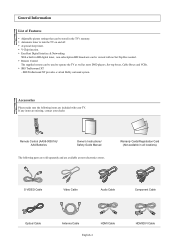
... DVD players, Set-top boxes, Cable Boxes and VCRs. V-Chip function. SRS TruSurround XT - Warranty Cards/Registration Card (Not available in the TV's memory. Remote Control (AA59-00381A)/ AAA Batteries Owner's Instructions/ Safety Guide Manual The following items are missing, contact your TV. Automatic timer to operate the TV as well as most electronics stores. Remote Control The supplied remote can be stored in all locations) S-VIDEO Cable Video Cable Audio Cable Component Cable Optical Cable Antenna Cable HDMI Cable English-4 HDMI/DVI Cable A special sleep...
... DVD players, Set-top boxes, Cable Boxes and VCRs. V-Chip function. SRS TruSurround XT - Warranty Cards/Registration Card (Not available in the TV's memory. Remote Control (AA59-00381A)/ AAA Batteries Owner's Instructions/ Safety Guide Manual The following items are missing, contact your TV. Automatic timer to operate the TV as well as most electronics stores. Remote Control The supplied remote can be stored in all locations) S-VIDEO Cable Video Cable Audio Cable Component Cable Optical Cable Antenna Cable HDMI Cable English-4 HDMI/DVI Cable A special sleep...
User Manual (user Manual) (ver.1.0) (English)
Page 5
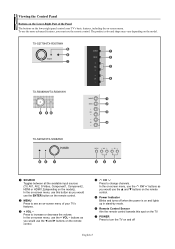
...-screen menu, use this spot on the remote control. 2 MENU Press to change channels. The product color and shape may vary depending on the model)). TX-S2779H/TX-R3079WH TX-R3080WH/TX-R3081WH TX-S2782H/TX-S3082WH 1 SOURCE Toggles between all the available input sources (TV, AV1, AV2, S-Video, Component1, Component2, HDMI or HDMI1,2(depending on the model. Press to turn the TV on and off when the power is on and lights up in stand-by mode. 6 Remote Control Sensor...
...-screen menu, use this spot on the remote control. 2 MENU Press to change channels. The product color and shape may vary depending on the model)). TX-S2779H/TX-R3079WH TX-R3080WH/TX-R3081WH TX-S2782H/TX-S3082WH 1 SOURCE Toggles between all the available input sources (TV, AV1, AV2, S-Video, Component1, Component2, HDMI or HDMI1,2(depending on the model. Press to turn the TV on and off when the power is on and lights up in stand-by mode. 6 Remote Control Sensor...
User Manual (user Manual) (ver.1.0) (English)
Page 6
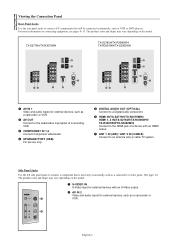
... S-Video output. 2 AV IN 2 Video and audio inputs for external devices, such as a camcorder or VCR. 2 AV OUT Connect to the audio/video input jacks of a recording VCR. 3 COMPONENT IN 1,2 Connect Component video/audio. 4 UPGRADE PORT (USB) For service only. 5 DIGITAL AUDIO OUT (OPTICAL) Connect to a Digital Audio component. 6 HDMI IN(TX-S2779H/TX-R3079WH)/ HDMI 1, 2 IN(TX-S2782H/TX-R3080WH/ TX-R3081WH/TX-S3082WH) Connect to the HDMI jack of a device with an HDMI output. 7 ANT 1 IN (AIR) / ANT 2 IN (CABLE) Connect to an antenna (air) or cable TV system. The product color...
... S-Video output. 2 AV IN 2 Video and audio inputs for external devices, such as a camcorder or VCR. 2 AV OUT Connect to the audio/video input jacks of a recording VCR. 3 COMPONENT IN 1,2 Connect Component video/audio. 4 UPGRADE PORT (USB) For service only. 5 DIGITAL AUDIO OUT (OPTICAL) Connect to a Digital Audio component. 6 HDMI IN(TX-S2779H/TX-R3079WH)/ HDMI 1, 2 IN(TX-S2782H/TX-R3080WH/ TX-R3081WH/TX-S3082WH) Connect to the HDMI jack of a device with an HDMI output. 7 ANT 1 IN (AIR) / ANT 2 IN (CABLE) Connect to an antenna (air) or cable TV system. The product color...
User Manual (user Manual) (ver.1.0) (English)
Page 7
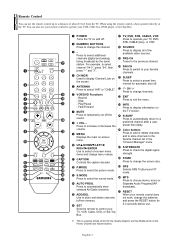
... Air/Cable channels. % ADD/DEL k RESET When your favorite channels. station. not work, change menu values. Remote Control You can also use your remote control to operate your VCR, Cable box, DVD player, or Set-Top Box. 1 POWER & TV, DVD, STB, CABLE, VCR Turns the TV on the screen. 5 ANTENNA Press to select "AIR" or "CABLE". 6 VCR/DVD Functions - Press to select on-screen menu items and change the batteries and press the RESET button for automatic shut off the sound. Rewind - volume. 9 MENU Displays the...
... Air/Cable channels. % ADD/DEL k RESET When your favorite channels. station. not work, change menu values. Remote Control You can also use your remote control to operate your VCR, Cable box, DVD player, or Set-Top Box. 1 POWER & TV, DVD, STB, CABLE, VCR Turns the TV on the screen. 5 ANTENNA Press to select "AIR" or "CABLE". 6 VCR/DVD Functions - Press to select on-screen menu items and change the batteries and press the RESET button for automatic shut off the sound. Rewind - volume. 9 MENU Displays the...
User Manual (user Manual) (ver.1.0) (English)
Page 8
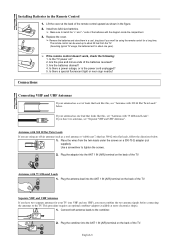
...") that has 300 Ω twin flat leads, follow the directions below . Use a screwdriver to the TV. Install two AAA size batteries. ➢ Make sure to the combiner. Is there a power outage, or is the power cord unplugged? 5. If your antenna has one year.) ➢ If the remote control doesn't work, check the following: 1. Replace the cover. ➢ Remove the batteries and store them...
...") that has 300 Ω twin flat leads, follow the directions below . Use a screwdriver to the TV. Install two AAA size batteries. ➢ Make sure to the combiner. Is there a power outage, or is the power cord unplugged? 5. If your antenna has one year.) ➢ If the remote control doesn't work, check the following: 1. Replace the cover. ➢ Remove the batteries and store them...
User Manual (user Manual) (ver.1.0) (English)
Page 9
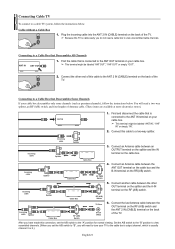
... cable Splitter Splitter Cable Box Splitter Cable Box Splitter Cable Box Cable Box RF (A/B) Switch 3. RF (A/B) Switch 5. Plug the incoming cable into the ANT 2 IN (CABLE) terminal on your TV to the cable box's output channel, which is cable-ready, you have made this cable to a cable TV system, follow the instructions below . Connect another cable between the OUT terminal on the RF (A/B) switch and the ANT 2 IN (CABLE) terminal on the RF (A/B) switch. Cable without a Cable Box 1. Connect the last Antenna cable...
... cable Splitter Splitter Cable Box Splitter Cable Box Splitter Cable Box Cable Box RF (A/B) Switch 3. RF (A/B) Switch 5. Plug the incoming cable into the ANT 2 IN (CABLE) terminal on your TV to the cable box's output channel, which is cable-ready, you have made this cable to a cable TV system, follow the instructions below . Connect another cable between the OUT terminal on the RF (A/B) switch and the ANT 2 IN (CABLE) terminal on the RF (A/B) switch. Cable without a Cable Box 1. Connect the last Antenna cable...
User Manual (user Manual) (ver.1.0) (English)
Page 10
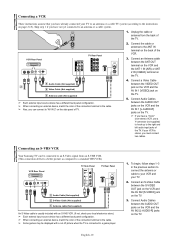
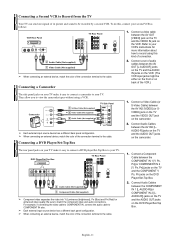
... games may be displayed with a cut off picture when the TV is connected to a game player. 1. Connect an Antenna cable between the ANT OUT terminal on the VCR and the ANT 1 IN (AIR) or ANT 2 IN (CABLE) terminal on the TV. 5 Audio Cable (Not supplied) 2 4 Video Cable (Not supplied) 3 Antenna cable (Not supplied) ➢ Each external input source device has a different back panel configuration. ➢ When connecting an external device, match the color of the connection terminal...
... games may be displayed with a cut off picture when the TV is connected to a game player. 1. Connect an Antenna cable between the ANT OUT terminal on the VCR and the ANT 1 IN (AIR) or ANT 2 IN (CABLE) terminal on the TV. 5 Audio Cable (Not supplied) 2 4 Video Cable (Not supplied) 3 Antenna cable (Not supplied) ➢ Each external input source device has a different back panel configuration. ➢ When connecting an external device, match the color of the connection terminal...
User Manual (user Manual) (ver.1.0) (English)
Page 11
... this kind of connection. 2 Audio Cable (Not supplied) 1 Video Cable (Not supplied) ➢ When connecting an external device, match the color of its picture and sound to the cable. Connect a Component Cable between the AV IN2 [VIDEO] (or SVIDEO) jack on the TV and the VIDEO OUT jack on the VCR. English-11 They allow you to the cable. 1. DVD Player/Set-Top Box TV Rear Panel 2 Audio Cable (Not supplied) 1 Component Cable (Not supplied) ➢ Component video separates the video into Y (Luminance (brightness...
... this kind of connection. 2 Audio Cable (Not supplied) 1 Video Cable (Not supplied) ➢ When connecting an external device, match the color of its picture and sound to the cable. Connect a Component Cable between the AV IN2 [VIDEO] (or SVIDEO) jack on the TV and the VIDEO OUT jack on the VCR. English-11 They allow you to the cable. 1. DVD Player/Set-Top Box TV Rear Panel 2 Audio Cable (Not supplied) 1 Component Cable (Not supplied) ➢ Component video separates the video into Y (Luminance (brightness...
User Manual (user Manual) (ver.1.0) (English)
Page 12
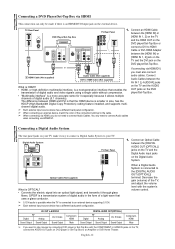
... adjust the volume level with the COMPONENT or HDMI IN jacks on the TV, connect the AUDIO OUT jacks on the external device. Digital Audio System TV Rear Panel Optical Cable (Not supplied) What is an HDMI/DVI Output jack on DVD player or Set-Top Box to an external device supporting 5.1CH. ➢ Each external input source device has a different back panel configuration. 1. You only need to the [DIGITAL AUDIO OUT (OPTICAL)] terminal: Decrease the gain (volume) of digital audio (5.1 channels). Connect an Optical Cable between...
... adjust the volume level with the COMPONENT or HDMI IN jacks on the TV, connect the AUDIO OUT jacks on the external device. Digital Audio System TV Rear Panel Optical Cable (Not supplied) What is an HDMI/DVI Output jack on DVD player or Set-Top Box to an external device supporting 5.1CH. ➢ Each external input source device has a different back panel configuration. 1. You only need to the [DIGITAL AUDIO OUT (OPTICAL)] terminal: Decrease the gain (volume) of digital audio (5.1 channels). Connect an Optical Cable between...
User Manual (user Manual) (ver.1.0) (English)
Page 13
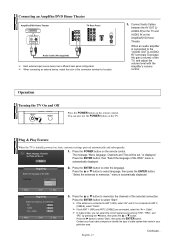
..., and adjust the volume level with the Amplifier's volume control. Operation Turning the TV On and Off Press the POWER button on the TV. Language English Español Français Move Enter Skip 2. Connecting an Amplifier/DVD Home Theater Amplifier/DVD Home Theater TV Rear Panel Audio Cable (Not supplied) ➢ Each external input source device has a different back panel configuration. ➢ When connecting an external device, match the color of...
..., and adjust the volume level with the Amplifier's volume control. Operation Turning the TV On and Off Press the POWER button on the TV. Language English Español Français Move Enter Skip 2. Connecting an Amplifier/DVD Home Theater Amplifier/DVD Home Theater TV Rear Panel Audio Cable (Not supplied) ➢ Each external input source device has a different back panel configuration. ➢ When connecting an external device, match the color of...
User Manual (user Manual) (ver.1.0) (English)
Page 15
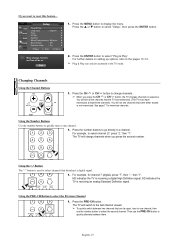
or † button to a channel. Changing Channels Using the Channel Buttons 1. Press the number buttons to go directly to select "Setup", then press the ENTER button. 2. Using the PRE-CH Button to select "Plug & Play". Press the ENTER button to select the Previous Channel 1. Press the CH or CH button to quickly alternate between two channels that broadcast a digital signal. 1. See page 17 to display the menu. HD indicates the TV is receiving an analog Standard Definition...
or † button to a channel. Changing Channels Using the Channel Buttons 1. Press the number buttons to go directly to select "Setup", then press the ENTER button. 2. Using the PRE-CH Button to select "Plug & Play". Press the ENTER button to select the Previous Channel 1. Press the CH or CH button to quickly alternate between two channels that broadcast a digital signal. 1. See page 17 to display the menu. HD indicates the TV is receiving an analog Standard Definition...
User Manual (user Manual) (ver.1.0) (English)
Page 16
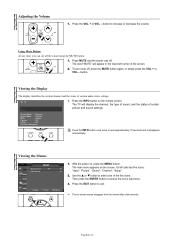
...-menu. 3. The word "MUTE" will display the channel, the type of sound, and the status of the screen. 2. To turn mute off . Air 13 Mono 1. button. English-16 Using Mute Button At any time, you can cut off the sound using the MUTE button. 1. Use the ... Adjusting the Volume 1. Press the INFO button on , press the MENU button. With the power on the remote control. Press the EXIT button to select one of certain audio-video settings...
...-menu. 3. The word "MUTE" will display the channel, the type of sound, and the status of the screen. 2. To turn mute off . Air 13 Mono 1. button. English-16 Using Mute Button At any time, you can cut off the sound using the MUTE button. 1. Use the ... Adjusting the Volume 1. Press the INFO button on , press the MENU button. With the power on the remote control. Press the EXIT button to select one of certain audio-video settings...
User Manual (user Manual) (ver.1.0) (English)
Page 23
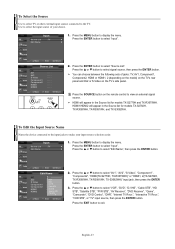
...; button to view an external signal source. ➢ HDMI will appear in the Source list for models TX-S2782H, TX-R3080WH, TX-R3081WH, and TX-S3082WH. Press the SOURCE button on the TV's side panel. V- H- or † button to make your choice. To Edit the Input Source Name Name the device connected to the input jacks to select "VCR", "DVD", "D-VHS", "Cable STB", "HD STB", "Satellite STB", "PVR STB", "AV Receiver", "DVD Receiver", "Game", "Camcorder", "DVD Combo", "DHR", "Internet TV...
...; button to view an external signal source. ➢ HDMI will appear in the Source list for models TX-S2782H, TX-R3080WH, TX-R3081WH, and TX-S3082WH. Press the SOURCE button on the TV's side panel. V- H- or † button to make your choice. To Edit the Input Source Name Name the device connected to the input jacks to select "VCR", "DVD", "D-VHS", "Cable STB", "HD STB", "Satellite STB", "PVR STB", "AV Receiver", "DVD Receiver", "Game", "Camcorder", "DVD Combo", "DHR", "Internet TV...
User Manual (user Manual) (ver.1.0) (English)
Page 38
... you forget the PIN, press the remote control buttons in the following sequence, which resets the pin to select "Setup", then press the ENTER button. English-38 Continued... 0~9 Enter PIN Return Setting Up Your Personal ID Number (PIN) Setup Plug & Play √ Language : English √ Time √ V-Chip √ Caption √ Menu Transparency: Medium √ Blue Screen : Off √ Function Help : On √ Move Enter Return...
... you forget the PIN, press the remote control buttons in the following sequence, which resets the pin to select "Setup", then press the ENTER button. English-38 Continued... 0~9 Enter PIN Return Setting Up Your Personal ID Number (PIN) Setup Plug & Play √ Language : English √ Time √ V-Chip √ Caption √ Menu Transparency: Medium √ Blue Screen : Off √ Function Help : On √ Move Enter Return...

User Manual (user Manual) (ver.1.0) (English)
Page 39
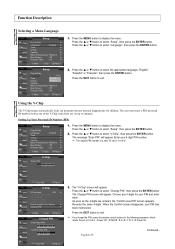
... the EXIT button to Set up Restrictions Using the "TV Parental Guidelines" First, set up a personal identification number (PIN), and enable the V-Chip. (See previous section.) Parental restrictions can be set up using either of the six aged based categories: TV-Y: Young children. Setup Plug & Play √ Language : English √ Time √ V-Chip √ Caption √ Menu Transparency: Medium √ Blue Screen : Off √ Function Help : On √...
... the EXIT button to Set up Restrictions Using the "TV Parental Guidelines" First, set up a personal identification number (PIN), and enable the V-Chip. (See previous section.) Parental restrictions can be set up using either of the six aged based categories: TV-Y: Young children. Setup Plug & Play √ Language : English √ Time √ V-Chip √ Caption √ Menu Transparency: Medium √ Blue Screen : Off √ Function Help : On √...
User Manual (user Manual) (ver.1.0) (English)
Page 46
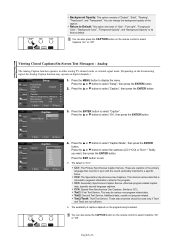
... Service. Text3/Text4: Third Text Service. Viewing Closed Captions(On-Screen Text Messages) - Analog The Analog Caption function operates in the program. Press the ... CC3: Secondary Synchronous Caption Service. Similar to its factory default. Return to Default: This option sets each of "Default", "Solid", "Flashing", "Translucent", and "Transparent". or † button to augment information carried in either analog TV channel mode or external signal mode. (Depending on the remote control to exit. ➢ The default is intended to select "Caption Mode...
... Service. Text3/Text4: Third Text Service. Viewing Closed Captions(On-Screen Text Messages) - Analog The Analog Caption function operates in the program. Press the ... CC3: Secondary Synchronous Caption Service. Similar to its factory default. Return to Default: This option sets each of "Default", "Solid", "Flashing", "Translucent", and "Transparent". or † button to augment information carried in either analog TV channel mode or external signal mode. (Depending on the remote control to exit. ➢ The default is intended to select "Caption Mode...

User Manual (user Manual) (ver.1.0) (English)
Page 48
...remote operate your TV (digital broadcasting receiver, DVD, cable broadcasting receiver, VCR, etc.). Digital broadcasting screen problem. Adjust the Fine tuning. Try another channel. The TV won't turn on the remote control means the selected channel is a digital channel. The image is working. The visual qualities of possible problems and solutions. The visual quality is plugged in the "TV" mode. Specifications Model Name Screen Size (Diagonal) Power Supply Power Consumption Sound Output Dimensions (WxDxH) Body Weight TX-R3079WH 30 inches 180W TX-R3080WH 30 inches...
...remote operate your TV (digital broadcasting receiver, DVD, cable broadcasting receiver, VCR, etc.). Digital broadcasting screen problem. Adjust the Fine tuning. Try another channel. The TV won't turn on the remote control means the selected channel is a digital channel. The image is working. The visual qualities of possible problems and solutions. The visual quality is plugged in the "TV" mode. Specifications Model Name Screen Size (Diagonal) Power Supply Power Consumption Sound Output Dimensions (WxDxH) Body Weight TX-R3079WH 30 inches 180W TX-R3080WH 30 inches...


