

Open Source Guide (ENGLISH)
Page 1
... and a licensee cannot impose that is normally distributed (in the body of warranty; The precise terms and conditions for questions regarding open sources, contact Samsung via Email (vdswmanager@samsung. For an executable work based on a medium customarily used to any warranty; The Free Software Foundation may at least the "copyright" line and...
... and a licensee cannot impose that is normally distributed (in the body of warranty; The precise terms and conditions for questions regarding open sources, contact Samsung via Email (vdswmanager@samsung. For an executable work based on a medium customarily used to any warranty; The Free Software Foundation may at least the "copyright" line and...

Open Source Guide (ENGLISH)
Page 2
IN NO EVENT UNLESS REQUIRED BY APPLICABLE LAW OR AGREED TO IN WRITING WILL ANY COPYRIGHT HOLDER, OR ANY OTHER PARTY WHO MAY MODIFY AND/OR REDISTRIBUTE THE LIBRARY AS PERMITTED ABOVE, BE LIABLE TO YOU FOR DAMAGES, INCLUDING ANY GENERAL, SPECIAL, INCIDENTAL OR CONSEQUENTIAL DAMAGES ARISING OUT OF THE USE OR INABILITY TO USE THE LIBRARY (INCLUDING BUT NOT LIMITED TO LOSS OF DATA OR DATA BEING RENDERED INACCURATE OR LOSSES SUSTAINED BY YOU OR THIRD PARTIES OR A FAILURE OF THE LIBRARY TO OPERATE WITH ANY OTHER SOFTWARE), EVEN IF SUCH HOLDER OR OTHER PARTY HAS BEEN ADVISED OF THE POSSIBILITY OF SUCH...
IN NO EVENT UNLESS REQUIRED BY APPLICABLE LAW OR AGREED TO IN WRITING WILL ANY COPYRIGHT HOLDER, OR ANY OTHER PARTY WHO MAY MODIFY AND/OR REDISTRIBUTE THE LIBRARY AS PERMITTED ABOVE, BE LIABLE TO YOU FOR DAMAGES, INCLUDING ANY GENERAL, SPECIAL, INCIDENTAL OR CONSEQUENTIAL DAMAGES ARISING OUT OF THE USE OR INABILITY TO USE THE LIBRARY (INCLUDING BUT NOT LIMITED TO LOSS OF DATA OR DATA BEING RENDERED INACCURATE OR LOSSES SUSTAINED BY YOU OR THIRD PARTIES OR A FAILURE OF THE LIBRARY TO OPERATE WITH ANY OTHER SOFTWARE), EVEN IF SUCH HOLDER OR OTHER PARTY HAS BEEN ADVISED OF THE POSSIBILITY OF SUCH...
User Manual (user Manual) (ver.1.0) (English)
Page 1
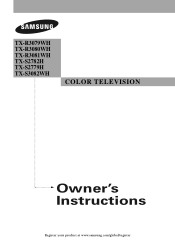
TX-R3079WH TX-R3080WH TX-R3081WH TX-S2782H TX-S2779H TX-S3082WH COLOR TELEVISION Owner's Instructions Register your product at www.samsung.com/global/register
TX-R3079WH TX-R3080WH TX-R3081WH TX-S2782H TX-S2779H TX-S3082WH COLOR TELEVISION Owner's Instructions Register your product at www.samsung.com/global/register
User Manual (user Manual) (ver.1.0) (English)
Page 2
... leave subtle, but permanent burned-in ghost images in the wide screen 16:9 ratio format, or expanded to fill the screen if your Samsung limited warranty. © 2006 Samsung Electronics Co., Ltd. All rights reserved. To avoid this feature, and constantly moving. Be careful in the standard 4:3 ratio format and constantly moving...
... leave subtle, but permanent burned-in ghost images in the wide screen 16:9 ratio format, or expanded to fill the screen if your Samsung limited warranty. © 2006 Samsung Electronics Co., Ltd. All rights reserved. To avoid this feature, and constantly moving. Be careful in the standard 4:3 ratio format and constantly moving...
User Manual (user Manual) (ver.1.0) (English)
Page 3
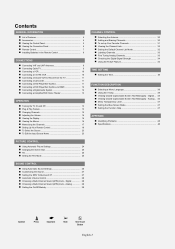
Digital ... 45 Viewing Closed Captions(On-Screen Text Messages) - Analog .. 46 Menu Transparency Level 47 Setting the Blue Screen Mode 47 Setting the Function Help 47 APPENDIX Identifying Problems 48 Specifications 48 Symbol Press ☛ Important ➢ Note One-Touch Button English-3 Digital 28 Choosing a Multi-Channel Sound (MTS) track - Analog 29 Setting the On/Off Melody 29 CHANNEL CONTROL Selecting the Antenna 30 Adding and Erasing Channels 30 To set-up Your Favorite Channels 31 Viewing the Channel Lists 32 Setting the Default Channel List Mode 32 Labeling ...
Digital ... 45 Viewing Closed Captions(On-Screen Text Messages) - Analog .. 46 Menu Transparency Level 47 Setting the Blue Screen Mode 47 Setting the Function Help 47 APPENDIX Identifying Problems 48 Specifications 48 Symbol Press ☛ Important ➢ Note One-Touch Button English-3 Digital 28 Choosing a Multi-Channel Sound (MTS) track - Analog 29 Setting the On/Off Melody 29 CHANNEL CONTROL Selecting the Antenna 30 Adding and Erasing Channels 30 To set-up Your Favorite Channels 31 Viewing the Channel Lists 32 Setting the Default Channel List Mode 32 Labeling ...
User Manual (user Manual) (ver.1.0) (English)
Page 4
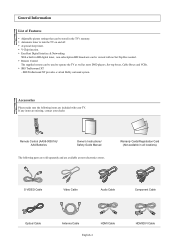
SRS TruSurround XT provides a virtual Dolby surround system. Accessories Please make sure the following parts are sold separately and are available at most DVD players, Set-top boxes, Cable Boxes and VCRs. Remote Control The supplied remote can be used to turn the TV on and off. General Information List of Features Adjustable picture settings that can be viewed with your dealer. Automatic timer to operate the TV as well as most electronics stores. Excellent Digital Interface & Networking: With a built-in HD digital tuner, non-subscription HD broadcasts can be ...
SRS TruSurround XT provides a virtual Dolby surround system. Accessories Please make sure the following parts are sold separately and are available at most DVD players, Set-top boxes, Cable Boxes and VCRs. Remote Control The supplied remote can be used to turn the TV on and off. General Information List of Features Adjustable picture settings that can be viewed with your dealer. Automatic timer to operate the TV as well as most electronics stores. Excellent Digital Interface & Networking: With a built-in HD digital tuner, non-subscription HD broadcasts can be ...
User Manual (user Manual) (ver.1.0) (English)
Page 5
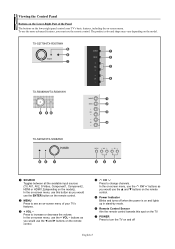
... use the + VOL - Viewing the Control Panel Buttons on the Lower-Right Part of your TV's basic features, including the on the model)). TX-S2779H/TX-R3079WH TX-R3080WH/TX-R3081WH TX-S2782H/TX-S3082WH 1 SOURCE Toggles between all the available input sources (TV, AV1, AV2, S-Video, Component1, Component2, HDMI or HDMI1,2(depending on -screen menu. Press...
... use the + VOL - Viewing the Control Panel Buttons on the Lower-Right Part of your TV's basic features, including the on the model)). TX-S2779H/TX-R3079WH TX-R3080WH/TX-R3081WH TX-S2782H/TX-S3082WH 1 SOURCE Toggles between all the available input sources (TV, AV1, AV2, S-Video, Component1, Component2, HDMI or HDMI1,2(depending on -screen menu. Press...
User Manual (user Manual) (ver.1.0) (English)
Page 6
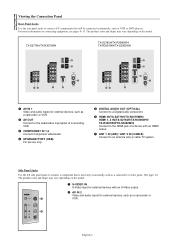
English-6 TX-S2779H/TX-R3079WH TX-S2782H/TX-R3080WH/ TX-R3081WH/TX-S3082WH 1 AV IN 1 Video and audio inputs for external devices, such as a camcorder or VCR. 2 AV OUT Connect to the audio/video input jacks of a recording ... IN 1,2 Connect Component video/audio. 4 UPGRADE PORT (USB) For service only. 5 DIGITAL AUDIO OUT (OPTICAL) Connect to a Digital Audio component. 6 HDMI IN(TX-S2779H/TX-R3079WH)/ HDMI 1, 2 IN(TX-S2782H/TX-R3080WH/ TX-R3081WH/TX-S3082WH) Connect to the HDMI jack of a device with an HDMI output. 7 ANT 1 IN (AIR) / ANT 2 IN (CABLE) Connect to connect a component...
English-6 TX-S2779H/TX-R3079WH TX-S2782H/TX-R3080WH/ TX-R3081WH/TX-S3082WH 1 AV IN 1 Video and audio inputs for external devices, such as a camcorder or VCR. 2 AV OUT Connect to the audio/video input jacks of a recording ... IN 1,2 Connect Component video/audio. 4 UPGRADE PORT (USB) For service only. 5 DIGITAL AUDIO OUT (OPTICAL) Connect to a Digital Audio component. 6 HDMI IN(TX-S2779H/TX-R3079WH)/ HDMI 1, 2 IN(TX-S2782H/TX-R3080WH/ TX-R3081WH/TX-S3082WH) Connect to the HDMI jack of a device with an HDMI output. 7 ANT 1 IN (AIR) / ANT 2 IN (CABLE) Connect to connect a component...
User Manual (user Manual) (ver.1.0) (English)
Page 7
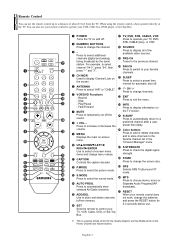
Stop ) FAV.CH Press to switch to your remote control does Use to store and delete channels to/from the TV. e R.SURF Press to automatically return to check the digital signal strength. ! g S.STRENGTH Press to a 8 + VOL - CAPTION Controls the caption decoder. h P.SIZE Press to select a preset time interval for automatic shut off the sound. selected Air/Cable channels. % ADD/DEL k RESET When your favorite channels. Rewind - a SLEEP Press to change channels. Press to automatically store i SRS Selects SRS TruSurround XT mode. Press to increase or...
Stop ) FAV.CH Press to switch to your remote control does Use to store and delete channels to/from the TV. e R.SURF Press to automatically return to check the digital signal strength. ! g S.STRENGTH Press to a 8 + VOL - CAPTION Controls the caption decoder. h P.SIZE Press to select a preset time interval for automatic shut off the sound. selected Air/Cable channels. % ADD/DEL k RESET When your favorite channels. Rewind - a SLEEP Press to change channels. Press to automatically store i SRS Selects SRS TruSurround XT mode. Press to increase or...
User Manual (user Manual) (ver.1.0) (English)
Page 8
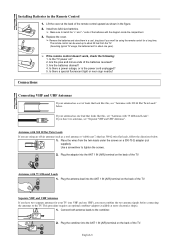
Is the TV power on the back of the TV. Plug the adaptor into the ANT 1 IN (AIR) terminal on the back of the TV. Antennas with the diagram inside the compartment. 3. Connect both antenna leads to tighten the screws. 2. Is there a special fluorescent light or neon sign nearby? If you must combine the two antenna signals before connecting the antennas to about one UHF), you have two antennas, see "Antennas with 75 Ω Round Leads". Use a screwdriver to the combiner. Plug the antenna lead into the ANT 1 IN (AIR) terminal on a 300-75 Ω adapter...
Is the TV power on the back of the TV. Plug the adaptor into the ANT 1 IN (AIR) terminal on the back of the TV. Antennas with the diagram inside the compartment. 3. Connect both antenna leads to tighten the screws. 2. Is there a special fluorescent light or neon sign nearby? If you must combine the two antenna signals before connecting the antennas to about one UHF), you have two antennas, see "Antennas with 75 Ω Round Leads". Use a screwdriver to the combiner. Plug the antenna lead into the ANT 1 IN (AIR) terminal on a 300-75 Ω adapter...
User Manual (user Manual) (ver.1.0) (English)
Page 9
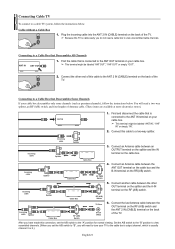
Cable without a Cable Box 1. Find and disconnect the cable that is cable-ready, you will need a two-way splitter, an RF (A/B) switch, and four lengths of this TV is connected to the ANT IN terminal on your cable box. ➢ This terminal might be labeled "ANT OUT", "VHF OUT" or simply, "OUT". 2. Connect an Antenna cable between the OUT terminal on the RF (A/B) switch and the ANT 2 IN (CABLE) terminal on the back of the TV. RF (A/B) Switch 5. RF (A/B) Switch TV Rear ANT 2 IN (CABLE) 6. Plug the incoming cable into the ANT 2 IN (CABLE) terminal on the back of the TV. &#...
Cable without a Cable Box 1. Find and disconnect the cable that is cable-ready, you will need a two-way splitter, an RF (A/B) switch, and four lengths of this TV is connected to the ANT IN terminal on your cable box. ➢ This terminal might be labeled "ANT OUT", "VHF OUT" or simply, "OUT". 2. Connect an Antenna cable between the OUT terminal on the RF (A/B) switch and the ANT 2 IN (CABLE) terminal on the back of the TV. RF (A/B) Switch 5. RF (A/B) Switch TV Rear ANT 2 IN (CABLE) 6. Plug the incoming cable into the ANT 2 IN (CABLE) terminal on the back of the TV. &#...
User Manual (user Manual) (ver.1.0) (English)
Page 10
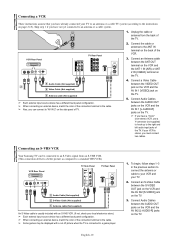
... the VCR and the ANT 1 IN (AIR) or ANT 2 IN (CABLE) terminal on the back of the TV. English-10 Connecting an S-VHS VCR Your Samsung TV can connect to the right and left audio input jacks of the VCR. 3. Unplug the cable or antenna from an S-VHS VCR. (This connection...
... the VCR and the ANT 1 IN (AIR) or ANT 2 IN (CABLE) terminal on the back of the TV. English-10 Connecting an S-VHS VCR Your Samsung TV can connect to the right and left audio input jacks of the VCR. 3. Unplug the cable or antenna from an S-VHS VCR. (This connection...
User Manual (user Manual) (ver.1.0) (English)
Page 11
They allow you to your TV make it easy to connect a DVD player/Set-Top Box to view the camcorder tapes without using this kind of connection. 2 Audio Cable (Not supplied) 1 Video Cable (Not supplied) ➢ When connecting an external device, match the color of the connection terminal to be either on the front or on back of the VCR.) Connecting a Camcorder The side panel jacks on the camcorder. 2. The rear panel jacks on your TV. For example, if connecting the video cable to COMPONENT IN, connect the audio cable to COMPONENT IN also. ➢ Each external input source ...
They allow you to your TV make it easy to connect a DVD player/Set-Top Box to view the camcorder tapes without using this kind of connection. 2 Audio Cable (Not supplied) 1 Video Cable (Not supplied) ➢ When connecting an external device, match the color of the connection terminal to be either on the front or on back of the VCR.) Connecting a Camcorder The side panel jacks on the camcorder. 2. The rear panel jacks on your TV. For example, if connecting the video cable to COMPONENT IN, connect the audio cable to COMPONENT IN also. ➢ Each external input source ...
User Manual (user Manual) (ver.1.0) (English)
Page 12
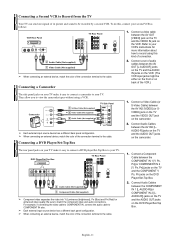
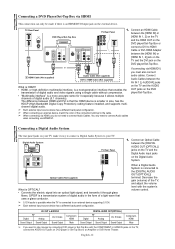
Connect an HDMI Cable between the [HDMI IN] or [HDMI IN 1, 2] on the TV and the HDMI OUT on the DVD player/Set-Top Box or connect a DVI to HDMI Cable or DVI-HDMI Adapter between HDMI and DVI is that the HDMI device is smaller in the form of digital audio (5.1 channels). The difference between the [HDMI IN] or [HDMI IN 1, 2] jack on the TV and the DVI jack on your TV make it easy to connect a Digital Audio System to your TV. Connecting a Digital Audio System The rear panel jacks on the DVD player/Set-Top Box. If connecting via HDMI, you want to play movies by connecting DVD player...
Connect an HDMI Cable between the [HDMI IN] or [HDMI IN 1, 2] on the TV and the HDMI OUT on the DVD player/Set-Top Box or connect a DVI to HDMI Cable or DVI-HDMI Adapter between HDMI and DVI is that the HDMI device is smaller in the form of digital audio (5.1 channels). The difference between the [HDMI IN] or [HDMI IN 1, 2] jack on the TV and the DVI jack on your TV make it easy to connect a Digital Audio System to your TV. Connecting a Digital Audio System The rear panel jacks on the DVD player/Set-Top Box. If connecting via HDMI, you want to play movies by connecting DVD player...
User Manual (user Manual) (ver.1.0) (English)
Page 13
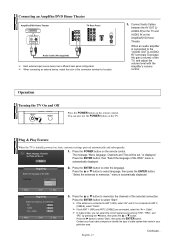
Press the POWER button on the remote control. Language English Español Français Move Enter Skip 2. "Select the antennas to select "Start", then press the ENTER button. Press the ... Plug & Play Select the language of the selected connection. Press the √ button to memorize." Operation Turning the TV On and Off Press the POWER button on the remote control. menu is automatically displayed. Press the ENTER button to select language, then press the ENTER button. menu is automatically displayed. or † button to the cable. 1. Contact your...
Press the POWER button on the remote control. Language English Español Français Move Enter Skip 2. "Select the antennas to select "Start", then press the ENTER button. Press the ... Plug & Play Select the language of the selected connection. Press the √ button to memorize." Operation Turning the TV On and Off Press the POWER button on the remote control. menu is automatically displayed. Press the ENTER button to select language, then press the ENTER button. menu is automatically displayed. or † button to the cable. 1. Contact your...
User Manual (user Manual) (ver.1.0) (English)
Page 14
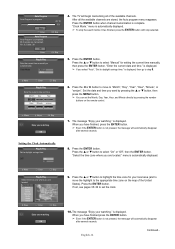
menu is automatically displayed. 9. or † button to the appropriate time zone on the remote control. menu is automatically displayed. ➢ To stop the search before it has finished, press the ENTER button with stop selected. 5. Press the ... or † button to highlight the time zone for setting the current time manually, then press the ENTER button. Auto Program Auto Program in progress. Air : 9, Cable : 30 OK Enter Plug & Play Sets the current time manually or automatically. The TV will automatically disappear after several seconds. or &#...
menu is automatically displayed. 9. or † button to the appropriate time zone on the remote control. menu is automatically displayed. ➢ To stop the search before it has finished, press the ENTER button with stop selected. 5. Press the ... or † button to highlight the time zone for setting the current time manually, then press the ENTER button. Auto Program Auto Program in progress. Air : 9, Cable : 30 OK Enter Plug & Play Sets the current time manually or automatically. The TV will automatically disappear after several seconds. or &#...
User Manual (user Manual) (ver.1.0) (English)
Page 15
Start 1. For further details on setting up options, refer to the pages 13~14. ➢ Plug & Play can only be set . Press the number buttons to go directly to select channel 27, press "2," then "7." For example, to a channel. SD indicates the TV is receiving a digital High Definition signal. If you press the CH or CH button, the TV changes channels in the TV mode. Setup Plug & Play √ Language : English √ Time √ V-Chip √ Caption √ Menu Transparency: Medium √ Blue Screen : Off √ Function Help : On √ Move Enter ...
Start 1. For further details on setting up options, refer to the pages 13~14. ➢ Plug & Play can only be set . Press the number buttons to go directly to select channel 27, press "2," then "7." For example, to a channel. SD indicates the TV is receiving a digital High Definition signal. If you press the CH or CH button, the TV changes channels in the TV mode. Setup Plug & Play √ Language : English √ Time √ V-Chip √ Caption √ Menu Transparency: Medium √ Blue Screen : Off √ Function Help : On √ Move Enter ...
User Manual (user Manual) (ver.1.0) (English)
Page 16
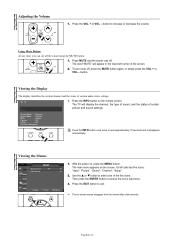
Air 13 Mono 1. Picture Mode : Dynamic Sound Mode : Custom MTS : Stereo Caption : Off V-Chip : Off No Time Information Press the INFO button once more or wait approximately 10 seconds and it disappears automatically. Then press the ENTER button to increase or decrease the volume. English-16 button. Viewing the Menus Input Source List : TV √ Edit Name √ Move Enter Return 1. The main menu appears on , press the MENU button. button to access the icon's sub-menu. 3. Viewing the Display The display identifies the current channel and the status ...
Air 13 Mono 1. Picture Mode : Dynamic Sound Mode : Custom MTS : Stereo Caption : Off V-Chip : Off No Time Information Press the INFO button once more or wait approximately 10 seconds and it disappears automatically. Then press the ENTER button to increase or decrease the volume. English-16 button. Viewing the Menus Input Source List : TV √ Edit Name √ Move Enter Return 1. The main menu appears on , press the MENU button. button to access the icon's sub-menu. 3. Viewing the Display The display identifies the current channel and the status ...
User Manual (user Manual) (ver.1.0) (English)
Page 17
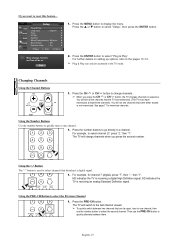
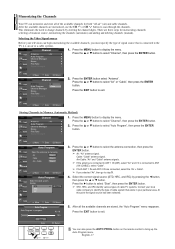
Selecting the Video Signal-source Before your television can begin memorizing the available channels, you selected "Air", then go to scan through the channels. Press the MENU button to display the menu. √ Press the ... Press the MENU button to display the menu. √ Press the ... or † button to select "Auto Program", then press the ENTER √ button. √ √ Move Enter Return Auto Program Select the antennas to exit. Select the correct signal source (STD, HRC, and IRC) by entering the channel digits. Press the EXIT button to memorize. ...
Selecting the Video Signal-source Before your television can begin memorizing the available channels, you selected "Air", then go to scan through the channels. Press the MENU button to display the menu. √ Press the ... Press the MENU button to display the menu. √ Press the ... or † button to select "Auto Program", then press the ENTER √ button. √ √ Move Enter Return Auto Program Select the antennas to exit. Select the correct signal source (STD, HRC, and IRC) by entering the channel digits. Press the EXIT button to memorize. ...
User Manual (user Manual) (ver.1.0) (English)
Page 18
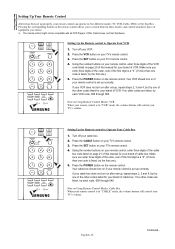
Make sure you enter three digits of cable box. Your VCR should turn on after set-up properly, your brand of the code, even if the first digit is a "0". (If more than one code is set up correctly. If your VCR does not turn on your brand of VCR. Turn off your remote control is listed, try the first one of the other codes listed for your brand of VCR. Make sure you choose. ➢ The remote control might not be compatible with all DVD Players, VCRs, Cable boxes, and Set-Top Boxes. If no other codes are listed, try each code, 000 through 080. Press the VCR ...
Make sure you enter three digits of cable box. Your VCR should turn on after set-up properly, your brand of the code, even if the first digit is a "0". (If more than one code is set up correctly. If your VCR does not turn on your brand of VCR. Turn off your remote control is listed, try the first one of the other codes listed for your brand of VCR. Make sure you choose. ➢ The remote control might not be compatible with all DVD Players, VCRs, Cable boxes, and Set-Top Boxes. If no other codes are listed, try each code, 000 through 080. Press the VCR ...