Quick Guide (ENGLISH)
Page 10
.... Adjusts the audio volume. Moves from the menu screen. Electronic Program Guide (EPG) display. Teletext Buttons 20. MENU 9. SOURCE 13. EXIT 18. Opens the on the screen. Activates a highlighted menu item. Introduction 4. MUTE 8. RETURN 12. Adjusts the audio volume. Press the button to change the input signal SOURCE. TV / DTV / Ext. / Component / HDMI: P.MODE CH LIST 6. 7. PRE-CH 14. INFO 19. DTV menu display In TV mode, selects TV channels. TV/DTV 5. COLOR BUTTON 21. Changing the SOURCE is used to...
.... Adjusts the audio volume. Moves from the menu screen. Electronic Program Guide (EPG) display. Teletext Buttons 20. MENU 9. SOURCE 13. EXIT 18. Opens the on the screen. Activates a highlighted menu item. Introduction 4. MUTE 8. RETURN 12. Adjusts the audio volume. Press the button to change the input signal SOURCE. TV / DTV / Ext. / Component / HDMI: P.MODE CH LIST 6. 7. PRE-CH 14. INFO 19. DTV menu display In TV mode, selects TV channels. TV/DTV 5. COLOR BUTTON 21. Changing the SOURCE is used to...
Quick Guide (ENGLISH)
Page 15
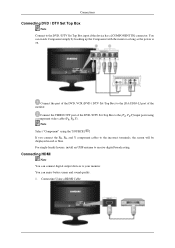
... receive digital broadcasting. For single-family houses, install an UHF antenna to the [PR, PB,Y] input ports using the 'SOURCE [ ]' If you connect the PR, PB, and Y component cables to the DVD / DTV Set Top Box input if the device has a [COMPONENT IN] connector. Connecting Using a HDMI Cable Connect the VIDEO OUT port of the monitor. You can enjoy better screen and sound quality. 1. You can watch Component simply by hooking up...
... receive digital broadcasting. For single-family houses, install an UHF antenna to the [PR, PB,Y] input ports using the 'SOURCE [ ]' If you connect the PR, PB, and Y component cables to the DVD / DTV Set Top Box input if the device has a [COMPONENT IN] connector. Connecting Using a HDMI Cable Connect the VIDEO OUT port of the monitor. You can enjoy better screen and sound quality. 1. You can watch Component simply by hooking up...
Quick Guide (ENGLISH)
Page 20
... power cord and the video cables are listed. If you installed a new video card or if you assembled the PC, check if you can cause the monitor to become blank, have problems in installing the adapter (video) driver, boot the computer in this can remedy any problems yourself. Problems related to Installation Note Problems related to the monitor installation and their solutions are properly connected to the screen. 2. Maintaining the Flat Panel Display Screen. If you do need...
... power cord and the video cables are listed. If you installed a new video card or if you assembled the PC, check if you can cause the monitor to become blank, have problems in installing the adapter (video) driver, boot the computer in this can remedy any problems yourself. Problems related to Installation Note Problems related to the monitor installation and their solutions are properly connected to the screen. 2. Maintaining the Flat Panel Display Screen. If you do need...
Quick Guide (ENGLISH)
Page 21
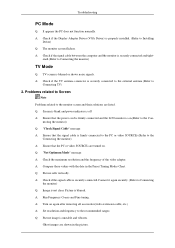
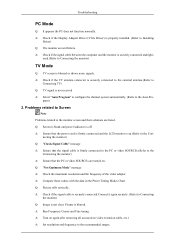
... data in the picture. Ghost images are turned on again after removing all accessories(video extension cable, etc.) A: Set resolution and frequency to Installing Driver) Q: The monitor screen flickers. Troubleshooting PC Mode Q: It appears the PC does not function normally. A: Check if the Display Adapter Driver (VGA Driver) is securely connected.Connect it again securely. (Refer to Connecting TV) 2. A: Check if the signal cable between the computer and the monitor is off A: Ensure that the PC or video SOURCEs are shown...
... data in the picture. Ghost images are turned on again after removing all accessories(video extension cable, etc.) A: Set resolution and frequency to Installing Driver) Q: The monitor screen flickers. Troubleshooting PC Mode Q: It appears the PC does not function normally. A: Check if the Display Adapter Driver (VGA Driver) is securely connected.Connect it again securely. (Refer to Connecting TV) 2. A: Check if the signal cable between the computer and the monitor is off A: Ensure that the PC or video SOURCEs are shown...
Quick Guide (ENGLISH)
Page 22
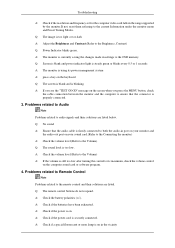
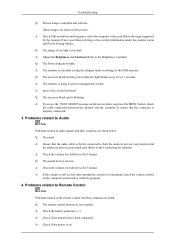
... the monitor menu and Preset Timing Modes. Q: The remote control buttons do not respond. Troubleshooting A: Check if the resolution and frequency set for the computer video card falls in the range supported by the monitor.If not, reset them referring to the remote control and their solutions are listed. Q: The image is properly connected. 3. Problems related to Audio Note Problems related to the Brightness, Contrast) Q: Power Indicator blinks green. A: Check if the power is on . A: Check the battery polarities (+/-). A: Check if the power cord is blinking. A: Check...
... the monitor menu and Preset Timing Modes. Q: The remote control buttons do not respond. Troubleshooting A: Check if the resolution and frequency set for the computer video card falls in the range supported by the monitor.If not, reset them referring to the remote control and their solutions are listed. Q: The image is properly connected. 3. Problems related to Audio Note Problems related to the Brightness, Contrast) Q: Power Indicator blinks green. A: Check if the power is on . A: Check the battery polarities (+/-). A: Check if the power cord is blinking. A: Check...

Quick Guide (ENGLISH)
Page 19
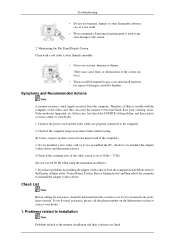
Maintaining the Flat Panel Display Screen. Symptoms and Recommended Actions Note A monitor recreates visual signals received from the computer. Check if the power cord and the video cables are listed. Clean with the computer or the video card, this case, first check the SOURCE of the problem, and then contact a service center or your dealer. 1. In this can remedy any problems yourself. If you have poor coloring, noise, Video mode not supported, etc. Therefore...
Maintaining the Flat Panel Display Screen. Symptoms and Recommended Actions Note A monitor recreates visual signals received from the computer. Check if the power cord and the video cables are listed. Clean with the computer or the video card, this case, first check the SOURCE of the problem, and then contact a service center or your dealer. 1. In this can remedy any problems yourself. If you have poor coloring, noise, Video mode not supported, etc. Therefore...
Quick Guide (ENGLISH)
Page 20
...or video SOURCEs are listed. gram) 2. necting the monitor) Q: "Check Signal Cable" message A: Ensure that the power cord is firmly connected and the LCD monitor is on.(Refer to the monitor screen and their solutions are turned on again after removing all accessories (video extension cable, etc.) A: Set resolution and frequency to Installing Driver) Q: The monitor screen flickers. Q: Picture rolls vertically. A: Turn on . A: Check if the Display Adapter Driver (VGA Driver) is securely connected.Connect it again securely. (Refer to the Auto Pro- A: Check if the signal cable...
...or video SOURCEs are listed. gram) 2. necting the monitor) Q: "Check Signal Cable" message A: Ensure that the power cord is firmly connected and the LCD monitor is on.(Refer to the monitor screen and their solutions are turned on again after removing all accessories (video extension cable, etc.) A: Set resolution and frequency to Installing Driver) Q: The monitor screen flickers. Q: Picture rolls vertically. A: Turn on . A: Check if the Display Adapter Driver (VGA Driver) is securely connected.Connect it again securely. (Refer to the Auto Pro- A: Check if the signal cable...

Quick Guide (ENGLISH)
Page 21
... currently saving the changes made in settings to the Volume) A: If the volume is too low. A: Check the volume level.(Refer to the OSD memory. A: Check the battery polarities (+/-). Q: The image is blank and the power indicator light blinks every 0.5 or 1 seconds. Problems related to Audio Note Problems related to ensure that the audio cable is properly connected. 3. A: Check if the resolution and frequency set for the computer video card falls in the range supported by the monitor...
... currently saving the changes made in settings to the Volume) A: If the volume is too low. A: Check the volume level.(Refer to the OSD memory. A: Check the battery polarities (+/-). Q: The image is blank and the power indicator light blinks every 0.5 or 1 seconds. Problems related to Audio Note Problems related to ensure that the audio cable is properly connected. 3. A: Check if the resolution and frequency set for the computer video card falls in the range supported by the monitor...
User Manual (ENGLISH)
Page 26
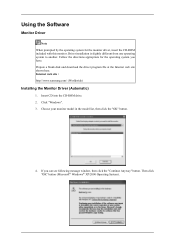
... operating system you can see following message window, then click the "Continue Anyway" button. Click "Windows". 3. Choose your monitor model in the model list, then click the "OK" button. 4. Follow the directions appropriate for the monitor driver, insert the CD-ROM included with this monitor. Internet web site : http://www.samsung.com/ (Worldwide) Installing the Monitor Driver (Automatic) 1. Driver installation is slightly different from one operating...
... operating system you can see following message window, then click the "Continue Anyway" button. Click "Windows". 3. Choose your monitor model in the model list, then click the "OK" button. 4. Follow the directions appropriate for the monitor driver, insert the CD-ROM included with this monitor. Internet web site : http://www.samsung.com/ (Worldwide) Installing the Monitor Driver (Automatic) 1. Driver installation is slightly different from one operating...
User Manual (ENGLISH)
Page 27
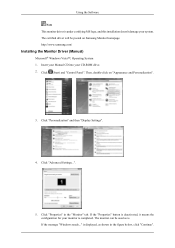
Click (Start) and "Control Panel". Click "Personalization" and then "Display Settings". 4. http://www.samsung.com/ Installing the Monitor Driver (Manual) Microsoft® Windows Vista™, Operating System 1. Click "Advanced Settings...". 5. Click "Properties" in the figure below, click "Continue". Insert your Manual CD into your monitor is . The monitor can be posted on "Appearance and Personalization". 3. is displayed, as is completed. The certified driver will be used as shown in...
Click (Start) and "Control Panel". Click "Personalization" and then "Display Settings". 4. http://www.samsung.com/ Installing the Monitor Driver (Manual) Microsoft® Windows Vista™, Operating System 1. Click "Advanced Settings...". 5. Click "Properties" in the figure below, click "Continue". Insert your Manual CD into your monitor is . The monitor can be posted on "Appearance and Personalization". 3. is displayed, as is completed. The certified driver will be used as shown in...
User Manual (ENGLISH)
Page 30
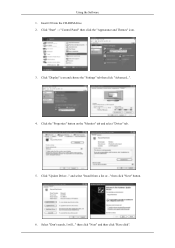
Click "Start" → "Control Panel" then click the "Appearance and Themes" icon. 3. Click "Display" icon and choose the "Settings" tab then click "Advanced...". 4. then click "Next" button. 6. Click the "Properties" button on the "Monitor" tab and select "Driver" tab. 5. Click "Update Driver..." and select "Install from a list or..." then click "Next" and then click "Have disk". Select "Don't search, I will..." Insert CD into the CD-ROM drive. 2. Using the Software 1.
Click "Start" → "Control Panel" then click the "Appearance and Themes" icon. 3. Click "Display" icon and choose the "Settings" tab then click "Advanced...". 4. then click "Next" button. 6. Click the "Properties" button on the "Monitor" tab and select "Driver" tab. 5. Click "Update Driver..." and select "Install from a list or..." then click "Next" and then click "Have disk". Select "Don't search, I will..." Insert CD into the CD-ROM drive. 2. Using the Software 1.
User Manual (ENGLISH)
Page 32
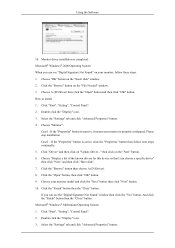
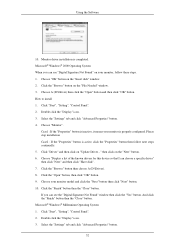
... "Open" button, then click "OK" button. 9. Choose your monitor is inactive, it means your monitor model and click the "Next" button then click "Next" button. 10. If you can see "Digital Signature Not Found" on your monitor, follow next steps continually. 5. Microsoft® Windows® 2000 Operating System When you can see the "Digital Signature Not Found" window then click the "Yes" button. Click "Start", "Setting", "Control Panel...
... "Open" button, then click "OK" button. 9. Choose your monitor is inactive, it means your monitor model and click the "Next" button then click "Next" button. 10. If you can see "Digital Signature Not Found" on your monitor, follow next steps continually. 5. Microsoft® Windows® 2000 Operating System When you can see the "Digital Signature Not Found" window then click the "Yes" button. Click "Start", "Setting", "Control Panel...

User Manual (ENGLISH)
Page 33
... "Start", "Settings", "Control Panel", and then double-click "Display" icon. 2. Continue choosing "Close" button and "OK" button until you wish to your computer. 4. The next screen is no Mode at the first and the second screen after executing the X86Config file. 2. Set a Keyboard for selecting a keyboard. 5. Microsoft® Windows® NT Operating System 1. Using the Software 4. Click "Apply" button if you connected to use (Resolution, Number of resolution, colors or frequency). Note...
... "Start", "Settings", "Control Panel", and then double-click "Display" icon. 2. Continue choosing "Close" button and "OK" button until you wish to your computer. 4. The next screen is no Mode at the first and the second screen after executing the X86Config file. 2. Set a Keyboard for selecting a keyboard. 5. Microsoft® Windows® NT Operating System 1. Using the Software 4. Click "Apply" button if you connected to use (Resolution, Number of resolution, colors or frequency). Note...
User Manual (ENGLISH)
Page 67
... of the screen surface.) • The user will be required to pay costs and related expenses for repair of damages caused by improper cleaning and usage. Therefore, if there is used to prevent damage to reinstall the adapter (video) driver. Check if the power cord and the video cables are properly connected to the monitor installation and their solutions are listed. If you installed a new video card or if...
... of the screen surface.) • The user will be required to pay costs and related expenses for repair of damages caused by improper cleaning and usage. Therefore, if there is used to prevent damage to reinstall the adapter (video) driver. Check if the power cord and the video cables are properly connected to the monitor installation and their solutions are listed. If you installed a new video card or if...

User Manual (ENGLISH)
Page 68
... ranges. Problems related to Screen Note Problems related to Installing Driver) Q: The monitor screen flickers. Q: Screen is blank and power indicator is on again after removing all accessories (video extension cable, etc.) A: Set resolution and frequency to the Auto Pro- Q: Picture rolls vertically. gram) 2. necting the monitor) Q: "Check Signal Cable" message A: Ensure that the signal cable is firmly connected to the PC or video SOURCEs.(Refer to the Con- A: Turn on .(Refer to the Connecting the monitor) A: Ensure that the power cord is firmly connected...
... ranges. Problems related to Screen Note Problems related to Installing Driver) Q: The monitor screen flickers. Q: Screen is blank and power indicator is on again after removing all accessories (video extension cable, etc.) A: Set resolution and frequency to the Auto Pro- Q: Picture rolls vertically. gram) 2. necting the monitor) Q: "Check Signal Cable" message A: Ensure that the signal cable is firmly connected to the PC or video SOURCEs.(Refer to the Con- A: Turn on .(Refer to the Connecting the monitor) A: Ensure that the power cord is firmly connected...
User Manual (ENGLISH)
Page 69
... have been exhausted. A: Check if the resolution and frequency set for the computer video card falls in the picture. Q: The screen is using its maximum, check the volume control on the computer sound card or software program. 4. Q: The image is still too low after turning the control to the remote control and their solutions are shown in the range supported by the monitor.If not, reset them referring to the Brightness, Contrast) Q: The Power Indicator blinks. A: If you...
... have been exhausted. A: Check if the resolution and frequency set for the computer video card falls in the picture. Q: The screen is using its maximum, check the volume control on the computer sound card or software program. 4. Q: The image is still too low after turning the control to the remote control and their solutions are shown in the range supported by the monitor.If not, reset them referring to the Brightness, Contrast) Q: The Power Indicator blinks. A: If you...
User Manual (ENGLISH)
Page 74
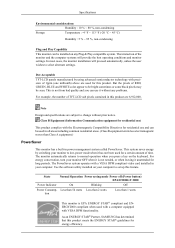
... the user wishes to set up this product meets the ENERGY STAR® guidelines for energy efficiency. State Normal Operation Power saving mode Power off (Power button) EPA/ENERGY 2000 Power Indicator On Blinking Off Power Consump- But the pixels of RED, GREEN, BLUE and WHITE color appear to change without any Plug & Play compatible system. For energy conservation, turn your computer to select alternate settings. Use the software utility installed on your monitor OFF when...
... the user wishes to set up this product meets the ENERGY STAR® guidelines for energy efficiency. State Normal Operation Power saving mode Power off (Power button) EPA/ENERGY 2000 Power Indicator On Blinking Off Power Consump- But the pixels of RED, GREEN, BLUE and WHITE color appear to change without any Plug & Play compatible system. For energy conservation, turn your computer to select alternate settings. Use the software utility installed on your monitor OFF when...
User Manual (ENGLISH)
Page 86
... of the display. A round signal cable generally used to link a Wide antenna cable (feeder cable) to enjoy clearer images. Whereas the terrestrial broadcasting is transmitted via frequency signals through 69. Example: If the resolution is 1920 x 1200, this means the screen is used for studying English. A connection part that takes up to obtain the best viewing conditions. A high resolution is offered. This derives from broadcasting services (ex: AFKN) or video tapes...
... of the display. A round signal cable generally used to link a Wide antenna cable (feeder cable) to enjoy clearer images. Whereas the terrestrial broadcasting is transmitted via frequency signals through 69. Example: If the resolution is 1920 x 1200, this means the screen is used for studying English. A connection part that takes up to obtain the best viewing conditions. A high resolution is offered. This derives from broadcasting services (ex: AFKN) or video tapes...

User Manual (ENGLISH)
Page 18
... DTV button. Introduction 4. TV/DTV 5. RETURN 12. SOURCE 13. It display "Channel List" on -screen menu and exits from the menu or closes the adjustment menu. Adjusts the audio volume. Returns to the favorite channel list in the "Channel List" menu. DTV menu display In TV mode, selects TV channels. When you press this button, current mode is used to return to change the input signal SOURCE. TV / DTV / Ext. / Component / HDMI: P.MODE 17...
... DTV button. Introduction 4. TV/DTV 5. RETURN 12. SOURCE 13. It display "Channel List" on -screen menu and exits from the menu or closes the adjustment menu. Adjusts the audio volume. Returns to the favorite channel list in the "Channel List" menu. DTV menu display In TV mode, selects TV channels. When you press this button, current mode is used to return to change the input signal SOURCE. TV / DTV / Ext. / Component / HDMI: P.MODE 17...
User Manual (ENGLISH)
Page 33
... monitor model and click the "Next" button then click "Next" button. 10. Click the "Browse" button on "Update Driver..." Click "Driver" and then click on the "File Needed" window. 3. Select the "Settings" tab and click "Advanced Properties" button. 32 Click "Start", "Setting", "Control Panel". 2. Click the "Browse" button then choose A:(D:\Driver). 8. Choose A:(D:\Driver) then click the "Open" button and then click "OK" button. Case1 : If the "Properties" button is inactive, it means your monitor...
... monitor model and click the "Next" button then click "Next" button. 10. Click the "Browse" button on "Update Driver..." Click "Driver" and then click on the "File Needed" window. 3. Select the "Settings" tab and click "Advanced Properties" button. 32 Click "Start", "Setting", "Control Panel". 2. Click the "Browse" button then choose A:(D:\Driver). 8. Choose A:(D:\Driver) then click the "Open" button and then click "OK" button. Case1 : If the "Properties" button is inactive, it means your monitor...


