SPH-M540 Battery - Samsung
SPH-M540 Battery
Related Manual Pages

Similar Questions


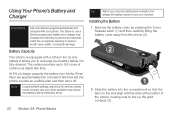
Battery Life
GOOD EVENIN I WAS IN A VERY IMPORTANT SCHOOL RELATED CELL PHONE CONVERSATION AND MY CALL AND PHONE J...
GOOD EVENIN I WAS IN A VERY IMPORTANT SCHOOL RELATED CELL PHONE CONVERSATION AND MY CALL AND PHONE J...
(Posted by susan14suzyq 11 years ago)

Dropped Samsung Boost. When You Hold Button To Turn On, Battery Signal Comes Up
phone was completely charged before dropping, now all it shows is battery half charged. when someone...
phone was completely charged before dropping, now all it shows is battery half charged. when someone...
(Posted by jnadine67 12 years ago)