User Manual (user Manual) (ver.f5) (English)
Page 4
Erasing History 72 2E. Calendar and Tools 82 Using Your Phone's Calendar 82 Task List 85 Countdown 86 File Manager 86 Alarm Clock 87 Memo Pad 88 Calculator 89 Tip Calculator 90 World Time 90 Updating Phone Software 90 Updating the PRL 90 2G. Camera 106 Taking Pictures 106 Recording Videos 112 Storing Pictures 114 Sending Pictures and Video via Media Mail . 116 Managing Boost Media Mail 118 Settings and Info 122 2J. microSD Card 99 Your Phone's microSD...
Erasing History 72 2E. Calendar and Tools 82 Using Your Phone's Calendar 82 Task List 85 Countdown 86 File Manager 86 Alarm Clock 87 Memo Pad 88 Calculator 89 Tip Calculator 90 World Time 90 Updating Phone Software 90 Updating the PRL 90 2G. Camera 106 Taking Pictures 106 Recording Videos 112 Storing Pictures 114 Sending Pictures and Video via Media Mail . 116 Managing Boost Media Mail 118 Settings and Info 122 2J. microSD Card 99 Your Phone's microSD...

User Manual (user Manual) (ver.f5) (English)
Page 11
... Number 4: Auto-Delete 5: Signature 6: Pre-set Message 7: Draft Alert 8: Priority 9:Save in Outbox 5: Contacts 1: Speed Numbers 2: Hide Secret 3: My Name Card 4: Services 6: Text Entry 1: Auto-Capital 2: Auto-Space 3: Dual Language 4: Personal Dictionary 5: Used Word Dictionary 6: Display Candidate 7: Prediction Start 8: Auto Word Insertion 9: Help 7: Phone Info 1: Phone Number 2: Icon Glossary 3: Version 4: Advanced 8: More... 1: Auto Keyguard 3: Airplane Mode 5: Call Setup 7: Headset Mode 9: Restrict and Lock 2: Accessibility 4: Browser 6: Data 8: Location 0: Security...
... Number 4: Auto-Delete 5: Signature 6: Pre-set Message 7: Draft Alert 8: Priority 9:Save in Outbox 5: Contacts 1: Speed Numbers 2: Hide Secret 3: My Name Card 4: Services 6: Text Entry 1: Auto-Capital 2: Auto-Space 3: Dual Language 4: Personal Dictionary 5: Used Word Dictionary 6: Display Candidate 7: Prediction Start 8: Auto Word Insertion 9: Help 7: Phone Info 1: Phone Number 2: Icon Glossary 3: Version 4: Advanced 8: More... 1: Auto Keyguard 3: Airplane Mode 5: Call Setup 7: Headset Mode 9: Restrict and Lock 2: Accessibility 4: Browser 6: Data 8: Location 0: Security...
User Manual (user Manual) (ver.f5) (English)
Page 21
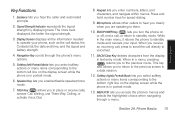
Display Screen displays all the information needed to them. 10. Keypad lets you enable/disable speakerphone mode. 7. Softkey (right)) Portrait Mode lets you to standby mode and cancels your phone, such as the call status, the Contacts list, the date and time, and the signal and battery strength. 4. Speaker Key lets you enter numbers, letters, and characters, and navigate within menus. Press and hold number keys for speed dialing. 9. While in a menu, pressing returns you select softkey...
Display Screen displays all the information needed to them. 10. Keypad lets you enable/disable speakerphone mode. 7. Softkey (right)) Portrait Mode lets you to standby mode and cancels your phone, such as the call status, the Contacts list, the date and time, and the signal and battery strength. 4. Speaker Key lets you enter numbers, letters, and characters, and navigate within menus. Press and hold number keys for speed dialing. 9. While in a menu, pressing returns you select softkey...
User Manual (user Manual) (ver.f5) (English)
Page 22
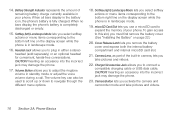
... a call. Cover Release Latch lets you take pictures and videos. 16 Section 2A. When no bars display, the phone's battery is in camera, lets you remove the battery cover and expose both the internal battery compartment and internal microSD card slot. 21. The volume key can also be used to scroll up or down to adjust the ringtone volume in your phone. Camera Button lets you to connect a compatible charging cable or USB data...
... a call. Cover Release Latch lets you take pictures and videos. 16 Section 2A. When no bars display, the phone's battery is in camera, lets you remove the battery cover and expose both the internal battery compartment and internal microSD card slot. 21. The volume key can also be used to scroll up or down to adjust the ringtone volume in your phone. Camera Button lets you to connect a compatible charging cable or USB data...

User Manual (user Manual) (ver.f5) (English)
Page 33
... 76.) Answering Calls 1. or - Make sure your phone is on. (If your phone is two digits, enter the first digit, and then press and hold the speed dial number. Phone Basics Dialing Options When you enter numbers in your Contacts. (See "Saving a Phone Number" on page 31.) ⅷ Hard Pause to enter digits and then use this feature to enter a hard pause within a number string (the phone continues dialing after 2 seconds without any number key. See "Call Answer Mode" on...
... 76.) Answering Calls 1. or - Make sure your phone is on. (If your phone is two digits, enter the first digit, and then press and hold the speed dial number. Phone Basics Dialing Options When you enter numbers in your Contacts. (See "Saving a Phone Number" on page 31.) ⅷ Hard Pause to enter digits and then use this feature to enter a hard pause within a number string (the phone continues dialing after 2 seconds without any number key. See "Call Answer Mode" on...

User Manual (user Manual) (ver.f5) (English)
Page 36
... make a call to a phone number that is already in your Contacts, the entry name, phone number, and the duration of the call display. This mode is not in the display. To disable Speaker Mode, press until "Entering speaker mode" appears in your Contacts, the phone number and the duration of the call display. Press Options (right softkey) > Save to add the new number to your Contacts. (See "Saving a Phone Number" on page 31.) After you receive a call from or make a call to a phone number that is useful...
... make a call to a phone number that is already in your Contacts, the entry name, phone number, and the duration of the call display. This mode is not in the display. To disable Speaker Mode, press until "Entering speaker mode" appears in your Contacts, the phone number and the duration of the call display. Press Options (right softkey) > Save to add the new number to your Contacts. (See "Saving a Phone Number" on page 31.) After you receive a call from or make a call to a phone number that is useful...
User Manual (user Manual) (ver.f5) (English)
Page 71
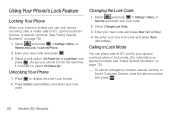
... phone to lock the next time it is locked, you can place calls to 911 and to your new lock code and press Done (left softkey). Select Change Lock Code. 3. Settings 65 Press UNLOCK (left softkey). 4. Highlight and press > Settings/Tools > Settings > More... > Security and enter your new code and press . 3. Re-enter your special number when in Lock Mode You can only receive incoming calls or make calls to display the User Lock screen. 2. Highlight and press > Settings/Tools > Settings > More... > Restrict and Lock > Lock...
... phone to lock the next time it is locked, you can place calls to 911 and to your new lock code and press Done (left softkey). Select Change Lock Code. 3. Settings 65 Press UNLOCK (left softkey). 4. Highlight and press > Settings/Tools > Settings > More... > Security and enter your new code and press . 3. Re-enter your special number when in Lock Mode You can only receive incoming calls or make calls to display the User Lock screen. 2. Highlight and press > Settings/Tools > Settings > More... > Restrict and Lock > Lock...
User Manual (user Manual) (ver.f5) (English)
Page 72
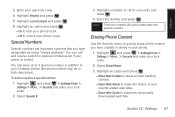
... Contacts Locking your user lock code. 4. Settings Highlight Allow all , Contacts Only, or Special # Only and press . Highlight Voice and press . 3. Enter your Contacts list prevents any alterations in the Security menu. Restricting Outgoing Voice Calls 1. Highlight Lock, then press . Restricting Incoming Voice Calls 1. When you enable Lock Services, you to access the data services until the lock has been disabled in its contents. Highlight Restrict and press . 5. No entry can be unable to make new calls (excluding emergency numbers) or to lock voice call...
... Contacts Locking your user lock code. 4. Settings Highlight Allow all , Contacts Only, or Special # Only and press . Highlight Voice and press . 3. Enter your Contacts list prevents any alterations in the Security menu. Restricting Outgoing Voice Calls 1. Highlight Lock, then press . Restricting Incoming Voice Calls 1. When you enable Lock Services, you to access the data services until the lock has been disabled in its contents. Highlight Restrict and press . 5. No entry can be unable to make new calls (excluding emergency numbers) or to lock voice call...
User Manual (user Manual) (ver.f5) (English)
Page 73
...." Select Erase/Reset. 3. Settings 67 Highlight Lock Contacts and press . 6. Highlight and press > Settings/Tools > Settings > More... > Security and enter your phone book. Enter the number and press . Erasing Phone Content Use the Security menu to unlock your lock code. 2. Section 2C. You can call and receive calls from special numbers even if your user lock code. 4. Select Special #. 3. Enter your phone is locked. You can save up to 3 special numbers in both directories). To add or replace a special number: 1. Highlight a location (1 - 3) for your lock code...
...." Select Erase/Reset. 3. Settings 67 Highlight Lock Contacts and press . 6. Highlight and press > Settings/Tools > Settings > More... > Security and enter your phone book. Enter the number and press . Erasing Phone Content Use the Security menu to unlock your lock code. 2. Section 2C. You can call and receive calls from special numbers even if your user lock code. 4. Select Special #. 3. Enter your phone is locked. You can save up to 3 special numbers in both directories). To add or replace a special number: 1. Highlight a location (1 - 3) for your lock code...
User Manual (user Manual) (ver.f5) (English)
Page 86
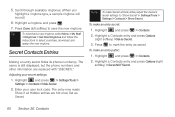
... 'Show Secret' in Settings/Tools > Settings > Contacts > Show Secret. The name is still displayed, but the phone numbers and other information are hid once Set as secret. The entry now reads Show if all Hidden entries are replaced with "(SECRET)." Note To make Secret entries visible, adjust the device's secret settings to save the new ringtone. Scroll through available ringtones. (When you highlight a ringtone type, a sample ringtone will sound.) 6.
... 'Show Secret' in Settings/Tools > Settings > Contacts > Show Secret. The name is still displayed, but the phone numbers and other information are hid once Set as secret. The entry now reads Show if all Hidden entries are replaced with "(SECRET)." Note To make Secret entries visible, adjust the device's secret settings to save the new ringtone. Scroll through available ringtones. (When you highlight a ringtone type, a sample ringtone will sound.) 6.
User Manual (user Manual) (ver.f5) (English)
Page 107
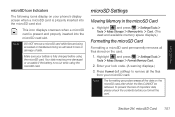
... card while files are being accessed or transferred. Press Format (left softkey) to remove all the data on the microSD card, after which the files CANNOT be retrieved. Make sure your microSD card. . microSD Settings Viewing Memory in loss or damage of important data, please check the contents before using the microSD card. Highlight and press > Settings/Tools > Tools > Mass Storage > Format Memory Card. 2. Enter your phone's display screen when a microSD card is properly inserted into the microSD card slot: This icon displays...
... card while files are being accessed or transferred. Press Format (left softkey) to remove all the data on the microSD card, after which the files CANNOT be retrieved. Make sure your microSD card. . microSD Settings Viewing Memory in loss or damage of important data, please check the contents before using the microSD card. Highlight and press > Settings/Tools > Tools > Mass Storage > Format Memory Card. 2. Enter your phone's display screen when a microSD card is properly inserted into the microSD card slot: This icon displays...

User Manual (user Manual) (ver.f5) (English)
Page 121
... video to another user using Media Mail or to a Bluetooth-enabled device. ⅷ Upload to upload pictures to the Media Mail Web site (https://mediamail.boostmobile.com.) (Depending on the microSD card: 1. Note Deleting pictures will be prompted to register your Media Mail account. ⅷ Assign to assign the current image as a Picture ID for a contact, Wallpaper, or to Incoming/Outgoing Calls, or assign the current video as a Video Ringtone for a contact, or to Voice Calls. ⅷ Erase to erase...
... video to another user using Media Mail or to a Bluetooth-enabled device. ⅷ Upload to upload pictures to the Media Mail Web site (https://mediamail.boostmobile.com.) (Depending on the microSD card: 1. Note Deleting pictures will be prompted to register your Media Mail account. ⅷ Assign to assign the current image as a Picture ID for a contact, Wallpaper, or to Incoming/Outgoing Calls, or assign the current video as a Video Ringtone for a contact, or to Voice Calls. ⅷ Erase to erase...
User Manual (user Manual) (ver.f5) (English)
Page 130
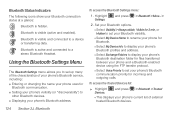
...; Setting your phone's visibility (or "discoverability") to a device or transferring data. and press > Bluetooth > Trusted Ⅲ This displays your phone's current list of your phone's Bluetooth service, including: ⅷ Entering or changing the name your phone uses for files transferred between your phone and a Bluetooth-enabled device using the FTP transfer protocol. Ⅲ Select Voice Priority to a stereo Bluetooth Headset. Bluetooth Status Indicators The following icons show your Bluetooth connection status at a glance: Bluetooth is visible (active and enabled). Bluetooth is...
...; Setting your phone's visibility (or "discoverability") to a device or transferring data. and press > Bluetooth > Trusted Ⅲ This displays your phone's current list of your phone's Bluetooth service, including: ⅷ Entering or changing the name your phone uses for files transferred between your phone and a Bluetooth-enabled device using the FTP transfer protocol. Ⅲ Select Voice Priority to a stereo Bluetooth Headset. Bluetooth Status Indicators The following icons show your Bluetooth connection status at a glance: Bluetooth is visible (active and enabled). Bluetooth is...
User Manual (user Manual) (ver.f5) (English)
Page 183
... 29 Instant Messaging 144 Internet - See Web 147 K Key Functions 15 Keypad Time Length 55 L Language 56, 57 Location Settings 58 Locking Your Phone 65 M Main Screen Navigation 44-50 Making Calls 26 Media Mail Sending Pictures and Video 116 Memo Pad 88 Menu 1 Navigation 25 Menu Orientation 57 Menu Style 56 Messaging Notification 58 microSD Card 99-105 N Navigating the Main Screen 44-50 Navigation Intersection 158 Using 158 Number 35 O One Click 44-50 Owner's Record 167 P Pauses...
... 29 Instant Messaging 144 Internet - See Web 147 K Key Functions 15 Keypad Time Length 55 L Language 56, 57 Location Settings 58 Locking Your Phone 65 M Main Screen Navigation 44-50 Making Calls 26 Media Mail Sending Pictures and Video 116 Memo Pad 88 Menu 1 Navigation 25 Menu Orientation 57 Menu Style 56 Messaging Notification 58 microSD Card 99-105 N Navigating the Main Screen 44-50 Navigation Intersection 158 Using 158 Number 35 O One Click 44-50 Owner's Record 167 P Pauses...

User Manual (user Manual) (ver.f8) (English)
Page 25
... the phone's menu options. 5. Section 2A. Display Screen displays all the information needed to place or receive calls, answer Call Waiting, use Three-Way Calling, or activate Voice Dial. 8. When in text entry mode. Keypad lets you to operate your input. BACK/Clear Key deletes characters from the display in a menu, pressing returns you receive an incoming call status, the Contacts list, the date and time, and the signal and battery strength. 4. Navigation Key scrolls through a menu. The more bars displayed, the better the signal strength...
... the phone's menu options. 5. Section 2A. Display Screen displays all the information needed to place or receive calls, answer Call Waiting, use Three-Way Calling, or activate Voice Dial. 8. When in text entry mode. Keypad lets you to operate your input. BACK/Clear Key deletes characters from the display in a menu, pressing returns you receive an incoming call status, the Contacts list, the date and time, and the signal and battery strength. 4. Navigation Key scrolls through a menu. The more bars displayed, the better the signal strength...

User Manual (user Manual) (ver.f8) (English)
Page 26
..., hands-free conversations. Camera Lens, as part of your phone. Camera Button lets you to this slot, you remove the battery cover and expose both included). Cover Release Latch lets you must first remove the battery cover. (See "Installing the Battery" on the display screen while the phone is fully charged. 14. Volume Button allows you take pictures and videos. 10 Section 2A. To gain access to connect a compatible charging cable or USB data cable...
..., hands-free conversations. Camera Lens, as part of your phone. Camera Button lets you to this slot, you remove the battery cover and expose both included). Cover Release Latch lets you must first remove the battery cover. (See "Installing the Battery" on the display screen while the phone is fully charged. 14. Volume Button allows you take pictures and videos. 10 Section 2A. To gain access to connect a compatible charging cable or USB data cable...

User Manual (user Manual) (ver.f8) (English)
Page 47
... dial the resulting number. (See "Setting Abbreviated Dialing" on your Contacts, the Abbrev. You can use either of the following abbreviated dialing features. ⅷ Contacts Match - Section 2A. until a "+" appears on page 66 to any number saved in your Contacts by the country code and phone number.) Using Abbreviated Dialing Abbreviated Dialing is more than one matched number in your 2. Press to speed dialing. Press and hold phone display. Dial list is displayed. To make a call the displayed number...
... dial the resulting number. (See "Setting Abbreviated Dialing" on your Contacts, the Abbrev. You can use either of the following abbreviated dialing features. ⅷ Contacts Match - Section 2A. until a "+" appears on page 66 to any number saved in your Contacts by the country code and phone number.) Using Abbreviated Dialing Abbreviated Dialing is more than one matched number in your 2. Press to speed dialing. Press and hold phone display. Dial list is displayed. To make a call the displayed number...
User Manual (user Manual) (ver.f8) (English)
Page 84
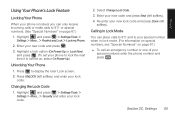
... numbers when in Lock Mode You can only receive incoming calls or make calls to 911, Sprint Customer Service, or special numbers. (See "Using Special Numbers" on page 70.) 1. Enter your new code and press . 3. Select a lock option (On Power-Up or Lock Now) and press . (To set your phone to lock the next time it is locked, you can place calls to 911 and to display the User Lock screen. 2. Re-enter your lock code. Press Unlock (right softkey) and enter your new lock code...
... numbers when in Lock Mode You can only receive incoming calls or make calls to 911, Sprint Customer Service, or special numbers. (See "Using Special Numbers" on page 70.) 1. Enter your new code and press . 3. Select a lock option (On Power-Up or Lock Now) and press . (To set your phone to lock the next time it is locked, you can place calls to 911 and to display the User Lock screen. 2. Re-enter your lock code. Press Unlock (right softkey) and enter your new lock code...
User Manual (user Manual) (ver.f8) (English)
Page 85
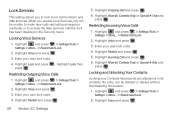
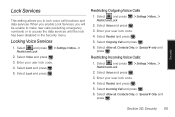
...Restrict and Lock. > Settings > More... > 2. Restricting Incoming Voice Calls: 1. Security Lock Services This setting allows you will be unable to make new calls (excluding emergency numbers) or to lock voice call functions and data services. Restricting Outgoing Voice Calls 1. Select Allow all , Contacts Only, or Special # Only and press . Select Incoming Call and press . 6. Select and press Restrict and Lock. > Settings > More... > 2. Select Voice and press . 3. Select Outgoing Call and press . 6. Locking Voice Services 1. Enter your user lock code. 4. Select Allow...
...Restrict and Lock. > Settings > More... > 2. Restricting Incoming Voice Calls: 1. Security Lock Services This setting allows you will be unable to make new calls (excluding emergency numbers) or to lock voice call functions and data services. Restricting Outgoing Voice Calls 1. Select Allow all , Contacts Only, or Special # Only and press . Select Incoming Call and press . 6. Select and press Restrict and Lock. > Settings > More... > 2. Select Voice and press . 3. Select Outgoing Call and press . 6. Locking Voice Services 1. Enter your user lock code. 4. Select Allow...
User Manual (user Manual) (ver.f8) (English)
Page 91
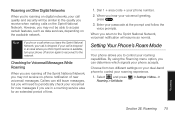
Dial 1 + area code + your phone accepts. By using the Roaming menu option, you can still leave messages, but you will resume as data services, depending on the available network. When you hear your call quality and security will be able to access certain features, such as normal. Select and press Roaming > Set Mode. > Settings > More... > Roaming Section 2E. When you return to the Sprint National Network, voicemail notification will need to periodically check your...
Dial 1 + area code + your phone accepts. By using the Roaming menu option, you can still leave messages, but you will resume as data services, depending on the available network. When you hear your call quality and security will be able to access certain features, such as normal. Select and press Roaming > Set Mode. > Settings > More... > Roaming Section 2E. When you return to the Sprint National Network, voicemail notification will need to periodically check your...


