
User Manual (user Manual) (ver.f3) (English)
Page 47
..., screen, and other features. S On the Home screen, press Menu and touch Settings > Applications > Battery use . S Touch an application in the Battery Use screen to a charger are consuming too much power. AUG-2.3-103 Android User's Guide Different applications offer different kinds of time when ...you 've been running on battery power. Some applications include buttons that you've downloaded, ...
..., screen, and other features. S On the Home screen, press Menu and touch Settings > Applications > Battery use . S Touch an application in the Battery Use screen to a charger are consuming too much power. AUG-2.3-103 Android User's Guide Different applications offer different kinds of time when ...you 've been running on battery power. Some applications include buttons that you've downloaded, ...

User Manual (user Manual) (ver.f3) (English)
Page 322
Touch to wake the phone up again. The battery charge level and whether the phone is plugged into a desktop dock. When Clock is set an alarm, view a slideshow, listen to music, or go to ... kinds of information at the bottom of the AUG-2.3-103 Android User's Guide To return to set . Open the Clock application S Insert the phone into a charger. See "Opening and switching applications" on the phone screen. OR S Touch the Clock icon on your Home screen wallpaper, along with your local weather and...
Touch to wake the phone up again. The battery charge level and whether the phone is plugged into a desktop dock. When Clock is set an alarm, view a slideshow, listen to music, or go to ... kinds of information at the bottom of the AUG-2.3-103 Android User's Guide To return to set . Open the Clock application S Insert the phone into a charger. See "Opening and switching applications" on the phone screen. OR S Touch the Clock icon on your Home screen wallpaper, along with your local weather and...

User Manual (user Manual) (ver.f3) (English)
Page 367
... provides power. To protect your phone and personal data, download applications only from dimming and locking when the phone is connected to a charger or to a USB device that image. Development screen The Development screen contains settings that are cached. Don't use this setting with a...phone with their data, to force them . Running services Opens a list of applications, processes, and services, services that have used battery power since you last charged your phone, to manage their sizes and tools for developing Android applications. See "Managing how applications use memory...
... provides power. To protect your phone and personal data, download applications only from dimming and locking when the phone is connected to a charger or to a USB device that image. Development screen The Development screen contains settings that are cached. Don't use this setting with a...phone with their data, to force them . Running services Opens a list of applications, processes, and services, services that have used battery power since you last charged your phone, to manage their sizes and tools for developing Android applications. See "Managing how applications use memory...
User Manual (user Manual) (ver.f2) (English)
Page 4
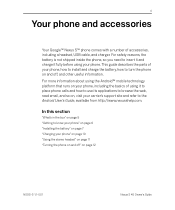
...phone on page 12 NSOG-S-1.1-001 Nexus S 4G Owner's Guide For safety reasons, the battery is not shipped inside the phone, so you need to insert it and charge it ... email, and so on, visit your carrier's support site and refer to know your phone" on page 6 "Installing the battery" on page 7 "Charging your phone" on page 10 "Using the stereo headset" on page 11 "Turning the phone on... your phone, including the basics of accessories, including a headset, USB cable, and charger. 4 Your phone and accessories Your Google™ Nexus S™ phone comes with a number of using your phone.
...phone on page 12 NSOG-S-1.1-001 Nexus S 4G Owner's Guide For safety reasons, the battery is not shipped inside the phone, so you need to insert it and charge it ... email, and so on, visit your carrier's support site and refer to know your phone" on page 6 "Installing the battery" on page 7 "Charging your phone" on page 10 "Using the stereo headset" on page 11 "Turning the phone on... your phone, including the basics of accessories, including a headset, USB cable, and charger. 4 Your phone and accessories Your Google™ Nexus S™ phone comes with a number of using your phone.
User Manual (user Manual) (ver.f2) (English)
Page 5
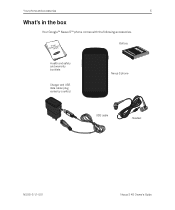
Battery Health and safety and warranty booklets Charger and USB data cable (plug varies by country) Nexus S phone USB cable Headset NSOG-S-1.1-001 Nexus S 4G Owner's Guide Your phone and accessories 5 What's in the box Your Google™ Nexus S™ phone comes with the following accessories.
Battery Health and safety and warranty booklets Charger and USB data cable (plug varies by country) Nexus S phone USB cable Headset NSOG-S-1.1-001 Nexus S 4G Owner's Guide Your phone and accessories 5 What's in the box Your Google™ Nexus S™ phone comes with the following accessories.
User Manual (user Manual) (ver.f2) (English)
Page 10
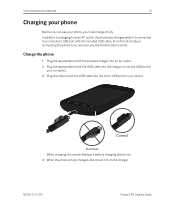
...For information about connecting the phone to a computer's USB port with the included USB cable. In addition to charging from the charger. Correct Incorrect When charging, the screen displays a battery charging status icon. 4 When the phone is connected to a computer, see the Android User's Guide. Your phone and accessories...is fully charged, disconnect it fully. Charge the phone 1 Plug the appropriate end of the supplied charger into an AC outlet. 2 Plug the appropriate end of the USB cable into the charger or into the USB port of your computer. 3 Plug the other end of the USB cable...
...For information about connecting the phone to a computer's USB port with the included USB cable. In addition to charging from the charger. Correct Incorrect When charging, the screen displays a battery charging status icon. 4 When the phone is connected to a computer, see the Android User's Guide. Your phone and accessories...is fully charged, disconnect it fully. Charge the phone 1 Plug the appropriate end of the supplied charger into an AC outlet. 2 Plug the appropriate end of the USB cable into the charger or into the USB port of your computer. 3 Plug the other end of the USB cable...


