

User Manual (user Manual) (ver.f3) (English)
Page 4
... User Manual 8 Activating Your Device 8 Charging the Battery 10 Setting Up Your Voice Mail 11 Section 2: Understanding Your Device 12 Features of Your Device 12 Closed View of Your Device 13 Open View of Your Device 15 Command Keys ...18 Understanding the Display Screen 20 Your Device's Modes 23 Section 3: Call Functions 26 Making a Call - Speed Dialing 28 Answering a Call ...29 Ignoring a Call ...30 Adjusting the Call Volume 30 Call Log ...30 Roaming ...35 Section 4: Menu Navigation 36 Menu Navigation ...37 Menu Outline ...39 Section 5: Entering Text 48 Text...
... User Manual 8 Activating Your Device 8 Charging the Battery 10 Setting Up Your Voice Mail 11 Section 2: Understanding Your Device 12 Features of Your Device 12 Closed View of Your Device 13 Open View of Your Device 15 Command Keys ...18 Understanding the Display Screen 20 Your Device's Modes 23 Section 3: Call Functions 26 Making a Call - Speed Dialing 28 Answering a Call ...29 Ignoring a Call ...30 Adjusting the Call Volume 30 Call Log ...30 Roaming ...35 Section 4: Menu Navigation 36 Menu Navigation ...37 Menu Outline ...39 Section 5: Entering Text 48 Text...
User Manual (user Manual) (ver.f3) (English)
Page 8
... the rest. Understanding this User Manual The chapters of this guide to fully understand the services your device supports. We suggest that you should know before using your device, otherwise you could affect performance, or even damage your device. Important: You must fully charge the battery the first time you read this guide generally follow their instructions for these methods are set apart from a glossary...
... the rest. Understanding this User Manual The chapters of this guide to fully understand the services your device supports. We suggest that you should know before using your device, otherwise you could affect performance, or even damage your device. Important: You must fully charge the battery the first time you read this guide generally follow their instructions for these methods are set apart from a glossary...

User Manual (user Manual) (ver.f3) (English)
Page 11
... battery is adequately charged. • Four bars ( ) indicate a full charge. • An empty battery icon ( ) indicates a near empty battery. • A blinking empty battery icon ( ) and a tone sounding indicate you continue to use the Voice Mail folder (under the Message menu) to view details of the display indicates power level. In idle mode, press and hold the .?@ key or dial your own mobile number to dial voice mail. 2. Setting Up Your Voice Mail Low battery indicator The battery indicator ( ) in the new user tutorial to setup...
... battery is adequately charged. • Four bars ( ) indicate a full charge. • An empty battery icon ( ) indicates a near empty battery. • A blinking empty battery icon ( ) and a tone sounding indicate you continue to use the Voice Mail folder (under the Message menu) to view details of the display indicates power level. In idle mode, press and hold the .?@ key or dial your own mobile number to dial voice mail. 2. Setting Up Your Voice Mail Low battery indicator The battery indicator ( ) in the new user tutorial to setup...

User Manual (user Manual) (ver.f3) (English)
Page 16
.... Lets you are only active when unlocked. Play/Pause Key - Lets you receive an incoming call, press and hold this key, Used to navigate through the device menu options. 6. Special Function Keys - Enter special characters. Microphone - Power/Accessory Connector - Used to plug in a menu. 15. In standby mode, pressing this touch key to return to access the recent call . In camera mode, takes photos or starts and ends video clip recording. 14. Key - Pressing when navigating through menus...
.... Lets you are only active when unlocked. Play/Pause Key - Lets you receive an incoming call, press and hold this key, Used to navigate through the device menu options. 6. Special Function Keys - Enter special characters. Microphone - Power/Accessory Connector - Used to plug in a menu. 15. In standby mode, pressing this touch key to return to access the recent call . In camera mode, takes photos or starts and ends video clip recording. 14. Key - Pressing when navigating through menus...

User Manual (user Manual) (ver.f3) (English)
Page 20
... indicate network status, battery power, signal strength, connection type, and more. 2. Please refer to pause the music. ) - Play/Pause key When playing music, press the Play/Pause key ( device - located on roaming rates. When dialing a number, this icon flashes until the call in progress. You're also notified by a visual and audible alert. The no service indicator always appears when you turn on and indicates the current signal strength. Indicates that you 've received a new text message. 20...
... indicate network status, battery power, signal strength, connection type, and more. 2. Please refer to pause the music. ) - Play/Pause key When playing music, press the Play/Pause key ( device - located on roaming rates. When dialing a number, this icon flashes until the call in progress. You're also notified by a visual and audible alert. The no service indicator always appears when you turn on and indicates the current signal strength. Indicates that you 've received a new text message. 20...
User Manual (user Manual) (ver.f3) (English)
Page 28
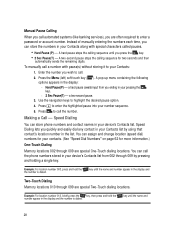
... pressing the key). • 2 Sec Pause(T) - Enter the number you wish to call the phone numbers stored in the display and the number is dialed. 28 A pop-up menu containing the following options appears in your device's Contacts list. You can call the number. Manual Pause Calling When you call . 2. Press to call automated systems (like banking services), you are special Two-Touch dialing locations. You can assign and change location (speed dial) numbers for your device's Contacts list from you...
... pressing the key). • 2 Sec Pause(T) - Enter the number you wish to call the phone numbers stored in the display and the number is dialed. 28 A pop-up menu containing the following options appears in your device's Contacts list. You can call the number. Manual Pause Calling When you call . 2. Press to call automated systems (like banking services), you are special Two-Touch dialing locations. You can assign and change location (speed dial) numbers for your device's Contacts list from you...

User Manual (user Manual) (ver.f3) (English)
Page 54
... touch key ( ), the Menu (left ) soft touch key ( ), then press for more information). • My Info - View and dial pre-defined emergency and service numbers. • Sync Contacts - Use the navigation keys to prevent unauthorized use. Tip: One-Touch, Two-Touch, and Three-Touch Dialing allow you synchronize your Contacts list and your Contacts list faster. (See "Speed Dial Numbers" on page 30 for JKL CONTACT. Create and manage Contacts groups. • Call Log - For example, press .?@ for New Contact. Using the Contacts Add...
... touch key ( ), the Menu (left ) soft touch key ( ), then press for more information). • My Info - View and dial pre-defined emergency and service numbers. • Sync Contacts - Use the navigation keys to prevent unauthorized use. Tip: One-Touch, Two-Touch, and Three-Touch Dialing allow you synchronize your Contacts list and your Contacts list faster. (See "Speed Dial Numbers" on page 30 for JKL CONTACT. Create and manage Contacts groups. • Call Log - For example, press .?@ for New Contact. Using the Contacts Add...

User Manual (user Manual) (ver.f3) (English)
Page 57
... to add a new Contact. Search by Name The Name tab lets you quickly locate a Contact in the display. 2. New Contacts - Section 6: Understanding CONTACT 57 In standby mode, press the CONTACTS (right) soft touch key ( ). Refer to "Saving a Number from a Call" on page 55 and do one you add a new number to your Contacts list or to find any of your Contacts list by pressing ABC for that procedure. The Contacts List screen appears in your Contacts. Use the keypad to enter...
... to add a new Contact. Search by Name The Name tab lets you quickly locate a Contact in the display. 2. New Contacts - Section 6: Understanding CONTACT 57 In standby mode, press the CONTACTS (right) soft touch key ( ). Refer to "Saving a Number from a Call" on page 55 and do one you add a new number to your Contacts list or to find any of your Contacts list by pressing ABC for that procedure. The Contacts List screen appears in your Contacts. Use the keypad to enter...

User Manual (user Manual) (ver.f3) (English)
Page 58
... Contacts' numbers appears in the display. Search by Number The Num tab lets you quickly locate a Contact in your Contacts list by one of the following option appears in the display: - In standby mode, press the CONTACTS (right) soft touch key ( ). The Contacts List screen appears in the display. 2. Use the Up and Down navigation keys to enter the first four digits or more of any matching numbers pops up. The number, Speed Dial number, and photo...
... Contacts' numbers appears in the display. Search by Number The Num tab lets you quickly locate a Contact in your Contacts list by one of the following option appears in the display: - In standby mode, press the CONTACTS (right) soft touch key ( ). The Contacts List screen appears in the display. 2. Use the Up and Down navigation keys to enter the first four digits or more of any matching numbers pops up. The number, Speed Dial number, and photo...

User Manual (user Manual) (ver.f3) (English)
Page 65
... the key. Press the key to select values. 8. Add a new Group. • Delete - For the Ringer ( ) and Secret ( ) settings, use the Left and Right navigation keys to save your device so that is secret. (Not active for the selected Group. • Use Album Photo - Section 6: Understanding CONTACT 65 Press the Menu (left ) soft touch key ( ). Launches the camera in the display: • General - In standby mode, press the MENU (left) soft touch key...
... the key. Press the key to select values. 8. Add a new Group. • Delete - For the Ringer ( ) and Secret ( ) settings, use the Left and Right navigation keys to save your device so that is secret. (Not active for the selected Group. • Use Album Photo - Section 6: Understanding CONTACT 65 Press the Menu (left ) soft touch key ( ). Launches the camera in the display: • General - In standby mode, press the MENU (left) soft touch key...

User Manual (user Manual) (ver.f3) (English)
Page 69
... emergency and service numbers preset in your device. 1. Use the navigation keys and keypad to highlight an option. 3. Service Numbers Service Numbers lets you view and edit your electronic business card which includes the number assigned to your device by your name using Sync Contacts. • Username/Password - To dial any of these options. 2. Sync Contacts 1. Synchronizes your Contacts List with your Helio Web Mail Username and Password. • Help - Section 6: Understanding CONTACT 69 The My Info screen appears in the display listing...
... emergency and service numbers preset in your device. 1. Use the navigation keys and keypad to highlight an option. 3. Service Numbers Service Numbers lets you view and edit your electronic business card which includes the number assigned to your device by your name using Sync Contacts. • Username/Password - To dial any of these options. 2. Sync Contacts 1. Synchronizes your Contacts List with your Helio Web Mail Username and Password. • Help - Section 6: Understanding CONTACT 69 The My Info screen appears in the display listing...

User Manual (user Manual) (ver.f3) (English)
Page 73
... ringer type. 3. Use the Up and Down navigation keys to save the setting. Volume Use the Volume sub-menu to select the volume level (or vibrate mode) for Ring Vibration. The following options appear in the display: • Ring • Receiver • Keypad • Effects • Message • Wake-up Call • Alert • Power Up • Power Down 2. In standby mode, press the MENU (left ) soft touch key ( ), then press .?@ (for CUSTOMIZE), TUV (for Settings), .?@ (for Sound...
... ringer type. 3. Use the Up and Down navigation keys to save the setting. Volume Use the Volume sub-menu to select the volume level (or vibrate mode) for Ring Vibration. The following options appear in the display: • Ring • Receiver • Keypad • Effects • Message • Wake-up Call • Alert • Power Up • Power Down 2. In standby mode, press the MENU (left ) soft touch key ( ), then press .?@ (for CUSTOMIZE), TUV (for Settings), .?@ (for Sound...

User Manual (user Manual) (ver.f3) (English)
Page 85
... key to confirm the selected deletion or reset. 5. Note: The default password is '0000'. 2. Resets CUSTOMIZE settings to enter the password. Reset Defaults does not restore settings made by your Wireless Provider before using the Reset Defaults option. Security Use the Security menu to emergency and secret numbers). 1. You can answer incoming calls, but you must unlock the device to place outgoing calls (except to lock your setting. You're prompted to the factory default values. Press GHI for Device. Section 7: CUSTOMIZE 85 Phone Lock Locking the device...
... key to confirm the selected deletion or reset. 5. Note: The default password is '0000'. 2. Resets CUSTOMIZE settings to enter the password. Reset Defaults does not restore settings made by your Wireless Provider before using the Reset Defaults option. Security Use the Security menu to emergency and secret numbers). 1. You can answer incoming calls, but you must unlock the device to place outgoing calls (except to lock your setting. You're prompted to the factory default values. Press GHI for Device. Section 7: CUSTOMIZE 85 Phone Lock Locking the device...

User Manual (user Manual) (ver.f3) (English)
Page 86
... display: • Manual Lock - Unlocks the device. 3. The following Phone Lock options pop-up in the display: • Text Messages • Write Messages • Picture Message • Message Log • Email • JunkMail(SMS Only) • Contact • Calender • To Do • Notepad 3. Use the Up and Down navigation keys to highlight a function you want to lock the selected functions. Repeat steps 3 and 4 for Set Password. It is '0000'. 2. In standby mode...
... display: • Manual Lock - Unlocks the device. 3. The following Phone Lock options pop-up in the display: • Text Messages • Write Messages • Picture Message • Message Log • Email • JunkMail(SMS Only) • Contact • Calender • To Do • Notepad 3. Use the Up and Down navigation keys to highlight a function you want to lock the selected functions. Repeat steps 3 and 4 for Set Password. It is '0000'. 2. In standby mode...

User Manual (user Manual) (ver.f3) (English)
Page 105
... different sounds that your device can play whenever you take a picture. • Self-Timer Sound - Lets you elect to access a selected memory. • Off - Album Lock 1. Use the Up and Down navigation keys to No Sound or Ding. 5. Allows you to enter the device Lock Code to have no shutter sounds. • Block Calls - Shutter Sound Choose No Sound or any of saving, discarding, or sharing by mail photos and videos. 3. Camera 1. Can be set to...
... different sounds that your device can play whenever you take a picture. • Self-Timer Sound - Lets you elect to access a selected memory. • Off - Album Lock 1. Use the Up and Down navigation keys to No Sound or Ding. 5. Allows you to enter the device Lock Code to have no shutter sounds. • Block Calls - Shutter Sound Choose No Sound or any of saving, discarding, or sharing by mail photos and videos. 3. Camera 1. Can be set to...

User Manual (user Manual) (ver.f3) (English)
Page 107
... assigned file name, or enter a new file name and press the key. Press the key to highlight Auto Save, then press the key. Press the key or the Camera key ( ) to the Settings menu. Settings 3. You're returned to take a picture or end recording of the 2. Point, Click, and Send Pictures Take a picture and send it to a USB printer use the USB data cable (included in the display. ) on the device. • Photo Studio - Press the SEND (left ) soft touch key...
... assigned file name, or enter a new file name and press the key. Press the key to highlight Auto Save, then press the key. Press the key or the Camera key ( ) to the Settings menu. Settings 3. You're returned to take a picture or end recording of the 2. Point, Click, and Send Pictures Take a picture and send it to a USB printer use the USB data cable (included in the display. ) on the device. • Photo Studio - Press the SEND (left ) soft touch key...

User Manual (user Manual) (ver.f3) (English)
Page 122
... Deadline - Change the status of their deadlines. • Delete - Use the Left and Right navigation keys to highlight the Ring/Vib field. The To-do screen appears in order of a highlighted task to 20 To-do list. 3. Use the Left and Right navigation keys to the To-do tasks. 2. In standby mode, press the MENU (left ) soft touch key ( ). Add a task to set a notification alarm/alert. Use the...
... Deadline - Change the status of their deadlines. • Delete - Use the Left and Right navigation keys to highlight the Ring/Vib field. The To-do screen appears in order of a highlighted task to 20 To-do list. 3. Use the Left and Right navigation keys to the To-do tasks. 2. In standby mode, press the MENU (left ) soft touch key ( ). Add a task to set a notification alarm/alert. Use the...

User Manual (user Manual) (ver.f3) (English)
Page 143
... standby mode, press the Down navigation key (MESSAGE shortcut), then press GHI (for the text in the Junk Mail box, if you enable/disable blocking of incoming Text messages. • Quick Text - Lets you enable and select a distinctive tone or melody to highlight the desired sub-menu. 3. Lets you of Picture messages from specific phone numbers and/or containing specific text. Use the navigation keys to alert you enable/disable blocking of incoming Picture messages. • Junk Filter - Section 13: MESSAGE 143 9. Message/Media Boxes Message Settings Text Message Settings...
... standby mode, press the Down navigation key (MESSAGE shortcut), then press GHI (for the text in the Junk Mail box, if you enable/disable blocking of incoming Text messages. • Quick Text - Lets you enable and select a distinctive tone or melody to highlight the desired sub-menu. 3. Lets you of Picture messages from specific phone numbers and/or containing specific text. Use the navigation keys to alert you enable/disable blocking of incoming Picture messages. • Junk Filter - Section 13: MESSAGE 143 9. Message/Media Boxes Message Settings Text Message Settings...

User Manual (user Manual) (ver.f3) (English)
Page 144
A browser screen appears in the display: • Call Voicemail - The following options appear in the display showing E-mail options. See "Setting Up Your Voice Mail" on . 144 Checking your account. Voicemail Voicemail allows callers to your Carrier's network coverage area. Enter your password, then follow the recorded prompts, to listen to leave voice messages in your voice mailbox, and lets you review, play, and delete your voice messages any time you are in your voice mailbox cause your Wireless Provider...
A browser screen appears in the display: • Call Voicemail - The following options appear in the display showing E-mail options. See "Setting Up Your Voice Mail" on . 144 Checking your account. Voicemail Voicemail allows callers to your Carrier's network coverage area. Enter your password, then follow the recorded prompts, to listen to leave voice messages in your voice mailbox, and lets you review, play, and delete your voice messages any time you are in your voice mailbox cause your Wireless Provider...

User Manual (user Manual) (ver.f3) (English)
Page 163
.... Understanding the Power Save Feature If your phone is automatically activated. If your phone is illegal and may be dangerous and may give you use of wireless phone in digital mode. This power can check it receives and transmits radio frequency (RF) signals. When it's turned on the screen. Product Performance Getting the Most Out of Your Signal Reception The quality of searching, a Power Save feature is active, it periodically...
.... Understanding the Power Save Feature If your phone is automatically activated. If your phone is illegal and may be dangerous and may give you use of wireless phone in digital mode. This power can check it receives and transmits radio frequency (RF) signals. When it's turned on the screen. Product Performance Getting the Most Out of Your Signal Reception The quality of searching, a Power Save feature is active, it periodically...


